- Download PDF Manual
-
function briefly until the windshield is clear again.
ROnly use air-recirculation mode briefly, e.g.
if there are unpleasant outside odors or when in a tunnel. The windows could otherwise fog up, since no fresh air is drawn into the vehicle in air-recirculation mode.
RUse the ZONE function to adopt the
temperature settings on the driver's side for the front-passenger side as well. The indicator lamp above theá button goes out.
146 Overview of climate control systems
Control panel for 3-zone automatic climate control
USA only
Front control panel
: Sets the temperature, left (Y page 153)
; Defrosts the windshield (Y page 155)
= Switches maximum cooling on/off (Y page 155)
? Switches cooling with air dehumidification on/off (Y page 151)
A Switches the rear window defroster on/off (Y page 156)
B Sets the temperature, right (Y page 153)
C Switches the ZONE function on/off (Y page 155)
D Switches climate control on/off (Y page 150)
E Sets the air distribution (Y page 154)
F Increases the airflow (Y page 154)
G Reduces the airflow (Y page 154)
H Display
I Adjusts the climate mode settings (Y page 153)
J Activates/deactivates air-recirculation mode (Y page 157)
K Sets climate control to automatic (Y page 152)
Rear control panel
L Increases the airflow (Y page 154)
M Sets the temperature (Y page 153)
N Sets rear-compartment climate control to automatic (Y page 152)
O Directs the airflow through the rear air vents (Y page 154)
P Directs the airflow through the footwell vents (Y page 154)
Overview of climate control systems
147
Q Switches rear-compartment climate control on/off (Y page 150)
R Reduces the airflow (Y page 154)
Canada only
Front control panel
: Sets the temperature, left (Y page 153)
; Defrosts the windshield (Y page 155)
= Switches the residual heat function on/off (Y page 157)
? Switches cooling with air dehumidification on/off (Y page 151)
A Switches the rear window defroster on/off (Y page 156)
B Sets the temperature, right (Y page 153)
C Switches the ZONE function on/off (Y page 155)
D Switches climate control on/off (Y page 150)
E Sets the air distribution (Y page 154)
F Increases the airflow (Y page 154)
G Reduces the airflow (Y page 154)
H Display
I Adjusts the climate mode settings (Y page 153)
J Activates/deactivates air-recirculation mode (Y page 157)
K Sets climate control to automatic (Y page 152)
Rear control panel
L Increases the airflow (Y page 154)
M Sets the temperature (Y page 153)
N Sets rear-compartment climate control to automatic (Y page 152)
O Directs the airflow through the rear air vents (Y page 154)
P Directs the airflow through the footwell vents (Y page 154)
148 Overview of climate control systems
Q Switches rear-compartment climate control on/off (Y page 150)
R Reduces the airflow (Y page 154)
Control panel for 3-zone automatic climate control with additional rear-
compartment climate control
Canada only
Front control panel
: Sets the temperature, left (Y page 153)
; Defrosts the windshield (Y page 155)
= Switches the ZONE function on/off (Y page 155)
? Activates/deactivates cooling with air dehumidification (Y page 151) or activates/
deactivates the residual heating function (Y page 157)
A Switches the rear window defroster on/off(Y page 156)
B Sets the temperature, right (Y page 153)
C Switches rear-compartment climate control on/off
D Switches climate control on/off (Y page 150)
E Sets the air distribution (Y page 154)
F Increases the airflow (Y page 154)
G Reduces the airflow (Y page 154)
H Display
I Adjusts the climate control settings (Y page 153)
J Activates/deactivates air-recirculation mode(Y page 157)
K Sets climate control to automatic (Y page 152)
Rear control panel
L Increases the airflow (Y page 154)
Overview of climate control systems
149
M Sets the temperature (Y page 153)
N Sets rear-compartment climate control to automatic (Y page 152)
O Directs the airflow through the rear air vents (Y page 154)
P Directs the airflow through the footwell vents (Y page 154)
Q Switches rear-compartment climate control on/off (Y page 150)
R Reduces the airflow (Y page 154)
USA only
Front control panel
: Sets the temperature, left (Y page 153)
; Defrosts the windshield (Y page 155)
= Switches maximum cooling MAX COOL on/off (Y page 155)
? Activates/deactivates cooling with air dehumidification (Y page 151) or activates/
deactivates the residual heating function (Y page 157)
A Switches the rear window defroster on/off(Y page 156)
B Sets the temperature, right (Y page 153)
C Switches the ZONE function on/off (Y page 155)
D Switches rear-compartment climate control on/off (Y page 150)
E Sets the air distribution (Y page 154)
F Increases the airflow (Y page 154)
G Reduces the airflow (Y page 154) or switches off climate control
H Display
I Adjusts the climate control settings (Y page 153)
J Activates/deactivates air-recirculation mode(Y page 157)
K Sets climate control to automatic (Y page 152)
Rear control panel
150 Operating the climate control systems
L Increases the airflow (Y page 154)
M Sets the temperature (Y page 153)
N Sets rear-compartment climate control to automatic (Y page 152)
O Directs the airflow through the rear air vents (Y page 154)
P Directs the airflow through the footwell vents (Y page 154)
Q Switches rear-compartment climate control on/off (Y page 150)
R Reduces the airflow (Y page 154)
Information about using 3-zone
Operating the climate control
automatic climate control
systems
The following contains instructions and recommendations to enable you to get the most out of your automatic climate control. RActivate climate control using theà and
¿/Á buttons. The indicator lamps above the à and ¿/Á buttons light up.
RIn automatic mode, you can also use the
ñ button to set a climate mode (FOCUS/MEDIUM/DIFFUSE). The MEDIUM level is recommended.
RSet the temperature to 72 ‡ (22 †).
ROnly use the "Windshield defrosting"
function briefly until the windshield is clear again.
ROnly use air-recirculation mode briefly, e.g.
if there are unpleasant outside odors or when in a tunnel. The windows could otherwise fog up, since no fresh air is drawn into the vehicle in air-recirculation mode.
RUse the ZONE function to adopt the
temperature settings on the driver's side for the front-passenger side and the rear compartment as well. The indicator lamp above the á button goes out.
RUse the residual heat function if you want
to heat or ventilate the vehicle interior when the ignition is switched off. The residual heat function can only be activated or deactivated with the ignition switched off.
Switching climate control on/off
Points to observe before use
When the climate control is switched off, the air supply and air circulation are also switched off. The windows could fog up. Therefore, switch off climate control only briefly
i Switch on climate control primarily using
the à button (Y page 152).
In the rear compartment, you can also switch climate control on and off using theà and ^ buttons.
Activating/deactivating
X Turn the SmartKey to position 2 in the
ignition lock (Y page 163).
X To activate: press the à button.
The indicator lamp in theà button lights up. Airflow and air distribution are set to automatic mode.
or X Press the ^ button.
The indicator lamp in the^ button goes out. The previously selected settings are restored.
X To deactivate: press the ^ button.
The indicator lamp in the^ button lights up.
Operating the climate control systems
151
Activating/deactivating cooling with
air dehumidification
Points to observe before use
If you deactivate the "Cooling with air- dehumidification" function, the air inside the vehicle will not be cooled. The air inside the vehicle will also not be dehumidified. The windows can fog up more quickly. Therefore, only deactivate the "Cooling with air- dehumidification" function briefly.
The cooling with air dehumidification function is only available when the engine is running. The air inside the vehicle is cooled and dehumidified according to the temperature selected.
Condensation may drip from the underside of the vehicle when it is in cooling mode. This is normal and not a sign that there is a malfunction.
Activating/deactivating
Example: ¿ button
X To activate: press the ¿/Á button.
The indicator lamp in the ¿/Á button lights up.
X To deactivate: press the ¿/Á
button. The indicator lamp in the ¿/Á button goes out. The "Cooling with air dehumidification" function has a delayed switch-off feature.
152 Operating the climate control systems
Problems with the "Cooling with air dehumidification" function
Problem
Possible causes/consequences and M Solutions
Cooling with air dehumidification has been deactivated due to a malfunction.
X Visit a qualified specialist workshop.
The indicator lamp in the ¿/Á button flashes three times or remains off. The "Cooling with air dehumidification" function cannot be switched on.
Setting climate control to automatic
Activating/switching
Points to observe before use
If you deactivate the "Cooling with air- dehumidification" function, the air inside the vehicle will not be cooled. The air inside the vehicle will also not be dehumidified. The windows can fog up more quickly. Therefore, only deactivate the "Cooling with air- dehumidification" function briefly.
In automatic mode, the set temperature is maintained automatically at a constant level. The system automatically regulates the temperature of the dispensed air, the airflow and the air distribution.
Automatic mode will achieve optimal operation if cooling with air dehumidification is also activated. If necessary, cooling with air dehumidification can be deactivated.
In the rear compartment, you can also switch climate control for the rear seats to automatic mode using the à button.
X Turn the SmartKey to position 2 in the
ignition lock (Y page 163).
X Set the desired temperature. X To activate: press the à button.
The indicator lamp in theà button lights up. Automatic air distribution and airflow are activated.
X To switch to manual mode: press the
_ button.
or X Press the I or K button.
The indicator lamp in theà button goes out.
3-zone automatic climate control: when automatic mode is activated, you can select a climate mode (Y page 153).
Operating the climate control systems
153
Adjusting the climate mode settings
3-zone automatic climate control
You can select the following climate mode settings in automatic mode:
FOCUS
high airflow that is set slightly cooler
MEDIUM medium airflow, standard setting
DIFFUSE low airflow that is set slightly
warmer and with less draft
Automatic climate control zones
You can select different temperature settings for the driver's and front-passenger sides as well as for the rear compartment.
X Turn the SmartKey to position 2 in the
ignition lock (Y page 163).
X To increase/reduce the temperature in the front: turn control : or B clockwise or counter-clockwise (Y page 146).
Only change the temperature setting in small increments. Start at 72 ‡ (22 †).
X To increase/reduce the temperature in
the rear compartment using the front control panel: press the á button. The indicator lamp in theá button goes out.
X Turn control : clockwise or counter-
clockwise (Y page 146).
Only change the temperature setting in small increments. Start at 72 ‡ (22 †). The temperature setting for the driver's side is adopted for the rear compartment and the front-passenger side.
X Turn the SmartKey to position 2 in the
ignition lock (Y page 163).
X Press the à button. X Press the ñ button repeatedly until the
desired climate mode appears in the display.
Setting the temperature
Dual-zone automatic climate control
Different temperatures can be set for the driver's and front-passenger sides.
X Turn the SmartKey to position 2 in the
ignition lock (Y page 163).
X To increase/reduce: turn control : or
X To increase/decrease the rear
B clockwise or counter-clockwise (Y page 143).
Only change the temperature setting in small increments. Start at 72 ‡ (22 †).
compartment temperature using the rear control panel: turn control M clockwise or counter-clockwise on the rear control panel (Y page 146).
Only change the temperature setting in small increments. Start at 72 ‡ (22 †).
154 Operating the climate control systems
Setting the air distribution
Adjusting
Air distribution settings
Front control panel
P Directs the airflow through the center
vents
O Directs air through the footwell air
vents
S Directs the airflow through the center
and footwell vents
¯ Directs air through the defroster vents b Directs the airflow through the
defroster and center vents (Canada only)
a Directs air through the defroster and
footwell vents
_ Directs the airflow through the
defroster, center and footwell air vents (Canada only)
Rear control panel
M Directs the airflow through the rear
center and rear side air vents
O Directs air through the footwell air
vents
i Using the rear control panel, you can also
activate both air distribution positions simultaneously. In order to do this, press both air distribution buttons. The air is then routed through all rear air vents.
i Regardless of the air distribution setting, airflow is always directed through the side air vents. The side air vents can only be closed when the controls on the side air vents are turned downwards.
X Turn the SmartKey to position 2 in the
ignition lock (Y page 163).
X Press the _ button repeatedly until the
desired symbol appears in the display.
Setting the airflow
X Turn the SmartKey to position 2 in the
ignition lock (Y page 163).
X To increase: press the K button. X To reduce: press the I button.
i You can use 3-zone automatic climate
control to set the airflow in the rear compartment separately.
Operating the climate control systems
155
Switching the ZONE function on/off
The climate control system switches to the following functions:
Rhigh airflow
Rhigh temperature
Rair distribution to the windshield and
front side windows
Rair-recirculation mode off
X To deactivate: press the ¬ button.
The indicator lamp in the¬ button goes out. The previously selected settings are restored. Air-recirculation mode remains deactivated.
X To activate: press the á button.
The indicator lamp above the á button lights up.
or X Press the à button.
Dual-zone automatic climate control: the temperature setting for the driver's side is not adopted for the front-passenger side.
3-zone automatic climate control: the temperature setting for the driver's side is not adopted for the front-passenger side and the rear compartment.
X To deactivate: press the á button.
The indicator lamp above the á button goes out.
Dual-zone automatic climate control: the temperature setting for the driver's side is adopted for the front-passenger side.
3-zone automatic climate control: the temperature setting for the driver's side is adopted for the front-passenger side and the rear compartment.
The indicator lamp in the¬ button goes out. Airflow and air distribution are set to automatic mode.
or
X Turn controls : or B clockwise or
counter-clockwise:
Dual-zone automatic climate control (Y page 143)
3-zone automatic climate control (Y page 146)
or X Press the K or I button.
MAX COOL maximum cooling
The MAX COOL function is only available in vehicles for the USA.
Defrosting the windshield
You can use this function to defrost the windshield or to defrost the inside of the windshield and the side windows.
Switch off the "defrosting" function as soon as the windshield is clear again.
X Turn the SmartKey to position 2 in the
ignition lock (Y page 163).
X To activate: press the ¬ button.
The indicator lamp in the¬ button lights up.
MAX COOL is only operational when the engine is running.
156 Operating the climate control systems
X To activate: press the Ù button.
The indicator lamp in the button lights up.
X To activate: press off-road button Ù
again. The indicator lamp goes out. The previously selected settings are restored.
When you activate MAX COOL, climate control switches to the following functions:
Rmaximum cooling
Rmaximum airflow
Rair-recirculation mode on
Defrosting the windows
Windows fogged up on the inside
X Activate the ¿ / Á cooling with air
dehumidification function.
X Activate automatic mode Ã.
X If the windows continue to fog up, activate
the defrosting function (Y page 155).
i You should only select this setting until
the windshield is clear again.
Windows fogged up on the outside
X Press the _ button repeatedly until the
P or O symbol appears in the display.
i You should only select this setting until
the windshield is clear again.
Rear window defroster
Activating/deactivating
The rear window defroster has a high current draw. You should therefore switch it off as soon as the rear window is clear. Otherwise, the rear window defroster switches off automatically after several minutes.
If the battery voltage is too low, the rear window defroster may switch off.
X Turn the SmartKey to position 2 in the
ignition lock (Y page 163).
X Press the ¤ button.
The indicator lamp in the¤ button lights up or goes out.
Operating the climate control systems
157
Problems with the rear window defroster
Problem
Possible causes/consequences and M Solutions
The rear window defroster has deactivated prematurely or cannot be activated.
The battery has not been sufficiently charged.
X Switch off any consumers that are not required, e.g. reading
lamps or interior lighting. When the battery is sufficiently charged, the rear window defroster is activated again automatically.
high outside temperatures, air- recirculation mode is automatically activated. When air-recirculation mode is activated automatically, the indicator lamp in the d button is not lit.
Outside air is added after about 30 minutes.
X To deactivate: press the d button.
The indicator lamp in thed button goes out.
i Air-recirculation mode deactivates
automatically:
Rafter approximately five minutes at
outside temperatures below approximately 41 ‡ (5 †)
Rafter approximately five minutes if cooling with air dehumidification is deactivated
Rafter approximately 30 minutes at
outside temperatures above approximately 41 ‡(5 †) if the "Cooling with air dehumidification" function is activated
Activating/deactivating the residual
heat function
The "residual heat" function is only available in Canada.
Activating/deactivating air-
recirculation mode
Points to observe before use
You can deactivate the flow of fresh air if unpleasant odors are entering the vehicle from outside. The air already inside the vehicle will then be recirculated.
If you switch on air-recirculation mode, the windows can fog up more quickly, in particular at low temperatures. Only use air- recirculation mode briefly to prevent the windows from fogging up.
Activating/deactivating
The operation of air-recirculation mode is the same for all control panels.
X Turn the SmartKey to position 2 in the
ignition lock (Y page 163).
X To activate: press the d button.
The indicator lamp in thed button lights up.
i In the event of high pollution levels (3-
zone automatic climate control only) or at
the immediate vicinity of the air vents. There is a risk of injury.
Make sure that all vehicle occupants always maintain a sufficient distance to the air outlets. If necessary, redirect the airflow to another area of the vehicle interior.
In order to ensure the direct flow of fresh air through the air vents into the vehicle interior, please observe the following notes:
Rkeep the air inlet grille on the hood and in
the engine compartment on the front- passenger side free of blockages, such as ice, snow or leaves.
Rnever cover the air vents or air intake grilles
in the vehicle interior.
i For virtually draft-free ventilation, adjust
the sliders of the air vents to the center position.
Setting the center air vents
158 Setting the air vents
It is possible to make use of the residual heat of the engine to continue heating the stationary vehicle for up to 30 minutes after the engine has been switched off. The heating time depends on the temperature that has been set. X To activate: press the Ì/Á button.
The indicator lamp in the Ì/Á button lights up.
i The blower will run at a low speed
regardless of the airflow setting.
i If you activate the residual heat function at high temperatures, only the ventilation will be activated. The blower runs at medium speed.
X To deactivate: press the Ì/Á
button. The indicator lamp in the Ì/Á button goes out.
Residual heat is deactivated automatically:
Rafter approximately 30 minutes
Rwhen the ignition is switched on
: Center air vent, left
Rif the battery voltage drops
; Center air vent, right
Rwhen the auxiliary heating is activated
= Center vent thumbwheel, right
? Center vent thumbwheel, left
X To open/close: turn thumbwheels =
and ? to the right or left.
Setting the air vents
Important safety notes
G WARNING Very hot or very cold air can flow from the air vents. This could result in burns or frostbite in
Setting the side air vents
X To open/close: turn thumbwheel :
clockwise or counter-clockwise.
Setting the air vents
159
: Side window defroster vent
; Side air vent
= Control for side air vent
X To open/close: turn thumbwheel = up or
down.
Setting the glove box air vent
! Close the air vent when heating the
vehicle.
At high outside temperatures, open the air vent and activate the "cooling with air dehumidification" function. Otherwise, temperature-sensitive items stored in the glove box could be damaged.
Setting the rear-compartment air
vents
Setting the center vents in the rear
compartment
Example: center vents with rear control panel : Rear-compartment air vent thumbwheel
; Rear-compartment air vent, right
= Rear control panel
? Rear-compartment air vent, left
X To open/close: turn thumbwheel : up or
down.
Setting the rear-compartment side air
vents
2nd row of seats
: Air vent thumbwheel
; Air vent
When automatic climate control is activated, the glove box can be ventilated, for instance to cool its contents. The level of airflow depends on the airflow and air distribution settings.
: B-pillar air vent
; Thumbwheel for B-pillar air vent
160 Setting the air vents
X To open/close: turn thumbwheel ; to the
left or right.
B-pillar air vent in the headliner : B-pillar air vent
; Thumbwheel for B-pillar air vent
X To open/close: turn thumbwheel ; up or
down.
3rd row of seats
B-pillar air vent in the headliner : B-pillar air vent
; Thumbwheel for B-pillar air vent
X To open/close: turn thumbwheel ; up or
down.
Useful information ............................ 162
Notes on breaking-in a new vehicle 162
Driving ............................................... 162
Automatic transmission ................... 169
Refueling ............................................ 177
Parking ............................................... 183
Driving tips ........................................ 186
Driving systems ................................ 195
Towing a trailer ................................. 257
161
162 Driving
Useful information
i This Operator's Manual describes all models and all standard and optional equipment of your vehicle available at the time of publication of the Operator's Manual. Country-specific differences are possible. Please note that your vehicle may not be equipped with all features described. This also applies to safety- related systems and functions.
i Read the information on qualified specialist workshops: (Y page 28).
Notes on breaking-in a new vehicle
Important safety notes
New and replaced brake pads and discs only reach their optimum braking effect after several hundred kilometers of driving. Compensate for this by applying greater force to the brake pedal.
The first 1,000miles (1,500 km)
The more you look after the engine when it is new, the more satisfied you will be with its performance in the future.
RYou should therefore drive at varying
vehicle and engine speeds for the first 1,000 miles (1,500 km).
RAvoid heavy loads, e.g. driving at full
throttle, during this period.
RChange gear in good time, before the
tachometer needle is Ô of the way to the red area of the tachometer.
RDo not manually shift to a lower gear to
brake the vehicle.
RIf possible, do not depress the accelerator
pedal past the point of resistance (kickdown).
ROnly select shift ranges 3, 2 or 1 when
driving slowly, e.g. in mountainous terrain.
After 1,000 miles (1,500 km), you can increase the engine speed gradually and accelerate the vehicle to full speed.
Additional breaking-in notes for AMG vehicles:
RDo not drive faster than 85 mph
(140 km/h) for the first 1,000 miles (1,500 km).
ROnly allow the engine to reach a maximum
engine speed of 4,500 rpm briefly.
RChange gear in good time.
RIdeally, for the first 1,000 miles (1,500 km),
drive in program C.
i You should also observe these notes on breaking in if the engine or parts of the drive train on your vehicle have been replaced.
i Always observe the respective speed
limits.
Driving
Important safety notes
G WARNING Objects in the driver's footwell can restrict the pedal travel or obstruct a depressed pedal. The operating and road safety of the vehicle is jeopardized. There is a risk of an accident.
Make sure that all objects in the vehicle are stowed correctly, and that they cannot enter the driver's footwell. Install the floormats securely and as specified in order to ensure sufficient clearance for the pedals. Do not use loose floormats.
G WARNING Unsuitable footwear can hinder correct usage of the pedals, e.g.:
Rshoes with thick soles
Rshoes with high heels
Rslippers
There is a risk of an accident.
Wear suitable footwear to ensure correct usage of the pedals.
Key positions
SmartKey
Driving 163
G WARNING If you switch off the ignition while driving, safety-relevant functions are only available with limitations, or not at all. This could affect, for example, the power steering and the brake boosting effect. You will require considerably more effort to steer and brake. There is a risk of an accident.
Do not switch off the ignition while driving.
G WARNING If the parking brake has not been fully released when driving, the parking brake can:
Roverheat and cause a fire
Rlose its hold function.
There is a risk of fire and an accident. Release the parking brake fully before driving off.
! Warm up the engine quickly. Do not use the engine's full performance until it has reached operating temperature.
Only shift the automatic transmission to the desired drive position when the vehicle is stationary.
Where possible, avoid spinning the drive wheels when pulling away on slippery roads. You could otherwise damage the drive train.
! AMG vehicles: at low engine oil
temperatures below 68 ‡ (+20 †), the maximum engine speed is restricted in order to protect the engine. To protect the engine and maintain smooth engine operation, avoid driving at full throttle when the engine is cold.
g To remove the SmartKey
1 Power supply for some consumers, such
as the windshield wipers
2 Ignition (power supply for all consumers)
and drive position 3 To start the engine
i The SmartKey can be turned in the
ignition lock even if it is not the correct SmartKey for the vehicle. The ignition is not switched on. The engine cannot be started.
KEYLESS-GO
General notes
RDo not keep the KEYLESS-GO key:
- with electronic devices, e.g. a mobile
phone or another SmartKey
- with metallic objects, e.g. coins or metal
foil
inside metallic objects, e.g. a metal case
This can impair the functionality of the KEYLESS-GO key.
Do not keep the KEYLESS-GO key in the temperature-controlled cup holder (Y page 345). Otherwise, the KEYLESS-GO key will not be recognized.
Vehicles with KEYLESS-GO are equipped with a SmartKey featuring an integrated KEYLESS- GO function and a detachable Start/Stop button.
164 Driving
The Start/Stop button must be inserted in the ignition lock and the SmartKey with the integrated KEYLESS-GO function must be in the vehicle.
Pressing the Start/Stop button several times in succession corresponds to the different key positions in the ignition lock. This is only the case if you are not depressing the brake pedal.
If you depress the brake pedal and press the Start/Stop button, the engine starts immediately.
The Start/Stop button can be removed from the ignition lock. Then, you can insert the SmartKey into the ignition lock.
i You do not have to remove the Start/Stop
button from the ignition lock when you leave the vehicle. You should, however, always take the SmartKey with you when leaving the vehicle. As long as the SmartKey is in the vehicle:
Rthe vehicle can be started using the
Start/Stop button and
starting the engine or lights up while driving, see (Y page 322).
X Insert Start/Stop button : into ignition
lock ;.
i When you insert Start/Stop button : into ignition lock ;, the system needs approximately two seconds recognition time. You can then use Start/Stop button :.
Activating power supply
X If Start/Stop button : has not yet been
pressed, this corresponds to the SmartKey being removed from the ignition.
X Press Start/Stop button : once.
The power supply is switched on. You can now activate the windshield wipers, for example.
i The power supply is switched off again if:
Rthe driver's door is opened and
Ryou press Start/Stop button : twice
when in this position.
Relectrically powered equipment can be
Switching on the ignition
operated.
i The engine can be turned off while the
vehicle is in motion by pressing and holding the Start/Stop button for approximately three seconds.
Key positions with KEYLESS-GO
X Press Start/Stop button : twice.
The ignition is switched on.
i The power supply is switched off again if:
Rthe driver's door is opened and
Ryou press Start/Stop button : once
when in this position.
As soon as the ignition is switched on, all the indicator lamps in the instrument cluster light up. If an indicator lamp does not go out after
Start/Stop button = USA only
? Canada only
Starting the engine
Important safety notes
G WARNING If children are left unsupervised in the vehicle, they could:
Ropen the doors, thus endangering other
people or road users.
Rget out and disrupt traffic.
Roperate the vehicle's equipment.
Additionally, children could set the vehicle in motion if, for example, they:
Rrelease the parking brake.
Rshift the automatic transmission out of
parking position P.
Rstarting the engine.
There is a risk of an accident and injury.
When leaving the vehicle, always take the SmartKey with you and lock the vehicle. Never leave children or animals unattended in the vehicle. Always keep the SmartKey out of reach of children.
G WARNING Combustion engines emit poisonous exhaust gases such as carbon monoxide. Inhaling these exhaust gases leads to poisoning. There is a risk of fatal injury. Therefore never leave the engine running in enclosed spaces without sufficient ventilation.
i Vehicles with a gasoline engine: the catalytic converter is preheated for up to 30 seconds after a cold start. The sound of the engine may change during this time.
Driving 165
Starting procedure with the SmartKey
X To start a gasoline engine: turn the
SmartKey to position 3 in the ignition lock (Y page 163) and release it as soon as the engine is running.
X To start a diesel engine: turn the
SmartKey to position 2 in the ignition lock (Y page 163). The % preglow indicator lamp in the instrument cluster lights up.
X When the % preglow indicator lamp goes out, turn the SmartKey to position 3(Y page 163) and release it as soon as the engine is running.
i You can start the engine without preglow
if the engine is warm.
Using KEYLESS-GO to start the engine
X Depress the brake pedal and keep it
depressed.
X To start a gasoline engine: press the Start/Stop button (Y page 163) once. The engine starts.
X To start a diesel engine: press the Start/
Stop button (Y page 163) once. Preglow is activated and the engine starts.
i The Start/Stop button can be used to
start the vehicle without inserting the SmartKey into the ignition lock. The Start/ Stop button must be inserted in the ignition lock and the SmartKey must be in the vehicle.
Pulling away
Automatic transmission
Automatic transmission
X Shift the transmission to position
P(Y page 169). The transmission position display in the multifunction display shows P(Y page 169).
i You can also start the engine when the
transmission is in position N.
G WARNING If the engine speed is above the idling speed and you engage transmission position D or R, the vehicle could pull away suddenly. There is a risk of an accident.
166 Driving
When engaging transmission position D or R, always firmly depress the brake pedal and do not simultaneously accelerate.
X Depress the brake pedal and keep it
depressed.
X Shift the transmission to position D or
R(Y page 169).
X Release the brake pedal.
X Carefully depress the accelerator pedal.
The electric parking brake (Y page 184) is automatically released. The red F (USA only) or ! (Canada only) indicator lamp in the instrument cluster goes out.
i It is only possible to shift the transmission
from position P to the desired position if you depress the brake pedal. Only then is the parking lock released. If you do not depress the brake pedal, you can move the DIRECT SELECT lever but the parking lock remains engaged.
i The vehicle locks centrally once you have pulled away. The locking knobs in the doors drop down.
You can open the doors from the inside at any time.
You can also deactivate the automatic locking feature (Y page 280).
i Upshifts take place at higher engine
speeds after a cold start. This helps the catalytic converter to reach its operating temperature more quickly.
Pulling away with a trailer
To ensure that you do not roll backwards when pulling away on an uphill slope, engage the electric parking brake.
X Press and hold handle :.
The electric parking brake continues to brake and prevent the vehicle from rolling backwards. The red F (USA only) or ! (Canada only) indicator lamp in the instrument cluster remains on.
X Depress the accelerator pedal.
X As soon as the vehicle/trailer combination
is held by the driving force of the engine, release lever :. The electric parking brake is released. The red F (USA only) or ! (Canada only) indicator lamp in the instrument cluster goes out.
Hill start assist
G WARNING After a short time, hill start assist will no longer brake your vehicle and it could roll away. There is a risk of an accident and injury.
Therefore, quickly move your foot from the brake pedal to the accelerator pedal. Never leave the vehicle when it is held by hill start assist.
X Remove your foot from the brake pedal.
The vehicle is then held for about a second.
X Pull away.
Hill start assist helps you when pulling away forwards or in reverse on an uphill gradient. It holds the vehicle for a short time after you have removed your foot from the brake pedal. This gives you enough time to move your foot from the brake pedal to the accelerator pedal and to depress it before the vehicle begins to roll.
Hill start assist will not function if:
Ryou are pulling away on a level road or on
a downhill gradient.
Rthe transmission is in position N.
Rthe electric parking brake is applied.
RESP® is malfunctioning.
Driving 167
168 Driving
Problems with the engine
Problem
Possible causes/consequences and M Solutions
The engine does not start. The starter motor can be heard.
RThere is a malfunction in the engine electronics.
RThere is a malfunction in the fuel supply.
X Try to start the engine again (Y page 165). Avoid excessively
long and frequent attempts to start the engine as these will drain the battery.
If the engine does not start after several attempts:
X Consult a qualified specialist workshop.
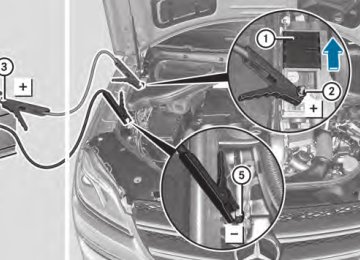
The engine does not start. You cannot hear the starter motor.
The on-board voltage is too low because the battery is too weak or discharged.
X Jump-start the vehicle (Y page 391).
If the engine does not start despite attempts to jump-start it:
X Consult a qualified specialist workshop.
The starter motor was exposed to a thermal load that was too high.
X Allow the starter motor to cool down for approximately two
minutes.
X Try to start the engine again.
If the engine still does not start:
X Consult a qualified specialist workshop.
There is a malfunction in the engine electronics or in a mechanical component of the engine management system.
X Only depress the accelerator pedal slightly.
X Have the cause rectified immediately at a qualified specialist
workshop. Otherwise, non-combusted fuel may get into the catalytic converter and damage it.
The engine is not running smoothly and is misfiring.
The coolant temperature gauge shows a value above 248 ‡ (120 †).
The coolant level is too low. The coolant is too hot and the engine is no longer being cooled sufficiently.
X Stop as soon as possible and allow the engine and the coolant
to cool down.
X Check the coolant level (Y page 369). Observe the warning
notes as you do so and add coolant if necessary.
Automatic transmission
Important safety notes
G WARNING If the engine speed is above the idling speed and you engage transmission position D or R, the vehicle could pull away suddenly. There is a risk of an accident.
When engaging transmission position D or R, always firmly depress the brake pedal and do not simultaneously accelerate.
G WARNING The automatic transmission switches to neutral position N when you switch off the engine. The vehicle may roll away. There is a risk of an accident.
After switching off the engine, always switch to parking position P. Prevent the parked vehicle from rolling away by applying the parking brake.
DIRECT SELECT lever
Overview of transmission positions
j Park position with parking lock
k Reverse gear
i Neutral
h Drive
The DIRECT SELECT lever is on the right of the steering column.
i The DIRECT SELECT lever always returns
to its original position. The current
Automatic transmission 169
transmission position P, R, N or D appears in the transmission position display (Y page 169) in the multifunction display.
Transmission position and drive
program display
! If the transmission position display in the
multifunction display is not working, you should pull away carefully to check whether the desired transmission position is engaged. Ideally, you should select transmission position D and, in AMG vehicles, drive program C or S. Do not restrict the shift range.
Transmission position and drive program display : Transmission position display
; Drive program display
The current transmission position and drive program appear in the multifunction display.
i The arrows in the transmission position
display show how and into which transmission positions you can change using the DIRECT SELECT lever.
Engaging park position P
! If the engine speed is too high or the
vehicle is moving, do not shift the automatic transmission directly from D to R, from R to D or directly to P. The automatic transmission could otherwise be damaged.
170 Automatic transmission
j Park position with parking lock
k Reverse gear
i Neutral
h Drive
Engaging reverse gear R
! Only shift the automatic transmission to
R when the vehicle is stationary.
X When the vehicle is stationary, depress the
brake pedal.
X Push the DIRECT SELECT lever up past the
first point of resistance.
Shifting to neutral N
G WARNING If children are left unsupervised in the vehicle, they could:
Ropen the doors, thus endangering other
X Push the DIRECT SELECT lever in the
direction of arrow P.
people or road users.
Rget out and disrupt traffic.
i The automatic transmission shifts into
park position P automatically:
Rif you open the driver's door while the
vehicle is stationary in transmission position D or R
Rif you open the door while traveling at
very low speeds in transmission position D or R
Engaging park position P automatically
Park position P is automatically engaged if:
Ryou switch off the engine using the
SmartKey and remove the SmartKey.
Roperate the vehicle's equipment.
Additionally, children could set the vehicle in motion if, for example, they:
Rrelease the parking brake.
Rshift the automatic transmission out of
parking position P.
Rstarting the engine.
There is a risk of an accident and injury.
When leaving the vehicle, always take the SmartKey with you and lock the vehicle. Never leave children or animals unattended in the vehicle. Always keep the SmartKey out of reach of children.
Ryou switch off the engine using the Start/
X When the vehicle is stationary, depress the
Stop button and open one of the front doors.
Rthe HOLD (Y page 211) or DISTRONIC PLUS (Y page 198) function brake your vehicle until it is stationary and at least one of the following conditions is fulfilled:
there is a system malfunction.
the vehicle is on a steep uphill or downhill gradient. The electric parking brake is then also applied.
brake pedal.
X Push the DIRECT SELECT lever up or down
to the first point of resistance.
If the engine has been switched off, the automatic transmission automatically shifts to N.
If you want the automatic transmission to remain in neutral N, e.g. when having the vehicle cleaned in an automatic car wash with a towing system, observe the following notes:
Using the SmartKey:
Transmission positions
Automatic transmission 171
B Park position
Do not shift the transmission into position P(Y page 183) unless the vehicle is stationary. The parking lock should not be used as a brake when parking. Always apply the electronic parking brake in addition to the parking lock in order to secure the vehicle.
If the vehicle electronics are malfunctioning, the transmission may be locked in position P. Have the vehicle electronics checked immediately at a qualified specialist workshop.
The automatic transmission shifts to P automatically if you:
Rremove the SmartKey
Rswitch off the engine when in R or D and open one of the front doors