- 2011 Mercedes-Benz GL Class Owners Manuals
- Mercedes-Benz GL Class Owners Manuals
- 2013 Mercedes-Benz GL Class Owners Manuals
- Mercedes-Benz GL Class Owners Manuals
- 2010 Mercedes-Benz GL Class Owners Manuals
- Mercedes-Benz GL Class Owners Manuals
- 2008 Mercedes-Benz GL Class Owners Manuals
- Mercedes-Benz GL Class Owners Manuals
- 2012 Mercedes-Benz GL Class Owners Manuals
- Mercedes-Benz GL Class Owners Manuals
- 2007 Mercedes-Benz GL Class Owners Manuals
- Mercedes-Benz GL Class Owners Manuals
- 2009 Mercedes-Benz GL Class Owners Manuals
- Mercedes-Benz GL Class Owners Manuals
- Download PDF Manual
-
visor : horizontally as desired.
X Vehicles with a sliding sunroof: fold
down additional sun visor ; to the windshield.
Roller sunblind, rear panorama roof The rear panorama roof roller sunblind protects the vehicle occupants in the third row of seats from direct sunlight. You can open/close the roller sunblind by hand. ! Always guide the roller sunblind by hand.
Do not let it snap back suddenly as this could damage the roller sunblind.
284 Features
X To close: pull out the roller sunblind using
handle = and attach arm ; to bracket :. The roller sunblind engages.
X To open: press release knob ? to release
the roller sunblind from bracket :. X Retract the roller sunblind by hand.
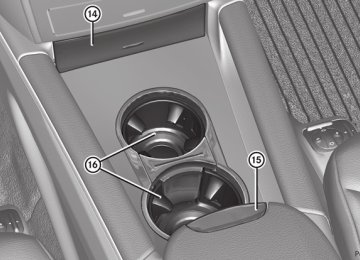
Ashtray Ashtray in the front-compartment center console i You can remove the ashtray insert and
use the resulting compartment for stowage.
! The stowage space under the ashtray is
not heat resistant. Before placing lit cigarettes in the ashtray, make sure that the ashtray is properly engaged. Otherwise, the stowage space could be damaged.
X To open: briefly press marking ?. Stowage compartment : opens.
X To remove the insert: lift insert =
up ; and out.
X To re-install the insert: press insert =
into the holder until it engages.
Ashtray in the rear-compartment center console ! Close the ashtray when it is not in use and before you fold the rear seats forward. You can otherwise damage the ashtray.
X To open: briefly press marking =.
Ashtray ; opens.
X To remove the insert: lift insert : up and
out.
X To install the insert: mount insert : from above into the holder and press down into the holder until it engages.
Cigarette lighter G WARNING When leaving the vehicle, always remove the SmartKey from the ignition lock. Always take the SmartKey with you and lock the vehicle. Do not leave children unattended in the vehicle, even if they are secured in a child restraint system, or with access to an unlocked vehicle. A child's unsupervised access to a vehicle could result in an accident and/or serious personal injury. The children could: Rinjure themselves on parts of the vehicle Rbe seriously or fatally injured through
excessive exposure to extreme heat or cold Rinjure themselves or cause an accident with
vehicle equipment that can be operated even if the SmartKey is removed from the ignition lock or removed from the vehicle, such as seat adjustment, steering wheel adjustment, or the memory function
If children open a door, they could injure other persons or get out of the vehicle and injure themselves or be injured by following traffic.
Do not expose the child restraint system to direct sunlight. The child restraint system's metal parts, for example, could become very hot, and the child could be burned on these parts. G WARNING Never touch the heating element or sides of the lighter; they are extremely hot. Hold the knob only. Make sure any children traveling with you do not injure themselves or start a fire with the hot cigarette lighter.
! The 12 V socket in the cigarette lighter
can be used for accessories (up to a maximum of 180 W) as long as they have the standard socket type for cigarette lighters. Note that the socket in the cigarette lighter can be damaged when connecting accessories, for example by frequent insertion and removal or by sockets that do not fit correctly. A damaged socket can cause the cigarette lighter to stop working.
! The cigarette lighter in the center console in the front compartment is not intended for operating the tire inflation compressor.
Features
285
X Turn the SmartKey to position 2 in the
ignition lock.
X To open: briefly press marking =. Stowage compartment : opens.
X Press in cigarette lighter ;.
Cigarette lighter ; will pop out automatically when the heating element is red-hot.
12 V sockets Points to observe before use ! The socket in the center console and the socket in the cargo compartment are not intended for operating the tire inflation compressor.
The sockets can be used for accessories, e. g. lamps or mobile phone chargers with a maximum current draw of 180 W (15 A). If you use the sockets for long periods when the engine is switched off, the battery may discharge. X Turn the SmartKey to position 2 in the
ignition lock.
i You can also use the power sockets when the SmartKey is in position 1 in the ignition lock. An emergency cut-out ensures that the on- board voltage does not drop too low. If the on-board voltage is too low, the power to the sockets is automatically cut. This ensures that there is sufficient power to start the engine.
286 Features
Socket in the front-passenger footwell
Socket in the rear-compartment center console
X Lift up the cover of socket :.
Socket in the front-compartment center console ! If accessories are connected, make sure that a maximum current draw of 15 A is not exceeded. Otherwise, you will overload the fuse.
! The socket is not suitable for operating
the tire inflation compressor.
X Lift up the cover of socket :.
Socket in the cargo compartment ! The socket is not suitable for operating
the tire inflation compressor.
X To open: briefly press marking =. Stowage compartment : opens.
X Remove cover from socket ;. i On vehicles with an ashtray and cigarette
lighter, you must remove the cigarette lighter (Y page 284) in order to use the socket.
X Lift up the cover of socket :.
115 V power socket G WARNING The 115V AC socket operates at high voltage. Use the 115V AC socket in the vehicle with the same caution and prudence that you exercise when using power outlets at home. Keep any fluids away from the 115V AC socket. Do not clean the socket with fluids or tapered objects. Keep the 115V AC socket cover in the closed position, when not in use. Otherwise, you could suffer an electric shock and be seriously or even fatally injured.
Features
287
G WARNING Any device that you connect must have a suitable plug and meet U.S. standards. Never pull at a cable to disconnect a plug from a 115 V AC power socket. Never use a damaged connection cable. The 115 V AC power socket must never be connected to another 115 V AC power source. Do not use a converter with an earthed plug for the 115 V AC power socket. This could cause serious injury to you and/or other people. G WARNING If the 115V AC socket is damaged or torn out of the trim, do not use or touch the 115V AC socket. Using a 115V AC socket that is damaged or torn out of the trim could cause serious personal injury to you and/or others.
X Open flap =. X Insert the plug of the electronic device into
115 V power socket :. Indicator lamp ; lights up. If indicator lamp ; does not light up, consult the section on malfunctions.
X To turn off: disconnect the plug from 115 V
power socket :. Ensure that you do not pull on the cord.
X Close flap =. Possible causes of malfunction: Rthe on-board power supply is not within a
permissible volt range.
Rthe temperature of the DC/AC converter is
temporarily too high.
Rsome small electronic devices have a constant nominal power of less than 150 W, but a very high inrush current. These devices will not work. If you connect such a device, 115 V power socket : will not supply it with power.
If indicator lamp ; still does not light up, contact a specialist workshop, e.g. an authorized Mercedes-Benz Center.
115 V socket : provides an alternating voltage of 115 V, so that small electronic devices can be connected. These devices, such as games consoles, chargers and laptops, together should not consume more than a maximum of 150 W. Requirements for operation of these devices: Rthe plug of the electronic device must be inserted fully into 115 V power socket :. Rthe maximum wattage of the device to be
connected must not exceed 150 W.
Rthe on-board power supply is within a
permissible volt range.
Rthe 12 V sockets in the rear and the cargo
compartment are operational (Y page 285).
mbrace Important safety notes ! A license agreement must exist in order to activate the mbrace service. Ensure that your system is activated and ready for use, and press the E MB Info call button to register. If any of the steps mentioned is not carried out, the system may not be activated. If you have questions about the activation, contact one of the following telephone assistance services: RUSA: Mercedes-Benz Customer
Assistance Center under 1-888-990-9007
RCanada: Customer Service at
1-888-923-8367
288 Features
Shortly after successfully registering with the mbrace service, a user ID and password will be sent to you by post. You can use this password to log in to the mbrace section under "Owners Online" at http:// www.mbusa.com32. The mbrace system is available if: Rit has been activated and is operational. Rthe corresponding mobile phone network
is available for transmitting data to the Customer Center.
Ra service subscription is available. Rthe starter battery is sufficiently charged. i Determining the location of the vehicle on a map is only possible if there is sufficient GPS reception and the vehicle position can be forwarded to the Customer Center.
The mbrace system The mbrace system provides different services, e.g.: Rautomatic and manual emergency call RRoadside Assistance call RMB Info call To adjust the volume during an mbrace call, proceed as follows: X Press the W or X button on the
multifunction steering wheel.
or X Use the volume controller of COMAND. You can find further information and a description of all available features under "Owners Online" at http:// www.mbusa.com33.
System self-test After you have switched on the ignition, the system carries out a self-diagnosis.
G WARNING A malfunction in the system has been detected if one of the following conditions occurs: Rthe indicator lamp in the SOS button does
not light up during the system self- diagnosis.
Rthe indicator lamp in the º Roadside
Assistance button does not light up during the system self-diagnosis.
RThe indicator lamp in the E information
button does not light up during self- diagnosis of the system.
Rthe indicator lamp in the SOS button,
º Roadside Assistance button or E information button continues to be lit red after the system self-diagnosis. RThe Tele Aid Inoperative or Tele Aid Not Activated message appears in the multifunction display after the system self- test.
If a malfunction is indicated as outlined above, the system may not operate as expected. In the event of an emergency, assistance must be summoned by other means. Have the system checked at the nearest authorized Mercedes-Benz Center or contact the following service hotlines: RUSA: Response Center under
888-990-9007
RCanada: Customer Service at
1-888-923-8367
Emergency call Important safety notes ! A license agreement must exist in order to activate the mbrace service. Ensure that your system is activated and ready for use, and press the E MB Info call button to register. If any of the steps mentioned is
32 USA only. 33 USA only.
not carried out, the system may not be activated. If you have questions about the activation, contact one of the following telephone assistance services: RUSA: Mercedes-Benz Customer
Assistance Center under 1-888-990-9007
RCanada: Customer Service at
1-888-923-8367
An emergency call is dialed automatically if an air bag or Emergency Tensioning Device is triggered. i An mbrace emergency call that has been
initiated automatically cannot be terminated by the customer.
An emergency call can also be initiated manually. As soon as the emergency call has been initiated, the indicator lamp in the SOS button flashes. The Connecting Call message appears on the multifunction display. The audio output is muted. Once a connection has been established, the Call Connected message appears in the multifunction display. All important information on the emergency is transmitted, for example: Rcurrent location of the vehicle (as
determined by the GPS system)
Rvehicle identification number Rinformation on the type of emergency Shortly after the emergency call has been initiated, a voice connection is automatically established between the Mercedes-Benz Customer Assistance Center and the vehicle occupants. If the vehicle occupants respond, the Mercedes-Benz Customer Assistance Center attempts to get more information on the emergency. i If no vehicle occupant answers, an ambulance is immediately sent to the vehicle.
Features
289
G WARNING If the indicator lamp in the SOS button is flashing continuously and no voice connection to the Mercedes-Benz Customer Assistance Center was established, then the mbrace system could not initiate an emergency call (e.g. the relevant cellular phone network is not available). The message Call Failed appears in the multifunction display for approximately 10 seconds. Should this occur, assistance must be summoned by other means.
Making an emergency call
X To initiate an emergency call
manually: press cover : briefly to open it.
X Press SOS button ; briefly.
The indicator lamp in SOS button ; flashes until the emergency call is concluded.
X Wait for a voice connection to the
Mercedes-Benz Customer Assistance Center.
X After the emergency call is ended, close
cover :. G WARNING If you feel in any way in jeopardy when in the vehicle (e.g. smoke or fire in the vehicle, vehicle in a dangerous road location), please do not wait for voice contact after you have pressed the SOS button. Carefully leave the vehicle and move to a safe location. The
290 Features
Mercedes-Benz Customer Assistance Center will automatically contact local emergency officials with the vehicle's approximate location if they receive an automatic SOS signal and cannot make voice contact with the vehicle occupants.
Roadside Assistance button X Open the stowage compartment under the
armrest (Y page 269).
X Press and hold Roadside Assistance
button : for more than two seconds. This initiates a call to the Mercedes-Benz Customer Assistance Center. The indicator lamp in Roadside Assistance button : flashes while the call is active. The Connecting Call message appears in the multifunction display. The audio output is muted. If a connection can be established, the Call Connected message appears in the multifunction display. If a cellular phone network is available and there is sufficient GPS reception, the mbrace system transmits data to the Mercedes-Benz Customer Assistance Center, for example: Rcurrent location of the vehicle Rvehicle identification number i The COMAND display shows that an
mbrace call is active. During the call, you can change to the navigation menu by pressing the NAVI button on COMAND, for example.
Voice output is not available.
A voice connection is established between the Mercedes-Benz Customer Assistance Center and the vehicle occupants. X Describe the type of assistance needed. The Mercedes-Benz Customer Assistance Center either sends a qualified Mercedes- Benz technician or organizes for your vehicle to be transported to the nearest authorized Mercedes-Benz Center. You may be charged for services such as repair work and/or towing. Further details are available in your mbrace manual. i The mbrace system failed to initiate a
Roadside Assistance call if: Rthe indicator lamp in Roadside Assistance button : is flashing continuously.
Rno voice connection to the Mercedes- Benz Customer Assistance Center was established.
This may be because the corresponding mobile phone network is not available. The Call Failed message appears in the multifunction display.
X To end a call: press the ~ button on the
multifunction steering wheel.
or X Press the corresponding button for ending
a phone call on COMAND.
MB Info call button X Open the stowage compartment under the
armrest (Y page 269).
Features
291
Further details on the mbrace system can be found under http://www.mbusa.com34. Log in under "Owners Online". i The mbrace system failed to initiate an
MB Info call if: Rthe indicator lamp in MB Info call button : is flashing continuously.
Rno voice connection to the Mercedes- Benz Customer Assistance Center was established.
This may be because the corresponding mobile phone network is not available. The Call Failed message appears in the multifunction display.
X To end a call: press the ~ button on the
multifunction steering wheel.
or X Press the corresponding button for ending
a phone call on COMAND.
Call priority When service calls are active, e.g. Roadside Assistance or MB Info calls, an emergency call can still be initiated. In this case, an emergency call will take priority and override all other active calls. The indicator lamp of the respective button flashes until the call is ended. An emergency call can only be terminated by the Mercedes- Benz Customer Assistance Center. All other calls can be ended by pressing the ~ button on the multifunction steering wheel or the corresponding button for ending a telephone call on COMAND. i If an mbrace call is initiated, audio output
is muted. The mobile phone is no longer connected to COMAND. However, if you want to use your mobile phone, we recommend that you do this only when the vehicle is stationary and in a safe location.
X Press and hold MB Info call button : for
more than two seconds. This initiates a call to the Mercedes-Benz Customer Assistance Center. The indicator lamp in MB Info call button : flashes while the connection is being established. The Connecting Call message appears in the multifunction display. The audio output is muted. If a connection can be established, the Call Connected message appears in the multifunction display. If a cellular phone network is available and there is sufficient GPS reception, the mbrace system transmits data to the Mercedes-Benz Customer Assistance Center, for example: Rcurrent location of the vehicle Rvehicle identification number i The COMAND display shows that an
mbrace call is active. During the call, you can change to the navigation menu by pressing the NAVI button on COMAND, for example. Voice output is not available.
A voice connection is established between the Mercedes-Benz Customer Assistance Center and the vehicle occupants. You can obtain information on how to operate your vehicle's systems, on the location of the nearest authorized Mercedes-Benz Center, and on further products and services offered by Mercedes-Benz USA.
34 USA only.
292 Features
Downloading destinations in COMAND i Information on the components and
operating principles of COMAND can be found in the separate COMAND operating instructions.
i You can only use the Destination Download function if the vehicle is equipped with a navigation system.
Destination Download gives you access to a database with over 15 million points of interest (POIs)/important destinations that can be downloaded onto the navigation system of your vehicle. If you know the destination, you can download the address or obtain the location of points of interest (POIs)/important destinations in the surrounding area. You are prompted to confirm route guidance to the address entered. X Select Yes with the = or ; buttons on COMAND.
X Press the 9 button on COMAND to
confirm.
The system calculates the route and subsequently starts the route guidance with the address entered. i If you select No, the address can be stored in the address book.
i The Destination Download function is
available if the corresponding mobile phone network is available and data transfer is possible.
Route Assistance This service is part of the mbrace PLUS Package and cannot be purchased separately. i You can also use the Route Assistance
function if your vehicle is not equipped with a navigation system.
Within the framework of this service, you receive a professional and reliable form of
35 USA only.
navigation support without having to leave your vehicle. The customer service representative determines a suitable driving route based on your current vehicle position and the desired destination and guides you live through the current sections of the route.
Search & Send "Search & Send" is a destination entry service. You can find further information on "Search & Send" in the separate COMAND operating instructions.
Vehicle remote opening If you have unintentionally locked your vehicle (e.g. the SmartKey is still in the vehicle) and a replacement SmartKey is not available, the vehicle can be opened by a Mercedes-Benz Customer Assistance Center. The vehicle can be opened remotely up to four days after the ignition was last switched off. X Contact the following service hotlines:
RUSA: Mercedes-Benz Customer
Assistance Center under 1-800-FOR- MERCedes(1-800-367-6372) or 1-888-990-9007
RCanada: Customer Service at
1-888-923-8367
You will be asked for your password.
X Return to your vehicle at the time agreed upon with the Mercedes-Benz Customer Assistance Center.
X Pull the tailgate handle for at least 20
seconds until the indicator lamp in the SOS button (Y page 288) flashes. The Connecting Call message appears on the multifunction display.
Alternatively, the vehicle can also be opened via the Internet or an iPhone in the "Owners Online" section using your ID number and password35.
i Vehicle remote unlocking is only possible if the corresponding mobile phone network is accessible. The SOS button flashes and the Call Connected message appears in the multifunction display to confirm that the command for vehicle remote unlocking has been received. If you pull the tailgate handle for more than 20 seconds before receiving authorization for remote unlocking from the Mercedes- Benz Customer Assistance Center, you must wait 15 minutes before you can pull the tailgate handle again.
Service for recovering a stolen vehicle If your vehicle has been stolen: X Notify the police.
The police will issue a numbered incident report.
X This number will be forwarded to the Mercedes-Benz Customer Assistance Center together with your PIN. The Mercedes-Benz Customer Assistance Center then attempts to locate the mbrace system. The Mercedes-Benz Customer Assistance Center contacts you and the local law enforcement agency if the vehicle is located. However, only the law enforcement agency is informed of the location of the vehicle.
i If the anti-theft alarm system is active for
longer than 30 seconds, mbrace automatically informs the Mercedes-Benz Customer Assistance Center.
Garage door opener Important safety notes The HomeLink® garage door opener integrated in the rear-view mirror allows you to operate up to three different door and gate systems.
Features
293
i Certain garage door drives are
incompatible with the integrated garage door opener. If you have difficulty programming the integrated garage door opener, contact an authorized Mercedes- Benz Center or call one of the following telephone hotlines: RUSA: Mercedes-Benz Customer
Assistance Center at 1-800-FOR-MERCedes
RCanada: Customer Service at
1-800-387-0100
G WARNING Before programming the integrated remote control to a garage door opener or gate operator, make sure people and objects are out of the way of the device to prevent potential harm or damage. When programming a garage door opener, the door moves up or down. When programming a gate operator, the gate opens or closes. Do not use the integrated remote control with any garage door opener that lacks safety stop and reverse features as required by U.S. federal safety standards (this includes any garage door opener model manufactured before April 1, 1982). A garage door that cannot detect an object - signaling the door to stop and reverse - does not meet current U.S. federal safety standards. When programming a garage door opener, park vehicle outside the garage. Do not run the engine while programming the integrated remote control. Inhalation of exhaust gas is hazardous to your health. All exhaust gas contains carbon monoxide (CO), and inhaling it can cause unconsciousness and possible death. All exhaust gas contains carbon monoxide (CO), and inhaling it can cause unconsciousness and possible death.
i USA only:
This device complies with Part 15 of the FCC requirements. Operation is subject to the following two conditions:
294 Features
1. This device must not cause harmful interference, and 2. this device must withstand any interference received, including interference that may cause undesired operation. Any unauthorized modification to this device could void the user's authority to operate the equipment.
i Canada only:
This device complies with RSS-210 of Industry Canada. Operation is subject to the following two conditions: 1. This device must not cause harmful interference, and 2. this device must withstand any interference received, including interference that may cause undesired operation. Any unauthorized modification to this device could void the user's authority to operate the equipment.
Programming the integrated garage door opener on the rear-view mirror Programming G WARNING Only press the transmitter button on the integrated garage door opener if there are no persons or objects present within the sweep of the garage door. People could otherwise be injured by the movement of the door.
Integrated garage door opener on the rear-view mirror Garage door remote control A is not part of this integrated garage door opener. i To achieve the best result, insert new batteries in garage door remote control A before programming.
X Before programming for the first time, clear the memory of the integrated garage door opener (Y page 296).
X Turn the SmartKey to position 2 in the
ignition lock.
X Press and hold one of transmitter
buttons ; to ? on the integrated garage door opener. Indicator lamp : starts to flash yellow after a short period.
i Indicator lamp : flashes yellow
immediately after the transmitter button has been stored for the first time. If the transmitter button has already been programmed, indicator lamp : does not flash yellow until 10 seconds have elapsed.
X Release the transmitter button. X Point transmitter button B of garage door remote control A towards the transmitter buttons on the rear-view mirror at a distance of 2 to 8 inches (5 to 20 cm). i The distance required between garage
door remote control A and the integrated garage door opener depends on the system of the garage door drive. You might require several attempts. You should test every
Features
295
position for at least 25 seconds before trying another position.
X Press and hold transmitter button B on
garage door remote control A until indicator lamp : lights up green. Programming is complete if indicator lamp : lights up or flashes green.
X Release transmitter button ;, = or ? on the integrated garage door opener and the transmitter button on garage door remote control B.
If indicator lamp : lights up red: X Repeat the programming procedure for the transmitter button. When doing so, vary the distance between the garage door remote control and the rear-view mirror.
i If the indicator lamp flashes green after successful programming, the garage door system is operating on a rolling code. After programming, you must synchronize the garage door opener integrated in the rear- view mirror with the receiver of the garage door system.
Synchronizing the rolling code Your vehicle must be within range of the garage or gate opener drive. Make sure that neither your vehicle nor any persons/objects are present within the sweep of the door or gate. Observe the safety notes when performing the rolling code synchronization. X Turn the SmartKey to position 2 in the
ignition lock.
X Press the programming button of the door
or gate drive (see the door or gate drive operating instructions, e.g. under "Programming of additional remote controls").
i You now normally have 30 seconds to
initiate the next step.
X Press the previously programmed
transmitter button of the HomeLink®
integrated garage door opener repeatedly in succession until the door opens. The rolling code synchronization is then complete.
Notes on programming the remote control Canadian radio frequency laws require a "break" (or interruption) of the transmission signals after broadcasting for a few seconds. These signals may not therefore last long enough for the integrated garage door opener to recognize the signal during programming. Comparable with Canadian law, some U.S. garage door openers also have a built-in "interruption". If you live in Canada or have difficulties programming the garage door opener (regardless of where you live) when using the programming steps (see above), proceed as follows: X Press and hold one of transmitter
buttons ; to ? of the integrated garage door opener. Indicator lamp : starts to flash yellow after a short period.
X Release the transmitter button. X Press transmitter button B of the garage
door remote control and hold for two seconds, then release for two seconds, then press again and hold for two seconds.
X Repeat this sequence on transmitter button B of the garage door remote control until indicator lamp : is green. Repeat the process if indicator lamp : turns red.
X Continue with the other programming
steps (see above).
Problems when programming If you are experiencing problems programming the integrated garage door opener on the rear-view mirror, take note of the following instructions: Rcheck the transmission frequency of
garage door remote control A (usually
296 Features
found on the reverse side of the remote control). The integrated garage door opener is compatible with devices that can be operated with units in a frequency range of 280 to 390 MHz.
Rchange the batteries in garage door remote control A. This increases the probability that garage door remote control A will send a strong and precise signal to the integrated garage door opener on the rear- view mirror.
Rwhen programming, hold garage door
remote control A at different distances and angles from the transmitter button that you are programming. Try different angles at a distance between 2 and 12 inches (5
to 30 cm) or the same angle at varying distances.Rif another remote control for the same
garage door drive is available, repeat the same programming steps with this remote control. Before you perform the steps of the operation, make sure that there are new batteries in the garage door remote control.
Rnote that some remote controls only
transmit for a limited amount of time (the indicator lamp on the remote control goes out). Press the remote control button again before it stops transmitting.
Ralign the antenna cable of the garage door
opener unit. This can improve signal reception/transmission.
Opening/closing the garage door Once programmed, the integrated garage door opener will assume the function of the garage door system's remote control. Please also read the operating instructions for the garage door system.
X Turn the SmartKey to position 2 in the
ignition lock.
X Press transmitter button ;, = or ? in the
overhead control panel that you have programmed to operate the garage door. Garage door system with a fixed code: indicator lamp : lights up green. Garage door system with a rolling code: indicator lamp : flashes green.
i The transmitter will transmit a signal for as long as the transmitter button is being pressed. After a maximum of ten seconds, transmission is terminated and indicator lamp : flashes yellow. Press the transmitter button again, if necessary.
Clearing the memory of the integrated garage door opener on the rear-view mirror X Turn the SmartKey to position 2 in the
ignition lock.
X Press transmitter buttons ; and ?.
The indicator lamp lights up yellow.
X Press and hold transmitter buttons ;
and ? until the indicator lamp turns green.
i Make sure that you clear the memory of the integrated garage door opener before selling the vehicle.
Compass Calling up the compass X Press the V or U button on the
multifunction steering wheel repeatedly until the Offroad menu appears in the multifunction display. The compass shows which direction the vehicle is currently traveling in: N, NE, E, SE, S, SW, W or NW.
Features
297
Infrared reflective windshield The infrared reflecting glass prevents the vehicle interior from becoming too hot. It also blocks radio waves up into the gigahertz range.
i If your vehicle does not have an AIRMATIC
package, the multifunction display only shows the compass.
Floormat on the driver's side G WARNING Whenever you are using a floormat, make sure there is enough clearance and that the floormat is securely fastened. The floormat should always be securely fastened using the fastening equipment. Before driving off, check that the floormat is securely in place and adjust it if necessary. A loose floormat could slip and hinder proper functioning of the pedals. Do not place several floormats on top of each other as this may impair pedal movement.
In order to operate radio-controlled equipment, e.g. toll recording systems, areas : on the windshield are permeable to radio waves. In these areas, you can install radio-controlled systems. These areas can best be seen from outside the vehicle by observing the light reflected off the windshield.
X Slide the seat backwards. X To install: place the floormat in the
footwell.
X Press studs : onto retainers ;. X To remove: pull the floormat off
retainers ;.
X Remove the floormat.
298
Useful information ............................ 300
Engine compartment ........................ 300
Maintenance ...................................... 305
Care .................................................... 305299
300 Engine compartment
Useful information
i This Operator's Manual describes all models and all standard and optional equipment of your vehicle available at the time of publication of the Operator's Manual. Country-specific differences are possible. Please note that your vehicle may not be equipped with all features described. This also applies to safety- related systems and functions.
i Please read the information on qualified
specialist workshops (Y page 24).
Engine compartment Hood Opening the hood G WARNING Do not pull the release lever while the vehicle is in motion. Otherwise, the hood could be forced open by passing air flow. This could cause the hood to come loose and injure you and/or others. G WARNING Do not open the hood when the engine is overheated. You could be seriously injured. Observe the coolant temperature display to determine whether the engine may be overheated. If you see flames or smoke coming from the engine compartment, move away from the vehicle. Wait until the engine has cooled. If necessary, call the fire department. G WARNING There is a risk of injury if the hood is open, even if the engine is not running. Some engine components can become very hot. To avoid the risk of burns, only touch those components described in the Operator's Manual and observe the relevant safety notes.
G WARNING To help prevent personal injury, stay clear of moving parts when the hood is open and the engine is running. The radiator fan may continue to run for approximately 30 seconds or may even restart after the engine has been turned off. Stay clear of fan blades. G WARNING Vehicles with gasoline engine: The engine is equipped with a transistorized ignition system. Because of the high voltage it is dangerous to touch any components (ignition coils, spark plug sockets, diagnostic socket) of the ignition system Rwith the engine running Rwhile starting the engine Rwhen the ignition is switched on and the
engine is turned manually G WARNING Vehicles with diesel engine: The engine is equipped with a high-voltage electronic control unit for the injection system. Because of the high voltage it is dangerous to touch any components of the injection system (injectors, electrical wires) Rwith the engine running Rwhile starting the engine Rwhen the ignition is switched on
X Make sure that the windshield wipers are
switched off. G WARNING The windshield wipers and wiper linkage could be set in motion. When the hood is open, you or others could be injured by the wiper linkage. Make sure that the windshield wipers are switched off. Remove the SmartKey or make sure that no ignition position has been selected with KEYLESS-GO. All indicator lamps must be off in the instrument cluster.
Engine compartment
301
otherwise come loose while the vehicle is in motion and injure you and/or others.
X Lower the hood and let it fall from a height
of approximately 8 inches (20 cm).
X Check that the hood has engaged properly. If the hood can be raised slightly, it is not properly engaged. Open it again and close it with a little more force.
Radiator i Vehicles with a diesel engine: do not
cover the radiator, for example with a winter front or bug cover. Otherwise, the readings of the on-board-diagnostic system may be inaccurate. Some of these readings are required by law and must be accurate at all times.
Engine oil Notes on the oil level Depending on the driving style, the vehicle consumes up to 0.9 US qts. (0.8 l) of oil over a distance of 600 miles (1000 km). The oil consumption may be higher than this when the vehicle is new or if you frequently drive at high engine speeds.
Checking the oil level using the oil dipstick When checking the oil level: Rpark the vehicle on a level surface. Rthe engine should be switched off for
approximately five minutes if the engine is at normal operating temperature.
X Pull release lever : on the hood.
The hood is released.
! Make sure that the windshield wipers are not folded away from the windshield. You could otherwise damage the windshield wipers or the hood.
X Reach into the gap, pull hood catch
handle ; up and lift the hood. Once you have lifted the hood about 15 inches (40 cm), it is automatically opened the rest of the way and held open by the gas-filled struts.
Closing the hood G WARNING When closing the hood, use extreme caution not to catch hands or fingers. Be careful that you do not close the hood on anyone. Make sure the hood is securely engaged before driving off. Do not continue driving if the hood can no longer engage after an accident, for example. The hood could
302 Engine compartment
Example: vehicles with a gasoline engine
Example: vehicles with a diesel engine X Pull oil dipstick : out of the dipstick guide
tube.
X Wipe off oil dipstick :. X Slowly slide oil dipstick : into the guide
tube to the stop, and take it out again. The oil level is correct if the level is between MIN mark = and MAX mark ;.
X Add oil if necessary.
Adding engine oil H Environmental note When adding oil, take care not to spill any. If oil enters the soil or waterways, it is harmful to the environment. G WARNING If engine oil comes into contact with hot engine parts, it may ignite and you could burn yourself. Do not spill any engine oil on hot engine parts.
! Use only engine oils and oil filters that
have been approved for vehicles equipped with a service system. A list of the engine oils and oil filters tested and approved in accordance with the Mercedes-Benz Specifications for Service Products can be called up by visiting http:// www.mbusa.com (USA only). More information about tested and approved engine oils and oil filters is available from any authorized Mercedes-Benz Center. Damage to the engine or exhaust system is caused by the following: Rusing engine oils and oil filters which
have not been specifically approved for the service system.
Rreplacing the engine oil or oil filter after the replacement interval required by the service system has elapsed Rusing engine oil additives.
Example: engine oil cap X Turn cap : counter-clockwise and remove
it.
X Add the amount of oil required. Fill carefully to the maximum mark on the oil dipstick. i Depending on the engine, the difference in quantity between the MIN mark and the MAX mark on the dipstick is approximately 1.6 to 2.1 US qt (1.5 to 2 l).
! Do not add too much oil. If the oil level is above the "max" mark on the dipstick, too much oil has been added. This can lead to
damage to the engine or the catalytic converter. Have excess oil siphoned off. For further information on engine oil, see (Y page 375). X Replace cap : on the filler neck and
tighten clockwise. Ensure that the cap locks into place securely.
Engine compartment
303
hot fluid and steam will be blown out under pressure.
Rdo not spill antifreeze on hot engine parts. Antifreeze contains ethylene glycol which may burn if it comes into contact with hot engine parts.
Checking and adding other service products Checking the coolant level Only check the coolant level when the vehicle is on a level surface and the engine has cooled down. X Turn the SmartKey to position
2 (Y page 149) in the ignition lock. On vehicles with KEYLESS-GO, press the Start/Stop button twice (Y page 149).
X Check the coolant temperature gauge in
the multifunction display. The coolant temperature must be below 158 ‡ (70 †). G WARNING In order to avoid any potentially serious burns: Ruse extreme caution when opening the hood if there are any signs of steam or coolant leaking from the cooling system, or if the coolant temperature display indicates that the coolant is overheated.
Rdo not remove the pressure cap on the
coolant reservoir if the coolant temperature is above 158 ‡ (70 †). Allow the engine to cool down before removing the cap. The coolant reservoir contains hot fluid and is under pressure.
Rusing a rag, slowly turn the cap
approximately 1/2 turn to relieve excess pressure. If opened immediately, scalding
X Slowly turn cap : half a turn counter- clockwise and allow excess pressure to escape.
X Turn cap : further counter-clockwise and
remove it. If the coolant is at the level of marker bar = in the filler neck when cold, there is enough coolant in coolant expansion tank ;. If the coolant is approximately 0.6 in (1.5 cm) above marker bar = in the filler neck when warm, there is enough coolant in coolant expansion tank ;.
X If necessary, add coolant that has been tested and approved by Mercedes-Benz.
X Replace cap : and turn it clockwise as far
as it will go.
For further information on coolant, see (Y page 376).
Windshield washer system and headlamp cleaning system The washer fluid reservoir is used for both the windshield washer system and the headlamp cleaning system. i Vehicle components and their service
products must match. You should,
304 Engine compartment
therefore, only use products that have been tested and approved by Mercedes-Benz. Information on tested and approved products can be obtained at any authorized Mercedes-Benz Center or on the Internet at http://www.mbusa.com (USA only). G WARNING Washer solvent/antifreeze is highly flammable. Do not spill washer solvent/ antifreeze on hot engine parts, because it may ignite and burn. You could be seriously burned.
! At temperatures below freezing: always fill the washer fluid reservoir with a mix of water and windshield washer concentrate (e.g. MB WinterFit). There is otherwise a risk of damaging the windshield washer system/headlamp cleaning system.
! Only use washer fluid concentrate which
is suitable for plastic lenses. Unsuitable washer fluid concentrate could damage the plastic lenses of the headlamps.
! Do not add distilled or de-ionized water to the washer fluid container. Otherwise, the level sensor may be damaged.
i Add windshield washer concentrate, e.g. MB SummerFit, to the washer fluid all year round.
Example: washer fluid reservoir X Mix the windshield washer fluid in a
container beforehand.
X At temperatures above freezing: fill the washer fluid reservoir with a mix of water
and windshield washer concentrate (e.g. MB SummerFit).
X At temperatures below freezing: fill the washer fluid reservoir with a mix of water and windshield washer concentrate (e.g. MB WinterFit). Adapt the mixing ratio to the outside temperature. For information on the mixing ratio (Y page 377).
X To open: pull cap : upwards by the tab. X Add the premixed washer fluid. X To close: press cap : onto the filler neck
until it engages.
Brake fluid level ! If you notice that the brake fluid level in the brake fluid reservoir has fallen to the MIN mark or less, check the brake system immediately for leaks. Also check the thickness of the brake linings. Contact a qualified specialist workshop, e.g. an authorized Mercedes-Benz Center immediately. Do not add brake fluid. This does not correct the error.
Only check the brake fluid level when the vehicle is stationary and on a level surface.
The brake fluid level is correct if it is between MIN marking ; and MAX marking : on the brake fluid reservoir.
Maintenance Service interval display Service messages Information on the type of service and service intervals (see separate Service Booklet). You can obtain further information from an authorized Mercedes-Benz Center or at http://www.mbusa.com (USA only). The service interval display informs you of the next service due date. If a service due date has been exceeded, you also hear an acoustic signal. The multifunction display shows a service message for a few seconds, e.g. Service A in .. mi Service A due now Service A overdue by .. mi The letter indicates how much time the workshop will require to carry out the service work. The letters displayed range from A for a short service duration to H for a long service duration. The service interval display does not take into account any periods of time during which the battery is disconnected. Maintaining the time-dependent service schedule: X Note down the service due date displayed
in the multifunction display before disconnecting the battery.
or X Subtract the battery disconnection periods from the service date shown on the display after reconnecting the battery.
i The service interval display does not provide any information regarding the engine's oil level. Observe the notes on the engine oil level (Y page 301).
Care 305
Hiding a service message X Press the . reset button on the instrument cluster (Y page 29).
Displaying a service message X Switch on the ignition. X Press V or U to select the standard
display menu on the steering wheel (Y page 220).
X Select & or * to select the service
interval display. The service due date appears in the multifunction display.
Please bear the following in mind Resetting service interval display If the qualified specialist workshop, e.g. a Mercedes-Benz Center, carried out the maintenance work, the service interval display will be reset. Further information, on maintenance for example, can be obtained at an authorized Mercedes-Benz Center or directly from Mercedes-Benz. ! If the service interval display has been
reset unintentionally, have the setting corrected at a Mercedes-Benz Center. Have service work carried out as described in the Service Booklet. This may otherwise lead to increased wear and damage to the major assemblies or the vehicle.
Driving abroad An extensive Mercedes-Benz Service network is also available in other countries. You can obtain further information from any authorized Mercedes-Benz Center.
Care Notes on care Regular care of your vehicle is a condition for retaining the quality in the long term.
306 Care
Use care products and cleaning agents recommended and approved by Mercedes- Benz. G WARNING Many cleaning products can be hazardous. Some are poisonous, others are flammable. Always follow the instructions on the particular container. Always open your vehicle's doors or windows when cleaning the inside. Never use fluids or solvents that are not designed for cleaning your vehicle. Always lock away cleaning products and keep them out of reach of children.
! For cleaning your vehicle, do not use any
of the following: Rdry, rough or hard cloths Rabrasive cleaning agents Rsolvents Rcleaning agents containing solvents Do not scrub. Do not touch the surfaces or protective films with hard objects, e.g. a ring or ice scraper. You could otherwise scratch or damage the surfaces and protective film. H Environmental note Dispose of empty packaging and cleaning cloths in an environmentally responsible manner.
! Do not park the vehicle for an extended period straight after cleaning it, particularly after having cleaned the wheels with wheel cleaner. Wheel cleaners could cause increased corrosion of the brake discs and brake pads/linings. For this reason, you should drive for a few minutes after cleaning. Braking heats the brake discs and the brake pads/linings, thus drying them. The vehicle can then be parked.
Exterior care Automatic car wash G WARNING Braking efficiency is reduced after washing the vehicle. This could cause an accident. For this reason, you must drive particularly carefully after washing the vehicle until the brakes have dried.
You can wash the vehicle in an automatic car wash from the very start. ! Never clean your vehicle in a Touchless Automatic Car Wash as these use special cleaning agents. These cleaning agents can damage the paintwork or plastic parts.
If the vehicle is very dirty, pre-wash it before cleaning it in an automatic car wash. ! In car washes with a towing mechanism, make sure that the automatic transmission is in transmission position N, otherwise the vehicle could be damaged. RVehicles with a SmartKey:
Do not remove the SmartKey from the ignition lock. Do not open the driver's door or front-passenger door when the engine is switched off. Otherwise, the automatic transmission selects park position P automatically and locks the wheels. You can prevent this by shifting the automatic transmission to N beforehand.
RVehicles with KEYLESS-GO:
Do not open the driver's door or front- passenger door when the engine is switched off. Otherwise, the automatic transmission selects park position P automatically and locks the wheels.
Observe the following to make sure that the automatic transmission stays in position N:
X Make sure the vehicle is stationary and the
ignition is switched off.
X Turn the SmartKey to position
2 (Y page 149) in the ignition lock. Use the SmartKey instead of the Start/ Stop button on vehicles with KEYLESS-GO.
X Depress and hold the brake pedal. X Shift the automatic transmission to
position N.
X Release the brake pedal. X Release the parking brake. X Switch off the ignition and leave the
SmartKey in the ignition lock.
! Make sure that:
Rthe side windows and the sliding sunroof
are fully closed.
Rthe ventilation/heating is switched off
(the OFF button has been pressed).
Rthe windshield wiper switch is in position
0.
Otherwise, the vehicle might be damaged. After using an automatic car wash, wipe off wax from the windshield and the wiper blades. This will prevent smears and reduce wiping noises caused by residue on the windshield.
Washing by hand Carefully remove all deposits of road salt as soon as possible when driving in winter. Also, clean the insides of the wheels when washing the underbody of the vehicle. X Do not use hot water and do not wash the
vehicle in direct sunlight.
X Use a soft car sponge for cleaning. X Use a gentle cleaning agent, e.g. a
Mercedes-Benz approved car shampoo.
X Wash down the vehicle with a gentle water
jet.
X Do not point the water jet directly at the air
inlets.
X Use plenty of water and rinse the sponge
frequently.
Care 307
X Rinse the vehicle with clean water and dry
it thoroughly with a chamois.
X Do not allow the cleaning agent to dry on
the paintwork.
Power washers G WARNING Do not use power washers with circular-jet nozzles (dirt grinders) to clean your vehicle, in particular the tires. You could otherwise damage the tires and cause an accident.
! Always maintain a distance of at least
11.8 in (30 cm) between the vehicle and the power washer nozzle. Information about the correct distance is available from the equipment manufacturer. Move the power washer nozzle around when cleaning your vehicle. Do not aim directly at any of the following: Rtires Rdoor gaps, roof gaps, joints etc. Relectrical components Rbattery Rconnectors Rlights