- 2008 Jeep Grand Cherokee SRT8 Owners Manuals
- Jeep Grand Cherokee SRT8 Owners Manuals
- 2012 Jeep Grand Cherokee SRT8 Owners Manuals
- Jeep Grand Cherokee SRT8 Owners Manuals
- 2010 Jeep Grand Cherokee SRT8 Owners Manuals
- Jeep Grand Cherokee SRT8 Owners Manuals
- 2013 Jeep Grand Cherokee SRT8 Owners Manuals
- Jeep Grand Cherokee SRT8 Owners Manuals
- 2009 Jeep Grand Cherokee SRT8 Owners Manuals
- Jeep Grand Cherokee SRT8 Owners Manuals
- 2006 Jeep Grand Cherokee SRT8 Owners Manuals
- Jeep Grand Cherokee SRT8 Owners Manuals
- 2007 Jeep Grand Cherokee SRT8 Owners Manuals
- Jeep Grand Cherokee SRT8 Owners Manuals
- Download PDF Manual
-
Please note that it is the owner’s responsibility to main- tain the proper level of protection against freezing ac- cording to the temperatures occurring in the area where the vehicle is operated. NOTE: Mixing coolant types will decrease the life of the engine coolant and will require more frequent coolant changes. Cooling System Pressure Cap The cap must be fully tightened to prevent loss of coolant, and to insure that coolant will return to the radiator from the coolant recovery bottle. The cap should be inspected and cleaned if there is any accumulation of foreign material on the sealing surfaces.
MAINTAINING YOUR VEHICLE 321
WARNING!
• The warning words “DO NOT OPEN HOT” on the cooling system pressure cap are a safety pre- caution. Never add coolant when the engine is overheated. Do not loosen or remove the cap to cool an overheated engine. Heat causes pressure to build up in the cooling system. To prevent scalding or injury, do not remove the pressure cap while the system is hot or under pressure. • Do not use a pressure cap other than the one specified for your vehicle. Personal injury or engine damage may result.
Disposal of Used Engine Coolant Used ethylene glycol based engine coolant is a regulated substance requiring proper disposal. Check with your local authorities to determine the disposal rules for your community. To prevent ingestion by animals or children
322 MAINTAINING YOUR VEHICLE
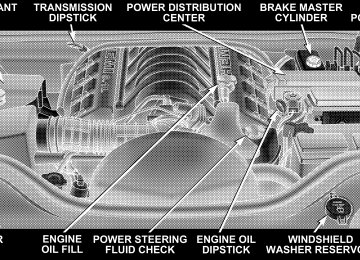
do not store ethylene glycol based engine coolant in open containers or allow it to remain in puddles on the ground. If ingested by a child, contact a physician immediately. Clean up any ground spills immediately. Coolant Level The coolant bottle provides a quick visual method for determining that the coolant level is adequate. With the engine off and cold, the level of the coolant in the bottle should be between the ranges indicated on the bottle. The radiator normally remains completely full, so there is no need to remove the radiator cap unless checking for coolant freeze point or replacing coolant. Advise your service attendant of this. As long as the engine operating temperature is satisfactory, the coolant bottle need only be checked once a month. When additional coolant is needed to maintain the proper level, it should be added to the coolant bottle. Do not overfill.
Points To Remember
NOTE: When the vehicle is stopped after a few miles (a few kilometers) of operation, you may observe vapor coming from the front of the engine compartment. This is normally a result of moisture from rain, snow, or high humidity accumulating on the radiator and being vapor- ized when the thermostat opens, allowing hot coolant to enter the radiator. If an examination of your engine compartment shows no evidence of radiator or hose leaks, the vehicle may be safely driven. The vapor will soon dissipate. • Do not overfill the coolant recovery bottle. • Check coolant freeze point in the radiator and in the coolant recovery bottle. If antifreeze needs to be added, contents of coolant recovery bottle must also be protected against freezing.
• If frequent coolant additions are required, or if the level in the coolant recovery bottle does not drop when the engine cools, the cooling system should be pres- sure tested for leaks. • Maintain coolant concentration at 50% HOAT engine coolant (minimum) and distilled water for proper corrosion protection of your engine which contains aluminum components. • Make sure that the radiator and coolant recovery bottle overflow hoses are not kinked or obstructed. • Keep the front of the radiator clean. If your vehicle is equipped with air conditioning, keep the front of the condenser clean, also. • Do not change the thermostat for summer or winter install
operation. If replacement is ever necessary,
MAINTAINING YOUR VEHICLE 323
ONLY the correct type thermostat. Other designs may result in unsatisfactory coolant performance, poor gas mileage, and increased emissions.
Hoses And Vacuum/Vapor Harnesses Inspect surfaces of hoses and nylon tubing for evidence of heat and mechanical damage. Hard or soft spots, brittle rubber, cracking, tears, cuts, abrasions, and exces- sive swelling indicate deterioration of the rubber. Pay particular attention to those hoses nearest to high heat sources such as the exhaust manifold. Inspect hose routing to be sure hoses do not come in contact with any heat source or moving component which may cause heat damage or mechanical wear. Insure nylon tubing in these areas has not melted or collapsed.
324 MAINTAINING YOUR VEHICLE
Inspect all hose connections such as clamps and cou- plings to make sure they are secure and no leaks are present. Components should be replaced immediately if there is any evidence of wear or damage that could cause failure. Brake System In order to assure brake system performance, all brake system components should be inspected periodically. Suggested service intervals can be found on the appro- priate “Maintenance Schedule.” Refer to Section 8 of this manual.
WARNING!
Riding the brakes can lead to brake failure and possibly an accident. Driving with your foot resting or riding on the brake pedal can result in abnormally high brake temperatures, excessive lining wear, and possible brake damage. You wouldn’t have your full braking capacity in an emergency.
Brake And Power Steering Hoses When the vehicle is serviced for scheduled maintenance, inspect surface of hoses and nylon tubing for evidence of heat and mechanical damage. Hard and brittle rubber, cracking, tears, cuts, abrasion, and excessive swelling indicate deterioration of the rubber. Particular attention should be made to examining those hose surfaces nearest to high heat sources, such as the exhaust manifold.
Insure nylon tubing in these areas has not melted or collapsed. Inspect all hose connections such as clamps and cou- plings to make sure they are secure and no leaks are present. NOTE: Often, fluid such as oil, power steering fluid, and brake fluid are used during assembly plant opera- tions to facilitate the assembly of hoses to couplings. Therefore, oil wetness at the hose-coupling area is not necessarily an indication of leakage. Actual dripping of hot fluid when systems are under pressure (during vehicle operation), should be noted before a hose is replaced based on leakage. Inspection of brake hoses should be performed NOTE: whenever the brake system is serviced and at every engine oil change. Inspect hydraulic brake hoses for surface cracking, scuffing, or worn spots. If there is any evidence of cracking, scuffing, or worn spots, the hose
MAINTAINING YOUR VEHICLE 325
should be replaced immediately! Eventual deterioration of the hose can take place resulting in a possibility of a burst failure.
WARNING!
Worn brake hoses can burst and cause brake failure. You could have an accident. If you see any signs of cracking, scuffing, or worn spots, have the brake hoses replaced immediately.
Brake Fluid Level Check The fluid level in the master cylinder should be checked when performing underhood services, or immediately if the brake system warning light indicates system failure. Clean the top of the master cylinder area before removing the cap. Add fluid to bring the level up to the top of the “FULL” mark on the side of the master cylinder reservoir.
326 MAINTAINING YOUR VEHICLE
Overfilling of fluid is not recommended because it may cause leaking in the system. Add enough fluid to bring the level up to the require- ments described on the brake fluid reservoir. With disc brakes, fluid level can be expected to fall as the brake pads wear. However, low fluid level may be caused by a leak and a checkup may be needed. Use only manufacturer’s recommended brake fluid, refer to Fluids, Lubricants and Genuine Parts for correct fluid type.
WARNING!
• Overfilling the brake fluid reservoir can result in spilling brake fluid on hot engine parts and the brake fluid catching fire. • Use of a brake fluid that has a lower initial boiling point than the recommended MOPAR DOT 3
product or a brake fluid that is unidentified as to FMVSS specification may result in sudden brake failure during hard prolonged braking. You could have an accident.Use only brake fluid that has been in a tightly closed container to avoid contamination from foreign matter or moisture.
CAUTION!
Do not allow petroleum base fluid to contaminate the brake fluid, all brake seal components could be damaged causing partial or complete brake failure.
Fuel System Hoses Electronic Fuel Injection high pressure fuel systems are designed with hoses and quick connect fittings which have unique material characteristics to provide adequate sealing and resist attack by deteriorated gasoline. You are urged to use only the manufacturer’s specified hoses with quick connect fittings, or their equivalent in material and specification, in any fuel system servicing. It is mandatory to replace any damaged hoses or quick connect fittings that have been removed during service.
MAINTAINING YOUR VEHICLE 327
Care should be taken in installing quick connect fittings to insure they are properly installed and fully connected. See your authorized dealer for service. Automatic Transmission
Fluid Level Check Regular automatic transmission fluid level checks are not required. For this reason the dipstick is omitted. If you notice fluid loss or gear shift malfunction, have your authorized dealer check the transmission fluid level.
328 MAINTAINING YOUR VEHICLE
CAUTION!
CAUTION!
Using a transmission fluid other than the manufac- turer’s recommended fluid may cause deterioration in transmission shift quality and/or torque converter shudder. Using a transmission fluid other than that recommended by the manufacturer will result in more frequent fluid and filter changes. Refer to the Fluids, Lubricants and Genuine Parts section for correct fluid type.
The fluid level is preset at the factory and does not require adjustment under normal operating condi- tions. If a transmission fluid leak occurs, visit your authorized dealer immediately. Severe damage to the transmission may occur. Your authorized dealer has the proper tools to accurately adjust the fluid level.
Fluid and Filter Changes Automatic transmission fluid and filter should be changed as follows: Maintenance Schedule “A” — No change necessary. Maintenance Schedule “B” – Every 60,000 miles (100 000
km) change fluid and filter under the following condi- tions:• Police, taxi, limousine, commercial type operation, or trailer towing where the vehicle is driven regularly for more than 45 minutes of continuous operation.
If the transmission is disassembled for any reason, the fluid and filter should be changed. Front And Rear Wheel Bearings Front and rear wheel bearings are permanently sealed. No regular maintenance is required for these compo- nents. Appearance Care And Protection From Corrosion
Protection of Body and Paint from Corrosion Vehicle body care requirements vary according to geo- graphic locations and usage. Chemicals that make roads passable in snow and ice, and those that are sprayed on trees and road surfaces during other seasons, are highly corrosive to the metal in your vehicle.
MAINTAINING YOUR VEHICLE 329
The following maintenance recommendations will enable you to obtain maximum benefit from the corrosion resistance built into your vehicle. What Causes Corrosion? Corrosion is the result of deterioration or removal of paint and protective coatings from your vehicle. The most common causes are: • Road salt, dirt and moisture accumulation. • Stone and gravel impact. • Insects, tree sap and tar. • Salt in the air near seacoast localities. • Atmospheric fallout/industrial pollutants.
330 MAINTAINING YOUR VEHICLE
Washing • Wash your vehicle regularly. Always wash your ve- hicle in the shade using Mopar威 Car Wash or a mild car wash soap, and rinse the panels completely with clear water. • If insects, tar, or other similar deposits have accumu- lated on your vehicle, use Mopar威 Super Kleen Bug and Tar Remover to remove. • Use Mopar威 Cleaner Wax to remove road film, stains, and to protect your paint finish. Take care never to scratch the paint. • Avoid using abrasive compounds and power buffing that may diminish the gloss or thin out the paint finish.
CAUTION!
Do not use abrasive or strong cleaning materials such as steel wool or scouring powder, which will scratch metal and painted surfaces.
Special Care • If you drive on salted or dusty roads or if you drive near the ocean, hose off the undercarriage at least once a month. • It is important that the drain holes in the lower edges of the doors, rocker panels and tailgate must be kept clear and open. • If you detect any stone chips or scratches in the paint, touch them up immediately. The cost of such repairs is considered the responsibility of the owner.
• If your vehicle is damaged due to an accident or similar cause which destroys the paint and protective coating have your vehicle repaired as soon as possible. The cost of such repairs is considered the responsibil- ity of the owner. • If you carry special cargo such as chemicals, fertilizers, de-icer salt, etc., assure that such materials are well packaged and sealed. • If a lot of driving is done on gravel roads, consider • Use Mopar威 Touch Up Paint on scratches or chips as soon as possible. Your authorized dealer has touch up paint to match the color of your vehicle.
mud or stone shields behind each wheel.
Wheel and Wheel Trim Care All wheels and wheel trim, especially aluminum and chrome plated wheels should be cleaned regularly with a mild soap and water to prevent corrosion. To remove
MAINTAINING YOUR VEHICLE 331
heavy soil, use Mopar威 Wheel Cleaner or select a non- abrasive, non-acidic cleaner. Do not use scouring pads, steel wool, a bristle brush or metal polishes. Only Mo- par威 cleaners are recommended. Do not use oven cleaner. Avoid automatic car washes that use acidic solutions or harsh brushes that may damage the wheels’ protective finish. Interior Care Use Mopar威 Total Clean to clean fabric upholstery and carpeting. Interior Trim should be cleaned starting with a damp cloth, a damp cloth with Mopar威 Total Clean, then Mopar威 Spot & Stain Remover if absolutely necessary. Do not use harsh cleaners or Armorall. Use Mopar威 Total Clean to clean vinyl upholstery. Leather Seat Care & Cleaning Mopar威 Total Clean is specifically recommended for leather upholstery.
332 MAINTAINING YOUR VEHICLE
Your leather upholstery can be best preserved by regular cleaning with a damp soft cloth. Small particles of dirt can act as an abrasive and damage the leather upholstery and should be removed promptly with a damp cloth. Stubborn soils can be removed easily with a soft cloth and Mopar威 Total Clean. Care should be taken to avoid soaking your leather upholstery with any liquid. Please do not use polishes, oils, cleaning fluids, solvents, deter- gents, or ammonia based cleaners to clean your leather upholstery. Application of a leather conditioner is not required to maintain the original condition.
WARNING!
Do not use volatile solvents for cleaning purposes. Many are potentially flammable, and if used in closed areas they may cause respiratory harm.
Glass Surfaces All glass surfaces should be cleaned on a regular basis with Mopar威 Glass Cleaner or any commercial household-type glass cleaner. Never use an abrasive type cleaner. Use caution when cleaning inside rear windows equipped with electric defrosters. Do not use scrapers or other sharp instruments which may scratch the elements. When cleaning the rear view mirror, spray cleaner on the towel or rag that you are using. Do not spray cleaner directly on the mirror. Cleaning Plastic Instrument Cluster Lenses The lenses in front of the instruments in this vehicle are molded in clear plastic. When cleaning the lenses, care must be taken to avoid scratching the plastic. 1. Clean with a wet soft rag. A mild soap solution may be used, but do not use high alcohol content or abrasive cleaners. If soap is used, wipe clean with a clean damp rag.
MAINTAINING YOUR VEHICLE 333
FUSE PANEL
Interior Fuses The fuse panel is on the lower instrument panel just to the left of the steering column.
2. Dry with a soft tissue. Seat Belt Maintenance Do not bleach, dye or clean the belts with chemical solvents or abrasive cleaners. This will weaken the fabric. Sun damage will also weaken the fabric. If the belts need cleaning, use Mopar威 Total Clean, a mild soap solution, or lukewarm water. Do not remove the belts from the vehicle to wash them. Replace the belts if they appear frayed or worn or if the buckles do not work properly.
Fuse Panel Location
334 MAINTAINING YOUR VEHICLE
Cav- ity
Cartridge
Fuse
Mini Fuse
Description
Cav- ity
Cartridge
Fuse
Mini Fuse
Description
30 Amp Green 15 Amp Blue 10 Amp Red 20 Amp Yellow Spare Spare 20 Amp Yellow 15 Amp Blue 20 Amp Yellow
Audio Amp (B+)
10
10 Amp Red
Sunroof (B+)
Htd Mirror (EBL)
Rr Pwr Out (B+)
Door Locks (B+)
Steer Col Lock (B+) (ELV) Pwr Outlet (B+)
11
1213
Spare (B+) 10 Amp Red
10 Amp Red
Final Drive Control Module (FDCM), Heater Ventilation, Air Conditioning (HVAC), Switch Bank, Transfer Case Switch, O/H, Heater Ventilation, Air Conditioning (HVAC) Relay, Rear Park As- sist
Door Mods, Mem. Sw, O/H Lamps, IP Cour- tesy Lamps, Glove Box Lamp (B+) Autowipe (R/A)
Cav- ity
Cartridge
Fuse
Mini Fuse
Description
Cav- ity
Cartridge
Fuse
Mini Fuse
Description
MAINTAINING YOUR VEHICLE 335
14
15
16
17
19
20
20 Amp Yellow 10 Amp Red 10 Amp Red
15 Amp Blue Spare (R/S) 10 Amp Red
Cigar Ltr (R/A)
Tire Pressure Trans- ducers (R/O) Steering Control Mod- ule (SCM), Diag. Con- nector, Cluster (B+) Flipper Glass (B+)
Sentry Key Remote Entry Module (SKREEM), Cluster (R/S)
21
22
24
25
Spare (Acc De- lay) 15 Amp Blue 10 Amp Red
10 Amp Red
Rear Wiper (B+)
Power Distribution Center (PDC) Relays, Final Drive Control Module (FDCM), Front Control Module (FCM) (R/S), A580
(R/S) Shifter Assy (BTSI), Trans. Case Switch, ESP/ABS, Brake Supp Rly Coil (R/S)336 MAINTAINING YOUR VEHICLE
Underhood Fuses (Power Distribution Center)
Power Distribution Center
Cav- ity
Cartridge
Fuse 40 Amp Green
Mini Fuse
Description
HVAC Blower
Cav- ity
10
Cartridge
Fuse 30 Amp Pink 30 Amp Pink 30 Amp Pink Spare 50 Amp Red Spare 40 Amp Green Spare 40 Amp Green
Mini Fuse
Description
Power Outlets
Rr Wiper/Ign R/O
ABS Pump
Auto Shut Down (ASD)
Acc Delay/Seats
Starter/Junction Block (JB) Power
Cartridge
Fuse 30 Amp Pink 40 Amp Green 40 Amp Green Spare Spare
Cav- ity
11
12
13
14
15
1617
1819
Mini Fuse
Description
Cav- ity
Cartridge
Fuse
Mini Fuse
Description
MAINTAINING YOUR VEHICLE 337
Cig Ltr/T-Tow
Rear Window Defog- ger (EBL)/Htd Mirror Junction Block (JB) Power
25 Amp Natural Spare 20 Amp Yellow 20 Amp Yellow
Integrated Power Module (IPM)/Coils
EATX/AC Clutch
Ign Sw
20
21
22
23
24
25
26
2728
PCM Batt (Gasoline Only) ABS Valves
T-Tow (BUX)
Final Drive Control Module (FDCM) Fuel Pump
Final Drive Control Module (FDCM)
Brake/Stop Lamps
20 Amp Yellow 30 Amp Green 20 Amp Yellow 20 Amp Yellow 20 Amp Yellow 20 Amp Yellow Spare 15 Amp Blue Spare
338 MAINTAINING YOUR VEHICLE
Underhood Fuses (Integrated Power Module)
Cav- ity
Cartridge
Fuse
Mini Fuse
Description
10
12
13
14
15
16
17
10 Amp Red 10 Amp Red 20 Amp Yellow 20 Amp Yellow 20 Amp Yellow 20 Amp Yellow 20 Amp Yellow 20 Amp Yellow
Trailer-Tow Park Lamps Rt Park Lamps
Front Control Module (FCM) Batt #4
Front Control Module (FCM) Batt #2
Adjustable PedalFt Fog Lamps
Horn
Rear Wiper
Integrated Power Module
Cav- ity
Cartridge
Fuse
Mini Fuse
Description
10 Amp Red
Lt Park Lamps
Cav- ity
Cartridge
Fuse
Mini Fuse
Description
Cav- ity
Cartridge
Fuse
29
30
18
19
20
21
22
23
27
28
20 Amp Yellow 20 Amp Yellow 20 Amp Yellow 20 Amp Yellow
Front Control Module (FCM) Batt #1
Lt Trailer-Tow Stop/ Turn Front Control Module (FCM) Batt #3
Rt Trailer-Tow Stop/ Turn Final Drive Control Module (FDCM) MOD Radiator Fan15 Amp Blue 20 Amp Yellow
Ignition Off Draw (IOD) #1
Ignition Off Draw (IOD) #230 Amp Pink
50 Amp Red
MAINTAINING YOUR VEHICLE 339
Mini Fuse
Description
10 Amp Red 10 Amp Red
Occupant Restraint Controller (ORC) R/S Occupant Restraint Controller (ORC) R/O
labeled Ignition-Off Draw (IOD#1).
VEHICLE STORAGE If you are leaving your vehicle dormant for more than 21
days you may want to take steps to protect your battery. You may: • Remove fuse #27 in the Intelligent Power Module • Or, disconnect the negative cable from the battery. • Anytime you store your vehicle, or keep it out of service (i.e. vacation) for two weeks or more, run the air conditioning system at idle for about five minutes in the fresh air and high blower setting. This will340 MAINTAINING YOUR VEHICLE
insure adequate system lubrication to minimize the possibility of compressor damage when the system is started again.
REPLACEMENT BULBS
Interior Lights Bulb Type Glove Box Light . . . . . . . . . . . . . . . . . . . . . . . . . 194
Grab Handle Light . . . . . . . . . . . . . . . . L002825W5W Overhead Console Reading Lights . . . . . . . . . . VT4976
Rear Cargo Light . . . . . . . . . . . . . . . . . . . . . . . 214–2
Visor Vanity Light . . . . . . . . . . . . . . . . . . . . . V26377
Underpanel Courtesy Lights. . . . . . . . . . . . . . . . . 906
Instrument Cluster (General Illumination) . . . . . . . 103
Telltale/Hazard Light . . . . . . . . . . . . . . . . . . . . . . 74
* Available only from authorized dealers.Exterior Lights Bulb Type Backup Lights . . . . . . . . . . . . . . . . . . . . . . . . . 3157K Front Fog Lights . . . . . . . . . . . . . . . . . . . . . . . . 9145
Front Park/Turn Light . . . . . . . . . . . . . . . . . . . 3157K Front Side Marker . . . . . . . . . . . . . . . . . . . . . . . 2825
Headlights (Low Beam) . . . . . . . . . . . . . . . . . . . 9006
Headlights (High Beam) . . . . . . . . . . . . . . . . . . . 9005
Rear License Plate Light. . . . . . . . . . . . . . . . . . . . 168
Rear Stop/Tail Lights . . . . . . . . . . . . . . . . . . . . 3157K Rear Turn/Tail Lights (2) . . . . . . . . . . . . . . . . . . 3157
NOTE: Numbers refer to commercial bulb types that can be purchased from your authorized dealer. If a bulb needs to be replaced, visit your authorized dealer or refer to the applicable Service Manual.BULB REPLACEMENT
Head Light
1. Open the hood. 2. Remove the headlamp cover.
MAINTAINING YOUR VEHICLE 341
3. Turn the low or high beam bulb 1/4 turn counter clockwise to remove from housing.
4. Disconnect the electrical connector and replace the bulb.
342 MAINTAINING YOUR VEHICLE
CAUTION!
Do not touch the new bulb with your fingers. Oil contamination will severely shorten bulb life. If the bulb comes in contact with any oily surface, clean the bulb with rubbing alcohol.
Front Turn Signal
1. Open the hood. 2. Remove the headlamp cover.
3. Turn the turn signal bulb 1/4 turn counter clockwise to remove from housing.
CAUTION!
MAINTAINING YOUR VEHICLE 343
Do not touch the new bulb with your fingers. Oil contamination will severely shorten bulb life. If the bulb comes in contact with any oily surface, clean the bulb with rubbing alcohol.
Front Fog Light
1. Reach behind the front fascia from under the vehicle. 2. Turn the front fog light bulb 1/4 turn counter clock- wise to remove from housing. 3. Disconnect the electrical connector and replace bulb.
4. Disconnect the electrical connector and replace the bulb.
344 MAINTAINING YOUR VEHICLE
CAUTION!
Do not touch the new bulb with your fingers. Oil contamination will severely shorten bulb life. If the bulb comes in contact with any oily surface, clean the bulb with rubbing alcohol.
Rear Tail, Stop, Turn Signal, and Back-Up Lights
1. Raise the liftgate. 2. Remove the two Torx fasteners.
3. Squeeze the socket assembly tabs to remove it from the housing.
Center High Mounted Stop Light (CHMSL) 1. Remove the two screws securing the CHMSL.
MAINTAINING YOUR VEHICLE 345
4. Pull the bulb to remove it from the socket. 5. Replace the bulb, reinstall the socket, and reattach the light assembly.
2. Twist the bulb socket to remove from the CHMSL housing. 3. Pull the bulb out of the socket. 4. Replace the bulb, reinstall the socket and reattach the CHMSL.
346 MAINTAINING YOUR VEHICLE
FLUID CAPACITIES
Fuel (Approximate) Engine Oil with Filter
6.1 Liter Engine (SAE 0W-40, API Certified)
Cooling System * 6.1 Liter Engine (Mopar威 Engine Coolant/Antifreeze 5 Year/
100,000 Mile Formula)
* Includes heater and coolant recovery bottle filled to MAX level.
U.S.
21 Gallons
7 Qts
14.8 Qts
Metric 79 Liters
6.6 Liters
14 Liters
MAINTAINING YOUR VEHICLE 347
FLUIDS, LUBRICANTS, AND GENUINE PARTS Engine Component Engine Coolant
Engine Oil (6.1L Engine)
Oil Filter (6.1L Engine) Spark Plugs
Fuel Selection (6.1L Engine)
Fluid, Lubricant, or Genuine Part Mopar威 Antifreeze/Coolant 5 Year/100,000 Mile Formula HOAT (Hybrid Or- ganic Additive Technology) Use API Certified SM/CF synthetic engine oil. SAE 0W-40 is recommended, meeting the requirements of DaimlerChrysler Material Standard MS-10725. Mopar威 Oil Filter (P/N 05281090) or equivalent. Refer to the Vehicle Emission Control Information label in the engine com- partment. Premium Unleaded 91 Octane Only or higher.
348 MAINTAINING YOUR VEHICLE
Chassis Component Automatic Transmission Transfer Case
Axle Differential (Front-Rear)
Brake Master Cylinder
Power Steering Reservoir
Fluid, Lubricant, or Genuine Part Mopar威 ATF+4 Automatic Transmission Fluid Mopar威 NV146 Transfer Case Fluid or equivalent. Usage of other fluid/ lubricants is NOT recommended. Mopar威 Synthetic Gear & Axle Lubricant SAE 75W-140 (API-GL5) or equivalent. Mopar威 DOT 3 Brake Fluid, SAE J1703 should be used. If DOT 3, SAE J1703 brake fluid is not available, then DOT 4 is acceptable. Use only rec- ommended brake fluids. This system requires the use of Mopar威 Hydraulic System Power Steering Fluid (P/N 05142893AA) or equivalent, which meets DaimlerChrysler Ma- terial Standard MS-10838.
MAINTENANCE SCHEDULES
CONTENTS
䡵 Emission Control System Maintenance . . . . . . . . 350
䡵 Maintenance Schedules . . . . . . . . . . . . . . . . . . . 350▫ Schedule “B” . . . . . . . . . . . . . . . . . . . . . . . . 353
▫ Schedule “A” . . . . . . . . . . . . . . . . . . . . . . . . 363M
350 MAINTENANCE SCHEDULES
EMISSION CONTROL SYSTEM MAINTENANCE The “Scheduled” maintenance services, listed in bold type must be done at the times or mileages specified to assure the continued proper functioning of the emission control system. These, and all other maintenance services included in this manual, should be done to provide best vehicle performance and reliability. More frequent main- tenance may be needed for vehicles in severe operating conditions such as dusty areas and very short trip driving. Inspection and service also should be done any time a malfunction is suspected. NOTE: Maintenance, replacement, or repair of the emis- sion control devices and systems on your vehicle may be performed by any automotive repair establishment or individual using any automotive part which has been certified pursuant to U.S. EPA or, in the State of Califor- nia, California Air Resources Board regulations.
MAINTENANCE SCHEDULES There are two maintenance schedules that show the required service for your vehicle. First is Schedule ⴖBⴖ. It is for vehicles that are operated under the conditions that are listed below and at the beginning of the schedule. • Day or night temperatures are below 32°F (0°C) • Stop and go driving • Excessive engine idling • Driving in dusty conditions • Short trips of less than 10 miles (16.2 km) • More than 50% of your driving is at sustained high • Trailer towing
speeds during hot weather, above 90°F (32°C)
NOTE: Most vehicles are operated under the conditions listed for Schedule “B.” If ANY of these apply to you, change your NOTE: engine oil every 3,000 miles (5 000 km) or 3 months, whichever comes first, and follow the maintenance rec- ommendations in “Maintenance Schedule B.” If ANY of these apply to you then flush and NOTE: replace your engine coolant every 102,000 miles (170 000
km) or 60 months, whichever comes first, and follow “Schedule B” of the “Maintenance Schedules” section of this manual. Second is Schedule “A”. It is for vehicles that are not operated under any of the conditions listed under Sched- ule “B.” Use the schedule that best describes your driving condi- tions. Where time and mileage are listed, follow the interval that occurs first.MAINTENANCE SCHEDULES 351
CAUTION!
Failure to perform the required maintenance items may result in damage to the vehicle.
At Each Stop for Fuel • Check the engine oil level about 5 minutes after a fully warmed engine is shut off. Checking the oil level while the vehicle is on level ground will improve the accu- racy of the oil level reading. Add oil only when the level is at or below the ADD or MIN mark. • Check the windshield washer solvent, add as required.
352 MAINTENANCE SCHEDULES
damage.
Once a Month • Check the tire pressure and look for unusual wear or • Inspect the battery and clean and tighten the terminals • Check the fluid levels of the coolant reservoir, brake • Check all lights and all other electrical items for correct
master cylinder, and add as needed.
as required.
operation.
At Each Oil Change • Change the engine oil filter. • Inspect the exhaust system. • Inspect brake hoses. • Check the engine coolant/anti-freeze level, hoses, and
clamps.
Schedule “B” Follow this schedule if you usually operate your vehicle under one or more of the following conditions. • Day or night temperatures are below 32°F (0°C) • Stop and go driving • Excessive engine idling • Driving in dusty conditions • Short trips of less than 10 miles (16.2 km) • More than 50% of your driving is at sustained high • Trailer towing
speeds during hot weather, above 90°F (32°C)
SCHEDULE “B” 353
If ANY of these apply to you, change your NOTE: engine oil every 3,000 miles (5 000 km) or 3 months, whichever comes first, and follow the maintenance rec- ommendations in “Maintenance Schedule B.” If ANY of these apply to you then flush and NOTE: replace your engine coolant every 102,000 miles (170 000
km) or 60 months, whichever comes first, and follow “Schedule B” of the “Maintenance Schedules” section of this manual.354 SCHEDULE “B”
Miles (Kilometers) Change the engine oil and engine oil filter, if not replaced at 3 months. Inspect the engine air cleaner filter, replace if nec- essary. Drain and refill the front and rear axles. Inspect the brake linings.
3,000
(5 000)6,000
(10 000)9,000
(15 000)12,000
(20 000)15,000
(25 000)SCHEDULE “B” 355
Miles (Kilometers) Change the engine oil and engine oil filter, if not replaced at 3 months. Inspect the engine air cleaner filter, replace if nec- essary. Inspect the PCV Valve, replace if necessary.〫 Drain and refill the front and rear axles. Inspect the brake linings. Drain the transfer case and refill.
18,000
(30 000)21,000
(35 000)24,000
(40 000)27,000
(45 000)30,000
(50 000)356 SCHEDULE “B”
Miles (Kilometers) Change the engine oil and engine oil filter, if not replaced at 3 months. Inspect the engine air cleaner filter, replace if nec- essary. Drain and refill the front and rear axles. Inspect the brake linings.
33,000
(55 000)36,000
(60 000)39,000
(65 000)42,000
(70 000)45,000
(75 000)SCHEDULE “B” 357
Miles (Kilometers) Change the engine oil and engine oil filter, if not replaced at 3 months. Inspect the engine air cleaner filter, replace if nec- essary. Inspect the PCV Valve, replace if necessary.〫 Inspect drive belt, replace if necessary. Inspect the brake linings. Drain and refill the front and rear axles. Drain and refill the transfer case fluid. Drain and refill the automatic transmission fluid, and replace filter. Flush and replace engine coolant/anti-freeze.
48,000
(80 000)51,000
(85 000)54,000
(90 000)57,000
(95 000)60,000
(100 000)358 SCHEDULE “B”
Miles (Kilometers) Change the engine oil and engine oil filter, if not replaced at 3 months. Inspect the engine air cleaner filter, replace if nec- essary. Inspect the drive belt, replace if necessary. Inspect the brake linings. Drain and refill the front and rear axle fluid.
63,000
(105 000)66,000
(110 000)69,000
(115 000)72,000
(120 000)75,000
(125 000)Miles (Kilometers) Change the engine oil and engine oil filter, if not replaced at 3 months. Inspect the engine air cleaner filter, replace if nec- essary. Inspect the PCV Valve, replace if necessary.〫 Inspect the drive belt, replace if necessary.* Drain and refill the transfer case fluid. Inspect the brake linings. Drain and refill the front and rear axle fluid.
78,000
(130 000)81,000
(135 000)84,000
(140 000)87,000
(145 000)90,000
(150 000)SCHEDULE “B” 359
360 SCHEDULE “B”
Miles (Kilometers) Change the engine oil and engine oil filter, if not replaced at 3 months. Inspect the engine air cleaner filter, replace if nec- essary. Replace the spark plugs. Inspect the drive belt, replace if necessary.* Inspect the brake linings. Drain and refill the front and rear axle fluid. Flush and replace the engine coolant/anti-freeze, if not done at 60 months.
93,000
(155 000)96,000
(160 000)99,000
(165 000)102,000
(170 000)105,000
(175 000)Miles (Kilometers) Change the engine oil and engine oil filter, if not replaced at 3 months. Inspect the engine air cleaner filter, replace if nec- essary. Inspect the PCV Valve, replace if necessary.〫 Inspect the drive belt, replace if necessary.* Inspect the brake linings. Drain and refill the front and rear axle fluid. Drain and refill the automatic transmission fluid, and replace filter. Drain and refill the transfer case fluid. Flush and replace the engine coolant/anti-freeze at 120 months, if not replaced at 102,000 miles (170
000 km).108,000
(180 000)111,000
(185 000)114,000
(190 000)117,000
(195 000)120,000
(200 000)SCHEDULE “B” 361
362 SCHEDULE “B”
Inspection and service should also be performed anytime a malfunction is observed or suspected. Retain all re- ceipts. 〫 This maintenance is recommended by the manufac- turer to the owner, but is not required to maintain emissions warranty.
* This maintenance is not required if the belt was previously replaced.
Schedule “A” Miles (Kilometers) [Months] Change the engine oil and engine oil filter. Inspect the engine air cleaner filter, and replace if necessary. Inspect the brake linings. Drain the transfer case and refill.
6,000
(10 000)[6]
12,000
(20 000)[12]
SCHEDULE “A” 363
18,000
(30 000)24,000
(40 000)30,000
(50 000)[24]
[18]
[30]
364 SCHEDULE “A”
Miles (Kilometers) [Months] Change the engine oil and engine oil filter. Inspect the brake linings.
36,000
(60 000)[36]
42,000
(70 000)[42]
48,000
(80 000)[48]
54, 000
(90 000)[54]
Miles (Kilometers) [Months] Change the engine oil and engine oil filter. Inspect the engine air cleaner filter, and replace if nec- essary. Inspect the PCV Valve, replace if necessary.〫 Inspect the drive belt, replace if necessary. Flush and replace the engine coolant/anti-freeze at 60
months. Inspect the brake linings. Drain the transfer case and refill.SCHEDULE “A” 365
60,000
(100 000)66,000
(110 000)72,000
(120 000)78,000
(130 000)[60]
[66]
[72]
[78]
366 SCHEDULE “A”
Miles (Kilometers) [Months] Change the engine oil and engine oil filter. Inspect the engine air cleaner filter, and replace if nec- essary. Inspect the PCV Valve, replace if necessary.〫 Replace the spark plugs. Inspect the drive belt, replace if necessary.* Inspect the brake linings. Flush and replace the engine coolant/anti-freeze if not replaced at 60 months. Drain the transfer case and refill.
84,000
(140 000)90,000
(150 000)96,000
(160 000)[84]
[96]
[90]
102, 000
(170 000)[102]
Miles (Kilometers) [Months] Change the engine oil and engine oil filter. Inspect the engine air cleaner filter, and replace if necessary. Inspect the PCV Valve, replace if necessary.〫 Inspect the drive belt, replace if necessary.* Inspect the brake linings. Flush and replace the engine coolant/anti-freeze if not done at 102,000 miles (170 000 km). Drain the transfer case and refill. Inspection and service should also be performed anytime a malfunction is observed or suspected. Retain all re- ceipts. 〫 This maintenance is recommended by the manufac- turer to the owner, but is not required to maintain emissions warranty.
108,000
(180 000)[108]
114,000
(190 000)[114]
SCHEDULE “A” 367
120,000
(200 000)[120]
* This maintenance is not required if the belt was previously replaced.
368 SCHEDULE “A”
WARNING!
You can be badly injured working on or around a motor vehicle. Do only that service work for which you have the proper equipment. If you have any doubt about your ability to perform a service job, take your vehicle to a competent mechanic.