- Download PDF Manual
-
button for more than 6 seconds. When the compass memory is cleared a "C" will appear in the display.
2. To calibrate the compass, drive the vehicle in 2 complete circles at less than 5 mph (8 km/h).
Integrated HomeLink® Wireless Control System The HomeLink® Wireless Control System provides a convenient way to replace up to three hand-held radio-fre- quency (RF) transmitters with a single built-in device. This innovative feature will learn the radio frequency codes of most current transmitters to operate devices such as gate operators, garage door openers, entry door locks, security sys- tems, even home lighting. Both standard and rolling code-equipped transmitters can be programmed by following the out- lined procedures. Additional HomeLink® information can be found at: www.home- link.com or by calling 1-800-355-3515.
42
Programming HomeLink® ✽✽ NOTICE • When programming a garage door opener, it is advised to park the vehi- cle outside of the garage.
• It is recommended that a new battery be placed in the hand-held transmit- ter of the device being programmed to HomeLink® for quicker training and accurate transmission of the radio- frequency signal.
• Some vehicles may require the igni- tion switch to be turned to the second (or "accessories") position for pro- gramming and/or operation of HomeLink®.
• In the event that there are still pro- gramming difficulties or questions after following the programming steps listed below, contact HomeLink® at: www.homelink.com or 1-800-355- 3515.
CAUTION
Before programming HomeLink® to a garage door opener or gate oper- ator, make sure that people and objects are out of the way of the device to prevent potential harm or damage. Do not use HomeLink® with any garage door opener that lacks the safety stop and reverse features required by U.S. federal safety standards (this includes any garage door opener model manu- factured before April 1, 1982). A garage door that cannot detect an object - signaling the door to stop and reverse - does not meet current U.S.federal safety standards.Using a garage door opener without these features increases the risk of seri- ous injury or death.
Retain the original transmitter of the RF device you are programming for use in other vehicles as well as for future HomeLink® programming. It is also sug- gested that upon the sale of the vehicle, the programmed HomeLink® buttons be erased for security purposes.
Standard programming To train most devices, follow these instructions: 1. For first-time programming, press and hold two outside buttons, HomeLink® Channel 1 and Channel 3
Buttons, until the indicator light begins to flash (after 20 seconds). Release both buttons. Do not hold the buttons for longer than 30 seconds.the
2. Position the end of your hand-held transmitter 1-3 inches (2-8 cm) away from the HomeLink® buttons while keeping the indicator light in view.
3. Simultaneously press and hold both the HomeLink® and hand-held trans- mitter button. DO NOT release the but- tons until step 4 has been completed. 4. While continuing to hold the buttons the red Indicator Status LED will flash slowly and rapidly after HomeLink® successfully trains to the frequency signal from the hand-held transmitter. Release both buttons.
then
the
5. Press and hold
just-trained HomeLink® button and observe the red Status Indicator LED. If the indicator light stays on constantly, programming is complete and your device should activate when the HomeLink® button is pressed and released.
6. To program
two HomeLink® buttons, follow steps 2
through 5.remaining
the
Rolling code programming Rolling code devices which are "code- protected" and manufactured after 1996
may be determined by the following: (cid:129) Reference the device owner's manualfor verification.
(cid:129) The handheld transmitter appears to program the HomeLink® Universal Transceiver but does not activate the device.
(cid:129) Press and hold the trained HomeLink® button. The device has the rolling code feature if the indicator light flashes rapid- ly and then turns solid after 2 seconds.
To train rolling code devices, follow these instructions: 1. At the garage door opener receiver (motor-head unit) in the garage, locate the "learn" or "smart" button. This can usually be found where the hanging antenna wire is attached to the motor- head unit. Exact location and color of the button may vary by garage door opener brand.
Features of your vehicle
If there is difficulty locating the training button, reference the device owner's manual or please visit our Web site at www.homelink.com.
2. Firmly press and release the "learn" or "smart" button (which activates the "training light").
✽✽ NOTICE There are 30 seconds in which to initiate step3.
3. Return to the vehicle and firmly press, hold for two seconds and then release the desired HomeLink® button. Repeat the "press/hold/release" sequence a second time to complete the program- ming. (Some devices may require you to repeat this sequence a third time to complete the programming.)
the
4. Press and hold
just-trained HomeLink® button and observe the red Status Indicator LED. If the indicator light stays on constantly, programming is complete and your device should activate.
the
5. To program
remaining
two HomeLink® buttons, follow either steps 1
through 4 above for other Rolling Code devices or steps 2 through 5 in Standard Programming for standard devices.4 43
Erasing HomeLink® buttons Individual buttons cannot be erased. However, to erase all three programmed buttons: 1. Press and hold
two outer HomeLink® buttons until the indicator light begins to flash-after 20 seconds. 2. Release both buttons. Do not hold for
the
longer than 30 seconds.
The Integrated HomeLink® Wireless Control System is now in the training (learn) mode and can be programmed at any time following the appropriate steps in the Programming sections above.
Reprogramming a single HomeLink® button To program a new device to a previously trained HomeLink® button, follow these steps: 1. Press and hold the desired HomeLink® button. Do NOT release until step 4
has been completed.2. When the indicator light begins to flash slowly (after 20 seconds), position the handheld transmitter 1 to 3 inches away from the HomeLink® surface.
3. Press and hold the handheld transmit- ter button. The HomeLink® indicator light will flash, first slowly and then rap- idly.
4. When the indicator light begins to flash
rapidly, release both buttons.
the
5. Press and hold
just-trained HomeLink® button and observe the red Status Indicator LED. If the indicator light stays on constantly, programming is complete and your new device should activate.
Features of your vehicle
Gate operator & Canadian program- ming During programming, your handheld transmitter may automatically stop trans- mitting. Continue to press the Integrated HomeLink® Wireless Control System but- ton (note steps 2 through 4 in the Standard Programming portion of this document) while you press and re-press ("cycle") your handheld transmitter every two seconds until the frequency signal has been learned. The indicator light will flash slowly and then rapidly after sever- al seconds upon successful training.
HomeLink®
Operating HomeLink® To operate, simply press and release the button. programmed Activation will now occur for the trained device (i.e. garage door opener, gate operator, security system, entry door lock, home/office lighting, etc.). For con- venience, the hand-held transmitter of the device may also be used at any time.
44
FCC ID: NZLZTVHL3
IC: 4112A-ZTVHL3This device complies with Part 15 of the FCC Rules. Operation is subject to the following two conditions: 1. this device may not cause harmful
interference, and
2. This device must accept any interfer- ence received, including interference that may cause undesired operation.
WARNING
The transceiver has been tested and complies with FCC and Industry Canada rules. Changes or modifications expressly approved by the party responsible for compliance could void the user's authority to operate the device.
not
D140200AUN-EU Outside rearview mirror Be sure to adjust mirror angles before driving. Your vehicle is equipped with both left- hand and right-hand outside rearview mirrors. The mirrors can be adjusted remotely with the remote switch. The mir- ror heads can be folded back to prevent damage during an automatic car wash or when passing in a narrow street.
WARNING - Rearview mir-
rors
(cid:129) The right outside rearview mirror is convex. Objects seen in the mirror are closer they appear.
than
(cid:129) Use your interior rearview mirror or direct observation to deter- mine the actual distance of fol- lowing vehicles when changing lanes.
NVS® is a registered trademark and Z- Nav™ is a trademark of the Gentex Corporation, Zeeland, Michigan. HomeLink® is a registered trademark owned Controls, Incorporated, Milwaukee, Wisconsin.
Johnson
by
Features of your vehicle
CAUTION
Do not scrape ice off the mirror face;this may damage the surface of the glass. If ice should restrict movement of the mirror, do not force the mirror for adjustment.To remove ice,use a deicer spray,or a sponge or soft cloth with warm water.
CAUTION
If the mirror is jammed with ice,do not adjust the mirror by force.Use an approved spray de-icer (not radi- ator antifreeze) to release the frozen mechanism or move the vehicle to a warm place and allow the ice to melt.
WARNING
Do not adjust or fold the outside rearview mirrors while the vehicle is moving. This could result in loss of control, and an accident which could cause death, serious injury or property damage.
4 45
Features of your vehicle
OBH048042
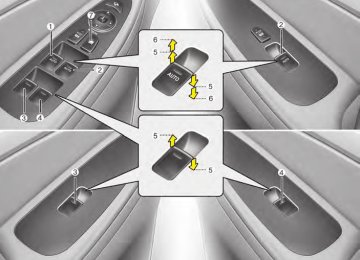
D140201ABH Remote control The electric remote control mirror switch allows you to adjust the position of the left and right outside rearview mirrors. To adjust the position of either mirror, move the lever (1) to right or left to select the right side mirror or the left side mirror, then press a corresponding point ( ) on the mirror adjustment control to position the selected mirror up, down, left or right. After adjustment, put the lever into neu- tral position to prevent the inadvertent adjustment.
46
CAUTION
(cid:129) The mirrors stop moving when they reach the maximum adjust- ing angles,but the motor contin- ues to operate while the switch is depressed. Do not depress the switch longer than necessary,the motor may be damaged.
(cid:129) Do not attempt to adjust the out- side rearview mirror by hand. Doing so may damage the parts.
Electric chromic mirror (ECM) (if equipped) The electric chromic mirror automatically controls the glare from the headlights of the car behind you in nighttime or low light driving conditions. The sensor mounted in the mirror senses the light level around the vehicle, and automati- cally controls the headlight glare from vehicles behind you. When the engine is running, the glare is automatically controlled by the sensor mounted in the rearview mirror. Whenever the shift lever is shifted into R (Reverse), the mirror will automatically go to the brightest setting in order to improve the drivers view behind the vehi- cle. If the ECM of inside rear view mirror operates, it will be working.
CAUTION
When cleaning the mirror, use a paper towel or similar material dampened with glass cleaner. Do not spray glass cleaner directly on the mirror as that may cause the liq- uid cleaner to enter the mirror hous- ing.
Features of your vehicle
The ignition switch must be in the ON position for the electric outside rearview mirrors to fold. The electric folding outside rearview mir- ror can be operated for approximately 30
seconds after the ignition key is removed or turned to the LOCK position.OBH048204N
D140202AEN Manual Type (if equipped) To fold the outside rearview mirror, grasp the housing of the mirror and then fold it toward the rear of the vehicle.
OBH048043
D140202ABH Folding the outside rearview mirror Electric Type (if equipped) To fold the outside rearview mirror, depress the button. To unfold it, depress the button again.
CAUTION
In case of the electric type of out- side rearview mirror,don’t fold it by hand. It could cause the failure of the motor.
4 47
Features of your vehicle
INSTRUMENT CLUSTER ■■ Type I
1. Tachometer 2. Turn signal indicators 3. Speedometer 4. Engine temperature gauge 5. Warning and indicator lights 6. Fuel gauge
7. LCD screen 8.
Low washer fluid level warning light* SCC sensor malfunction indicator* AUTO HOLD malfunction indicator*
AUTO HOLD
9. 10.
Shift pattern indicator
SCC malfunction indicator* Charging system warning light
OBH042045N
* : if equipped * The actual cluster in the vehicle may differ from the illustration.
For more details refer to the "Gauges" in the next pages.
48
■■ Type II
Features of your vehicle
1. Tachometer 2. Turn signal indicators 3. Speedometer 4. Engine temperature gauge 5. Warning and indicator lights 6. Fuel gauge 7. LCD screen
8.
9.
LDWS FAIL
LDWS malfunction indicator* SCC malfunction indicator* SCC sensor malfunction indicator* Charging system warning light Low washer fluid level warning light* Trunk ajar warning light
10.
AUTO HOLD indicator/
AUTO HOLD AUTO HOLD malfunction indicator*
11. Shift pattern indicator
* : if equipped * The actual cluster in the vehicle may differ from the illustration.
For more details refer to the "Gauges" in the next pages.
OBH042300N
4 49
Features of your vehicle
OBH048046L
OBH048233
OBH041050
D150100AUN Instrument panel illumination When the vehicle’s parking lights or headlights are on, rotate the illumination control knob to adjust the brightness of the instrument panel illumination.
Gauges D150201AUN Speedometer The speedometer indicates the forward speed of the vehicle. The speedometer is calibrated in miles per hour and/or kilometers per hour.
D150202AUN Tachometer The tachometer indicates the approxi- mate number of engine revolutions per minute (rpm). Use the tachometer to select the correct shift points and to prevent lugging and/or over-revving the engine. When the door is open, or if the engine is not started within 1 minute, the tachome- ter pointer may move slightly in ON posi- tion with the engine OFF. This movement is normal and will not affect the accuracy of the tachometer once the engine is run- ning.
50
CAUTION
Do not operate the engine within the tachometer's RED ZONE. This may cause severe engine dam- age.
Features of your vehicle
WARNING
Never remove the radiator cap when the engine is hot. The engine coolant is under pressure and could cause severe burns. Wait until the engine is cool before adding coolant to the reservoir.
OBH041051
D150203AUN Engine temperature gauge This gauge shows the temperature of the engine coolant when the ignition switch is ON. Do not continue driving with an overheat- ed engine. If your vehicle overheats, refer to “If the engine overheats” in section 6.
CAUTION
If the gauge pointer moves beyond the normal range area toward the “H”position, it indicates overheat- ing that may damage the engine.
4 51
WARNING - Fuel gauge
Running out of fuel can expose vehicle occupants to danger. You must stop and obtain addition- al fuel as soon as possible after the warning light comes on or when the gauge indicator comes close to the E level.
CAUTION
Avoid driving with a very low fuel level.If you run out of fuel,it could cause the engine to misfire and result in excessive loading of the catalytic converter.
D150206ABH-EU Trip computer The trip computer is a microcomputer- controlled driver information system that displays information related to driving, including odometer, tripmeter, elapsed time, average speed, average fuel con- sumption (if equipped), instant fuel con- sumption and distance to empty on the display when the ignition switch is in the ON position. All stored driving informa- tion (except odometer) is reset if the bat- tery is disconnected.
Features of your vehicle
OBH041052
D150204BBH Fuel gauge The fuel gauge indicates the approxi- mate amount of fuel remaining in the fuel tank. The fuel tank capacity is given in sec- tion 8. The fuel gauge is supplemented by a low fuel warning light, which will illumi- nate when the fuel tank is near empty. On inclines or curves, the fuel gauge pointer may fluctuate or the low fuel warning light may come on earlier than usual due to the movement of fuel in the tank.
52
Features of your vehicle
Type I
Type II
Type I
Type II
OBH048053N
OBH042055N
OBH042054N
TRIP Button Push the TRIP button for less than 1 sec- ond to select tripmeter function as fol- lows:
TRIP A
TRIP B
Odometer
Odometer (mi. or km) The odometer indicates the total dis- tance the vehicle has been driven. You will also find the odometer useful to determine when periodic maintenance should be performed.
Tripmeter (mi. or km) TRIP A : Tripmeter A TRIP B : Tripmeter B This mode indicates the distance of indi- vidual trips selected since the last trip- meter reset. The meter's working range is from 0.0 to 999.9 miles (0.0 to 999.9 km). Pressing the TRIP button for more than 1
second, when the tripmeter (TRIP A or TRIP B) is being displayed, clears the tripmeter to zero (0.0).4 53
Features of your vehicle
Distance to empty
Type I
Type II
Average speed
Elapsed time
Average fuel consumption
Instant fuel consumption
ECO Driving ON/OFF
(if equipped)
AV information (if equipped)
Turn by turn navigation
(if equipped)
OBH042057N
Distance to empty (mi. or km) This mode indicates the estimated dis- tance to empty based on the current fuel in the fuel tank and the amount of fuel delivered to the engine. When the remaining distance is below 30 miles (50
km), “---” will be displayed and the dis- tance to empty indicator will blink. The meter’s working range is from 30 to 990 miles (50 to 990 km).DISP Button Press between modes.
the DISP button
OBH048056N
to change
54
Type I
Type II
Type I
Type II
Type I
Type II
Features of your vehicle
OBH042059N
OBH042060L
OBH042333N
Average speed (MPH or km/h) This mode calculates the average speed of the vehicle since the last average speed reset. Even if the vehicle is not in motion, the average speed is calculated while the engine is running. Pressing the RESET button for more than 1 second, when the average speed is being displayed, clears the average speed to zero (---). If the ignition switch is turned to OFF for more than 2 hours, it will be reset automatically.
Elapsed time This mode indicates the total time trav- eled since the last driving time reset. Even if the vehicle is not in motion, the driving time is calculated while the engine is running. The meter’s working range is from 0:00~99:59. Pressing the RESET button for more than 1 second, when the driving time is being displayed, clears the driving time to zero (0:00). If the ignition switch is turned to OFF for more than 2 hours, it will be reset automatically.
Average fuel consumption (if equipped) (MPG or l/100 km) This mode calculates the average fuel consumption from the total fuel used and the distance since the last average con- sumption reset. The total fuel used is cal- culated from the fuel consumption input. For an accurate calculation, begin driving the vehicle for several miles. Pressing the RESET button for more than 1 second, when the average fuel con- sumption is being displayed, clears the average fuel consumption to zero (----). If the vehicle speed exceeds 1.6 MPH (1
km/h) after refueled more than 1.6 gal- lons (6 l), the average fuel consumption will be cleared to zero (---).4 55
Features of your vehicle
Type I
Type II
OBH042334N Instant fuel consumption (MPG or l/100km) This mode calculates the instant fuel consumption every 0.2 second from the driving distance and quantity of fuel con- sumed.
✽✽ NOTICE • If the vehicle is not on level ground or the battery power has been interrupt- ed, the “Distance to empty” function may not operate correctly. The trip computer may not register additional fuel if less than 1.6 gallons (6
liters) of fuel are added to the vehicle. • The fuel consumption and distance to empty values may vary significantly based on driving conditions, driving habits, and condition of the vehicle.• The distance to empty value is an esti- mate of the available driving distance. This value may differ from the actual driving distance available.
Type I
Type II
OBH042403L
ECO Driving ON/OFF mode (if equipped) You can turn the ECO indicator on/off on the instrument cluster in this mode. If you push the DISP button (or the RESET button) more than 1 second in the ECO Driving ON mode, ECO Driving OFF is displayed in the screen and the ECO indicator turns off while driving. If you want to display the ECO indicator again, press the DISP button (or the RESET button) more than 1 second in the ECO Driving OFF mode and then ECO Driving ON mode is displayed in the screen.
56
OBH042353L
OBH042350L
AV information (if equipped) This mode displays the state of the AV (RADIO, CD, USB, AUX etc.).
Turn by turn navigation (if equipped) This mode displays the information of the navigation.
Features of your vehicle
D150300AEN Warnings and indicators All warning lights are checked by turning the ignition switch ON (do not start the engine). Any light that does not illuminate should be checked by an authorized HYUNDAI dealer. After starting the engine, check to make sure that all warning lights are off. If any are still on, this indicates a situation that needs attention. When releasing the parking brake, the brake system warning light should go off. The fuel warning light will stay on if the fuel level is low.
4 57
Features of your vehicle
ECO indicator (if equipped)
ECO
The ECO indicator light helps that you to drive economically. It is displayed if you drive fuel efficiently to help you improve fuel efficiency. (cid:129) The ECO indicator (green) will turn on when you are driving fuel efficiently in the ECO Driving ON mode. If you don't want the indicator dis- played, you can turn the ECO Driving ON mode to OFF mode by pressing the DISP button (or the RESET button). As per ECO Driving ON/OFF mode operation, refer to the previous page.
(cid:129) The fuel-efficiency can be changed by the driver's driving habits and road conditions.
(cid:129) The ECO indicator will not display if the condition doesn't meet economical driving such as P (Park), N (Neutral), R (Reverse) or sports mode.
(cid:129) While the instant fuel consumption mode is displayed on the LCD screen, the ECO indicator turns off (if equipped).
58
D150303AEN Anti-lock brake system (ABS) warning light
This light illuminates if the ignition switch is turned ON and goes off in approxi- mately 3 seconds if the system is operat- ing normally. If the ABS warning light remains on, comes on while driving, or does not come on when the ignition switch is turned to the ON position, this indicates that there may be a malfunction with the ABS. If this occurs, have your vehicle checked by an authorized HYUNDAI dealer as soon as possible. The normal braking system will still be operational, but with- out the assistance of the anti-lock brake system.
WARNING
Do not watch the indicator while driving. This will distract you and may cause an accident that results in severe personal injury.
D150302ABH Air bag warning light
This warning light will illuminate for approximately 6 seconds each time you turn the ignition switch to the ON posi- tion. This light also comes on when the Supplemental Restraint System (SRS) is not working properly. If the SRS air bag warning light does not come on, or continuously remains on after operating for about 6 seconds when you turned the ignition switch to the ON position or start- ed the engine, or if it comes on while driving, have the SRS inspected by an authorized HYUNDAI dealer.
Features of your vehicle
Electronic brake force distri- bution (EBD) system warning light If these two warning lights illuminate at the same time while driving, your vehicle may have a malfunction with the ABS and EBD system. In this case, your ABS and regular brake system may not work normally. Have the vehicle checked by an authorized HYUNDAI dealer as soon as possible.
WARNING
If the both ABS and brake warning lights are on and stay on, your vehi- cle’s brake system will not work nor- mally during sudden braking. In this case, avoid high speed driving and abrupt braking. Have your vehicle checked by an authorized HYUNDAI dealer as soon as possible.
✽✽ NOTICE If the ABS warning light or EBD warn- ing light is on and stays on, the speedometer or odometer/tripmeter may not work. In this case, have your vehicle checked by an authorized HYUNDAI dealer as soon as possible.
D150304CBH-EU Seat belt warning
D150305AUN Turn signal indicator
As a reminder to the driver, the seat belt warning light will blink for approximately 6 seconds each time you turn the ignition switch ON, regardless of belt fastening. The warning light will blink again for approximately 6 seconds when starting the engine. If the driver's seat belt is not fastened when the ignition switch is turned on, the seat belt warning light and chime will oper- ate for approximately 6 seconds. But if it is fastened within the 6 seconds, the warning light will blink for the 6 seconds and the warning chime will turn off immediately. If the driver's seat belt is disconnected after the ignition switch is turned to the ON position, the seat belt warning light will turn on for approximately 6 seconds. But if it is fastened within the 6 seconds, the warning light will turn off immediately. If the driver's seat belt is not fastened when the vehicle speed exceeds 6 mph (10 km/h), the seat belt warning light and chime will operate for approximately 11
times with a pattern of 6 seconds on and 24 seconds off until the belt is fastened or the vehicle speed decreases below 3
mph (5 km/h).The blinking green arrows on the instru- ment panel show the direction indicated by the turn signals. If the arrow comes on but does not blink, blinks more rapidly than normal, or does not illuminate at all, a malfunction in the turn signal system is indicated. Your dealer should be consult- ed for repairs.
D150306AUN High beam indicator
This indicator illuminates when the head- lights are on and in the high beam posi- tion or when the turn signal lever is pulled into the Flash-to-Pass position.
D150331ABH Tail light indicator
This indicator illuminates when the tail lights are on.
4 59
Features of your vehicle
D150307AEN Engine oil pressure warning light
This warning light indicates the engine oil pressure is low. If the warning light illuminates while driv- ing: 1. Drive safely to the side of the road and
stop.
2. With the engine off, check the engine oil level. If the level is low, add oil as required.
If the warning light remains on after adding oil or if oil is not available, call an authorized HYUNDAI dealer.
CAUTION
If the engine is not stopped imme- diately after the engine oil pressure warning light is illuminated,severe damage could result.
60
CAUTION
If the oil pressure warning light stays on while the engine is run- ning, serious engine damage may result. The oil pressure warning light comes on whenever there is insufficient oil pressure. In normal operation,it should come on when the ignition switch is turned on, then go out when the engine is started.If the oil pressure warning light stays on while the engine is running,there is a serious malfunc- tion. If this happens, stop the car as soon as it is safe to do so,turn off the engine and check the oil level.If the oil level is low,fill the engine oil to the proper level and start the engine again. If the light stays on with the engine running, turn the engine off immediately. In any instance where the oil light stays on when the engine is running, the engine should be checked by an authorized HYUNDAI dealer before the car is driven again.
D150308ABH-EU Parking brake & brake fluid warning light
Parking brake warning This light is illuminated when the parking brake is applied with the ignition switch in the START or ON position. The warning light should go off when the parking brake is released while an engine is run- ning. The parking brake warning chime will sound to remind you that the parking brake is applied when you are driving above 6 mph (10 km/h). Always release the parking brake before you drive.
Low brake fluid level warning If the warning light remains on, it may indicate that the brake fluid level in the reservoir is low. If the warning light remains on: 1.Drive carefully to the nearest safe loca-
tion and stop your vehicle.
2.With the engine stopped, check the brake fluid level immediately and add fluid as required. Then check all brake components for fluid leaks.
3.Do not drive the vehicle if leaks are found, the warning light remains on or the brakes do not operate properly.
Have the vehicle towed to any author- ized HYUNDAI dealer for a brake sys- tem inspection and necessary repairs. Your vehicle is equipped with a dual- diagonal braking system. This means you still have braking on two wheels even if one of the brake circuits is damaged or malfunctions. With only one of the circuits working, more than normal pedal travel and greater pedal pressure are required to stop the car. Also, the car will not stop in as short a distance with only a portion of the brake system working. If the brakes fail while you are driving, shift to a lower gear for additional engine braking and stop the car as soon as it is safe to do so. To check bulb operation, check whether the parking brake and brake fluid warning light illuminates when the ignition switch is in the ON position.
WARNING
Driving the vehicle with a warning light on is dangerous. If the brake warning light remains on, have the brakes checked and repaired imme- diately by an authorized HYUNDAI dealer.
D150331ABH Low tire pressure telltale (if equipped)
Low tire pressure position telltale (if equipped)
The low tire pressure telltale comes on for 3 seconds after the ignition switch is turned to the ON position. If the warning light does not come on, or continuously remains on after coming on for about 3 seconds when you turned the ignition switch to the ON position, the Tire Pressure Monitoring System is not working properly. If this occurs, have your vehicle checked by an authorized HYUNDAI dealer as soon as possible. The warning lights will also illuminate if one or more of your tires is significantly under-inflated. The low tire pressure posi- tion telltale (supplemental) indicates which tire is significantly under-inflated by illumi- nating the corresponding position light.You should stop and check your tires as soon as possible. If the warning lights illumi- nate while driving, reduce vehicle speed immediately and stop the vehicle. Avoid hard braking and overcorrecting at the steering wheel. Inflate the tires to the proper pressure as indicated on the vehi- cle’s tire information placard.
Features of your vehicle
WARNING - Low tire pres-
sure
low
Significantly tire pressure makes the vehicle unstable and can contribute to loss of vehicle control and increased braking distances. Continued driving on tires with low pressure will cause the tires to overheat and fail.
4 61
Features of your vehicle
D150332AEN TPMS (Tire Pressure Monitoring System) malfunction indicator (if equipped)
TPMS
The TPMS malfunction indicator comes on for 3 seconds after the ignition switch is turned to the ON position. If the warn- ing light does not come on, or remains on after 3 seconds when the ignition switch is turned to the ON position, the Tire Pressure Monitoring System is not work- ing properly. If this occurs, have your vehicle checked by an authorized HYUNDAI dealer as soon as possible. The warning light also comes on and stays on when there is a problem with the Tire Pressure Monitoring System. If this happens, the system may not mon- itor the tire pressure. Have the system checked by an authorized HYUNDAI dealer as soon as possible.
62
WARNING - Safe stopping (cid:129) The TPMS cannot alert you to severe and sudden tire damage caused by external factors.
(cid:129) If you feel any vehicle instability, immediately take your foot off the accelerator, apply the brakes gradually and with light force, and slowly move to a safe posi- tion off the road.
For more information about the TPMS, refer to “Tire Pressure Monitoring System” in section 6.
D150312ABH Shift pattern indicator
The indicator displays which automatic transmission shift position is selected.
D150313AEN Charging system warning light
This warning light indicates a malfunction of either the generator or electrical charging system. If the warning light comes on while the vehicle is in motion: 1. Drive to the nearest safe location. 2. With the engine off, check the genera- tor drive belt for looseness or break- age.
3. If the belt is adjusted properly, a prob- lem exists somewhere in the electrical charging system. Have an authorized HYUNDAI dealer correct the problem as soon as possible.
D150309AUN Front fog light indicator (if equipped)
D150317CBH Immobilizer indicator
This light comes on when the front fog lights are ON.
D150315AHD Trunk lid open warning light
This warning light illuminates when the trunk lid is not closed securely with the ignition in any position.
D150316AUN Door ajar warning light
This warning light illuminates when a door is not closed securely with the igni- tion switch in any position.
Without smart key system This light illuminates when the immobiliz- er key is inserted and turned to the ON position to start the engine. At this time, you can start the engine. The light goes out after the engine is running. If this light blinks when the ignition switch is in the ON position before starting the engine, have the system checked by an authorized HYUNDAI dealer.
With smart key system (if equipped) If any of the following occurs in a vehicle equipped with the smart key, the immobi- lizer indicator illuminates, blinks or the light goes off.
Features of your vehicle
(cid:129) When the smart key is in the vehicle, if the engine start/stop button is turned to the ON position, the indicator will illuminate until the engine is started. However, when the smart key is not in the vehicle, if the engine start/stop but- ton is depressed, the indicator will blink for a few minutes to indicate that you will not be able to start the engine.
(cid:129) When the ignition switch is turned to the ON position and the indicator turns off after 2 seconds, the system may have a problem. Have the vehicle checked by an authorized HYUNDAI dealer.
(cid:129) When the battery is weak, if the engine start/stop button is depressed, the indi- cator will blink and you will not be able to start the engine. However, you may still be able to start the engine by inserting the smart key in the smart key holder. If smart key system related parts have a problem, the indicator blinks.
4 63
Features of your vehicle
D150318AUN Low fuel level warning light
D150320ABH-EU Malfunction indicator light (MIL) (check engine light)
This warning light indicates the fuel tank is nearly empty. When it comes on, you should add fuel as soon as possible. Driving with the fuel level warning light on or with the fuel level below “E” can cause the engine to misfire and damage the catalytic converter.
D150319AUN Low washer fluid level warning light (if equipped)
This warning light indicates the washer fluid reservoir is near empty. Refill the washer fluid as soon as possible.
This indicator light is part of the Engine Control System which monitors various emission control system components. If this light illuminates while driving, it indi- cates that a potential malfunction has been detected somewhere in the emis- sion control system. This light will also illuminate when the ignition switch is turned to the ON posi- tion, and will go out in a few seconds after the engine is started. If it illuminates while driving, or does not illuminate when the ignition switch is turned to the ON position, take your vehicle to your near- est authorized HYUNDAI dealer and have the system checked. Generally, your vehicle will continue to be drivable, but have the system checked by an authorized HYUNDAI dealer promptly.
CAUTION
(cid:129) Prolonged driving with the Malfunction Indicator Light illumi- nated may cause damage to the emission control systems which could effect drivability and/or fuel economy.
(cid:129) If the Malfunction Indicator Light illuminates, potential catalytic converter damage is possible. This could result in loss of engine power. Have the Engine Control System inspected as soon as pos- sible by an authorized HYUNDAI dealer.
64
Features of your vehicle
D150325ABH Cruise indicator (if equipped)
Cruise SET indicator
SET
CRUISE indicator
CRUISE
The indicator light illuminates when the cruise control system is enabled. The cruise indicator light in the instru- ment cluster is illuminated when the cruise control ON-OFF button on the steering wheel is pushed. The indicator light turns off when the cruise control ON-OFF button is pushed again. For more information about the use of cruise control, refer to “Cruise control system or Smart cruise control system” in section 5.
The indicator light illuminates when the cruise function switch (SET- or RES+) is ON. The cruise SET indicator light in the instrument cluster is illuminated when the cruise control switch (SET- or RES+) is pushed. The cruise SET indicator light does not illuminate when the cruise con- trol switch (CANCEL) is pushed or the system is disengaged.
D150323AUN-EU ESC (Electronic Stability Control)indicator
ESC
The ESC indicator will illuminate when the ignition switch is turned ON, but should go off after approximately 3 sec- onds. When the ESC is on, it monitors the driving conditions and under normal driving conditions, the ESC light will remain off. When a slippery or low trac- tion condition is encountered, the ESC will operate, and the ESC indicator will blink to indicate the ESC is operating. The ESC indicator stays on when the ESC may have a malfunction. Take your car to an authorized HYUNDAI dealer and have the system checked.
D150324AEN-EU ESC OFF indicator
ESC OFF
To switch to ESC OFF mode, press the ESC OFF button. The ESC OFF indicator will illuminate indicating the ESC is deac- tivated.
4 65
LDWS indicator (if equipped)
LDWS
The LDWS indicator will illuminate when you turn the lane departure warning sys- tem on by pressing the LDWS switch.
LDWS malfunction indicator (if equipped)
LDWS FAIL
If the LDWS malfunction indicator comes on, the LDWS is not working properly. Take your vehicle to an authorized HYUNDAI dealer and have the system checked.
D150327ABH Key reminder warning chime Without smart key If the driver’s door is opened while the ignition key is left in the ignition switch (ACC or LOCK position), the key reminder warning chime will sound. This is to prevent you from locking your keys in the vehicle. The chime sounds until the key is removed from the ignition switch or the driver’s door is closed.
With smart key If the driver’s door is opened while the smart key is in the vehicle with the engine start/stop button in ACC or the smart key is in the smart key holder with the engine start/stop button in OFF, the key reminder warning chime will sound. The chime sounds until the smart key is removed from the smart key holder or the driver’s door is closed.
Features of your vehicle
D150320ABH Smart cruise control indicator (if equipped)
SCC (Smart cruise control) malfunction indicator
The warning light illuminates when the vehicle to vehicle distance control sys- tem is not functioning normally. Take your vehicle to an authorized HYUNDAI dealer and have the system checked.
SCC (Smart cruise control) sensor malfunction indicator
If the sensor or cover is dirty or obscured with foreign matter such as snow, the indicator will illuminate. Clean the sensor by using a soft cloth.
For more information about the use of smart cruise control, refer to "Smart cruise control system" in section 5.
66
Features of your vehicle
D150334ABH AFLS(Adaptive Front Lighting System) malfunc- tion indicator (if equipped)
AFLS
If the AFLS malfunction indicator comes on, the AFLS is not working properly. Drive to the nearest safe location and restart the engine. If the indicator contin- uously remains on, take your vehicle to an authorized HYUNDAI dealer and have the system checked.
D150332ABH EPB (Electric Parking Brake) malfunction indica- tor (if equipped)
EPB
D150333ABH AUTO HOLD indicator (if equipped)
AUTO HOLD
If you press the AUTO HOLD switch, the white AUTO HOLD indicator on the clus- ter will illuminate. And when you stop the vehicle completely by pressing the brake pedal, the indicator changes from white to green. If the AUTO HOLD malfunction indicator on the LCD screen lights up yellow, the AUTO HOLD is not working properly. Take your vehicle to an authorized HYUNDAI dealer and have the system checked. For more information, refer to “AUTO HOLD” in section 5.
The EPB malfunction indicator will illumi- nate when the ignition switch is turned ON, but should go off after approximate- ly 3 seconds. If the warning light does not come on, or continuously remains on after coming on for about 3 seconds when you turned the ignition switch to the ON position, the Electric Parking Brake is not working properly. If it comes on while driving, the EPB is not working properly. Take your vehicle to an authorized HYUNDAI dealer and have the system checked. The EPB malfunction indicator may illu- minate when the ESC indicator comes on to indicate that the ESC is not working properly, but if this occurs it does not indi- cate malfunction of the EPB.
4 67
Features of your vehicle
D150401ABH Warning on the LCD screen (if equipped) Key is not in vehicle
D150402ABH Key is not detected
D150403ABH Low key battery
Type I
Type II
If the smart key is not in the vehicle and if any door is opened or closed with the engine start/stop button in ACC, ON, or START, the warning illuminates on the LCD screen. The chime also sounds for 5
seconds when the smart key is not in the vehicle and any door is closed. Turn the ignition switch off or get hold of the smart key.Type I
Type II
Type I
Type II
If the smart key is not in the vehicle or is not detected and you push the engine start/stop button, the warning illuminates on the LCD screen for 10 seconds.
When the smart key in the vehicle dis- charges, the warning illuminates on the LCD screen for 10 seconds. Replace the battery with a new one. If it is not possible, you can start the engine by inserting the smart key into the smart key holder and pushing the engine start/stop button.
68
D150404ABH Press brake pedal to start engine
D150405ABH Shift to "P" position
D150406ABH Remove key
Features of your vehicle
Type I
Type II
Type I
Type II
Type I
Type II
If the engine start/stop button turns to the ACC position twice by pushing the engine start/stop button repeatedly with- out pressing the brake pedal, the warn- ing illuminates on the LCD screen for 10
seconds to indicate that you should press the brake pedal to start the engine.If you push the engine start/stop button with the engine start/stop button ON and the shift lever not in P(Park), the warning illuminates on the LCD screen for 10 sec- onds to indicate that you should press the engine start/stop button with the shift lever in P(Park) to turn off the engine.
When you turn off the engine with the smart key in the smart key holder, the warning illuminates on the LCD screen for 10 seconds. Push the smart key inward and pull it out from the smart key holder.
4 69
Features of your vehicle
D150407ABH Insert key
D150408ABH Press start button again
D150409ABH Shift to "P" or "N" to start the engine
Type I
Type II
Type I
Type II
Type I
Type II
If you push the engine start/stop button while the "Key is not detected" illumi- nates on the LCD screen, the warning illuminates for 10 seconds.
If there is a problem with the engine start/stop button system, the warning illu- minates for 10 seconds to indicate that you could start the engine by pressing the engine start/stop button while press- ing the brake pedal. If the warning illuminates each time you push the engine start/stop button, take your vehicle to an authorized HYUNDAI dealer and have the system checked.
If you try to start the engine with the shift lever not in P(Park) or N(Neutral), the warning illuminates for 10 seconds on the LCD screen. You can also start the engine with the shift lever in N(Neutral), but for your safe- ty start the engine with the shift lever in P(Park).
70
D150412ABH Check stop lamp fuse
Type I
Type II
When the stop lamp fuse is disconnect- ed, the warning illuminates for 10 sec- onds on the LCD screen. Replace the fuse with a new one. If that is not possible you can start the engine by pressing the engine start/stop button for 10 seconds with the ignition switch in ACC.
Features of your vehicle
4 71
Features of your vehicle
PARKING ASSIST SYSTEM (IF EQUIPPED)
The sensing range and objects detectable by the sensors are limited. When moving the vehicle, pay as much attention to what is in front of and behind you as you would in a vehicle without a parking assist system.
WARNING
The parking assist system should only be considered as a supple- mentary function. The driver must check the front and rear view. The operational function of the parking assist system can be affected by many factors and conditions of the surroundings, so the responsibility rests always with the driver.
Sensors
OBH048064L
Sensors
OBH048065
D170000ABH The parking assist system assists the driver during movement of the vehicle by chiming if any object is sensed within the distance of 23.62 in (60 cm) in front or 39.37 in (100 cm) behind the vehicle. This system is a supplemental system and it is not intended to nor does it replace the need for extreme care and attention of the driver. 72
OBH048205L
Operation of the parking assist system D170101ABH Operating condition (cid:129) This system will activate when the parking assist button is pressed with the engine running.
(cid:129) Sensing distance in backing up is approximately 39.37 in (100 cm) when you are driving less than 6.21 mph (10
km/h).(cid:129) Sensing distance in moving forward is approximately 23.62 in (60 cm) when you are driving less than 6.21 mph (10
km/h).(cid:129) When more than two objects are sensed at the same time, the closest one will be recognized first.
✽✽ NOTICE The parking assist system may not oper- ate if the vehicle’s distance from the object is already less than approximate- ly 9.84 in (25 cm) when the system is ON.
D170102ABH Types of warning sound (cid:129) When an object is 39.37 in (100 cm) to 23.62 in (61 cm) from the rear bumper : Buzzer beeps intermittently
(cid:129) When an object is 23.62 in (60 cm) to 11.81 in (31 cm) from the front or rear bumper : Buzzer sounds two beeps intermittently
(cid:129) When an object is within 11.81 in (30
cm) of the front or rear bumper : Buzzer sounds continuously.D170200ABH Non-operational conditions of parking assist system Parking assist system may not oper- ate normally when: 1. Moisture is frozen to the sensor. (It will operate normally when the moisture melts.)
2. The sensor is covered with foreign matter, such as snow or water, or the sensor cover is blocked. (It will operate normally when the material is removed or the sensor is no longer blocked.)
3. The sensor is stained with foreign mat- ter such as snow or water. (Sensing range will return to normal when removed.)
Features of your vehicle
There is a possibility of parking assist system malfunction when: 1. Driving on uneven road surfaces such as unpaved roads, gravel, bumps, or gradient.
2. Objects generating excessive noise such as vehicle horns, loud motorcycle engines, or truck air brakes can inter- fere with the sensor.
3. Heavy rain or water spray. 4. Wireless
transmitters or mobile
phones present near the sensor.
5. Sensor is covered with snow.
4 73
Features of your vehicle
Detecting range may decrease when: 1. Outside air temperature is extremely
hot or cold.
2. Undetectable objects smaller than 39.37 in (1 m) and narrower than 5.51
in (14 cm) in diameter.The following objects may not be rec- ognized by the sensor: 1. Sharp or slim objects such as ropes,
chains or small poles.
2. Objects, which tend to absorb sensor frequency such as clothes, spongy material or snow.
74
✽✽ NOTICE 1. The warning may not sound sequen- tially depending on the speed and shapes of the objects detected.
2. The parking assist system may mal- function if the vehicle bumper height or sensor installation has been modi- fied. Any non-factory installed equip- ment or accessories may also interfere with the sensor performance.
3. Sensor may not recognize objects less than 11.81 in (30 cm) from the sensor, or it may sense an incorrect distance. Use with caution.
4. When the sensor is frozen or stained with snow or water, the sensor may be inoperative until the stains are removed using a soft cloth.
5. Do not push, scratch or strike the sen- sor with any hard objects that could damage the surface of the sensor. Sensor damage could occur.
✽✽ NOTICE This system can only sense objects with- in the range and location of the sensors, it can not detect objects in other areas where sensors are not installed. Also, small or slim objects, or objects located between sensors may not be detected. Always visually check in front and behind the vehicle when driving. Be sure to inform any drivers in the vehicle that may be unfamiliar with the system regarding the system’s capabili- ties and limitations.
WARNING
Pay close attention when the vehi- cle is driven close to objects on the road, particularly pedestrians, and especially children. Be aware that some objects may not be detected by the sensors, due to the objects distance, size or material, all of which can limit the effectiveness of the sensor. Always perform a visual inspection to make sure the vehicle is clear of all obstructions before moving the vehicle in any direction.
D170400ABH Self-diagnosis If you don’t hear an audible warning sound or if the buzzer sounds intermit- tently when shifting the gear to the R (Reverse) position, this may indicate a malfunction in the rear parking assist sys- tem. If this occurs, have your vehicle checked by an authorized HYUNDAI dealer as soon as possible.
WARNING
Your new vehicle warranty does not cover any accidents or damage to the vehicle or injuries to its occu- pants related to a parking assist system. Always drive safely and cautiously.
Features of your vehicle
4 75
Features of your vehicle
REAR VIEW CAMERA (IF EQUIPPED)
HAZARD WARNING FLASHER
The green line (1) is the position 118.11
in (300 cm) from the rear bumper. The yellow line (2) is the position 39.37 in (100 cm) from the rear bumper. The red line (3) is the position 19.68 in (50 cm) from the rear bumper.WARNING
(cid:129) This system is a supplementary function only. It is the responsi- bility of the driver to always check the inside/outside rearview mirror and the area behind the vehicle before and while backing up.
(cid:129) Always keep the camera lens clean. If the lens is covered with foreign matter, the camera may not operate normally.
✽✽ NOTICE The rearview camera may not operate normally, when you drive in the extremely high or low temperature area (operating temperature : -20°C~65°C (- 13°F~149°F)).
OBH068001N
D180000AUN The hazard warning flasher should be used whenever you find it necessary to stop the car in a hazardous location. When you must make such an emer- gency stop, always pull off the road as far as possible. The hazard warning lights are turned on by pushing in the hazard switch. This causes all turn signal lights to blink. The hazard warning lights will operate even though the key is not in the ignition switch. To turn the hazard warning lights off, push the switch a second time.
OBH041068N
OBH048069
D330000ABH The rearview camera will activate when the back-up light is ON with the ignition switch ON and the shift lever in the R position. This system is a supplemental system that shows behind the vehicle through the navigation display while backing-up.
76
LIGHTING D190100ABH Battery saver function (cid:129) The purpose of this feature is to pre- vent the battery from being dis- charged. The system automatically turns off the parking lights when the driver removes the ignition key (smart key : turns off the engine) and opens the driver-side door (in that order).
(cid:129) With this feature, the parking lights will be turned off automatically if the driver parks on the side of the road at night. If necessary, to keep the lights on when the ignition key is removed (smart key : turns off the engine), per- form the following: 1) Open the driver-side door. 2) Turn the parking lights OFF and ON again using the light switch on the steering column.
Headlight welcome function (if equipped) When the headlight switch is set to ON or AUTO position and all doors (and trunk) are closed and locked, if you press the door unlock button on the transmitter (or the smart key), the headlights will come on for about 15 seconds. At this time, if you press the door lock button, the head- lights will turn off immediately.
D190200ABH Headlight escort function (if equipped) If you turn the ignition switch to the ACC or OFF position with the headlights ON, the headlights (and/or tail lights) remain on for about 20 minutes. However, if the driver’s door is opened and closed, the headlights are turned off after 30 sec- onds. The headlights can be turned off by pressing the lock button on the transmit- ter (or smart key) twice or turning the light switch to the OFF or Auto position. If the headlight switch is in the AUTO position, the function can only operate at night.
CAUTION
If the driver gets out of the vehicle through other doors (except dri- ver's door),the battery saver func- tion does not operate and the head- light escort function does not turn off automatically.Therefore,it caus- es the battery to be discharged.In this case,make sure to turn off the lamp before getting out of the vehi- cle.
Features of your vehicle
OBH049072
D190400AUN Lighting control The light switch has a Headlight and a Parking light position. To operate the lights, turn the knob at the end of the control lever to one of the fol- lowing positions: (1) OFF position (2) Parking light position (3) Headlight position (4) Auto light/AFLS position
(if equipped)
4 77
Features of your vehicle
OBH049073
OBH049074
OBH049075
D190401ABH Parking light position ( When the light switch is in the parking light position (1st position), the tail, license and instrument panel lights are ON and the tail light indicator is ON (if equipped).
D190402ABH Headlight position ( ) When the light switch is in the headlight position (2nd position), the head, tail, license and instrument panel lights are ON.
✽✽ NOTICE The ignition switch must be in the ON position to turn on the headlights.
D190403AUN Auto light/AFLS position (if equipped) When the light switch is in the AUTO light position while the engine is running, the taillights and headlights will be turned ON or OFF automatically depending on the amount of light outside the vehicle. If your vehicle is equipped with the adap- tive front lighting system (AFLS), it will also operate when the headlamp is ON.
78
CAUTION
(cid:129) Never place anything over the sensor (1) located on the instru- ment panel.This will ensure bet- ter auto-light system control.
(cid:129) Don’t clean the sensor using a window cleaner.The cleaner may leave a light film which could interfere with sensor operation.
(cid:129) If your vehicle has window tint or other types of metallic coating on the front windshield, the Auto light system may not work prop- erly.
Features of your vehicle
OBH049076
To flash the headlights, pull the lever towards you. It will return to the normal (low beam) position when released. The headlight switch does not need to be on to use this flashing feature.OBH049077
D190500AUN High beam operation To turn on the high beam headlights, push the lever away from you. Pull it back for low beams. The high beam indicator will light when the headlight high beams are switched on. To prevent the battery from being dis- charged, do not leave the lights on for a prolonged time while the engine is not running.
WARNING
Do not use high beam when there are other vehicles. Using high beam could obstruct the other dri- ver's vision.
4 79
To signal a lane change, move the turn signal lever slightly and hold it in position (B). The lever will return to the OFF posi- tion when released. If an indicator stays on and does not flash or if it flashes abnormally, one of the turn signal bulbs may be burned out and will require replacement.
One-touch triple turn signal (if equipped) To activate an one-touch triple turn signal move the turn signal lever slightly for less than 1.8 seconds and then release it. The lane change signals will blink 3 times.
✽✽ NOTICE If an indicator flash is abnormally quick or slow, a bulb may be burned out or have a poor electrical connection in the circuit.
Features of your vehicle
OBH049078
D190600AUN Turn signals and lane change sig- nals The ignition switch must be on for the turn signals to function. To turn on the turn signals, move the lever up or down (A). Green arrow indicators on the instru- ment panel indicate which turn signal is operating. They will self-cancel after a turn is completed. If the indicator contin- ues to flash after a turn, manually return the lever to the OFF position.
80
OBH049079