- 2011 Hyundai Accent Owners Manuals
- Hyundai Accent Owners Manuals
- 2005 Hyundai Accent Owners Manuals
- Hyundai Accent Owners Manuals
- 2003 Hyundai Accent Owners Manuals
- Hyundai Accent Owners Manuals
- 2009 Hyundai Accent Owners Manuals
- Hyundai Accent Owners Manuals
- 2008 Hyundai Accent Owners Manuals
- Hyundai Accent Owners Manuals
- 2004 Hyundai Accent Owners Manuals
- Hyundai Accent Owners Manuals
- 2007 Hyundai Accent Owners Manuals
- Hyundai Accent Owners Manuals
- 2012 Hyundai Accent Owners Manuals
- Hyundai Accent Owners Manuals
- Download PDF Manual
-
anti-freeze solution in accordance with instructions on the container. Window washer anti-freeze is available from Hyundai dealers and most auto parts outlets. Do not use engine coolant or other types of anti-freeze as these may damage the finish.
C160I01A-AAT
Don't Let Your Parking Brake Freeze Under some conditions your parking brake can freeze in the engaged position. This is most likely to happen when there is an accumulation of snow or ice around or near the rear brakes or if the brakes are wet. If you think the parking brake may freeze, apply it only temporarily while you put the gear selector lever in "P" (automatic) or in first or reverse gear (manual transaxle) and block the rear wheels so the car cannot roll. Then re- lease the parking brake.
C160J01A-AAT
Don't Let Ice and Snow Accumulate Underneath Under some conditions, snow and ice can build up under the fenders and inter- fere with the steering. When driving in severe winter conditions where this may happen, you should periodically check underneath the car to be sure the move- ment of the front wheels and the steering components is not obstructed.
C160K01A-AAT
Carry Emergency Equipment Depending on the severity of the weather where you drive your car, you should carry appropriate emergency equipment. Some of the items you may want to carry include tire chains, tow straps or chains, flashlight, emergency flares, sand, a shovel, jumper cables, a window scraper, gloves, ground cloth, coveralls, a blanket, etc.
HIGHER SPEED MOTORING
C170A02A-AAT
Pre-Trip Inspections 1. Tires: Adjust the tire inflation pressures for high- way driving. Low tire inflation pressures will result in overheating and possible failure of the tires. Avoid using worn or damaged tires which may result in reduced traction or tire fail- ure.
NOTE: Never exceed the maximum tire infla- tion pressure shown on the tires.
WARNING:
o Underinflated or overinflated tires can cause poor handling, loss of ve- hicle control, and sudden tire failure leading to accidents, injuries, and even death. Always check tires are properly inflated before driving. Refer to pages 2-20 and 8-3 for proper tire pressures and further information.
DRIVING YOUR HYUNDAI
USE OF LIGHTS
19
C180A01A-AAT Check your lights regularly for correct operation and always keep them clean. When driving during the day in conditions of poor visibility, it is helpful to drive with headlights on low beam. This enables you to be seen, as well as to see.
WARNING:
o Driving on tires with no or insuffi- cient tread is dangerous. Worn-out tires can result in loss of vehicle control, collisions, injury, and even death. Worn-out tires should be re- placed as soon as possible and should never be used for driving. Always check tire tread before driv- ing your car. Refer to 8-12 for further information and tread limits.
2. Fuel, engine coolant and engine oil: High speed travel consumes more fuel than urban motoring. Do not forget to check both engine coolant and engine oil.
3. Drive belt: A loose or damaged drive belt may result in overheating of the engine.
2 DRIVING YOUR HYUNDAI 20
TRAILER TOWING
C190A01A-AAT
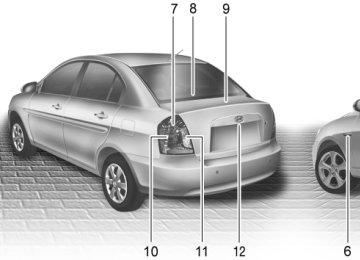
VEHICLE LOAD LIMIT
C190F01MC-AAT
Tire and Loading Information Label Type A
Type C
Type B
C190F01MC-1
Type D
C190F01MC-3
C190A01MC Your Hyundai should not be used to tow a trailer. It is designed to be compact and light for good fuel economy, and is not designed as a trailer-towing vehicle. Damages or malfunctions caused by tow- ing may not be covered by the limited warranties applying to your Hyundai. Damages or malfunctions that result from towing a trailer for commercial purposes are specifically not covered by Hyundai limited warranties.
C190F01MC-2
C190F01MC-4
DRIVING YOUR HYUNDAI
21
The tire label located on the driver's side of the center pillar outer panel gives the original tire size, cold tire pressures recommended for your ve- hicle, the number of people that can be in your vehicle and vehicle capacity weight.
Vehicle capacity weight: 849 lbs (385 kg) Vehicle capacity weight is the maxi- mum combined weight of occupants and cargo. If your vehicle is equipped with a trailer, the combined weight includes the tongue load.
Seating capacity: Total: 5 persons
(Front seat: 2 persons, Rear seat: 3 persons)
Seating capacity is the maximum num- ber of occupants including a driver, your vehicle may carry.
However the seating capacity may be reduced based upon the weight of all of the occupants, and the weight of the cargo being carried or towed. Do not overload the vehicle as there is a limit to the total weight, or load limit includ- ing occupants and cargo, the vehicle can carry.
Towing capacity: We do not recommend using this ve- hicle for trailer towing.
Cargo capacity: The cargo capacity of your vehicle will increase or decrease depending on the weight and the number of occupants and the tongue load, if your vehicle is equipped with a trailer.
Steps for Determining Correct Load Limit (1)Locate the statement "The com- bined weight of occupants and cargo should never exceed XXX pounds'' on your vehicle's placard.
(2)Determine the combined weight of the driver and passengers that will be riding in your vehicle.
(3)Subtract the combined weight of the driver and passengers from XXX kilograms or XXX pounds.
(4)The resulting figure equals the avail- able amount of cargo and luggage load capacity. For example, if the "XXX" amount equals 1400 lbs, and there will be five 150 lb. passengers in your vehicle, the amount of avail- able cargo and luggage load capac- ity is 650 lbs. (1400-750 (5 x 150) = 650 lbs.)
2 DRIVING YOUR HYUNDAI 22
(5)Determine the combined weight of luggage and cargo being loaded on the vehicle. That weight may not safely exceed the available cargo and luggage load capacity calcu- lated in Step 4.
(6)If your vehicle will be towing a trailer, load from your trailer will be transferred to your vehicle. Consult this manual to determine how this reduces the available cargo and luggage load capacity of your ve- hicle.
CAUTION:
We do not recommend using this vehicle for trailer towing.
Example 1
Example 2
C190F01JM
Item
Description
Total
Item
Description
Vehicle Capacity Weight
1400 lbs
(635 kg)
Subtract Occupant Weight
300 lbs
150 lbs (68 kg) × 2
Available Cargo and
Luggage Weight
(136 kg)
1100 lbs
(489 kg)
Vehicle Capacity Weight
Subtract Occupant Weight
750 lbs
150 lbs (68 kg) x 5
Available Cargo and
Luggage Weight
(340 kg)
650 lbs
(295 kg)
C190F02JM
Total
1400 lbs
(635 kg)
Example 3
Refer to your vehicle’s tire and loading information label for specific informa- tion about your vehicle’s capacity weight and seating positions. The com- bined weight of the driver, passengers and cargo should never exceed your vehicle’s capacity weight.
Item
Description
Vehicle Capacity Weight
C190F03JM
Total
1400 lbs
(635 kg)
Subtract Occupant Weight
860 lbs
172 lbs (78 kg) x 5
Available Cargo Weight
(390 kg)
540 lbs
(245 kg)
DRIVING YOUR HYUNDAI
23
C190G03JM-AAT
Compliance Label
C190G01A The compliance label is located on the driver's side of the center pillar outer panel.
The label shows the maximum allow- able weight of the fully loaded vehicle. This is called the GVWR (Gross Ve- hicle Weight Rating). The GVWR in- cludes the weight of the vehicle, all occupants, fuel and cargo.
2 DRIVING YOUR HYUNDAI 24
This label also tells you the maximum weights that can be supported by the front and rear axles, called Gross Axle Weight Rating (GAWR). To find out the actual loads on your front and rear axles, you need to go to a weigh station and weigh your vehicle. Your dealer can help you with this. Be sure to spread out your load equally on the left and right sides of the centerline.
WARNING:
o Never exceed the GVWR for your vehicle, the GAWR for either the front or rear axle and vehicle ca- pacity weight. Exceeding these ratings can cause an accident or vehicle damage. You can calcu- late the weight of your load by weighing the items (or people) before putting them in the ve- hicle. Be careful not to overload your vehicle.
! WARNING:
o Do not load your vehicle any heavier than the GVWR, either the maximum front or rear GAWR and vehicle capacity weight. If you do, parts, including tires on your vehicle can break, and it can change the way your vehicle handles and braking ability. This could cause you to lose control and crash. Also, overloading can shorten the life of your vehicle.
! WARNING:
o Overloading your vehicle can cause heat buildup in your vehicle's tires and possible tire failure that could lead to a crash. o Overloading your vehicle can cause increased stopping dis- tances that could lead to a crash. o A crash resulting from poor han- dling vehicle damage, tire failure, or increased stopping dis- tances could result in serious injury or death.
DRIVING YOUR HYUNDAI
25
NOTE: o Overloading your vehicle may cause damage. Repairs would not be covered by your warranty. Do not overload your vehicle.
o Using heavier suspension com- ponents to get added durability might not change your weight ratings. Ask your dealer to help you load your vehicle the right way.
The label will help you decide how much cargo and installed equipment your vehicle can carry.
If you carry items inside your vehicle – like suitcases, tools, packages, or anything else – they move as fast as the vehicle goes. If you have to stop or turn quickly, or if there is a crash, the items will keep going and can cause an injury if they strike the driver or a passenger.
! WARNING:
Items you carry inside your vehicle can strike and injure people in a sudden stop or turn, or in a crash.
o Put things in the cargo area of your vehicle. Try to spread the weight evenly.
o Never stack items, like suitcases, inside the vehicle above the tops of the seats.
o Do not leave an unsecured child
restraint in your vehicle.
o When you carry something in-
side the vehicle, secure it.
o Do not drive with a seat folded
down unless necessary.
WHAT TO DO IN AN EMERGENCY
If the Engine Will Not Start ........................................... 3-2
Jump Starting................................................................ 3-3
If the Engine Overheats ............................................... 3-4
Tire Pressure Monitoring System (TPMS) ................... 3-5
Spare Tire ................................................................... 3-10
If You Have a Flat Tire ............................................... 3-11
Changing a Flat Tire ................................................... 3-11
If Your Vehicle Must Be Towed ................................. 3-16
Emergency Towing ..................................................... 3-18
If You Lose Your Keys ............................................... 3-203 3
3
WHAT TO DO IN AN EMERGENCY
IF THE ENGINE WILL NOT START
D010A01A-AAT
WARNING:
If the engine will not start, do not push or pull the car to start it. This could result in a collision or cause other dam- age. In addition, push or pull starting may cause the catalytic converter to be overloaded and create a fire hazard.
D010B02A-AAT
If Engine Doesn't Turn Over or Turns Over Slowly
D010C01A-AAT
If Engine Turns Over Normally but Does Not Start
OMC055018
D010C03MC
1. If your car has an automatic transaxle, be sure the gear selector lever is in "N" or "P" and the emergency brake is set. 2. Check the battery connections to be
sure they are clean and tight.
3. Turn on the interior light. If the light dims or goes out when you operate the starter, the battery is discharged.
4. Check the starter connections to be
sure they are securely tightened.
5. Do not push or pull the vehicle to start it. See instructions for "Jump Starting".
1. Check fuel level. 2. With the key in the "OFF" position, check all connectors at ignition coil and spark plugs. Reconnect any that may be disconnected or loose.
3. Check the fuel line in the engine room. 4. If the engine still refuses to start, call a Hyundai dealer or seek other qualified assistance.
D010D01A-AAT
If the Engine Stalls While Driving 1. Reduce your speed gradually, keep- ing a straight line. Move cautiously off the road to a safe place.
2. Turn on your emergency flashers. 3. Try to start the engine again. If your vehicle will not start, contact a Hyundai dealer or seek other qualified assis- tance.
F020100AUN-EU
If the Engine Stalls at a Crossroad or Crossing If the engine stalls at a crossroad or crossing, set the shift lever in the N(Neutral) position and then push the vehicle to a safe place.
JUMP STARTING
D020A02A-AAT
D020A02MC
WARNING:
The gas produced by the battery during the jump-start operation is highly ex- plosive. If these instructions are not followed exactly, serious personal in- jury and damage to the vehicle may occur! If you are not sure how to follow this procedure, seek qualified assis- tance. Automobile batteries contain sul- furic acid. This is poisonous and highly corrosive. When jump starting, wear protective glasses and be careful not to get acid on yourself, your clothing or on the car.
WHAT TO DO IN AN EMERGENCY
o If you should accidentally get acid on your skin or in your eyes, immediately remove any contaminated clothing and flush the area with clear water for at least 15 minutes. Then promptly obtain medical attention. If you must be transported to an emergency facil- ity, continue to apply water to the af- fected area with a sponge or cloth.
o The gas produced by the battery dur- ing the jump-start operation is highly explosive. Do not smoke or allow a spark or open flame in the vicinity.
o The battery being used to provide the jump start must be 12-volt. If you can- not determine that it is a 12-volt bat- tery, do not attempt to use it for the jump start.
o To jump start a car with a discharged battery, follow this procedure exactly:
1. If the booster battery is installed in another vehicle, be sure the two ve- hicles are not touching.
2. Turn off all unnecessary lights and
accessories in both vehicles.
WHAT TO DO IN AN EMERGENCY
3. Attach the clamps of the jumper cable in the exact location shown on the previous page. First, attach one clamp of the jumper cable to the positive (+) post or cable of the discharged battery. Then attach the other end of the same cable to the positive (+) post or cable of the booster battery. Next, using the other cable, attach one clamp to the negative (-) post or cable of the booster battery. Then attach the other end of that cable to a solid metal part of the engine away from the battery. Do not connect the cable to any moving part. 4. Start the engine in the car with the booster battery and let it run for a few minutes. This will help to assure that the booster battery is fully charged. During the jumping operation, run the engine in this vehicle at about 2000
rpm.5. Start the engine in the car with the discharged battery using the normal starting procedure. After the engine starts, leave the jumper cables con- nected and let the engine run at fast idle or about 2000 rpm for several minutes.
6. Carefully remove the jumper cables in
the reverse order of attachment.
If you do not know why your battery be- came discharged (because the lights were left on, etc.), have the charging system checked by your Hyundai dealer.
IF THE ENGINE OVERHEATS
D030A02A-AAT If your temperature gauge indicates over- heating, you experience a loss of power, or hear loud pinging or knocking, the engine is probably too hot. If this hap- pens, you should:
1. Pull off the road and stop as soon as
it is safe to do so.
2. Place the gear selector lever in "P" (automatic), or neutral (manual transaxle) and set the parking brake. If the air conditioner is on, turn it off.
3. If coolant is running out under the car or steam is coming out from the hood, stop the engine. Do not open the hood until the coolant has stopped running or the steaming has stopped. If there is no visible loss of coolant and no steam, leave the engine running and check to be sure the engine cooling fan is op- erating. If the fan is not running, turn the engine off.
4. Check to see if the water pump drive belt is missing. If it is not missing, check to see that it is tight. If the drive belt seems to be satisfactory, check for coolant leaking from the radiator, hoses or under the car. (If the air conditioner had been in use, it is normal for cold water to be draining from it when you stop).
WARNING:
While the engine is running, keep hands, long hair and clothing away from mov- ing parts such as the fan and drive belts to prevent injury.
5. If the water pump drive belt is broken or coolant is leaking out, stop the en- gine immediately and call the nearest Hyundai dealer for assistance.
WARNING:
Do not remove the radiator cap when the engine is hot. This may allow cool- ant to be blown out of the opening and cause serious burns.
6. If you cannot find the cause of the overheating, wait until the engine tem- perature has returned to normal. Then, if coolant has been lost, carefully add water to the reservoir (Page 6-7) to bring the fluid level in the reservoir up to the halfway mark.
7. Proceed with caution, keeping alert for further signs of overheating. If over- heating happens again, call a Hyundai dealer for assistance.
CAUTION:
Serious loss of coolant indicates there is a leak in the cooling system and this should be checked as soon as possible by a Hyundai dealer.
WHAT TO DO IN AN EMERGENCY
TIRE PRESSURE MONITOR- ING SYSTEM (TPMS)
C320A01MC-AAT
(If Installed)
➀ Low Tire Pressure Telltale ➁ TPMS Malfunction Indicator
C320A01TG
Each tire, including the spare (if pro- vided), should be checked monthly when cold and inflated to the inflation pressure recommended by the vehicle manufacturer on the vehicle placard or tire inflation pressure label. (If your vehicle has tires of a different size than the size indicated on the vehicle placard or tire inflation pressure label, you should determine the proper tire inflation pressure for those tires.)
WHAT TO DO IN AN EMERGENCY
As an added safety feature, your ve- hicle has been equipped with a Tire Pressure Monitoring System (TPMS) that illuminates a low tire pressure telltale when one or more of your tires is significantly under-inflated. Accord- ingly, when the low tire pressure tell- tale illuminates, you should stop and check your tires as soon as possible, and inflate them to the proper pres- sure. Driving on a significantly under- inflated tire causes the tire to overheat and can lead to tire failure. Under- inflation also reduces fuel efficiency and tire tread life, and may affect the vehicle’s handling and stopping ability.
Please note that the TPMS is not a substitute for proper tire maintenance, and it is the driver’s responsibility to maintain correct tire pressure, even if under-inflation has not reached the level to trigger illumination of the TPMS low tire pressure telltale.
Your vehicle has also been equipped with a TPMS malfunction indicator to indicate when the system is not oper- ating properly. The TPMS malfunction indicator is provided by a separate telltale, which displays the symbol "TPMS" when illuminated. When the malfunction indicator is illuminated, the system may not be able to detect or signal low tire pressure as intended. TPMS malfunctions may occur for a variety of reasons, including the instal- lation of replacement or alternate tires or wheels on the vehicle that prevent the TPMS from functioning properly. Always check the TPMS malfunction indicator after replacing one or more tires or wheels on your vehicle to ensure that the replacement or alter- nate tires and wheels allow the TPMS to continue to function properly.
Low Tire Pressure Telltale
When the tire pressure monitoring sys- tem warning telltale is illuminated, one or more of your tires is significantly under-inflated. Immediately reduce your speed, avoid hard cornering and anticipate increased stopping distances. You should stop and check your tires as soon as pos- sible. Inflate the tires to the proper pressure as indicated on the vehicle’s placard or tire inflation pressure label located on the driver’s side center pillar outer panel. If you cannot reach a service station or if the tire cannot hold the newly added air, replace the low pressure tire with the temporary spare tire. Then the TPMS malfunc- tion indicator or the Low Tire Pressure telltale may turn on after restarting and about 20 minutes of continuous driving before you have the low-pressure tire repaired and replaced on the vehicle.
!
CAUTION:
In winter or cold weather, the low tire pressure telltale may be illumi- nated if the tire pressure was ad- justed to the recommended tire in- flation pressure in warm weather. It does not mean your TPMS is mal- functioning because the decreased temperature leads to a proportional lowering of tire pressure. When you drive your vehicle from a warm area to a cold area or from a cold area to a warm area, or the outside temperature is greatly higher or lower, you should check the tire inflation pressure and ad- just the tires to the recommended tire inflation pressure.
WARNING:
Significantly low tire pressure makes the vehicle unstable and can contribute to loss of vehicle control and increased braking distances. Continued driving on low pressure tires will cause the tires to overheat and fail.
TPMS (Tire Pressure Moni- toring System) Malfunction Indicator
The TPMS malfunction indicator comes on and stays on when there is a problem with the Tire Pressure Moni- toring System. If the system is able to correctly detect an under-inflation warn- ing at the same time as system failure then it will illuminate both the TPMS malfunction and the low tire pressure telltale e.g. if Front Left sensor fails, the TPMS malfunction indicator turns on, but if Front Right, Rear Left, or
WHAT TO DO IN AN EMERGENCY
Rear Right tire is under-inflated, the low tire pressure telltale may turn on at the same time as the TPMS malfunc- tion indicator. Have the system checked by an authorized Hyundai dealer as soon as possible to deter- mine the cause of the problem.
NOTE: o The TPMS malfunction indicator may be illuminated if the vehicle is moving around electric power sup- ply cables or radio transmitters such as police stations, govern- ment and public offices, broad- casting stations, military installa- tions, airports, or transmitting tow- ers, etc. which can interfere with normal operation of the Tire Pres- sure Monitoring System (TPMS). o The TPMS malfunction indicator may be illuminated if snow chains or some electronic devices, such as notebook computers, are used in the vehicle. This can interfere with normal operation of the Tire Pressure Monitoring System (TPMS).
WHAT TO DO IN AN EMERGENCY
o If there is a failed tire sensor, it is possible for the TPMS to tempo- rarily learn a replacement sensor if closely driven to another ve- hicle that is also equipped with TPMS. In rare cases, this may temporarily delay the TPMS mal- function indicator from turning on.
Changing a tire with TPMS If you have a flat tire, the Low Tire Pressure telltale will turn on. Have the flat tire repaired by an authorized Hyundai dealer as soon as possible or replace the flat tire with the temporary spare tire.
NOTE: NEVER use a puncture-repairing agent to repair and/or inflate a low pressure tire. If used, you will have to replace the tire pressure sensor.
Each wheel is equipped with a tire pressure sensor mounted inside the tire behind the valve stem. You must use TPMS specific wheels. It is rec- ommended that you always have your tires serviced by an authorized Hyundai dealer as soon as possible. After you replace the low pressure tire with the spare tire, the TPMS malfunc- tion indicator or the Low Tire Pressure telltale may illuminate after restarting and about 20 minutes of continuous driving. Once the low pressure tire is re-in- flated to the recommended pressure and installed on the vehicle, the TPMS malfunction indicator and the low tire pressure telltale will be extinguished. If the low pressure and TPMS mal- function indicators are not extinguished after about 20 minutes of continuous driving, please visit an authorized Hyundai dealer. You may not be able to identify a low tire by simply looking at it. Always use a good quality tire pressure gauge to measure the tire's inflation pressure.
Please note that a tire that is hot (from being driven) will have a higher pres- sure measurement than a tire that is cold (from sitting stationary for at least 3 hours and driven less than 1 mile during that 3 hour period). Allow the tire to cool before measuring the infla- tion pressure. Always be sure the tire is cold before inflating to the recommended pres- sure. A cold tire means the vehicle has been sitting for 3 hours and driven for less than 1 mile in that 3 hour period.
WHAT TO DO IN AN EMERGENCY
This device complies with Part 15
of the FCC rules. Operation is subject to the following two conditions: 1. This device may not cause harmfulinterference, and
2. This device must accept any inter- ference received, including interfer- ence that may cause undesired op- eration.
WARNING:
Changes or modifications not ex- pressly approved by the party re- sponsible for compliance could void the user’s authority to operate the equipment.
CAUTION:
o Do not use any tire sealant if your vehicle is equipped with a Tire Pressure Monitoring System. The liquid sealant can damage the tire pressure sensors.
o In order for the system to cor- rectly monitor tires for under-in- flation, there should be a total of exactly 4 sensors fitted to each of the four driven wheel positions. There should be no other sen- sors in the vehicle including spare tire since this could cause the system to monitor the wrong sen- sors.
WARNING - TPMS
o The TPMS cannot alert you to severe and sudden tire damage caused by external factors such as nails or road debris.
o If you feel any vehicle instability, immediately take your foot off the accelerator, apply the brakes gradually and with light force, and slowly move to a safe posi- tion off the road.
WARNING:
Tampering with, modifying, or dis- abling the Tire Pressure Monitoring System (TPMS) components may interfere with the system's ability to warn the driver of low tire pressure conditions and/or TPMS malfunc- tions. Tampering with, modifying, or disabling the Tire Pressure Moni- toring System (TPMS) components may void the warranty for that por- tion of the vehicle.
3
10WHAT TO DO IN AN EMERGENCY
SPARE TIRE
D040A02MC-AAT
TEMPORARY SPARE TIRE The following instructions for the tem- porary spare tire should be observed: 1. Check inflation pressure as soon as is practical after installing the spare tire, and adjust to the specified pressure. The tire pressure should be periodically checked and main- tained at the specified pressure while the tire is stored. Spare Tire Pressure
Tire Size
T115/70D15
Inflation Pressure
60 psi (420 kPa)
2. The spare tire should only be used temporarily and should be returned to the luggage compartment as soon as the original tire can be repaired or replaced.
3. Continuous use at speeds of over 50 mph (80 km/h) is not recom- mended.
4. As the temporary spare tire is spe- cifically designed for your car, it should not be used on any other vehicle.
5. The temporary spare tire should not be used on any other wheels, nor should standard tires, snow tires, wheel covers or trim rings be used with the temporary spare wheel. If such use is attempted, damage to these items or other car compo- nents may occur.
6. The temporary spare tire pressure should be checked once a month while the tire is stored.
CAUTION:
o Do not use snow chains with
your temporary spare tire.
o Do not use more than one tempo-
rary spare tire at a time.
WARNING:
The temporary spare tire is for emer- gency use only. Do not operate your vehicle on this temporary spare at speeds over 50 mph (80 km/h). The original tire should be repaired or replaced as soon as is possible to avoid failure of the spare possi- bly leading to personal injury or death.
IF YOU HAVE A FLAT TIRE
CHANGING A FLAT TIRE
WHAT TO DO IN AN EMERGENCY
11
D040B01A-AAT
Handling the Spare Tire
D050A01A-AAT If a tire goes flat while you are driving:
D060A01A-AAT
D040B01MC Remove the installation bolt to remove the spare tire. To replace the spare tire in its storage compartment, tighten the bolt firmly with your fingers until there is no more play in the spare tire.
1. Take your foot off the accelerator pedal and let the car slow down while driving straight ahead. Do not apply the brakes immediately or attempt to pull off the road as this may cause a loss of control. When the car has slowed to such a speed that it is safe to do so, brake carefully and pull off the road. Drive off the road as far as possible and park on firm, level ground. If you are on a divided high- way, do not park in the median area between the two traffic lanes.
2. When the car is stopped, turn on your emergency hazard flashers, set the parking brake and put the transaxle in "P" (automatic) or re- verse (manual transaxle).
3. Have all passengers get out of the car. Be sure they all get out on the side of the car that is away from traffic.
4. When changing a flat tire, follow the instructions provided on the next description.
D060A04MC
The procedure described on the fol- lowing pages can be used to rotate tires as well as to change a flat tire. When preparing to change a flat tire, check to be sure the gear selector lever is in "P" (automatic) or reverse gear (manual transaxle) and that the parking brake is set, then:
WHAT TO DO IN AN EMERGENCY
12
D060K01FC-AAT
Wheel Cap (If Installed)
D060B01MC-AAT
1. Obtain Spare Tire and Tool
D060C01A-AAT
2. Block the Wheel
Flat tire
D060K02MC
1. Wrap a piece of cloth around the tip of the flat-head screwdriver to avoid scratching.
2. Insert the flat-head screwdriver into the notch of the wheel cap and pry gently to remove the wheel cap.
3. Change the flat tire. 4. Reinstall the wheel cap by fitting the boss of the wheel cap in the notch of the wheel, hitting the cen- ter of the wheel cap with your hand.
D060B01MC-A
Remove the spare tire and remove the jack and tool bag from the trunk.
NOTE: The spare tire and tool is located beneath the luggage mat in the ve- hicle trunk or luggage compartment.
D060C02MC
Block the wheel that is diagonally opposite from the flat to keep the vehicle from rolling when the car is raised on the jack.
D060D01A-AAT
3. Loosen Wheel Nuts
D060E01A-AAT
4. Put the Jack in Place
D060F02E-AAT
5. Raising the Car
WHAT TO DO IN AN EMERGENCY
13
1JBA6025
The base of the jack should be placed on firm, level ground. The jack should be positioned as shown in the drawing.D060D02MC
The wheel nuts should be loosened slightly before raising the car. To loosen the nuts, turn the wrench handle counterclockwise. When doing this, be sure that the socket is seated completely over the nut so it cannot slip off. For maximum leverage, posi- tion the wrench so the handle is to the right. Then, while holding the wrench near the end of the handle, pull up on it with steady pressure. Do not re- move the nuts at this time. Just loosen them about one-half turn.
Wrench bar
Wheel nut wrench
D060F02MC After inserting a wrench bar into the wheel nut wrench, install the wrench bar into the jack as shown in the drawing. To raise the vehicle, turn the wheel nut wrench clockwise. As the jack begins to raise the vehicle, double check that it is properly positioned and will not slip. If the jack is on soft ground or sand, place a board, brick, flat stone or other object under the base of the jack to keep it from sink- ing.
WHAT TO DO IN AN EMERGENCY
14
Raise the car high enough so that the fully inflated spare tire can be installed. To do this, you will need more ground clearance than is required to remove the flat tire.
WARNING:
Do not get under the car when it is supported by the jack! This is very dangerous as the vehicle could fall and cause serious injury or death. No one should stay in the car while the jack is being used.
D060G02Y-AAT
6. Changing Wheels
D060G02MC
Loosen the wheel nuts and remove them with your fingers. Slide the wheel off the studs and lay it flat so it cannot roll away. To put the wheel on the hub, pick up the spare tire, line up the holes with the studs and slide the wheel onto them. If this is difficult, tip the wheel slightly and get the top hole in the wheel lined up with the top stud. Then jiggle the wheel back and forth until the wheel can be slid over the other studs.
D060G03MC
! WARNING:
Wheels and wheel covers may have sharp edges. Handle them carefully to avoid possible severe injury. Before putting the wheel into place, be sure that there is nothing on the hub or wheel (such as mud, tar, gravel, etc.) that interferes with the wheel fitting solidly against the hub. If there is, remove it.
!
WARNING:
If there is not good contact on the mounting surface between the wheel and hub, the wheel nuts could loosen and cause the loss of a wheel. Loss of a wheel may result in loss of control of the vehicle. This may cause serious injury or death.
D060H02A-AAT
7. Re-install Wheel Nuts
D060I01E-GAT
8. Lower Vehicle and Tighten Nuts
WHAT TO DO IN AN EMERGENCY
15
D060H03MC To reinstall the wheel cover, hold it on the studs, put the wheel nuts on the studs and tighten them finger tight. The nuts should be installed with their small diameter ends directed inward. Jiggle the tire to be sure it is com- pletely seated, then tighten the nuts as much as possible with your fingers again.
OMC047009
Lower the car to the ground by turning the wheel nut wrench counterclock- wise. Then position the wrench as shown in the drawing and tighten the wheel nuts. Be sure the socket is seated completely over the nut. Do not stand on the wrench or use an exten- sion pipe over the wrench handle. Go around the wheel tightening every other nut until they are all tight. Then double-check each nut for tightness.
WHAT TO DO IN AN EMERGENCY
16
After changing wheels, have a techni- cian tighten the wheel nuts to their proper torque as soon as possible.
Wheel nut tightening torque: Steel wheel & aluminium alloy wheel: 65-80 lb.ft (900-1,100 kg.cm)
D060J01E-AAT
After Changing Wheels
If the pressure is lower than recom- mended, drive slowly to the nearest service station and inflate to the cor- rect pressure. If it is too high, adjust it until it is correct. Always reinstall the valve cap after checking or adjusting tire pressure. If the cap is not re- placed, air may leak from the tire. If you lose a valve cap, buy another and install it as soon as possible. After you have changed wheels, al- ways secure the flat tire in its place in the trunk and return the jack and tools to their proper storage locations.
IF YOUR VEHICLE MUST BE TOWED
D080A01O-GAT If your vehicle has to be towed, it should be done by your Hyundai dealer or a commercial tow truck service. This will help assure that your vehicle is not dam- aged in towing. Also, professionals are generally aware of local laws governing towing. In any case, rather than risk dam- age to your car, it is suggested that you show this information to the tow truck operator. Be sure that a safety chain sys- tem is used and that all local laws are observed. It is recommended that your vehicle be towed with a wheel lift and dollies or flatbed equipment with all the wheels off the ground.
If you have a tire gauge, remove the valve cap and check the air pressure.
D060J02MC
CAUTION:
incorrectly!
o Your vehicle can be damaged if towed
o Be sure the transaxle is in neutral. o When the engine will not start, be sure the steering is unlocked by plac- ing the key in the "ACC" position.
CAUTION:
o When towing the vehicle, take care not to cause damage to the bumper or underbody of the vehicle.
D080B01O-GAT
Towing the Vehicle
1)
2)
3)
dolly
D080B01MC
Your vehicle can be towed by wheel lift type truck (1), (2) or flatbed equipment (3).
D080B02MC
o Do not tow with sling type truck as this may cause damage to the bumper or underbody of the vehicle.
1) If the vehicle is being towed with the rear wheels on the ground, be sure the parking brake is released.
WHAT TO DO IN AN EMERGENCY
17
NOTE: Before towing, check the level of the automatic transaxle fluid. If it is below the "HOT" range on the dipstick, add fluid. If you cannot add fluid, a towing dolly must be used.
2) If any of the loaded wheels or suspen- sion components are damaged or the vehicle is being towed with the front wheels on the ground, use a towing dolly under the front wheels.
o Manual Transaxle:
If you do not use a towing dolly, place the ignition key in the "ACC" position and put the transaxle in "N (Neutral)".
CAUTION:
Do not tow with the key removed or in the "LOCK" position when towing from the rear without a towing dolly.
WHAT TO DO IN AN EMERGENCY
18
o Automatic Transaxle:
Be sure to use a towing dolly under the front wheels.
D080D01MC-AAT
EMERGENCY TOWING Front (If Installed)
CAUTION:
Rear
OMC045015
D080B03MC
A vehicle with an automatic transaxle should never be towed from the rear with the front wheels on the ground. This can cause serious damage to the transaxle.
3) It is recommended that your vehicle be towed with all the wheels off the ground.
OMC045016
For emergency towing when no commer- cial tow vehicle is available, attach a tow cable, chain or strap to one of the towing hooks under the front/rear of your car. Do not attempt to tow your vehicle in this manner on any unpaved surface. This may result in serious damage to your car. Nor should it be attempted if the wheels, drive train, axles, steering or brakes are damaged. Before towing, be sure the transaxle is in neutral and the key in "ACC" (with the engine off) or in the "ON" position (with the engine running). A driver must be in the towed car to steer it and operate the brakes.
NOTE: Before towing, check the level of the automatic transaxle fluid. If it is below the "HOT" range on the dipstick, add fluid. If you cannot add fluid, a towing dolly must be used.
WHAT TO DO IN AN EMERGENCY
19
(3)Attach a tow cable, chain or strap to the
towing hook on the front bumper.
NOTE: Place the towing hook & towing hole cover in its original position when not in use.
CAUTION:
If the car is being towed with all four wheels on the ground, it can be towed only from the front. Be sure that the transaxle is in neutral. Do not tow at speeds greater than 30 mph (50 km/h) and for more than 15 miles (25 km). Be sure the steering is unlocked by plac- ing the key in the "ACC" position. A driver must be in the towed vehicle to operate the steering and brakes.
How to Use Front Towing Hook (If Installed)
(1)Open the towing hole cover by push-
ing it with your finger.
OMC045013
OMC045014
(2)Take out the towing hook from the jack case. To mount the towing hook, ro- tate it clockwise.
NOTE: The jack case is located on the spare tire in the trunk or luggage compart- ment.
CAUTION
It should be tightened firmly with your fingers until there is no more play in the towing hole. Towing hook is located in the jack case on the spare tire.
3
20WHAT TO DO IN AN EMERGENCY
IF YOU LOSE YOUR KEYS
D120A01A-AAT If you lose your keys, many Hyundai dealers can make you a new key if you have your key number. If you lock the keys inside your car and you cannot obtain a new key, many Hyundai dealers can use special tools to open the door for you.
CORROSION PREVENTION &
APPEARANCE CARE
Corrosion Protection ..................................................... 4-2
To Help Prevent Corrosion .......................................... 4-3
Washing and Waxing.................................................... 4-4
Cleaning the Interior...................................................... 4-644 CORROSION PREVENTION AND APPEARANCE CARE
CORROSION PROTECTION
E010A01A-AAT
Protecting Your Hyundai from Cor- rosion By using the most advanced design and construction practices to combat corro- sion, Hyundai produces cars of the high- est quality. However, this is only part of the job. To achieve the long term corro- sion resistance your Hyundai can deliver, the owner's cooperation and assistance is also required.
E010B01A-AAT
Common Causes of Corrosion The most common causes of corrosion on your car are:
o Road salt, dirt and moisture that is allowed to accumulate underneath the car.
o Removal of paint or protective coat- ings by stones, gravel, abrasion or minor scrapes and dents which leave unprotected metal exposed to corro- sion.
E010C01A-AAT
High-Corrosion Areas If you live in an area where your car is regularly exposed to corrosive materials, corrosion protection is particularly impor- tant. Some of the common causes of accelerated corrosion are road salts, dust control chemicals, ocean air and indus- trial pollution.
E010D01A-AAT
Moisture Breeds Corrosion Moisture creates the conditions in which corrosion is most likely to occur. For ex- ample, corrosion is accelerated by high humidity, particularly when temperatures are just above freezing. In such condi- tions, the corrosive material is kept in contact with the car surfaces by moisture that is slow to evaporate. Mud is a particular enemy of corrosion protection because it is slow to dry and holds moisture in contact with the ve- hicle. Even though the mud appears to be dry, it can still retain moisture and promote corrosion. High temperatures can also accelerate corrosion of parts that are not properly ventilated so the moisture can be dis- persed. For all these reasons, it is par- ticularly important to keep your car clean and free of mud or accumulations of other materials. This applies not only on the visible surfaces but particularly to the underside of the car.
TO HELP PREVENT COR- ROSION
E020A01A-AAT You can help prevent corrosion from getting started by observing the follow- ing:
E020B01A-AAT
Keep Your Car Clean The best way to prevent corrosion is to keep your car clean and free of corrosive materials. Attention to the underside of the car is particularly important.
o If you live in a high-corrosion area — where road salts are used, near the ocean, areas with industrial pollution, acid rain, etc.— you should take extra care to prevent corrosion. In winter, hose off the underside of your car at least once a month and be sure to clean the underside thoroughly when winter is over.
o When cleaning underneath the car, give particular attention to the compo- nents under the fenders and other areas that are hidden from view.
CORROSION PREVENTION AND APPEARANCE CARE
CORROSION PREVENTION AND APPEARANCE CARE 4
Do a thorough job; just dampening the accumulated mud rather than washing it away will accelerate corrosion rather than prevent it. Water under high pres- sure and steam are particularly effec- tive in removing accumulated mud and corrosive materials.
o When cleaning lower door panels, rocker panels and frame members, be sure that drain holes are kept open so that moisture can escape and not be trapped inside to ac-celerate corro- sion.
E020C01A-AAT
Keep Your Garage Dry Don't park your car in a damp, poorly ventilated garage. This creates a favor- able environment for corrosion. This is particularly true if you wash your car in the garage or drive it into the garage when it is still wet or covered with snow, ice or mud. Even a heated garage can contribute to corrosion unless it is well ventilated so moisture is dispersed.
E020D02A-AAT
Keep Paint and Trim in Good Condi- tion Scratches or chips in the finish should be covered with "touch-up" paint as soon as possible to reduce the possibility of cor- rosion. If bare metal is showing through, the attention of a qualified body and paint shop is recommended.
Bird droppings : Bird droppings are highly corrosive and may damage painted sur- faces in just a few hours. Always remove bird droppings as soon as possible.
E020E01A-AAT
Don't Neglect the Interior Moisture can collect under the floor mats and carpeting to cause corrosion. Check under the mats periodically to be sure the carpeting is dry. Use particular care if you carry fertilizers, cleaning materials or chemicals in the car. These should be carried only in proper containers and any spills or leaks should be cleaned up, flushed with clear water and thoroughly dried.
44 CORROSION PREVENTION AND APPEARANCE CARE
WASHING AND WAXING
E030A02A-AAT
Washing Your Hyundai Never wash your car when the surface is hot from being in the sun. Always wash your car in the shade.
Wash your car frequently. Dirt is abrasive and can scratch the paint if it is not re- moved. Air pollution or acid rain may damage the paint and trim through chemi- cal action if pollutants are allowed to remain in contact with the surface. If you live near the ocean or in an area where road salts or dust control chemicals are used, you should pay particular attention to the underside of the car. Start by rins- ing the car to remove dust and loose dirt. In winter, or if you have driven through mud or muddy water, be sure to thor- oughly clean the underside as well. Use a hard direct stream of water to remove accumulations of mud or corrosive mate- rials. Use a good quality car-washing solution and follow the manufacturer's directions on the package. These are available at your Hyundai dealer or auto parts outlet. Don't use strong household detergents, gasoline, strong solvents or abrasive cleaning powders as these may damage the finish.
Use a clean sponge or cloth, rinse it frequently and don't damage the finish by rubbing too hard. For stubborn spots, dampen them frequently and remove them a little at a time.
To clean whitewall tires, use a stiff brush or soap-impregnated steel-wool scour- ing pad.
To clean plastic wheel covers, use a clean sponge or soft cloth and water.
To clean cast aluminum alloy wheels, use a mild soap or neutral detergent. Do not use abrasive cleaners. Protect the bare-metal surfaces by cleaning, polish- ing and waxing. Because aluminum is subject to corrosion, be sure to give alu- minum alloy wheels special attention in winter. If you drive on salted roads, clean the wheels thoroughly afterwards.
After washing, be sure to rinse thoroughly. If soapy water dries on the finish, streak- ing will result.
When the weather is warm and the hu- midity low, you may find it necessary to rinse each section immediately after wash- ing to avoid streaking.
After rinsing, dry the car using a damp chamois or soft, absorbent cloth. The rea- son for drying the car is to remove water from the car so it will dry without water spots. Don't rub, this can damage the finish.
If you find any nicks or scratches in the paint, use touch-up paint to cover them to prevent corrosion. To protect the paintwork of the car against corrosion, you must clean your Hyundai (at least once a month). Give special attention to the removal of salt, mud and other sub- stances on the underside of the splashboards of the car. Make sure that the outlets and the underside of the doors are open. Paint damage can be caused by small accumulation of tar, industrial precipitation, tree resin, insects and bird droppings, when not removed immedi- ately. If water alone is not strong enough to remove the accumulated dirt, use a mild car washing solution. Be sure to rinse the surface after washing to remove the solu- tion. Never allow the solution to dry on the painted surfaces.
!
CAUTION:
CORROSION PREVENTION AND APPEARANCE CARE
CORROSION PREVENTION AND APPEARANCE CARE 4
E030B01A-AAT
Spot Cleaning Don't use gasoline, strong solvents or corrosive cleaning agents. These can damage the finish of the car. To remove road tar, use turpentine on a clean, soft cloth. Be gentle. To remove dead insects or tree sap, use warm water and mild soap or car-wash- ing solution. Soak the spot and rub gen- tly. If the paint has lost its luster, use a commercial car-cleaning polish.
E030D01A-AAT
When to Wax Again You should polish and wax the car again when water no longer beads on a clean surface but spreads out over a larger area.
E030E01A-AAT
Maintaining Bumpers Special precautions must be observed to preserve the appearance of the bumpers on your Hyundai. They are:
OJB037800
o Water washing in the engine com- partment including high pressure water washing may cause the failure of electrical circuits located in the engine compartment.o Never allow water or other liquids to come in contact with electrical/elec- tronic components inside the vehicle as this may damage them.
E030C01A-AAT
Polishing and Waxing Always wash and dry the car before pol- ishing or waxing or using a combination cleaner and wax. Use a good quality commercial product and follow the manufacturer's directions on the con- tainer. Polish and wax the bright trim pieces as well as the paint.
o Be careful not to spill battery electro- lyte or hydraulic brake fluid on the bumpers. If you do, wash it off imme- diately with clean water.
o Be gentle when cleaning the bumper surfaces. They are made of soft plastic and the surface can be damaged if mistreated. Do not use abrasive clean- ers. Use warm water and mild soap or carwashing solution.
o Do not expose the bumpers to high temperatures. For example, if you have your car repainted, do not leave the bumpers on the car if the car is going to be placed in a high-temperature paint booth.
44 CORROSION PREVENTION AND APPEARANCE CARE
CLEANING THE INTERIOR
E040A01A-AAT
To Clean the Vinyl Upholstery To clean the vinyl upholstery, first remove loose dirt and dust with a vacuum cleaner. Then apply a solution of mild soap or detergent and water using a clean sponge or soft cloth. Allow this to stay on the surface to loosen the dirt, then wipe with a clean damp sponge or cloth. If all the dirt stains are not removed, repeat this procedure until the upholstery is clean. Do not use gasoline, solvent, paint thin- ner or other strong cleaners.
E040C01A-AAT
Cleaning the Carpets Use a foam-type carpet cleaner. Clean- ers of this type are available in aerosol cans in liquid form or powder. Read the instructions and follow them exactly. Us- ing a vacuum cleaner with the appropri- ate attachment, remove as much dirt from the carpets as possible. Apply the foam following the manufacturer's directions, then rub in overlapping circles. Do not add water. These cleaners work best when the carpet is kept as dry as pos- sible.
E040D01A-AAT
Cleaning the Seat Belts To clean the seat belts, use a cloth or sponge with mild soap or detergent and warm water. Do not use strong deter- gents, dye, bleach or abrasive materials on the seat belts as this may weaken the fabric. While cleaning the belts, inspect them for excessive wear, cuts, fraying or other signs of damage and replace them if necessary.
E040E01A-AAT
Cleaning the Windows You may use any household window cleaner on the windows. However, when cleaning the inside of the rear window be careful not to damage the rear window defroster wiring.
ANY QUESTIONS?
E050A01A-AAT If you have any questions about the care of your car, consult your Hyundai dealer.
CORROSION PREVENTION AND APPEARANCE CARE
CORROSION PREVENTION AND APPEARANCE CARE 4
VEHICLE MAINTENANCE REQUIREMENTS
Maintenance Intervals................................................... 5-2
Scheduled Maintenance ............................................... 5-4
Maintenance under Severe Usage Conditions ............ 5-6
Explanation of Scheduled Maintenance Items ............. 5-7
California Perchlorate Notice ...................................... 5-1055
5 VEHICLE MAINTENANCE REQUIREMENTS
MAINTENANCE INTERVALS
F010A01A-AAT
Service Requirements To ensure that you receive the greatest number of miles of satisfying operation from your Hyundai, certain maintenance procedures must be performed. Although careful design and engineering have re- duced these to a minimum, those that are required are of the utmost importance. It is your responsibility to have these maintenance procedures performed to comply with the terms of the warranties covering your new Hyundai. The Owner's Handbook supplied with your new ve- hicle provides further information about these warranties.
F010B01A-AAT
Maintenance Requirements The maintenance required for your Hyundai can be divided into three main areas:
o Specified scheduled procedures o General checks o Do-it-yourself maintenance
F010C01A-AAT
Specified Scheduled Procedures These are the procedures such as in- spections, adjustments and replacements that are listed in the maintenance charts starting on page 5-4. These procedures must be performed at the intervals shown in the maintenance schedule to assure that your warranty remains in effect. Al- though it is strongly recommended that they be performed by the factory-trained or distributor-trained technicians at your Hyundai dealer, these procedures may be performed at any qualified service facility. It is suggested that genuine Hyundai service parts be used for any required repairs or replacements. Other parts of equivalent quality such as engine oil, engine coolant, manual or auto transaxle oil, brake fluid and so on which are not supplied by Hyundai Motor Company or its distributor may be used without affect- ing your warranty coverage but you should always be sure these are equivalent to the quality of the original Hyundai parts. Your Owner's Handbook provides further information about your warranty cover- age.
F010D01A-AAT
General Checks These are the regular checks you should perform when you drive your Hyundai or you fill the fuel tank. A list of these items will be found on page 6-3.
F010E01A-AAT
Do-It-Yourself Maintenance If you are mechanically inclined, own a few tools that are required and want to take the time to do so, you can inspect and service a number of items. For more information about doing it yourself, see Section 6.
SCHEDULED NANCE REQUIREMENTS
MAINTE-
VEHICLE MAINTENANCE REQUIREMENTS
F020A02A-AAT o Inspection should be performed any time a malfunction is experienced or suspected.
o Receipts for all emission control sys- tem services should be retained to demonstrate compliance with condi- tions of the emissions system war- ranty.
o After 120 months or 150,000 miles (240,000 km), continue to follow the prescribed maintenance intervals.
o For severe usage maintenance re- quirements, see page 5-6 of this sec- tion.
F010F01A-AAT
A Few Tips o Whenever you have your Hyundai serviced, keep copies of the service records in your glove box. This will help ensure that you can document that the required procedures have been performed to keep your warranties in effect. This is especially important when service is not performed by an authorized Hyundai dealer.
o If you choose to do your own mainte- nance and repairs, you may find it helpful to have an official Hyundai Shop Manual. A copy of this publica- tion may be purchased at your Hyundai dealer's parts department.
5 VEHICLE MAINTENANCE REQUIREMENTS
SCHEDULED MAINTENANCE
F030A01A-AAT The following maintenance services must be performed to assure good vehicle control and performance. Keep receipts for all vehicle services to protect your warranty. Where both mileage and time are shown, the frequency of service is determined by whichever occurs first.
F030B02MC-AAT R : Replace I : Inspect and, after inspection, clean, adjust, repair or replace if necessary
No.
DESCRIPTION
MILES X 1000
KILOMETERS X 1000
MONTHS
7.5
12
15
24
12
22.5
36
18
30
48
24
37.5
60
30
45
72
36
EMISSION CONTROL ITEMS
ENGINE OIL AND FILTER
FUEL FILTER
FUEL LINES, FUEL HOSES AND CONNECTIONS
VACUUM HOSE
CRANKCASE VENTILATION HOSE
VAPOR HOSE AND FUEL FILLER CAP
AIR CLEANER FILTER
FUEL TANK AIR FILTER
SPARK PLUGS