- Download PDF Manual
-
II-ON position: This is the normal running position.
III-START position: The starter will engage when the key is turned to this position.
To remind you to remove the ignition key when leaving your car, a beeper will sound if the key is still in the ignition when you open the driver's door. The beeper system is deactivated when you turn the ignition to 0 (Lock) and fully remove the key.
Main Menust Starting the Engine
Before Starting
Manual Transmission: 1. Apply the parking brake. 2. Push the clutch pedal all the way in (see NOTE below). 3. Shift the transmission to neutral.
NOTE: On cars equipped with manual transmissions, the engine will not crank unless the clutch pedal is fully depressed.
Automatic Transmission: 1. Make sure the shift lever is in Park (P). 2. Apply the parking brake and the foot brake.
NOTE:
When starting in cold weather, keep all unnecessary electrical circuits off (lights, defogger, etc.) for the best battery output. Do not crank the engine for more than 15 seconds at a time. Wait 10 seconds before going to the next step.
Starting the Engine 1. With your foot off the accelerator start the engine by turning the
key to the III position.
2. If the engine won't start within 15 seconds or starts but fails to continue to run, push the accelerator pedal halfway, and hold it there while cranking the engine. Once the engine starts, release the accelerator gradually as the engine speeds up.
3. If it doesn't start within 15 seconds, push the accelerator pedal down to the floor and hold it there while cranking in order to clear flooding. Try step 2 again.
Cold Weather at High Altitude Starting 1. When starting in cold weather at high altitude (above 8,000 feet), push the accelerator pedal about halfway and hold it there while cranking the accelerator gradually as the engine speeds up.
the engine starts,
the engine. Once
release
2. If it doesn't start within 15 seconds, push the accelerator pedal down to the floor and hold it there while cranking in order to clear flooding. Try step 1 again.
NOTE: If the outside temperature is below freezing, or if your car has not been driven for several days, warm up the engine for a few minutes before driving.
Main Menust Safety Items
Before driving away, check that: The doors are closed properly. The mirrors are properly adjusted, and the windows clean. The driver and passengers are wearing properly adjusted seat belts. The head restraints are properly adjusted. The warning and indicator lights are operating properly. The brake pedal feels normal. All luggage and cargo is secured. Nothing is interfering with the driver's feet or blocking vision to the rear.
While driving remember to:
Always drive defensively; expect the unexpected. Reduce your speed during night hours and bad weather. Follow at a safe distance; don't tailgate. Get off the highway when you are tired; stop and take a rest.
When stopping for repairs:
Park the car well off the road. Turn on the hazard warning flasher. Use flares or other warning devices to warn other motorists.
After parking your car:
Apply the parking brake and shift to first gear if equipped with manual transmission, or PARK on automatic transmission equip- ped cars. Take your keys. Make sure the windows are closed and the doors are locked. If parked on a hill: 1. Turn the front wheels away from the curb if facing uphill. 2. Turn the front wheels toward the curb if facing downhill. Never leave children unattended in a parked car.
Main Menust Engine Exhaust Gas Warning
A properly maintained car is your best protection against exhaust gas entering the passenger compartment. The exhaust system should be thoroughly inspected by a compe- tent mechanic whenever:
The car is raised for oil change. You notice a change in the sound of the exhaust. The exhaust system or the rear or underside of the car is damaged.
Avoid breathing exhaust gases. They contain carbon monoxide, which is a colorless, odorless gas that can cause loss of con- sciousness and eventual death. If you suspect that exhaust gas is entering the passenger compartment, have the cause deter- mined and corrected as soon as possible. If you must drive under these conditions, drive only with all windows fully open. Do not drive with the tailgate open. An open tailgate may draw exhaust gases into the passenger compartment. If you must drive with the tailgate open, drive only with all the windows wide open. Do not run the engine in confined areas, such as garages, any longer than necessary to move the car in or out. If you must sit in a parked car with the engine running for more than a short time, adjust the heating/ventilation system as follows: 1 .Set the function lever to the 2.Set the temperature control dial for best comfort. 3.Set the recirculation lever to the position. 4.Turn the fan to the highest speed.
position.
NOTE: To insure proper operation of the car's ventilation system, keep the front air inlet clear of snow, mud, leaves or other obstructions.
Main Menust Shifting the 5 or 6 Speed
The fully synchronized manual transmission is very easy to shift up or down. When you slow down for traffic, steep hills, or corners, shift to a lower gear before the engine starts to labor. When de- scending steep grades, select a lower gear to help maintain a safe speed and to prevent the brakes from overheating. When shifting, depress the clutch pedal fully, shift gears and then release the clutch gradually. Do not speed-shift; allow time for the gears to synchronize. To prevent grinding the gears when shifting into reverse, hold the clutch pedal depressed briefly before shifting, or shift the lever into one of the forward gears before selecting reverse. A safety lockout prevents accidental shifting straight from 5th to Reverse.
5 Speeds (CIVIC WAGON)
6 Speeds (4WD)
SL-Super Low Gear (4WD) This super low ratio gear reduces the possibility of spinning the wheels when accelerating on roads covered with snow, sand or mud, or on steep hills.
Avoid rapid acceleration or sudden deceleration when either or both driving wheels are on a slippery surface. Decreased traction could cause loss of directional control.
CAUTION: When downshifting to SL, do so only at speeds of 3 mph (5km/h) or less and release the clutch gradually to avoid any sudden engine over-revving.
Main Menust free
Clutch Pedal Adjustment Clutch pedal to compensate for lining wear. There should be approximately 25 mm (1 in) of pedal free travel. If not, or if the clutch seems to slip or you have difficulty shifting, have your dealer check the clutch adjustment.
travel must be adjusted periodically
CAUTION.
Do not drive with your foot on the clutch pedal as this will cause premature wear of clutch components. Do not shift into reverse while the car is moving. Driving with the clutch pedal free travel improperly adjusted can cause premature wear of the clutch components.
Maximum Allowable Speeds The speeds shown below are the maximum at which the car can be driven or downshifted in each gear without over-revving the engine.
CIVIC WAGON
4WD
(cont'd)
Main Menust Shifting the 5 or 6 Speed (cont'd)
Recommended Shift Speeds For best fuel economy, and effective emission control, shift at the speeds shown:
CIVIC WAGON
4WD
Main Menust Shifting the Automatic (CIVIC WAGON)
The automatic transmission shift lever has a locking mechanism to prevent accidental shifting into Reverse (R), Park (P) or 2nd (2). Also, an Automatic Shift Lock prevents you from shifting out of Park unless the brake pedal is already depressed and the ignition switch is in the II position. Push the button on the shift handle to shift into 2nd, Reverse or Park; depress the brake pedal and then push the button on the shift handle to shift out of Park.
Depress button
: Depress the brake pedal first and push the button, then shift.
: Push the button, then shift. : Shift as desired.
KEY
Insert
If you cannot shift out of Park with the brake pedal depressed and the ignition switch in the II position: 1.Turn the ignition switch off and
remove the key.
2. Insert the key in the Shift Lock Release located to the right of the shift lever.
SHIFT LOCK RELEASE
3. Press and hold the key down, then press the button on the shift handle and move the shift lever to Neutral.
4. Return the key
ignition switch, depress the brake pedal and restart the engine.
to the
NOTE: If you encounter any problem shifting out of Park, have your authorized Honda dealer check the system as soon as possible.
(cont'd)
Main Menust Shifting the Automatic (CIVIC WAGON) (cont'd)
Operating Tips For smoother operation, apply the brakes when shifting from Neutral or Park to a forward or reverse gear. When parking: bring the car to a stop with the foot brake, hold the brake on and shift into Park, set the hand brake and then turn off the engine.
NOTE: Your 4 speed automatic transmission is equipped with a torque converter lock-up clutch. Because of this, you may notice what feels like an extra shift as the clutch engages.
CAUTION:
Shift into P only after the car has come to a complete stop. Shift into or out of R only after the car has come to a complete stop. Do not "rev-up" the engine when the brake is on and the shift lever is in D4, D3, 2 or R. When stopped on a hill, use the brakes to hold your position, not the accelerator pedal. Do not shift from N or P into D4, D3, 2 or R when the engine is above idle speed. Before shifting into gear, make sure your foot is firmly on the brake pedal. Do not rest your hand on the shift lever or push the shift button while driving.
Main Menust Driving Technique
D4-4th Use the D4 range for normal in-town and highway driving. The car will start off in 1st and shift automatically to 2nd, 3rd, and 4th. The further down you push the accelerator, the later the transmission will shift and the faster the car will accelerate.
D3-3rd Use of D3 will allow the transmission to start off in 1st and shift automatically to 2nd and 3rd. Use D 3 when climbing grades to prevent the transmission from "hunting" between 3rd and 4th gear; or when increased braking is needed.
NOTE: If rapid acceleration is necessary, depress the accelerator to the floor; the transmission will automatically shift down according to load and engine speed. This applies to both D 4 and D3 ranges.
2-2nd Use 2nd gear for increased engine braking when driving downhill, and increased power when driving uphill; also for driving on slippery roads, and freeing the car from mud or sand, where 1st gear could provide too much power and cause skidding or wheelspin. The maximum recommended speed in 2nd gear is: 62 mph (100 km/h)
R-Reverse CAUTION: Shift into or out of reverse only after the car has come to a complete stop; the transmission may be damaged if you shift while the car is moving.
P-Park CAUTION: Use this position when starting the engine, or when parking. Shift into Park only when the car is COMPLETELY stopped.
N-Neutral Use when starting the engine or during prolonged idling in traffic.
Main Menust Depress button
: Push the button, then shift. : Shift as desired.
If you cannot shift out of Park with the brake pedal depressed and the ignition switch in the II position: 1. Turn the ignition switch off and
remove the key.
2. Insert the key in the Shift Lock Release located to the right of the shift lever.
3. Press and hold the key down, then press the button on the shift handle and move the shift lever to Neutral.
4. Return the key
ignition switch, depress the brake pedal and restart the engine.
to the
KEY
Insert
SHIFT LOCK RELEASE
NOTE: If you encounter any problem shifting out of Park, have your authorized Honda dealer check the system as soon as possible.
Main Menust Operating Tips For smoother operation, apply the brakes when shifting from Neutral or Park to a forward or reverse gear. When parking: bring the car to a stop with the foot brake, hold the brake on and shift into Park, set the hand brake and then turn off the engine.
NOTE: Your 4 speed automatic transmission is equipped with a torque converter lock-up clutch. Because of this, you may notice what feels like an extra shift as the clutch engages.
CAUTION:
Shift into P only after the car has come to a complete stop. Shift into or out of R only after the car has come to a complete stop. Do not "rev-up" the engine when the brake is on and the shift lever is in D, S, 2 or R. When stopped on a hill, use the brakes to hold your position, not the accelerator pedal. Do not shift from N or P into D, S, 2 or R when the engine is above idle speed. Before shifting into gear, make sure your foot is firmly on the brake pedal. Do not rest your hand on the shift lever or push the shift button while driving.
(cont'd)
Main Menust Shifting the Automatic (4WD) (cont'd)
Driving Technique
D-4th Use the D range for normal in-town and highway driving. The car will start off in 1st and shift automatically to 2nd, 3rd, and 4th. The further down you push the accelerator, the later the transmission will shift and the faster the car will accelerate.
S (S3-3rd/S4-4th) The " S" shift selector range changes the shift points under part throttle acceleration, allowing the transmission to stay in each lower gear for a longer period before automatically upshifting. With the shift selector in the " S" range, the transmission will shift from 1st to 2nd and 3rd but not 4th. This is especially useful when climbing or descending grades. While driving in the " S" range, the car's performance is improved but fuel economy is reduced. While driving in the " S" range, you can select 4th gear by pushing the "S4" switch. Depending upon vehicle speed and throttle pedal position, the transmission will shift to 4th gear when the switch is pressed; the "S4" indicator light in the instrument panel will come on. Pushing the "S4" switch again will cause the transmission to downshift to 3rd gear in the "S3" mode. The "S4" indicator light in the instrument panel will go out, and the "S3" light on the instrument panel will come on. If the shift lever is moved to any other driving range, the "S4" switch will be cancelled automatically.
SWITCH
Push
NOTE: If rapid acceleration is necessary, depress the accelerator to the floor; the transmission will automatically shift down according to load and engine speed. This applies to both D and S ranges.
Main Menust 2-1st/2nd
Use " 2" to increase engine braking when driving downhill and engine power when driving uphill. Using " 2" will allow the transmission to automatically shift up or down between the 1st gear and the 2nd gear. The maximum recommended speed for the " 2" range is: 62mph (100km/h) If you need more engine braking or engine power when using the " 2" position, push the When the speed is more than 31 mph (50 km/h): The indicator light in the instrument panel will come on but the transmission will remain in 2nd gear. However, when the speed goes below 31 mph (50 km/h), the transmission downshifts from 2nd to 1st and locks in 1st. The maximum recommended speed when locked in 1st gear is: 37mph (60km/h) To release the Low lock, push the any other driving range.
switch to use the 1st gear only.
switch again or select
R-Reverse CAUTION: Shift into or out of reverse only after the car has come to a complete stop; the transmission may be damaged if you shift while the car is moving.
P-Park CAUTION: Use this position when starting the engine, or when parking. Shift into Park only when the car is COMPLETELY stopped.
N-Neutral Use when starting the engine or during prolonged idling in traffic.
Main Menust Real Time 4WD
The 4WD system automatically engages between the front and rear wheels.
Service
To prevent sudden movement of the car, which may result in personal injury, always disengage the 4 WD system manually before performing service that requires either the front or rear wheels to be raised and turning.
Towing CAUTION: Before towing the car with either the front or rear wheels raised off the ground, place the transmission in neutral and manually disengage the 4WD system to prevent the raised wheels from turning.
4WD Disengagement (Manual Transmission) 1. Locate the orange disengagement lever at the rear of the engine
compartment.
DISENGAGEMENT LEVER
2. Loosen the lock bolt at the slotted end of the lever. NOTE: For better accessibility, use a socket and a long extension bar. CAUTION: Do not loosen the lock bolt more than 5 — 7 turns. Replacement is extremely difficult.
Unlocked Position (4WD off)
Locked Position (4WD on)
MIDDLE BOLT
LOCK BOLT
10 mm
10 mm
3. Move the lever by turning the middle bolt counterclockwise. 4.Tighten the lock bolt. NOTE: After service or towing is completed, return the lever to the normal (4WD on) position and tighten the lock bolt.
Main Menust 4WD Disengagement (Automatic Transmission) 1. Locate the disengagement plate at the rear of the transmission
case behind the right front wheel.
DISENGAGEMENT LEVER
2. Loosen the lock bolt in the notch on the plate.
NOTE: For better accessibility, use a socket and a long extension bar.
CAUTION: Do not loosen the lock bolt more than 5 — 7 turns. Replacement is extremely difficult.
Unlocked Position (4WD off)
Locked Position (4WD on)
MIDDLE BOLT
10 mm
LOCK BOLT
10 mm
3. Turn the middle bolt counterclockwise until the plate rotates
about 150° and is stopped by the lock bolt.
4.Tighten the lock bolt.
NOTE: After service or towing is completed, return the plate to the normal (4WD on) position and tighten the lock bolt.
Main Menust Maintenance Schedule and Records
Your Honda automobile must be properly maintained to ensure that it is in peak operating condition and the emission levels are within the standards set by the Federal Clean Air Act. The following instructions and maintenance procedures are based on the assumption that your car will be used exclusively for the purpose for which it was designed: 1. To carry passengers and cargo within the load limits shown on
the label in the glove box.
2. To be driven on reasonable road surfaces within legal limits. 3. To generally be driven daily over a distance of several miles. 4. Use gasoline from pumps labeled unleaded, with a pump octane number of 86 or higher. The pump octane number is an average of the Research (R) octane and Motor (M) octane numbers.
NOTE: Failures which occur due to a lack of maintenance will not be covered under warranty.
The Required Maintenance Schedule* specifies all maintenance required to keep your car in peak operating condition. Work should be done by a Honda dealer but may be done by any qualified service facility or individual who is competent in this type of work. Maintenance, replacement, or repair of emission control devices and systems may be done by any automotive repair establishment or individual using parts that are "certified" to EPA standards. After the maintenance has been done, be sure to complete the Maintenance Records on pages 61 — 63. All required maintenance is considered normal owner operating cost and you will be charged for it by your dealer.
* Maintenance operations indicated by *4 are recommended by the manufacturer for vehicle sold in California, but not required. Other maintenance operations are required by California regulations and condition the emission warranty. All operations (including *4) are required for vehicles sold outside California.
Main Menust Check the following items at each fuel stop: 1. Engine oil level. 2. Radiator coolant level.
Check the following items periodically: 1. Brakes: for braking efficiency, brake pedal travel and hydraulic
fluid level.
2. Lights: for operation of headlights, taillights, side marker lights,
stoplights, turn signals and back-up lights.
3. Tires: for correct pressures (including spare); inspect for cuts and uneven or excessive wear. Rotate every 7,500 miles (12,000 km) in the pattern shown on page 90.
4. Steering: for excessive play or vibration while driving. 5. Exhaust system: for leaks or loose mounts. 6. Wipers: for operation of windshield wipers and washer, and
condition of wiper blades.
7. Seat belts: for condition of fabric and buckles, and operation of
the restraint mechanism.
8. Battery condition. 9. Clutch adjustment (clutch pedal free travel).
(cont'd)
Main Menust Maintenance Schedule and Records (cont'd)
: Check oil and coolant level at each fuel stop. : Under severe driving conditions, service these items twice as often. (See page 62)
Main Menust Required Maintenance Record • Have your servicing dealer record all Required Maintenance below. • Keep receipts for all work done on your car.
(cont'd)
Main Menust Maintenance Schedule and Records (cont'd)
Severe Driving Conditions CAUTION: The following items must be serviced more frequently on cars normally used under severe driving conditions. Refer to the chart below for the appropriate maintenance intervals.
Severe driving conditions include: A: Repeated short distance driving B: Driving in dusty conditions C: Driving in severe cold weather D: Driving in areas using road salt or other corrosive materials E: Driving on rough and/or muddy roads
R-Replace I -Inspect
After inspection, clean, adjust, repair or replace if necessary.
Non-Scheduled Maintenance Record Record additional maintenance for severe driving conditions or non- scheduled maintenance on this page. (See page 60 )
Main Menust Main Menust Fluid Locations
ENGINE OIL FILLER CAP
AUTOMATIC TRANSMISSION FLUID DIPSTICK
POWER STEERING FLUID RESERVOIR (CIVIC WAGON with automatic transmission and 4WD)
BRAKE FLUID RESERVOIR
RADIATOR CAP
ENGINE OIL DIPSTICK
WASHER FLUID RESERVOIR CAP
RADIATOR RESERVOIR CAP
Main Menust Engine Oil and Filter
Checking Check the engine oil a couple of minutes after shutting the engine off, with the car parked on level ground. Remove the dipstick and wipe it clean. Re-insert it all the way down, then pull it out and read the level. The level should be between the upper and lower marks.
ENGINE OIL FILLER CAP
UPPER
LOWER
DIPSTICK
DIPSTICK
Adding If the level has dropped close to the lower mark, add oil until it is even with the upper mark. 1.Turn the oil filler cap counterclockwise to remove. Add oil, then
check the level again. Do not overfill.
2. Reinstall the cap and twist clockwise until it stops.
CAUTION:
Be sure the oil filler cap is correctly replaced before starting the engine. Engine oil is a major factor affecting the performance and service life of the engine, you should use only a premium quality detergent oil labeled SG grade.
LOOK FOR THIS LABEL ON THE OIL CONTAINER
Use the proper viscosity oil for the climate in which you drive:
Ambient Temperature
Some oil labels may also include additional designations of quality such as CC or CD. However, these are acceptable only when used together with SG. NOTE: 5W-30 viscosity oil is recommended for improved fuel economy.
(cont'd)
Main Menust Engine Oil and Filter (cont'd)
Fuel Efficient Oil For the best fuel economy from your car, it is recommended that you use a fuel efficient SG grade oil. This oil is usually identified by the words such as: "Energy Conserving II," "Gas Saving," and "Fuel Saving," etc.
Changing Oil and Filter Engine oil and the filter should be changed together every 6 months or 7,500 miles (12,000 km), whichever comes first. The filter is located on the engine block, below the intake manifold.
CAUTION: The oil filter cannot easily be removed from above the engine. For this reason it is recommended that the oil filter change be done by a skilled mechanic.
1. Start the car to warm up the
engine, then shut it off.
2. Remove the engine oil filler cap
and drain bolt, and drain the oil.
A warmed-up engine and the oil in it are hot; be careful not to burn yourself.
3. Remove the oil filter and let the
remaining oil drain out.
4. Install a new filter according to the instructions on or with the filter.
5. Reinstall the drain bolt with a new washer and tighten it securely. Refill the engine with the recom- mended oil, to the upper mark on the dipstick.
ENGINE OIL CAPACITY (including filter): 3.5
(3.7 US qt , 3.1 Imp qt)
ENGINE OIL DRAIN BOLT
OIL FILTER
Main Menust 6. Reinstall the filler cap securely. 7. Start the engine and make sure oil is not leaking from the drain
bolt or the filter.
8. Shut off the engine and recheck the oil level.
NOTE: Please dispose of used motor oil in a manner that is compatible with the environment. We suggest you take it in a sealed container to your local service station for reclamation. Do not throw it in the trash or pour it on the ground.
CAUTION: Used motor oil may cause skin cancer if repeatedly left in contact with the skin for prolonged periods. Although this is unlikely unless you handle used oil on a daily basis, it is still advisable to thoroughly wash your hands with soap and water as soon as possible after handling used oil.
Main Menust Transmission Oil/Fluid Check
Transmission oil/fluid must be checked with the engine off and the car on level ground.
If the engine has been running, some engine components may be hot enough to burn you.
CAUTION: If the oil/fluid level is low, check for possible leaks before adding oil. Do not overfill.
Since the transmission and differential are in the same housing, you are actually checking both oil/fluid levels in one procedure. Change transmission oil/fluid according to the Maintenance Schedule on page 60.
Manual Remove the oil filler bolt (beside the right axle). Feel inside the bolt hole with your finger. If the oil is up to the bottom edge of the hole, the oil level is correct. If it is not, slowly add oil until it runs out of the hole, then reinstall the bolt and tighten it securely with a wrench.
CORRECT LEVEL
OIL CHECK/ FILLER BOLT
MANUAL TRANSMISSION OIL CHANGE CAPACITY: CIVIC WAGON: 1.8 2.3 4WD:
(1.9 US qt , 1.6 Imp qt) (2.4 US q t, 2.0 Imp qt)
Use only SF or SG grade motor oil when adding or changing transmis- sion oil.
Main Menust Use the proper viscosity oil for the climate in which you drive:
Ambient Temperature
Automatic The automatic transmission fluid level is checked (with the engine off and the car on level ground) using the dipstick in the right end of the transmission housing. Remove the dipstick and wipe it off.
4WD
DIPSTICK
UPPER
LOWER
Insert the dipstick and remove it. The fluid level should be between the upper and lower marks. If necessary, add fluid and recheck. Use only DEXRON® II Automatic Transmission Fluid (A.T.F.) when adding or changing fluid. After checking the fluid level, push the dipstick in securely.
AUTOMATIC TRANSMISSION FLUID CHANGE CAPACITY:
CIVIC WAGON: 4WD:
2.4
3.2(2.5 US qt , (3.4 US qt
2.1 Imp qt) 2.8 Imp qt)
Main Menust Rear Differential Oil (4WD)
Rear differential oil must be checked or filled with the engine off and the car on the level ground.
CAUTION:
When checking the rear differential oil level, remember that if the car has been running, the differential and exhaust pipe will be hot. If the oil level is low, check for possible leaks before adding oil. Do not overfill.
Remove the oil filler bolt. Feel inside the bolt hole with your finger. If the oil is up to the bottom edge of the hole, the oil level is correct. If it is not, slowly add oil until it runs out of the hole, then reinstall the bolt and tighten it securely with a wrench.
OIL CHECK/ FILLER BOLT
CORRECT LEVEL
REAR DIFFERENTIAL OIL CHANGE CAPACITY:
0.65
(0.69 US q t, 0.57 Imp qt)
Recommended oil:
HYPOID GEAR OIL (API GL5) SAE 90 above 5°C (41 °F) HYPOID GEAR OIL (API GL5) SAE 80 below 5°C (41 °F)
Main Menust Cooling System
The engine in your Honda contains a number of aluminum parts. Therefore, it requires an antifreeze/coolant specifically formulated to protect the aluminum parts from corrosion. Failure to use a suitable antifreeze/coolant may seriously shorten the life of the engine as the result of rapid corrosion damage. Some antifreeze/ coolants, although labeled for use in engines containing aluminum, may not provide adequate protection for your engine. Therefore, use only a Honda RECOMMENDED antifreeze/coolant. CHECK WITH YOUR AUTHORIZED HONDA DEALER. For best corrosion protection, the mixture of coolant and water must be maintained year-round at 50/50. Concentrations less than 50% coolant may not provide sufficient protection against corrosion and freezing. Concentrations of greater than 60% coolant will impair cooling efficiency and are not recommended. Low- mineral drinking water or distilled water should be mixed with the antifreeze/coolant. Coolant loss should be replenished by a mixture containing the proper concentration of antifreeze and water. Do not mix different antifreeze/coolants. Do not use additional rust inhibitors or anti-rust products, as they may not be compatible with the radiator coolant. ENGINE DAMAGE CAUSED BY IMPROPER COOLANT USAGE IS NOT COVERED BY THE NEW CAR WARRANTY.
(cont'd)
Main Menust Cooling System (cont'd)
Checking Coolant Check the coolant level in the reserve tank when the engine is at normal operating temperature.
RESERVE TANK
If the level is below the MAX mark, but still visible, add a 50/50
solution of antifreeze and water to bring it up to MAX. If there is no coolant in the re- serve tank, the cooling system should be checked for leaks and repaired if necessary. Coolant must then be added to the radi- ator.MAX MIN
Do not remove the radiator cap when the engine is hot; the coolant is under pressure and could severely scald you.
CAUTION: Radiator coolant will damage paint. Quickly rinse any spilled coolant from painted surfaces.
Wait until the engine is cool, then turn the radiator cap counterclock- wise until it stops. DO NOT PRESS DOWN WHILE TURNING THE CAP. After any remaining pressure has been relieved, remove the cap by pressing down and again turning it counterclockwise. Add enough coolant to fill the radiator, and reinstall the cap. Be sure to tighten it securely. Fill the reserve tank up to the MAX mark with the engine cold.
Maintenance 1. Check the freeze protection level of the coolant with a hydrome-
ter.
2. Keep the front of the radiator free of dirt and debris. 3. Check hoses and hose clamps regularly.
Main Menust Replacing Coolant Replace coolant at 36 months or 45,000 miles (72,000 km), which- ever comes first. Thereafter, replace every 2 years or 30,000 miles (48,000 km), whichever comes first. RADIATOR COOLANT REFILL CAPACITY:
Manual Transmission (CIVIC WAGON): 4.1 (4WD): 4.0 Automatic Transmission (CIVIC WAGON): 4.0 4.5 (4WD): Plus reserve tank 0.4
(1.08 US gal, 0.90 Imp gal) (1.06 US gal, 0.88 Imp gal)
(1.06 US gal, 0.88 Imp gal) (1.19 US gal ,0.99 Imp gal) (0.11 US gal, 0.09 Imp gal)
1. Set the heater temperature control dial to maximum heat. 2. Remove the radiator cap and drain plug when the radiator is cool,
and drain the radiator.
RADIATOR CAP
BLEED BOLT
DRAIN PLUG
DRAIN BOLT
3. Remove the drain bolt from the front side of the cylinder block, and drain the engine and heater. 4.Apply non-hardening sealant
to the drain bolt threads, then rein- stall the bolt and tighten it se- curely.
5. Tighten the radiator drain plug se-
curely.
6. Mix the recommended antifreeze low- with an equal amount of mineral or distilled water and fill the to maximum, as illustrated.
reservoir
Fill to here
MAX
MIN
(cont'd)
Main Menust Cooling System (cont'd)
7. Loosen the air bleed bolt in the thermostat housing, then fill the radiator to the filler neck with the coolant mixture. Tighten the bleed bolt as soon as coolant starts to run out in a steady stream without bubbles.
FILLER NECK
Fill to here
8. With the radiator cap off, start the engine and let it run until warmed up (fan goes on at least twice). Then, if necessary, add more coolant mix to bring the level back up to the filler neck.
9. Put the radiator cap on, then run the engine again and check for
leaks.
Main Menust Brakes
Brake System Design The diagonally-separated dual serv- ice brake system is designed so half the system will still provide braking action if the other half fails. Stopping the car after losing the brake fluid from half the system will require more pedal pressure and pedal travel than normal. Also, the distance required to stop will be longer using only half the brake system. If the brakes fail suddenly, downshift to a lower gear for increased engine braking, and pull off the road as soon as possible.
It is dangerous to drive your car with a problem in either the brake electrical or hydraulic system; have your dealer check both systems if you suspect brake trouble. Do not ride the brakes. In other words, don't put your foot on the brake pedal unless you intend to brake. This causes excessive brake wear and can damage, or lead to loss of braking effectiveness through overheating. Your brake lights may also confuse drivers behind you. Driving through deep water may affect the brakes. Check their effectiveness by pressing the brake pedal gently. If the car does not slow down at the normal rate, continue gently applying the brakes, while maintaining a safe speed, until they dry out and normal performance returns.
Brake Wear Both front and rear brakes should be inspected for wear at the intervals shown in the Maintenance Schedule on page 60. When the brakes require maintenance, use only genuine Honda replacement parts or their equivalent.
(cont'd)
Main Menust Brakes (cont'd)
Front Brake Wear Indicators Your car is equipped with audible brake wear indicators. When the brake pads need to be replaced, the wear indicators will make a "screeching" sound or a high pitch chirp.
NOTE: Due to some driving habits or climates, brakes may "squeal" when you first apply them or when you have them partially applied; this is normal, and does not indicate excessive wear. The wear indicator makes a "screeching" sound while the brakes are applied.
Brake Fluid Check the fluid level in the brake reservoir periodically; it should be between the MAX and MIN marks on the reservoir. If the level is near the MIN mark, add fluid to raise it to the MAX mark. Do not overfill. Use only brake fluid manufactured to DOT 3
or DOT 4 specifications (see reservoir cap) from a sealed container. Follow the manufacturer's instructions printed on the can.NOTE: A low brake fluid level may be an indication of brake pad wear or of brake fluid leakage. You should have your brakes checked if the brake fluid level in the reservoir is low before re-filling it.
BRAKE FLUID RESERVOIR
M AX MIN
CAUTION: The arrow on the reservoir cap must be pointing forward after the cap is installed. Make sure the brake warning switch wiring doesn't get caught between the cap and top edge of the reservoir.
Main Menust P o w er Steering(4WD or CIVIC WAGON with Automatic)
The power steering on your car provides easy handling while parking and maneuvering in traffic, without loss of road "feel" at highway speeds. An engine-driven hydraulic pump provides full power assist at low speeds and decreasing assist as the car goes faster.
CAUTION: If the power steering system should fail, or if the engine should stall, the car can still be steered. However, much greater effort will be required, particularly in sharp turns at low speed.
NOTE: You may feel a slight clunk or knock when turning the wheel with the engine off. This is a normal condition due to the design of the system.
RESERVOIR CAP
UPPER LOWER
Power Steering Fluid Check the power steering fluid level with the engine cold and the car parked on level ground. Make sure the fluid level is between the upper and lower marks on the reservoir. If the level has dropped close to or below the lower mark, check for leaks before adding fluid the upper mark. Do not overfill.
to
CAUTION: Use only genuine Honda power steering fluid. The use of other fluids such as A.T.F. or other manufacturer's power steering fluid will damage the system.
Main Menust Air and Fuel Filters
Air Filter Replace the air filter every 24 months or 30,000 miles (48,000 km), whichever comes first (more often in extremely dusty conditions).
Replacement Remove the four screws holding the air filter cover halves together. Remove the top half of the air filter cover. Replace the filter. Reinstall the cover and screws securely.
SCREWS
AIR FILTER
Fuel Filters The fuel filter is located in the engine compartment, on the right center of the lower dashboard. It should be replaced at 60,000 miles (96,000 km) or 48 months whichever comes first, or any time you suspect contaminated gas may have clogged it.
CAUTION: Because the fuel system is under pressure, the filter should be replaced only by a qualified Honda technician.
Main Menust Spark Plugs
Spark plugs should be replaced every 24 months or 30,000 miles (48,000 km), whichever comes first.
Recommended spark plugs:
CAUTION: Never use spark plugs with an improper heat range; they will adversely affect engine performance and durability.
(cont'd)
Main Menust Spark Plugs (cont'd)
Spark Plug Replacement Replace plugs one at a time, so you don't get the wires mixed up. 1. Clean any dirt from around the spark plug base. 2. Disconnect the plug cap, then remove and discard the old plug. 3. Check the gap of the new spark plug before installation.
Plug gap should be: 1.1mm (0.04in ).
4.Thread the new spark plug in by hand to prevent cross-threading. 5. After the plug seats against the cylinder head, tighten 1/2 turn
with a spark plug wrench to compress the washer.
6. Reinstall the spark plug cap.
PLUG CAP
CAUTION: The spark plugs must be securely tightened, but not overtightened. A plug that's too loose can get very hot and possibly damage the engine; one that's too tight could damage the threads in the cylinder head.
Main Menust For maximum visibility, replace worn or cracked wiper blades when you notice they do not wipe the windshield cleanly or smoothly.
Wiper Blades
To Replace Worn-out Blades 1. Detach the blade assembly from the arm by pressing the lock tab in, then pushing the blade toward the base of the arm.
Press Lock Tab in
Push
2. Firmly grasp the end of the blade rubber and pull until the tabs are free of the metal support.
METAL SUPPORT
Pull out
TABS
3. Remove the metal retainers from the worn-out blade rubber and put them in a new blade rubber.
4. Insert the new blade rubber from the opposite side of the blade tabs and position the tabs in the metal support.
RETAINERS
Main Menust Battery
The condition of the battery can be determined by checking the test indicator. Service as required according to the label on the battery. Any corrosion around the positive and negative terminals should be washed off with a solution of baking soda and warm water. Dry the terminals and then coat them with grease.
TERMINAL
TEST INDICATOR
UPPER LOWER
TERMINAL
• The battery gives off explosive gases; keep sparks, flames and cigarettes away. Provide adequate ventilation when charging or using the battery in an enclosed space. The battery contains sulfuric acid (electrolyte). Contact with skin or eyes may cause severe burns. Wear protective clothing and a face shield. — If electrolyte gets on your skin, flush with water. — If electrolyte gets in your eyes, flush with water for at least
15 minutes and call a physician immediately.
Electrolyte is poisonous. — If swallowed, drink large quantities of water or milk and follow with milk of magnesia or vegetable oil and get immediate medical assistance.
KEEP OUT OF REACH OF CHILDREN.
Main Menust Fuse Replacement
The fuse box is located under the dashboard on the driver's side. The circuits protected by each fuse are listed inside the box.
The fuses for automatic shoulder belt buckle motor are installed on the
terminal of the battery.
If any of your car's lights, accessories, or controls don't work, check their fuses. If a fuse has blown, the wire inside it will be burned through.
BLOWN
FUSE REMOVER
Checking the fuses: 1. Turn off the ignition and all other switches. 2. If you find a blown or possibly faulty fuse, use the fuse remover, stored beside the spare fuse to pull the blown fuse out of its clips.
3. Check all other fuses as well as the one you suspect. 4. Push in a new fuse of the same rating, and make sure it fits tightly
in the clips. If it fits loosely, have your dealer fix it. If you don't have a spare, take a fuse of the same rating (or lower) out of a circuit you may not need, like the radio or cigarette lighter. Remember to replace the borrowed fuse and the missing spares.
CAUTION: A blown fuse may be just a symptom of some other problem. If a new fuse blows right away, the cause should be diagnosed and corrected by a qualified Honda technician. Never replace a fuse with anything but another fuse of the same or lower rating. A higher capacity fuse could cause damage and even start a fire.
(cont'd)
Main Menust Fuse Replacement (cont'd)
The main fuse and some primary fuses are installed on the right front fender beside the battery.
If the circuits from the battery are ever overloaded (by a short in the system drawing too much current for example) the main or a primary fuse will blow, preventing damage to the entire wiring harness. If the main fuse blows, have a Honda dealer check the system, repair the cause, and replace the fuse.
CAUTION:
The electrical system is protected by fuses that are designed to fail and prevent damage to the wire harness. Always replace blown fuses with the same rating as specified to prevent wiring damage that can result in a possible fire. For proper electrical contact after replacing these fuses, make sure all screws are tight.
Main Menust Bulb Replacement
NOTE: See page 109 for bulb specifications.
Front turn signal lights
Front side marker and parking lights
License plate lights
(cont'd)
Main Menust Bulb Replacement (cont'd)
Rear side marker, turn signal, brake/taillights and back-up lights
Interior light
Luggage area light
High-mount brake light
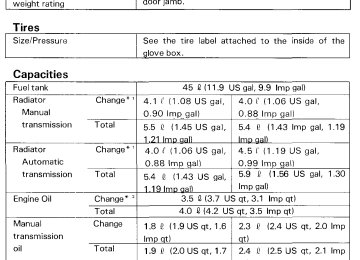
Main Menust Tires
The factory installed tires on your car were selected to match the car's performance capabilities and to provide the best combination of handling, ride comfort and tread wear. We recommend that you get the same size, type, and grade of tires when replacement is necessary. If your tires have an all-season tread design, the model name will be followed by the marking: "M + S" (mud and snow) or "all-season". If you decide not to get the same brand of tires as those originally installed, you should make sure that the replacements are the radial type, of the same size, load range and speed rating as the original tires. If you have any questions about your car's tires, please contact your Honda dealer.
tire pressures
Inflation Pressures The tire label in the glove box lists recommended for carrying loads up to the limit shown. (Tire pressures are also listed on the back cover of this manual.) These pressures were chosen to provide you with the best combi- nation of tread life, riding comfort and stability under normal driving conditions. Improper life and load carrying capacity. Check the tire pressures at least once a month, including the spare. Lower pressure than recommended lets the tread and sidewalls flex too much, causing increased tire temperatures, uneven wear, and poor handling. Pressure higher than recommended can make the tire too stiff, increasing the chance of damage from road hazards, and also causing uneven wear.
inflation can reduce both tire
TIRE LABEL
CAUTION:
Check tire pressure when the tires are cold. (After the car has been parked for more than 3 hours or driven less than 1 mile/1.6 km.) Tire pressure may increase as much as 41 kPa (6 psi) when the tire is hot, so NEVER ADJUST tire pressure when the tires are hot. Never inflate load range B tires to more than 220 kPa (32 psi) cold. Cars with luggage racks or cartop carriers DO NOT have greater load limits than those on the label.
(cont'd)
Main Menust Tires (cont'd)
Winter Driving Tires marked "M + S" or "all season" have an all-weather tread design and should be suitable for most driving conditions. However, snow tires and tire chains may be required under some conditions. If your tires do not have these markings, they may not be suitable for winter driving conditions. We recommend snow tires or tire chains for snow and icy conditions.
Snow Tires If you use snow tires, they should be of the same size, construction and load capacity as the original tires on your car. Snow tires must be installed in sets of four, or they may cause poor handling. Driving with snow tires on dry roads can reduce your car's performance during acceleration, turning and stopping. If you need further information on snow tires, please contact your Honda dealer.
Tire Chains Use chains only when you have to. Check with local authorities or Provinces for requirements prior to installing tire chains. Make sure the chains are the right size for your tires. Install them only on the drive wheels of your car, and do so as tightly as possible, following the manufacturer's instructions. If metal chains are used, they must be SAE Class " S ." Cable type traction devices can also be used. Drive slowly with chains installed. If you hear the chains contacting your car's body or chassis, stop and tighten them.
CAUTION:
If the contact continues, slow down until it stops or your car can be damaged. Chains that are the wrong size or improperly installed can damage your car's brake lines, suspension, body, and wheels.
If you need further information on tire chains, please see your Honda dealer. Remove the chains as soon as the road is clear of ice and snow.
Main Menust Tire Replacement Honda recommends that you replace tires in sets of four, or in pairs, front or rear. If you need to replace only one tire, mount the new tire opposite the tire showing the least amount of wear. For instance, if the left front tire shows the least amount of wear, mount the new tire on the front right side. The original tires on your car have tread wear indicators to indicate when they should be replaced. The indicators appear as bands about 12.7 mm (1/2 in) wide when the tire tread depth is less than 1.6 mm (1/16 in). When indicators appear across t wo or more grooves in a row, you should re- place the tire.
INDICATOR LOCATION MARKS
TREAD WEAR INDICATORS
Driving on worn-out tires is very hazardous, and will reduce braking effectiveness, steering accuracy and traction.
When replacing tires, use only the recommended tire size. Wheel rim widths and offsets must be those recommended by American Honda Motor Co., Inc. Contact the Zone Office nearest you as shown on the inside of the back cover.
Tires and wheels other than those recommended may be unsafe. Do not mix radial and bias ply tires on the same car.
Tire Balancing
Unbalanced tires may affect handling and tire wear. A tire should always be rebalanced after it has been dismounted from the wheel. Your original tires were properly balanced before the car left the factory, but may need rebalancing at some time during the life of the tire. Tire balancing for the COMPACT spare is not necessary.
(cont'd)
Main Menust Tire Rotation Tires may wear unevenly when used for a long time in the same position on the car. To avoid this, rotate the tires every 7,500 miles (12,000 km). If abnormal or uneven wear develops between rotations, the cause should be found and corrected as soon as possible. The illustration shows how the tires can be rotated. The COMPACT spare tire must not be included in tire rotation.
NOTE: Front brake pads should be inspected for wear whenever the tires are rotated.
Front
Tire Traction
Worn tires or slippery road surfaces can reduce driving, cornering and braking traction. To reduce the possibility of losing traction, slow down when the road gets slippery, replace tires when wear indicators are visible, and KEEP TIRES PROPERLY INFLATED.
Additional 4 WD Tire Information Unevenly worn tires, or different sized tires, can cause the 4WD mechanism to engage abnormally, which may eventually damage the transmission. Therefore, observe the following precautions carefully:
Rotate the tires at least every 7,500 miles (12,000 km). Replace worn tires in sets of four. If replacement of all four tires is not practical (because of damage to an individual tire, for example), always replace with the same size, brand and type as those currently on the car.
Main Menust Air Conditioner Care
Condenser and Radiator Check the engine radiator and the air conditioner condenser (in front of the radiator) for accumulated dirt, insects or leaves. Carefully brush or hose them off to assure maximum cooling performance.
CAUTION: Radiator and condenser fins are very thin and easily damaged; do not bend them with the high water pressure or brush.
Compressor Drive Belt Check the compressor belt tension monthly, during periods when you use the air conditioner a lot.
If the engine has been running, some engine components may be hot enough to burn you.
When pushed with 98 N (22 Ib) of force midway between the compressor drive pulley and the engine crankshaft pulley, the belt should deflect about: 7.0 — 9.0 mm (0.28 — 0.35 in) Have the belt adjusted whenever necessary.
COMPRESSOR DRIVE PULLEY
CRANKSHAFT PULLEY
Main Menust Air Conditioner Care (cont'd)
System Maintenance Run your air conditioner at least once a week for about ten minutes, even during the off season, to lubricate the seals and the inside of the compressor and, to verify that the system is functional.
If the air conditioner is not cooling properly, it may indicate an undercharged system. Have your dealer check the system for leaks, then evacuate and charge the system with refrigerant 12. Charging quantity: 850 — 950 g (30.1 — 33.6 oz)
CAUTION: Prolonged use of an undercharged system may damage the compressor.
Main Menust Appearance Care
Interior Trim Remove dust and loose dirt with a vacuum cleaner. Wipe the vinyl with a clean, damp cloth or sponge. Stains can be removed with a commercially available vinyl cleaner.
CAUTION: Do not use thinner, gasoline, kerosene, naphtha or other solvents on the interior. They are toxic, flammable and hazardous and could damage the material you're cleaning.
Windows A 10 to 1 mix of water and white vinegar, or a commercially available glass cleaner may be used to clean windows and to remove the dust film sometimes caused by the ingredients used in interior vinyls and plastics.
NOTE: Do not put this solution in the windshield washer reservoir, it will damage the windshield washer pump.
Be careful not to scratch or damage the defogger wires when clean- ing the inside of the rear window; wipe the window horizontally along the wires, not up and down. Dry the windows with a lint-free cloth or paper towel. Keep all the windows clean for maximum visibility.
Exterior Care
Washing Rinse all loose dirt off the car by spraying it with lukewarm or cold water. Do not use hot water. Wash using a soft-bristle brush, sponge or cloth with water containing a mild detergent such as a liquid dishwashing detergent. Remove oil, tar, tree sap, etc., with tar remover or turpentine. Remove road salt, insects, etc., with mild detergent and lukewarm water. Any of these substances may damage the finish if left on painted surfaces. Rinse the car well. Promptly wipe with a chamois or soft towel to prevent water-spotting. Do not let water or soap air-dry on painted surfaces. During wiping, inspect the surface for stone chips and scratches; paint them with touch-up paint so they won't rust (touch-up paint is available through your Honda dealer). For further instructions on corrosion protection, refer to the Rust Prevention section on page 94.
(cont'd)
Main Menust Appearance Care (cont'd)
Waxing Wax the car when water will no longer "bead" on the paint. Always wash and dry the car before you wax it. Use a good quality liquid or paste wax, and follow the manufacturer's instructions. Wax all the metal trim to keep its luster.
NOTE: Removing oil, tar, etc., with a spot remover will usually strip the wax from the surrounding finish. Be sure to re-wax these areas even if the rest of the car does not yet need waxing.
Rust Prevention Rusting is likely to occur in parts of the car where water is trapped or where there is continual dampness.
Water will collect inside doors and body panels if drain holes become clogged. Water which seeps under or soaks floor mats will subject floor sections to prolonged wetness or dampness. Road dirt or sand, which collects and fills recesses on the underside of the car, retains moisture long after the rest of the car has dried.
The removal of paint and undercoating by stones, gravel, and minor accidents immediately exposes metal to air and moisture. Rusting is increased by high humidity and by the presence of corrosive substances in the air or on the roads.
Salt used for road de-icing will coat the bottom of the car and hasten rusting. Localities with high humidity have greater potential for rust problems, especially where salt is also present on the road or in moist sea air. Industrial pollution will accelerate the deterioration of paint finishes and promote rusting.
Main Menust rear suspension,
above subframe,
under rear bumper.
Preventive Service Check all drain holes in the doors and body panels for clogging and clear if necessary. When washing your car, also clean the underside of the car by using high pressure water; inside front fender, and After washing your car or after heavy rain, check for leaks. While checking for leaks, lift the floor mats in the passenger, cargo and spare tire areas, and check beneath them. Water can collect in these areas and remain unseen for prolonged periods. Dry any wet areas of your car's interior. Remove and dry wet floor mats. Have leaks repaired as soon as possible. After driving your car, wipe off any road dirt or salt on the radio antenna, with it fully extended.
inside rear wheel housing,
Main Menust Body Repair
Replacement Body and Fender Parts If your vehicle incurs body damage and requires replacement parts, we encourage you to use only Genuine Honda sheet metal body and fender parts. Many insurance companies are specifying imitation sheet metal parts for collision repairs in an effort to reduce claim costs; however, if imitation parts are used the following conditions may apply:
There is no assurance that imitation parts will equal the fit and finish of Genuine Honda sheet metal parts; and in our experience they often do not. There is no assurance that imitation parts will resist corrosion as well as Genuine Honda sheet metal parts. Imitation sheet metal parts are not covered by the Honda Limited Warranty.
To ensure your continued satisfaction with your Honda vehicle in the event of an accident, contact your insurance adjuster and insist on Genuine Honda parts in the repair of your vehicle.
Main Menust Spare Tire
COMPACT Spare Tire Your car is supplied with a COMPACT spare tire and wheel for temporary use only in the event of a flat tire. Use the COMPACT spare only when you have to, and only to go as far as the next garage or dealer to have the regular tire repaired and reinstalled.
Because you will rarely use the COMPACT spare, be sure to regularly check its condition and air pressure (415 kPa, 60 psi), so it will be ready when you need it. This type of tire holds less air at higher pressure than a regular tire, so it will inflate (or deflate if there is a leak) more rapidly; check its pressure often and add air gradually if it needs any.
The COMPACT spare tire has a different tire size, air pressure re- quirement, tread life and maxi- mum speed rating than the four regular tires on your car. Disre- garding these warnings may re- sult in tire failure, loss of vehicle control and possible injury to vehicle occupants. Do not exceed 50 mph (80 km/h) under any circumstances when using the COMPACT spare. Do not mount snow chains on the COMPACT spare. They will not fit properly and will damage the tire and possibly your car. If you must use the COMPACT spare when driving on roads covered with snow or ice, use it as one of the rear tires and mount chains only on the front two regular tires.
(cont'd)
Main Menust Spare Tire (cont'd)
INDICATOR LOCATION MARK
TREAD WEAR INDICATOR
The COMPACT spare tire has a much shorter tread life than regu- lar tires. Replace the tire as soon as tread wear indicators appear as solid bands across the tread. Replace with a tire of exactly the same size and construction. The COMPACT spare tire and wheel set was designed espe- cially for your car; do not use it on any other vehicle; do not in- stall any other tire on this wheel which is not identical to the original in size and construction, and do not use the COMPACT spare tire on any other wheel. Because the COMPACT spare is smaller in size and higher in air pressure than a regular tire, it will ride more harshly with less ground clearance and may have less traction on some road surfaces. Drive cautiously.
Main Menust Changing a Flat Tire
Do not attempt to change a tire unless the car is on firm, level ground and well out of the flow of traffic.
Park the car on a firm, level surface, apply the parking brake, turn on the hazard warning switch and put the transmission in gear (Park for automatic). 1. Remove the
lug wrench/jack handle and extension (in the tool bag) from the location shown.
jack handle
jack,
NOTE: To remove the jack, release its tension against the mount by turning the screw counterclockwise.
SPARE TIRE LID
JACK
COMPACT SPARE
TOOL BAG
2. Remove the spare tire. (On the 4WD, remove the spare tire
bucket before removing the spare tire.)
3. Place blocks in front and back of the wheel diagonally opposite
the tire you are changing.
4. Use the lug wrench/jack handle to loosen the wheel lug nuts
counterclockwise one-half turn.
Follow tire changing preparations and procedures carefully to reduce the possibility of injury. The jack is designed for changing tires only. STAND CLEAR, DO NOT get under the car and DO NOT run the engine when the car is supported only by the jack.
(cont'd)
Main Menust Changing a Flat Tire (cont'd)
5. Place the jack under the jack point nearest the wheel you are removing; align the jack head so the car frame will fit in the recess as you raise the jack.
To reduce the possibility of injury, be sure to use the jack provided with the car and the correct jacking points; never use any other part of the car for jack support.
6. Set the jack handle extension in the connector on the end of the jack and install the lug wrench/jack handle. Turn the lug wrench/ jack handle clockwise until the tire is slightly off the ground.
JACK HANDLE EXTENSION
LUG WRENCH/JACK HANDLE
7. Remove the lug nuts, semi-cap and wheel.
(Semi-cap: 4WD)
SEMI-CAP
LUG NUT
VALVE
Main Menust 8. Everytime you install the wheel on the brake hub, use a rag to wipe any dirt off the mounting surface of the hub and the wheel. This will assure a tight, even contact between the wheel and hub.
9. Install the spare, and lug nuts hand tight. 10. Lower the car, remove the jack, then tighten the lug nuts
securely in an " X" pattern as shown.
11 .Tighten the lug nuts to the recommended torque is:
110 N·m(11.0 kg-m,80 Ib-ft) If a torque wrench was not used, ask an authorized Honda dealer to verify the torque as soon as possible.
TIGHTENING TORQUE: 110 N·m(11 kg-m,80 Ib-ft)
(cont'd)
Main Menust Changing a Flat Tire (cont'd)
12. Repair or replace the damaged tire as soon as you can, reinstall it
in its original position, then put the spare back in the car.
Always stow the jack, tools and tire securely to prevent them from becoming dangerous projectiles in an accident.
13.Secure the tire and the spacer as shown in the illustration.
SPACER
COMPACT SPARE TIRE
NORMAL TIRE
SPARE TIRE PAN
Main Menust Jump Starting
To start a car with a dead battery, use another battery of the same voltage, and the proper jumper cables.
Procedures other than those below could cause injury or damage from battery acid spray, explosion or charging system overload. Never connect the jumper cable directly to the negative post of the "dead" battery. Never allow the two cars to touch each other. Never allow the jumper cable clamps to touch each other. Never lean over the battery when making connections. Never attempt to jump start a vehicle with a frozen battery. The battery could rupture and explode. If you suspect a frozen battery, remove the vent caps and check the fluid. If there seems to be no fluid, or if you see ice, do not attempt a jump start until the fluid thaws.
CAUTION: If jumper cables are connected backwards, the car's main fuse may blow.
1 .Turn off all lights, heater and other electrical loads, set the parking
brake, and shift the transmission to Neutral or Park.
2. Use one cable to connect the positive terminal of the booster
battery to the positive terminal of the "dead" battery.
Negative to the engine at the ground cable, not to the battery
DEAD BATTERY
Do not attach cable here
Positive to positive
BOOSTER BATTERY
3. Use the other cable to connect the negative terminal of the
booster battery to the engine at the ground cable as shown.
4.To remove the cables, reverse the above procedures exactly.
DO NOT push or tow a car to start it. The forward surge when the engine starts could cause a collision. Also, under some conditions, the catalytic converter could be damaged. A car equipped with an automatic transmission cannot be started by pushing or towing.
Main Menust Towing
If towing is necessary, contact a professional towing service. Your authorized Honda dealer can assist you with detailed towing instructions.
Never use tow chains or rope to tow a car; your ability to safely control the car may be adversely affected.
We recommend the following: Flat Bed Equipment — Entire car is winched on a flat bed vehicle. This is the best way of transporting your Honda. Wheel Lift Type — Tow with the front wheels off the ground.
If the car can only be towed with the front wheels on the ground: make sure the transmission is full of fluid (see pages 68 — 69) and tow with the transmission in neutral (N) and the ignition key in the I position.
CAUTION: To avoid serious damage on automatic transmission cars, first start the engine and shift to D4 (D on 4WD) then to N and shut the engine off. If the engine does not run or the transmission cannot be shifted while the engine is running, the car must be transported on flat bed equipment.
Check local regulations for towing.
CAUTION:
Do not exceed 35 mph (55 km/h) or tow for distances of more than 50 miles (80 km). If a sling type tow is used, the tow truck driver should position wood spacer blocks between your car's frame and the chains and lift straps to avoid damaging the bumper and the body. Do not use the bumpers to lift the car or to support the car's weight while towing. (4WD) Before towing the car with either the front or rear wheels raised off the ground, place the transmission in neutral and manually disengage the 4WD system to prevent the raised wheels from turning (see page 56).
Main Menust If Your Car Gets Stuck
If your car gets stuck in sand, mud, or snow, call a professional towing service for assistance in getting your car out.
CAUTION:
Do not rev up the engine and allow the wheels to spin freely at high speed. Severe transmission damage may result if the wheels are allowed to spin for more than a few seconds. DO NOT try to free a car with automatic transmission from snow, etc. by rocking the car alternately between forward and reverse gears. Severe transmission damage may result from shifting into gear with the wheels moving.
Main Menust Shoulder Belt Buckle
Proceed as follows if the shoulder belt buckle stalls.
1. Lift the hood and remove the cover from the fuse case (for the
automatic shoulder belt buckle motor) located on the battery's terminal.
2. Remove the fuse for the automatic ("passive") shoulder belt
buckle motor that does not work.
LEFT MOTOR
RIGHT MOTOR
3. If the fuse has blown, replacing it with a new fuse of the same am- perage should allow the shoulder belt buckle motor to work. How- ever, if the fuse hasn't blown, or if a new fuse did not solve the problem, remove the fuse and operate the motor manually.
BLOWN
CAUTION: Always remove the fuse before manually operating the shoulder belt buckle motor, otherwise the motor may suddenly activate.
Main Menust 4. Remove the cover located on the center pillar.
COVER
5. Set the wrench extension into the wrench grip (both provided in the tool bag) then insert the wrench into the socket and turn it counterclockwise until the shoulder belt buckle reaches its rear locked position.
WRENCH
WRENCH EXTENSION
WRENCH GRIP
NOTE: After the manual operation, make sure that the seat belt warning light is off and the shoulder belt buckle is seated properly in its locked position.
6. Replace the cover on the center pillar. 7. Reinstall the fuse, the fuse remover and both fuse box covers.
Main Menust Specifications
*1 Excluding the coolant in the reserve tank and that remaining in the engine:
0.4
(0.11 US gal, 0.09 Imp gal)
*2 Excluding the oil remaining but including that remaining in the oil fitter.
Main Menust page 79.
Main Menust Identification Numbers
The Vehicle Identification Number (V.I.N.) is stamped on a plate attached to the top left side of the dashboard. It also appears on the Certification label attached to the left rear door jamb, as well as under the hood on the body, directly behind the engine.
NOTE: The V.I.N. is also provided in bar code on the Certification label.
VEHICLE IDENTIFICATION NUMBER
AUTOMATIC TRANSMISSION NUMBER
CERTIFICATION LABEL
VEHICLE IDENTIFICATION NUMBER
MANUAL TRANSMISSION NUMBER
ENGINE NUMBER
The Engine Number is stamped on the right front side of the engine block. The Transmission Number appears on a label on the top edge of the transmission where it attaches to the engine.
Main Menust DOT Tire Quality Grades
The tires on your car meet Federal Safety Requirements. All tires are also "graded" according to Department of Transportation (DOT) standards for tread wear, traction and temperature.
Three grades are shown on the tire sidewall
TIRE
WHEEL RIM
Tread Wear The tread wear grade is a comparative rating based on the wear rate of the tire when tested under controlled conditions on a specified government test course. For example, a tire graded 150 would wear one and one half (1-1/2) times as well on the government course as a tire graded 100. The the actual conditions of their use, however, and may depart significantly from the norm due to variations in driving habits, service practices and differences in road characteristics and climate.
relative performance of
tires depends upon
Traction The traction grades, from highest to lowest, are A, B, and C, and they represent the tire's ability to stop on wet pavement as measured under controlled conditions on specified government test surfaces of asphalt and concrete. A tire marked C may have poor traction performance.
The traction grades assigned are based on braking (straight ahead) traction tests and do not include cornering (turning) traction.
(cont'd)
Main Menust Temperature The temperature grades are A (the highest), B and C representing the tire's resistance to the generation of heat and its ability to dissipate heat when tested under controlled conditions on a specified indoor laboratory test wheel. Sustained high temperature can cause the material of the tire to degenerate and reduce tire life, and excessive temperature can lead to sudden tire failure. The grade C corresponds to a level of performance which all passenger car tires must meet under the Federal Motor Vehicle Safety Standard No. 109. Grades B and A represent higher levels of performance on the laboratory test wheel than the minimum required by law.
The tire temperature grade is established for a tire that is properly inflated and not overloaded. Excessive speed, underinflation, or excessive loading, either separately or in combination, can cause heat buildup and possible tire failure.
Main Menust Emission Controls
Sources of Emissions The combustion process produces carbon monoxide, oxides of nitrogen and hydrocarbons. The evaporation of fuel in the fuel tank also produces hydrocarbons. Control of oxides of nitrogen and hydrocarbons is very important since, under certain conditions, when subjected to sunlight, they react to form photochemical smog. Carbon monoxide does not react to form smog, but it is toxic. Honda Motor Co., Ltd. has developed a number of systems which are highly effective in reducing carbon monoxide, oxides of nitrogen and hydrocarbons.
The Clean Air Act The Clean Air Act requires all vehicle manufacturers to explain in writing, the operation and maintenance of their emission control systems. Maintenance instructions are included on pages 58 — 63; the operation of each system is explained on the following.
Replacement Parts The emission control systems on your new Honda were designed, built and certified regulations implementing the Clean Air Act. Honda recommends only the use of new, genuine Honda parts or their equivalent. The use of other replacement parts which are not of equivalent quality may impair the effectiveness of your car's emission control systems.
to conform with
the Federal
Crankcase Emission Control System To prevent crankcase emissions, your car is equipped with a Positive Crankcase Ventilation (PCV) System which routes blowby gases from the crankcase, through the PCV valve and intake manifold, into the combustion chamber.
(cont'd)
Main Menust Emission Controls (cont'd)
Evaporative Emission Control System The Evaporative Emission Control System is designed to prevent fuel vapors from escaping into the atmosphere. Fuel vapors from the fuel tank are directed into the charcoal canister where they are adsorbed and stored while the engine is stopped or idling. When the coolant temperature rises to a certain value, the vapors are drawn into the engine through the throttle body and the intake manifold during normal engine operation.
Engine Exhaust Emission Controls The engine exhaust emission control systems are designed to control combustion during idle, acceleration, cruise, and deceleration. These systems are entirely separate from the crankcase and evaporative emission control systems described previously.
HONDA PGM Fl System The PGM-FI system consists of three independent sub-systems; Air Intake, Electronic Control and Fuel Control, thus allowing more accurate control of air/fuel ratios under all operating conditions. The Electronic Control Unit (ECU) detects the amount of air drawn into the cylinders and determines the amount of fuel to be injected to provide the optimum air/fuel ratio for all engine needs.
Ignition Timing Control System This system automatically controls the ignition timing to reduce the amount of HC and NOx.
Catalytic Converter Three Way Catalyst The catalyst is used to convert hydrocarbons (HC), carbon monoxide (CO) and oxides of nitrogen (NOx) in the exhaust gas, to carbon dioxide (CO 2), dinitrogen (N 2) and water vapor.
Exhaust Gas Recirculation (EGR) [California automatic models with 1.5 The EGR system is designed to control the formation of oxides of nitrogen fuel mixture burns at high temperature. It works by recirculating exhaust gas through the EGR valve and intake manifold into the combustion chambers where it reduces peak temperature by diluting the air/fuel mixture.
(NOx) caused when
engine]
Main Menust Catalytic Converter
A catalytic converter is installed in the exhaust system to help clean-up the harmful exhaust gases that can cause air pollution.
CATALYTIC CONVERTER
To be effective, the converter must work at high temperature, so don't park your car over dry grass, leaves or anything else that could burn easily. To stay effective, the converter must not be contaminated by leaded gasoline; use only unleaded gas as explained on page 39.
CAUTION: The converter can be overheated and damaged if it's fed too much unburned fuel mixture from the engine, so: — Don't push or tow the car to start it; if the battery is dead, jump
start the car as shown on page 103.
— Don't turn the key off while the engine is running above idle
— Don't change the ignition timing, or remove any emission control
speed.
parts.
— Use only the spark plugs specified in this manual. — Don't keep driving your car if it isn't running properly, or if its CHARGE warning light comes on; have it checked by your Honda dealer.
Main Menust Warranty Service
Warranty The following warranties are provided with every new vehicle: 1. New Car Limited Warranty 2. Emission Control Systems Defects Warranty 3. Emission Performance Warranty 4. Original Equipment Battery Limited Warranty 5. Rust Perforation Limited Warranty 6. Accessory Limited Warranty 7. Replacement Parts Limited Warranty 8. Replacement Muffler Lifetime Limited Warranty 9. Seat Belt Limited Warranty 10.Replacement Battery Limited Warranty
Your car's original tires are covered by their manufacturer. Tire warranty information is in a separate booklet.
All warranty details pertaining to your car can be found in the Warranty booklet provided with your new car except the required maintenance schedule which is contained here in the Owner's Manual.
If you are unable to obtain warranty service or are dissatisfied with the warranty decision or service you received at an authorized Honda dealership, you should that dealership's Service Manager. This will normally resolve your problem. If it does not resolve your problem you should appeal the decision with the owner of the dealership. Please bear in mind that your problem will likely be resolved at the dealership, using the dealer's facilities, equipment and personnel. So it is very important that your initial contact be with the dealer or his management.
the matter with
review
After following these steps, if you wish to have the matter reviewed by American Honda you should contact the Zone Office serving your area, as shown on the map on the inside of the back cover. When contacting American Honda, please provide the Zone Office with the following information:
Vehicle Identification Number Servicing Dealer Name and Address Date of Purchase Mileage on your Car Your Name, Address, and Phone Number Nature of Problem Selling Dealer
After a review of the facts, you will be advised of what can be done.
Main Menust Reporting Safety Defects
If you believe that your vehicle has a defect which could cause a crash or could cause injury or death, you should immediately inform the National Highway Traffic Safety Administration (NHTSA) in addition to notifying American Honda Motor Co., Inc. If NHTSA receives similar complaints, it may open an investigation, and if it finds that a safety defect exists in a group of vehicles, it may order a recall and remedy campaign. However, NHTSA cannot become involved in individual problems between you, your dealer, or American Honda Motor Co., Inc. To contact NHTSA, you may either call the Auto Safety Hotline toll- free at 1-800-424-9393 (or 366-0123 in Washington, D.C. area) or write to: NHTSA, U.S. Department of Transportation Washington, D.C. 20590. You can also obtain other information about motor vehicle safety from the Hotline.
Main Menust Index
Air Conditioner
Care........................................... 91