- Download PDF Manual
-
& DEF
DEF
HI
COOL
WARM
OFF
PANEL
A/C
MAX A/C
PANEL & FLOOR FLOOR FLR & DEF
DEF
Defrostingwindshield Set mode control to DEF, turn temperature control to maximum heat (red) and set fan speed control to HI.
or FLR &
Controls and features
LO
HI
COOL
WARM
OFF
PANEL
A/C
MAX A/C
PANEL & FLOOR FLOOR FLR & DEF
DEF
Drive with the climate control system on (in either the heating or air conditioning mode) to reduce humidity in your vehicle. To prevent air intake restriction, remove any snow, ice or leaves from the air intake area located directly under the windshield.
f12_column_overall
31
f12_ignition_positions
Controls and features
Positions of the ignition
1 (Accessory) - allows electrical accessories such as the audio system and wiper/washer to operate when the engine is not running. 2 (Lock) - locks the steering wheel and automatic gearshift lever (if equipped).
32
3 (Off) - shuts off the engine and all accessories without locking the steering wheel. 4 (On) - tests the warning lights. Key remains here when engine is running. 5 (Start) - cranks the engine. Key returns to 4(On) when released.
Speed control (if equipped) Toturnspeedcontrolon • Press ON
Toturnspeedcontroloff • Press OFF or • Turn off the vehicle ignition. Once speed control is switched off, the previously programmed set speed will be erased. Tosetaspeed Press SET ACCEL. For speed control to operate, the speed control must be ON and the vehicle speed must be greater than 48 km/h (30 mph).
Controls and features
com_speed_off.01
f12_speed_cont
com_speed_on.01
com_set_speed.01
ON
OFF
RES
SET
ACCEL
COAST
33
Controls and features
If you drive up or down a steep hill, your vehicle speed may vary momentarily slower or faster than the set speed. This is normal. Speed control cannot reduce the vehicle speed if it increases above the set speed on a downhill. If your vehicle speed is faster than the set speed while driving on a downhill in Overdrive, you may want to shift to the next lower gear to reduce your vehicle speed. If your vehicle slows downs more than 16 km/h (10 mph) below your set speed on an uphill, your speed control will disengage. This is normal. Pressing RES will re-engage it.
Do not use the speed control in heavy traffic or
on roads that are winding, slippery, or unpaved.
Tosetahigherspeed • Press and hold SET ACCEL. Release the switch when the desired vehicle speed is reached, or
• Press and release SET ACCEL. Each press will increase the set speed by 1.6 km/h (1 mph) or • Accelerate with your accelerator pedal, then press SET ACCEL.
You may accelerate with the accelerator pedal at any time during speed control usage. Releasing the accelerator pedal will return your vehicle speed to the
34
com_speed_up.01
RES
SET
ACCEL
COAST
previously programmed set speed. Tosetalowersetspeed • Press and hold COAST. Release
the switch when the desired vehicle speed is reached, or
• Press and release COAST. Each press will decrease the set speed by 1.6 km/h (1 mph) or • Depress the brake pedal. When
the desired vehicle speed is reached press SET ACCEL.
Toreturntoasetspeed • Press RES. For RES to operate, the vehicle speed must be faster than 48 km/h (30 mph).
Todisengagespeedcontrol • Depress the brake pedal. Disengaging the speed control will not erase the previously programmed set speed.
Controls and features
com_slow_down.01
com_disengage_speed_control.01
com_resume_feature.01RES
SET
ACCEL
COAST
RES
SET
ACCEL
COAST
f12_wiper_washer
35
Controls and features
f12_high_beams
activate the washer.
Wiper/washer controls • Push and hold the end to • Push end briefly for a single • Push and hold for a constant • Turn the control to adjust intermittent wiper speed.
cycle.
wipe.
36
Controls and features
Highbeamcontrol • Push the stalk forward to activate the high beam lamps. • Pull the stalk towards you to
activate the “flash to pass†function.
Turnsignals Push the stalk down to activate the left turn signal; push the stalk up to activate the right turn signal.
f12_overdrive
37
f12_deactivate_od
f12_activate_od
OVERDRIVE OFF
Controls and features
Overdrive control Activatingoverdrive D (Overdrive) is the normal drive position for the best fuel economy. The overdrive function allows automatic upshifts to second, third and fourth gear.
Deactivatingoverdrive Press the transmission control switch on the end of the gearshift lever. The transmission control indicator light (TCIL) (OFF) will illuminate on the end of the gearshift lever. Transmission will operate in gears one through three. To return to normal overdrive mode, press the transmission control switch again. The TCIL (OFF) will no longer be illuminated. When you shut off and re-start your vehicle, the transmission will automatically return to normal D (Overdrive) mode.
38
Deactivate overdrive whenever driving conditions (i.e., city traffic, hilly terrain, etc.) cause the transmission to shift excessively between D (Overdrive) and D(Drive) ranges. Also deactivate D (Overdrive) when: • driving with a heavy load • towing a trailer up or down • additional engine braking is
steep hills
desired.
Transmissioncontrolindicator light(TCIL) The TCIL (OFF), located on the end of the gearshift lever, may flash steadily if a malfunction has been detected. If the TCIL is flashing, contact your Ford dealer as soon as possible. If this condition persists, damage to the transmission could occur.
Hazard flasher control Use only in an emergency to warn traffic of vehicle breakdown, approaching danger, etc. Depress control to activate all indicators simultaneously. Depress control again to turn off. The hazard lights can be operated when the ignition is off.
Controls and features
f12_tcil_light
OVERDRIVE OFF
f12_hazard
f12_tilt_steer
39
f12_overhead_overall
f12_illuminated_entry f12_domemap_lamp
Controls and features
Tilt steering (if equipped) Pull the lever to adjust the steering column angle. Push the lever back up to lock the steering wheel into position.
Never adjust the steering wheel when the vehicle is
moving.
OVERHEAD CONTROLS
Dome/map lamp (if equipped) Press either the left or right switch to activate the left or right map lamps.
40
or
Illuminatedentry The interior lamps illuminate when: • either front door handle is lifted • the remote entry system is used to unlock the door or sound the personal alarm. See Remote entry system for more information.
the dimmer control or
The system automatically turns off after 25 seconds or when the ignition is turned to the Start or Accessory positions. The inside lights will not turn off if: • they have been turned on with • any door is open. Batterysaver Battery saver is a feature that automatically shuts off power to these lights after 40 minutes: • glove box lamp • engine compartment lamp • overhead lamps. Battery saver prevents the battery from being drained if these lights are left on or if a door is not completely closed. Battery power is restored if the remote entry transmitter is used, any door is opened or the ignition key is turned to On.
Controls and features
LO
f12_battery_saver
NLO
PA
NIC
41
Controls and features
Power windows (if equipped) Driver-sidewindowcontrol • Press rear of switch to open • Press front of switch to close
window.
window.
The driver-side power window has a one-touch down feature. When AUTO is fully pressed (two clicks will be heard), the driver-side window will move completely down. This feature can be cancelled by pressing the driver-side power window switch again.
42
L R
AUTO
f12_driver_control
f12_pass_control
Passenger-sidewindow controls • Press rear of switches to open • Press front of switches to close
passenger window.
passenger window.
f12_acc_delay
Controls and features
L R
AUTO
Accessorydelay(ifequipped) With accessory delay, the window switches may be used for up to ten minutes after the ignition switch is turned to the Off position or until either door is opened.
f12_power_locks
43
f12_remote_mirrors
f12_driver_control
Controls and features
Power locks (if equipped) Driverandpassengercontrols • Press L to lock both doors. • Press U to unlock both doors.
L R
AUTO
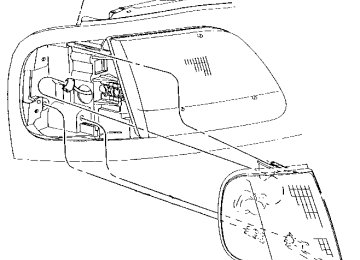
Dual electric remote control mirrors (if equipped) 1. Select driver or passenger mirror by moving selector lever left (L) for driver or right (R) for passenger. 2. Move the mirror control until mirror reaches desired position. 3. Move selector lever to center to “lock†position.
L R
AUTO
44
Controls and features
f12_third_door
Fold-awaymirrors Pull the side mirrors in carefully when driving through a narrow space, like an automatic car wash.
Third door (if equipped) On SuperCab models a third door is located behind the passenger door. This door allows for improved access to the rear passenger compartment.
To open the third door (the passenger door must be open) pull either the handle located in the
45
Controls and features
door jamb or the handle on the interior of the third door. • To lock the third door, lock the passenger door or press the power lock switch (if equipped). • When the passenger door is
unlocked, the third door cannot be opened until the passenger door is opened. The third door can then be opened.
f12_trunk_overall
L R
AUTO
46
Controls and features
f12_tailgate_lock f12_tailgate_removal
Tailgate lock (if equipped) Your vehicle is equipped with a tailgate lock designed to prevent theft of the tailgate. • Insert ignition key and turn to • Turn ignition key to the left to
the right to engage lock.
unlock.
Tailgate removal Your tailgate is removable to allow more room for loading. 1. Lower the tailgate. 2. Use a screwdriver to pry the spring clip (on each connector) past the head of the support screw. Disconnect cable. 3. Disconnect the other cable. 4. Lift tailgate to a 45 degree angle. 5. Lift right side off of its hinge. 6. Lift left side off of its hinge.
f12_antitheft
47
Controls and features
LOCK
PANIC
UNLOCK
Remote entry system (if equipped) The remote entry system allows you to lock or unlock all vehicle doors without a key. The remote entry features only operate with the ignition key in the Off position. It also arms and disarms the anti-theft system (for more information on the anti-theft system, refer to Anti-theft system in this chapter.) Unlockingthedoors Press UNLOCK to unlock the driver door. The interior lamps will illuminate. Press UNLOCK a second time within five seconds to unlock all doors.
48
f12_remote_entry
f12_unlocking_doors
LOCK
PANIC
UNLOCK
f12_locking_doors
Lockingthedoors Press LOCK to lock all doors. To confirm that all doors are closed and locked, press the LOCK control a second time. The doors will lock again, the horn will chirp and the lamps will flash.
This process will also arm your anti-theft system. If the horn chirps twice, a door is still ajar and the anti-theft system will not arm. For more information on arming the anti-theft system, refer to Anti-theft system in this chapter. Soundingapanicalarm Press PANIC to activate the alarm. To deactivate the alarm, press the PANIC control again or turn the ignition to the Accessory or On position.
Arminganddisarmingthealarm system Your remote entry system will: • automatically arm the factory
installed anti-theft system when the doors are closed and locked.
• reset the triggered anti-theft
alarm (when either the UNLOCK or PANIC controls are pressed).
Controls and features
LOCK
PANIC
UNLOCK
LOCK
PANIC
UNLOCK
LOCK
PANIC
UNLOCK
49
f12_sounding_panic
f12_arm_disarm_system
Controls and features
The remote entry system may not arm and disarm non-factory installed anti-theft systems. Replacingthebatteries The transmitter is powered by two coin type three-volt lithium batteries. A decrease in operating range can be caused by: • battery failure • weather conditions • structures around the vehicle. Replacement batteries for the remote entry transmitters may be purchased at pharmacies, watch stores or at authorized dealers. To replace the batteries: 1. Twist a thin coin between the two halves of the transmitter. DO NOT TAKE THE FRONT PART OF THE TRANSMITTER APART. 2. Place the positive (+) side of the new batteries down. 3. Snap the two halves back together. Replacinglosttransmitters Take all your vehicle’s transmitters to your dealer for reprogramming if: • a transmitter is lost or • you want to purchase additional transmitters (up to four total) Additionalinformationabout remoteentry This device complies with Part 15
of the FCC rules. Operation is50
f12_replacing_batteries
f12_fcc_rule
Controls and features
subject to the following two conditions: (1) This device may not cause harmful interference, and (2) This device must accept any interference received, including interference that may cause undesired operation.
f12_arming_anti_theft
Anti-theft system (if equipped) When armed, the anti-theft system prevents unauthorized entry into your vehicle. Armingtheanti-theftsystem Turn the ignition to Off and use one of the following methods to arm the system: • Press the LOCK control on the • Open either door and press the
remote entry transmitter or
power door lock switch.
LOCK
PANIC
UNLOCK
f12_identifying_armed
Identifyinganarmedsystem While the system is arming, the THEFT light in the instrument cluster will illuminate for 30
seconds. After 30 seconds, THEFT will flash, indicating the system is armed. If the system is armed with the doors open, the THEFT light will stay illuminated until all the doors are closed and then illuminate for 30 seconds and begin flashing. When an unauthorized entry occurs, the activated system will: • flash the headlamps, parking lamps and the THEFT light51
Controls and features • sound the horn • prohibit the vehicle from
starting.
The flashing headlamps and the honking horn automatically shut off after about three minutes and will remain off unless another unauthorized entry is attempted. However, the vehicle will not start until the system is disarmed. Disarminganuntriggered anti-theftsystem Press the UNLOCK control or unlock either door with the key to disarm the untriggered system. If the driver armed the system but did not exit the vehicle, disarm the system by inserting the key and turning the ignition to On.
Disarmingatriggeredanti-theft system Press either the UNLOCK or PANIC control or unlock either door with the key to disarm the system.
A triggered system may also be disarmed by inserting the key and turning the ignition to Accessory or On.
52
f12_disarming_untriggered
LOCK
PANIC
UNLOCK
LOCK
PANIC
UNLOCK
f12_adjusting_bench
f12_split_bench
Seating and safety restraints
SEATING
Full bench seat (if equipped) • Lift the release bar to move the seat forward or backward. Ensure that the seat is relatched into place. • Push down the release lever to
quickly fold the seatback forward.
60/40splitbenchseat(if equipped) • Lift the release bar to move the seat forward or backward. Ensure the seat is relatched into place.
53
Seating and safety restraints • Pull the seatback handle up to
recline the seat.
f12_adjust_man_bucket
• Turn the lumbar support dial to • Push down the release lever to
adjust firmness.
quickly fold the seatback forward.
Centerarmrest(ifequipped) Pull the strap down to move the armrest down.
54
Seating and safety restraints
Captain’s chair (if equipped) • Lift the release bar to move the seat forward or rearward. Ensure that the seat is relatched into place.
• Pull the seatback handle up to • Push the release lever down to
recline the seat.
quickly fold the seatback forward.
Power seats (if equipped) • Pull up the seatback handle to • Push down the release lever to
recline the seat.
quickly fold the seatback forward.
f12_adjust_power_seat
55
Seating and safety restraints
Press switch to tilt the front of the seat up or down.
Press switch to tilt the rear of the seat up or down.
56
f12_adjust_lumbar
f12_rear_bench
Seating and safety restraints
Press control to move the seat forward, backward, up or down.
Adjustablelumbarsupport Turn the lumbar support dial clockwise to adjust firmness.
57
Seating and safety restraints
60/40 split rear seat (if equipped) When folded down, the rear seats provide a “load floor†of additional storage space. To fold down the rear seats: 1. Pull the straps to lower the seat cushions. 2. Store the center safety belt in the opening on the seat back. When returning the seats to their normal position: 1. Clear the load floor before folding seat up. 2. Ensure the seat cushion is latched into place. 3. Remove center safety belt from its stowed position.
Check to assure that 60/40
Split rear seat cushion islatched by pulling up and forward on lap belt buckles.
SAFETY RESTRAINTS
Safety restraints precautions The use of safety belts helps to restrain you and your passengers in case of a collision. In most states and Canada, the law requires the use of safety belts.
Always drive and ride with your seatback upright and the lap belt snug and low across the hips.
58
f12_seat_belts
f12_safety_res_prec
Seating and safety restraints
All occupants of the vehicle, including the
driver, should always wear their safety belts.
To prevent the risk of injury, make sure children
sit where they can be properly restrained.
It is extremely dangerous to ride in a cargo area,
inside or outside of a vehicle. In a collision, people riding in these areas are more likely to be seriously injured or killed. Do not allow people to ride in any area of your vehicle that is not equipped with seats and safety belts. Be sure everyone in your vehicle is in a seat and using a safety belt properly.
f12_using_sr_properly
59
f12_comb_lap_sh_belts
Seating and safety restraints
Using safety restraints properly Combinationlapandshoulder belts 1. To connect the safety belt, insert the tongue into the buckle. 2. To disconnect the safety belt, push the red release button and remove the tongue from the buckle. The front and rear (if equipped) outboard safety restraints in your vehicle are combination lap and shoulder safety belts. The outboard passenger safety belts have the two types of locking modes described below:
Vehiclesensitive(emergency) lockingmode The vehicle sensitive mode is the normal retractor mode, allowing free shoulder belt length adjustment to your movements and locking in response to vehicle movement. For example, if the driver brakes suddenly or turns a corner sharply, or the vehicle receives an impact of approximately 8 km/h (5 mph) or more the combination safety belts will lock to help reduce forward
60
Seating and safety restraints
f12_auto_lock_mode
movement of the driver and passengers. The front seat belt system can also be made to lock manually by quickly pulling on the shoulder belt. Rear seat belts (if equipped) cannot be made to lock up by pulling quickly on the belt.
Automaticlockingmode In this mode, the shoulder belt is automatically pre-locked. The belt will still retract to remove any slack in the shoulder belt. The automatic locking mode is not available on the driver safety belt. Whentousetheautomatic lockingmode • When a tight lap/shoulder belt • Any time a child safety seat is installed in the vehicle. Refer to Children and infant or child safety seats later in this chapter.
fit is desired.
f12_when_to_use_alr
f12_how_use_alr
61
Seating and safety restraints
Usingtheautomaticlocking mode The automatic locking mode must be used when installing a child safety seat in any outboard passenger seat. 1. Buckle the combination lap and shoulder belt.
2. Grasp the shoulder belt portion and pull downward until the entire belt is extracted. 3. Allow the belt to retract. As the belt retracts, you will hear a clicking sound. This indicates that the safety belt is now in the automatic locking mode.
Cancellingtheautomatic lockingmode Disconnect the combination lap/shoulder belt and allow it to completely retract to cancel the automatic locking mode and activate the vehicle sensitive (emergency) locking mode.
62
f12_cancel_alr
f12_front_sbelt_height_adjust
Seating and safety restraints
Front seat safety belt height adjustment Your vehicle has safety belt height adjustments for the driver and passenger seating positions. Adjust the height of the shoulder belt so the belt rests across the middle of your shoulder. 1. Push the button and slide down to lower the shoulder belt height. 2. Push the button and slide up to raise the shoulder belt height. 3. Pull down on the height adjustment assembly to make sure it is locked in place. If you have a SuperCab vehicle, the front passenger seat combination lap and shoulder belt height cannot be adjusted.
Lap belts Lap belts are located in the center of the front bench or split bench seat (if equipped) and rear bench seat (SuperCab only). Adjustinglapbelts The lap belt does not have a retractor to automatically adjust itself during vehicle movement.
f12_lap_belts
f12_adjusting_lap_belts
63
Seating and safety restraints
The lap belt must be adjusted before use. To shorten the belt: • Buckle the belt. • Pull the loose end of the belt
until snug.
To lengthen the belt: • Tip and pull the tongue. Do not wear the lap belt around your waist.
Shorten and fasten the belt when not in use.
Safety belt warning light and indicator chime
illuminates in the instrument
cluster and a chime sounds to remind the occupants to fasten their safety belts.
64
f12_sbelt_warning_chime
f12_cond_operation
Seating and safety restraints
Conditionsofoperation
If... The driver safety belt is not buckled when the ignition key is turned to On...
The driver safety belt is buckled while the indicator light is illuminated and the reminder chime is sounding... The driver safety belt is buckled before the ignition key is turned to On...
Safety belt maintenance Check the safety belt systems periodically to make sure that they work properly and are not damaged. Check the safety belts to make sure that there are no nicks, wear or cuts. If your vehicle has been involved in an accident, have all the safety belts and child seat anchoring brackets (if equipped) examined by a qualified technician.
Failure to replace the safety belt assembly under the above conditions could result in severe personal injuries in the event of a collision.
Safetybeltextensionassembly For some people, the safety belt may be too short even when it is fully extended. You can add about 20 cm (8 in.) to the belt length
Then... The safety belt indicator illuminates for 1-2 minutes and the reminder chime sounds for 4-8
seconds. The safety belt indicator light and the reminder chime turn off.The safety belt indicator light and the safety belt reminder chime remain off.
65
f12_sbelt_maint
f12_sbelt_extension
Seating and safety restraints
with a safety belt extension assembly (part # 611C22). Safety belt extensions are available at no cost from your Ford or Lincoln/Mercury dealer. Use only extensions manufactured by the same supplier as the safety belt. Manufacturer identification is located at the end of the webbing on the label. Also, use the safety belt extension only if the safety belt is too short for you when fully extended. Do not use extension to change the fit of the shoulder belt across the torso.
SUPPLEMENTAL RESTRAINT SYSTEM (SRS)
Important supplemental restraint system (SRS) precautions The supplemental restraint system is designed to: • work with the safety belt to protect the driver and right front passenger • reduce certain upper body
injuries
Failure to follow these instructions will affect the performance of the safety belts and increase the risk of personal injury.
66
f12_air_bags
com_important_precautions.01
Seating and safety restraints
The right front passenger air bag is not designed to restrain occupants in the front seating position.
Do not place objects or mount equipment on or
near the air bag covers that may come into contact with an inflating air bag.
Do not attempt to service, repair, or modify the Air
Bag Supplemental Restraint System or its fuses. See your Ford or Lincoln-Mercury dealer.
Children and air bags For additional important safety information, read all information on safety restraints in this guide.
com_children.01
67
Seating and safety restraints
Children should always wear their safety belts. Failure to follow these instructions may increase the risk of injury in a collision.
Rear-facing child seats or infant carriers should never be placed in the front seats.
com_how_work.01
How does the air bag supplemental restraint system work? The SRS is designed to activate when the vehicle sustains sufficient longitudinal deceleration, similar to hitting a fixed barrier head on at 12–24 km/h (8–14
mph). The fact that the air bags did not inflate in a collision does not mean that something is wrong with the system. Rather, it means the forces68
Seating and safety restraints
were not of the type sufficient to cause activation.
The air bags inflate and deflate rapidly upon activation. After air bag deployment, it is normal to notice a smoke-like, powdery residue or smell the burnt propellant. This may consist of cornstarch, talcum powder (to lubricate the bag) or sodium compounds (e.g., baking soda) that result from the combustion process that inflates the air bag. Small amounts of sodium hydroxide may be present which may irritate the skin and eyes, but none of the residue is toxic.
Several air bag system components get hot after
inflation. Do not touch them after inflation.
69
Seating and safety restraints
If the air bag is inflated, the air bag will not
function again and must be replaced immediately. If the air bag is not replaced, the unrepaired area will increase the risk of injury in a collision.
The SRS consists of: • driver and passenger air bag modules (which include the inflators and air bags),
sensors,
• one or more impact and safing • a readiness light and tone • and the electrical wiring which
connects the components.
The diagnostic module monitors its own internal circuits and the supplemental air bag electrical system readiness (including the impact sensors), the system wiring, the air bag system readiness light, the air bag back up power and the air bag ignitors.
Determining if the system is operational The SRS uses a readiness light in the instrument cluster or a tone to indicate the condition of the system. Refer to the Air bag readiness section in the Instrumentation chapter. Routine maintenance of the air bag is not required.
70
com_determing_operational.01
Seating and safety restraints
flash or stay lit.
A difficulty with the system is indicated by one or more of the following: • The readiness light will either • The readiness light will not illuminate immediately after ignition is turned on. • A group of five beeps will be heard. The tone pattern will repeat periodically until the problem and light are repaired.
If any of these things happen, even intermittently, have the SRS serviced at your dealership or by a qualified technician immediately. Unless serviced, the system may not function properly in the event of a collision.
Passenger air bag deactivate switch Your vehicle has a passenger air bag deactivate switch. This switch MUST be used to activate or deactivate the passenger air bag whenever a rear-facing infant seat is used in the right front or center front passenger seat position.
f12_srs_deactivate
PASSENGER AIRBAG
ON
OFF
OFF
71
Seating and safety restraints
Keep the passenger air bag turned on unless there is a rear-facing infant seat installed in the front seat. When the passenger air bag switch is turned off, the passenger air bag will not inflate in a collision.
If the passenger air bag switch is turned off, it increases the likelihood of injury to forward facing occupants in the passenger seat. Turningthepassengerairbag off 1. Insert the ignition key, turn the switch to OFF and remove the key. 2. The OFF light illuminates when the key is inserted in the ignition and turned to On. This indicates that the passenger air bag is deactivated.
If the light fails to illuminate when the
passenger air bag switch is in the OFF position and the ignition switch is in ON, have the passenger air bag switch serviced at your Ford or Lincoln-Mercury dealer immediately.
72
PASSENGER AIRBAG
ON
OFF
OFF
Seating and safety restraints
In order to avoid inadvertent deployment of
the passenger air bag, always remove the ignition key from the passenger air bag deactivate switch.
Turningthepassengerairbag backon The passenger air bag remains off until you turn it back on. 1. Insert the ignition key and turn the switch to ON. 2. The OFF light will not illuminate when the ignition is turned to On.
If the light is illuminated when the passenger air
bag switch is in the ON position and the ignition switch is in ON, have the passenger air bag switch serviced at your Ford or Lincoln-Mercury dealer immediately.
PASSENGER AIRBAG
ON
OFF
OFF
73
com_disposal.01
f12_child
f12_imp_childres_prec
Seating and safety restraints
Keep the passenger air bag turned on unless there is a rear-facing infant seat installed in the front seat. When the passenger air bag switch is turned off, the passenger air bag will not inflate in a collision.
Disposal of air bags and air bag equipped vehicles For disposal of air bags or air bag equipped vehicles, see your local dealership or qualified technician. Air bags MUST BE disposed of by qualified personnel.
SAFETY RESTRAINTS FOR CHILDREN
Important child restraint precautions You are required by law to use safety restraints for children in the U.S. and Canada. If small children ride in your vehicle (generally children who are four years old or younger and who weigh 18 kg [40
lbs] or less), you must put them in safety seats made especially for children. Check your local and state laws for specific requirements regarding the safety of children in your vehicle.Never let a passenger hold a child on his or her lap
while the vehicle is moving. The passenger cannot protect the child from injury in a collision.
74
Seating and safety restraints
Always follow the instructions and warnings that come with any infant or child restraint you might use. If possible, place children in the rear seat of your vehicle. Accident statistics suggest that children are safer when properly restrained in rear seating positions than when they are restrained in front seating positions.
Children and safety belts Children who are too large for child safety seats (as specified by your child safety seat manufacturer) should always wear safety belts. Follow all the important safety restraint and air bag precautions that apply to adult passengers in your vehicle. If the shoulder belt portion of a combination lap and shoulder belt can be positioned so it does not cross or rest in front of the child’s face or neck, the child should wear the lap and shoulder belt. Moving the child closer to the center of the vehicle may help provide a good shoulder belt fit. If the shoulder belt cannot be properly positioned: • move the child to one of the seats with a lap belt only (if equipped)
OR • if the child is the proper size, restrain the child in a safety seat.
com_safety_belts.01
75
Seating and safety restraints
Do not leave children, unreliable adults, or pets
unattended in your vehicle.
To improve the fit of lap and shoulder belts on children who have outgrown child safety seats, Ford recommends use of a belt-positioning booster seat that is labelled as conforming to all Federal motor vehicle safety standards. Belt-positioning booster seats raise the child and provide a shorter, firmer seating cushion that encourages safer seating posture and better fit of lap and shoulder belts on the child. A belt-positioning booster should be used if the shoulder belt rests in front of the child’s face or neck, or if the lap belt does not fit snugly on both thighs, or if the thighs are too short to let the child sit all the way back on the seat cushion when the lower legs hang over the edge of the seat cushion. You may wish to discuss the special needs of your child with your pediatrician.
76
com_safety_seats.01
Seating and safety restraints
Child and infant or child safety seats
Carefully follow all of the manufacturer’s instructions included with the safety seat you put in your vehicle. If you do not install and use the safety seat properly, the child may be injured in a sudden stop or collision.
Ford recommends the use of a child safety seat having a top tether strap. Install the child safety seat in a seating position which is capable of providing a tether anchorage. For more information on top tether straps see Attaching safety seats with tether straps in this chapter. When installing a child safety seat: • Use the correct safety belt • Make sure the tongue is securely fastened in the buckle. • Keep the buckle release button pointing up and away from the safety seat, with the tongue between the child seat and the release button, to prevent accidental unbuckling.
buckle for that seating position.
• Place seatbacks in the upright • Put the safety belt in the
position.
automatic locking mode. Refer to Using the automatic locking mode in this chapter.
f12_installing_seats
77
Seating and safety restraints
Installingchildsafetyseatsin combinationlapandshoulder beltseatingpositions 1. Position the child safety seat in a seat with a combination lap and shoulder belt.
If you choose to install a child safety seat in the front passenger seat, move the seat as far back as possible.
78
Seating and safety restraints
Keep the passenger air bag turned on unless there is a rear-facing infant seat installed in the front seat. When the passenger air bag switch is turned off, the passenger air bag will not inflate in a collision.
2. Pull down on the shoulder belt and then grasp the shoulder belt and lap belt together.
3. While holding the shoulder and lap belt portions together, route the tongue through the child seat according to the child seat manufacturer’s instructions. Be
79
Seating and safety restraints
sure the belt webbing is not twisted. 4. Insert the belt tongue into the proper buckle for that seating position until you hear and feel the latch engage. Make sure the tongue is latched securely by pulling on it.
5. To put the retractor in the automatic locking mode, grasp the shoulder portion of the belt and
80
Seating and safety restraints
pull downward until all of the belt is extracted and a click is heard. 6. Allow the belt to retract. The belt will click as it retracts to indicate it is in the automatic locking mode. 7. Pull the lap belt portion across the child seat toward the buckle and pull up on the shoulder belt while pushing down on the child seat.
8. Allow the safety belt to retract to remove any slack in the belt. 9. Before placing the child in the seat, forcibly tilt the seat forward and back to make sure the seat is securely held in place.
10. Try to pull the belt out of the retractor to make sure the retractor is in the automatic locking mode (you should not be
81
f12_tether_straps
Seating and safety restraints
able to pull more belt out). If the retractor is not locked, unbuckle the belt and repeat steps two through nine. Check to make sure the child seat is properly secured before each use.
Using a tether strap Ford recommends using child safety seats with a top tether strap. Contact the manufacturer of your safety seat for information about ordering a tether strap if one is not provided to you. Contact your Ford dealer for a free tether strap if one is not provided to you. Contact your Ford dealer for a free tether anchor kit (613D74) so you can attach a tether anchor bracket to the back of the seat cushion. If you have a SuperCab, attach the bracket to the inside of the back panel of your vehicle. Carefully follow the instructions provided with the kit. If you have a SuperCab, Ford recommends you attach tether safety seats in a rear seating position (if possible) with the tether strap attached to the tether anchor bracket as shown in the instructions provided with the tether anchor kit. If the tethered seat is installed in the front seat, put the tether strap over the seatback and attach it to the anchor bracket installed on the rear edge of the seat cushion as explained in the tether strap instructions.
82
STARTING YOUR VEHICLE
Important safety precautions A computer system controls the engine’s idle revolutions per minute (RPM). When the engine starts, the idle RPM runs faster to warm the engine. If the engine idle speed does not slow down automatically, have the vehicle checked. Do not allow the vehicle to idle for more than ten minutes.
Extended idling at high engine speeds can produce
very high temperatures in the engine and exhaust system, creating the risk of fire or other damage.
Do not park, idle, or drive your vehicle in dry grass or other dry ground cover. The emission system heats up the engine compartment and exhaust system, which can start a fire.
Do not start your vehicle in a closed garage or in other enclosed areas. Exhaust fumes can be toxic. Always open the garage door before you start the engine. See Guarding against exhaust fumes in this chapter for more instructions.
Starting
com_important_precautions.05
83
com_preparing_start.01
Starting
If you smell exhaust fumes inside your vehicle, have your dealer inspect your vehicle immediately. Do not drive if you smell exhaust fumes.
Preparing to start the vehicle Engine starting is controlled by the spark ignition system. This system meets all Canadian Interference-Causing Equipment standard requirements regulating the impulse electrical field strength of radio noise. When starting a fuel-injected engine, avoid pressing the accelerator before or during starting. Only use the accelerator when you have difficulty starting the engine. For more information on starting the vehicle, refer to Starting the vehicle in this chapter. Before starting the vehicle: 1. Make sure all vehicle occupants have buckled their safety belts. For more information on safety belts and their proper usage, refer to
84
the Seating and safety restraints chapter. 2. Make sure the headlamps and vehicle accessories are off.
Starting
If starting a vehicle with an automatic transmission: • Make sure the parking brake is • Make sure the gearshift is in P
set.
(Park).
85
Starting
If starting a vehicle with a manual transmission: • Make sure the parking brake is • Push the clutch pedal to the
set.
floor.
3 D
4 R
86
3. Turn the key to the ON position (without turning the key to START). Make sure the following lights illuminate briefly. If a light fails to illuminate, have the vehicle serviced.
LOW FUEL
40
50
80
60
30
60
100
70
DOOR AJAR
BRAKE
CHECK ENGINE
40
0 0 0 0 0 5
20
10
20 km/h
MPH MPH
0 0 1 0
120
140
80
90
100180
LOW FUEL
18
BRAKE
40
50
80
60
30
60
100
70
40
0 0 0 0 0 5
20
10
20 km/h
MPH
0 0 1 0
120
140
80
90
100180
• If the driver’s safety belt is
fastened, the illuminate.
light does not
Starting
18
ABS
RPMx1000
ABS
CHECK ENGINE
87
4
com_starting_vehicle.01
com_engine_heater.01
Starting
STARTING PROCEDURE
Starting the engine 1. Turn the key to 5 (Start) without pressing the accelerator. The key will return to 4 (On).
2. If the engine does not start within five seconds, wait ten seconds and try again. 3. If the engine does not start in two attempts OR the temperature is below —12°C (10°F), depress accelerator and start the engine while holding the accelerator down. Release accelerator when engine starts. 4. After idling for a few seconds, apply the brake and release the parking brake.
Using the engine block heater (if equipped) An engine block heater warms the engine coolant, which improves starting, warms up the engine faster and allows the heater-defroster system to respond quickly. They are strongly recommended if you live in a region where temperatures reach —23°C (–10°F) or below. For best results, plug the heater in at least three hours before starting
88
the vehicle. Using the heater for longer than three hours will not harm the engine, so the heater can be plugged in the night before starting the vehicle.
To prevent electrical shock, do not use your
heater with ungrounded electrical systems or two-pronged (cheater) adapters.
Guarding against exhaust fumes Although odorless and colorless, carbon monoxide is present in exhaust fumes. Take precautions to avoid its dangerous effects.
If you ever smell exhaust fumes of any kind inside your vehicle, have your dealer inspect and fix your vehicle immediately. Do not drive if you smell exhaust fumes. These fumes are harmful and could kill you.
Have the exhaust and body ventilation systems checked whenever: • the vehicle is raised for service • the sound of the exhaust system • the vehicle has been damaged in
changes
a collision
Starting
com_guarding_exhaust.01
com_ventilation_info.01
89
L R
AUTO
OFF
PANEL
A/C
MAX A/C
PANEL & FLOOR FLOOR FLR & DEF
DEF
Starting
Important ventilating information If the engine is idling while the vehicle is stopped in an open area for long periods of time, open the windows at least 2.5 cm (one inch).
Adjust the heating or air conditioning (if equipped) to bring in fresh air. Improve vehicle ventilation by keeping all air inlet vents clear of snow, leaves and other debris.
90
BRAKES
Driving
f12_rear_abs
Rear anti-lock brake system (ABS) (if equipped) This system prevents one or both rear wheels from locking up when the brakes are applied during a sudden stop. Even with rear ABS, the front brakes may lock up on any surface. Be careful when braking, especially on loose snow or gravel. Anti-lockbrakesystem(ABS)(if equipped) The ABS operates by detecting the onset of wheel lock up during brake applications and compensating for this tendency. The front wheels are prevented from locking even when the brakes are firmly applied. The accompanying illustration depicts the advantage of an ABS equipped vehicle (on bottom) to a non-ABS equipped vehicle (on top) during hard braking. UsingABS • In an emergency, apply full force
on the brake. The ABS will be activated immediately, thus allowing you to retain full steering control of your vehicle and, providing there is sufficient space, will enable you to avoid obstacles and bring the vehicle to a quiet stop.
• We recommend that you
familiarize yourself with this
com_abs.01
com_using_abs.01
91
f12_parking_brake
f12_setting_pbrake
Driving
braking technique. However, avoid taking any unnecessary risks.
Parking brake The parking brake should be used whenever you park your vehicle. It is not designed to stop a moving vehicle. However, if the normal