- Download PDF Manual
-
(a) Circular spray pattern generally indicates
seal leakage or crankshaft damage.
(b) Where leakage tends to run straight down, possible causes are a porous block, camshaft bore cup plugs, oil galley pipe plugs, oil filter runoff, and main bearing cap to cylinder block mating sur- faces. See Engine, for proper repair procedures of these items. (4) If no leaks are detected, pressurized the crank- case as outlined in the section, Inspection (Engine oil Leaks in general)
CAUTION: Do not exceed 20.6 kPa (3 psi).
(5) If the leak is not detected, very slowly turn the crankshaft and watch for leakage. If a leak is detected between the crankshaft and seal while slowly turning the crankshaft, it is possible the crankshaft seal surface is damaged. The seal area on the crankshaft could have minor nicks or scratches that can be polished out with emery cloth.
CAUTION: Use extreme caution when crankshaft polishing is necessary to remove minor nicks or scratches. The crankshaft seal flange is specially machined to complement the function of the rear oil seal.
(6) For bubbles that remain steady with shaft rotation, no further inspection can be done until dis- assembled. (Refer to 9 - ENGINE - DIAGNOSIS AND TESTING), under the Oil Leak row, for components inspections on possible causes and corrections.
(7) After the oil leak root cause and appropriate corrective action have been identified, (Refer to 9 - ENGINE/ENGINE OIL SEAL - REAR - REMOVAL).
BLOCK/CRANKSHAFT
REMOVAL
NOTE: This procedure can be performed in vehicle.
(1) If being preformed in vehicle, remove the
transmission.
(2) Remove the flexplate (Refer to 9 - ENGINE/
ENGINE BLOCK/FLEX PLATE - REMOVAL).
NOTE: The crankshaft oil seal CAN NOT be reused after removal.
NOTE: The crankshaft rear oil seal remover Special Tool 8506 must be installed deeply into the seal. Continue to tighten the removal tool into the seal until the tool can not be turned farther. Failure to install tool correctly the first time will cause tool to pull free of seal without removing seal from engine.
(3) Using Special Tool 8506, remove the crankshaft
rear oil seal.
INSTALLATION
CAUTION: The rear seal must be installed dry for proper operation. Do not lubricate the seal lip or outer edge.
(1) Position the plastic seal guide onto the crank- shaft rear face. Then position the crankshaft rear oil seal onto the guide.
(2) Using Special Tools 8349 Crankshaft Rear Oil Seal Installer and C-4171 Driver Handle, with a hammer, tap the seal into place. Continue to tap on the driver handle until installer seats against the cylinder block crankshaft bore.
the seal
(3) Install the flexplate. (4) Install the transmission.
CRANKSHAFT REAR OIL SEAL RETAINER REMOVAL
(1) Disconnect negative cable from battery. (2) Remove the transmission. (3) Remove the drive plate / flywheel. (4) Remove the oil pan (Refer to 9 - ENGINE/LU-
BRICATION/OIL PAN - REMOVAL).
(5) Remove the rear oil seal retainer mounting
(6) Carefully remove the retainer from the engine
bolts.
block.
ENGINE - 5.7L
9 - 205
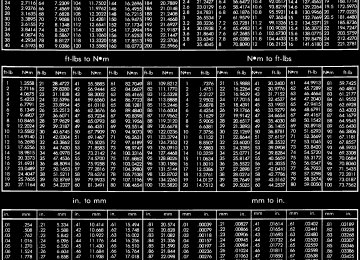
.0001 in.) INCREMENTS is required. If a bore gauge is not available, do not use an inside micrometer.
(2) Measure the inside diameter of the cylinder bore at a point 38.0 mm (1.5 inches) below top of bore. Start perpendicular (across or at 90 degrees) to the axis of the crankshaft at point A and then take an additional bore reading 90 degrees to that at point B (Fig. 11).
(3) The coated pistons will be serviced with the
piston pin and connecting rod pre-assembled.
(4) The coating material is applied to the piston after the final piston machining process. Measuring the outside diameter of a coated piston will not pro- vide accurate results (Fig. 10). Therefore measuring the inside diameter of the cylinder bore with a dial Bore Gauge is MANDATORY. To correctly select the proper size piston, a cylinder bore gauge capable of reading in 0.003 mm (.0001 in.) increments is required.
(5) Piston installation into
cylinder bore requires slightly more pressure than that required for non-coated pistons. The bonded coating on the piston will give the appearance of a line-to-line fit with the cylinder bore.
the
DR CRANKSHAFT REAR OIL SEAL RETAINER (Continued) INSTALLATION
(1) Throughly clean all gasket resdue from the
engine block.
from the retainer.
(2) Use extream care and clean all gasket resdue
(3) Position the gasket onto the retainer. (4) Position the retainer onto the engine block. (5) Install the retainer mounting bolts. Tighten the bolts to 15 N·m (132 in. lbs.) using a crisscross pat- tern, starting with the bolt on the lower right.
(6) Install a new rear seal(Refer to 9 - ENGINE/ ENGINE BLOCK/CRANKSHAFT OIL SEAL - REAR - INSTALLATION).
(7) Install the oil pan (Refer to 9 - ENGINE/LU-
BRICATION/OIL PAN - INSTALLATION).
(8) Install the drive plate / flywheel. (9) Install the transmission. (10) Check and verify engine oil level. (11) Start engine and check for leaks.
FLEX PLATE REMOVAL
(1) Remove the transmission. (2) Remove the bolts and flexplate.
INSTALLATION
(1) Position the flexplate onto the crankshaft and
install the bolts hand tight.
(2) Tighten the flexplate retaining bolts to 95 N·m
(70 ft. lbs.).
(3) Install the transmission.
PISTON & CONNECTING ROD DESCRIPTION
CAUTION: Do not use a metal stamp to mark con- necting rods as damage may result, instead use ink or a scratch awl.
The pistons are made of a high strength aluminum alloy. Piston skirts are coated with a solid lubricant (Molykote) to reduce friction and provide scuff resis- tance. The piston top ring groove and land is anod- ized. The connecting rods are made of forged powdered metal, with a “fractured cap” design. A pressed fit piston pin is used to attach the piston and connecting rod.
STANDARD PROCEDURE—PISTON FITTING
(1) To correctly select the proper size piston, a cyl- inder bore gauge, capable of reading in 0.003 mm (
Fig.10MolyCoatedPiston
1 - MOLY COATED 2 - MOLY COATED
REMOVAL
ENGINE/LUBRICATION/OIL PAN - REMOVAL).
(1) Disconnect negative cable from battery. (2) Remove the following components: † Oil pan and gasket/windage tray (Refer to 9 - † Cylinder head covers (Refer to 9 - ENGINE/ CYLINDER HEAD/CYLINDER HEAD COVER(S) - REMOVAL) and (Refer to 9 - ENGINE/CYLINDER HEAD/CYLINDER HEAD COVER(S) - REMOVAL). † Timing chain cover (Refer to 9 - ENGINE/ VALVE TIMING/TIMING BELT / CHAIN COVER(S) - REMOVAL).
ENGINE - 5.7L
9 - 206
PISTON & CONNECTING ROD (Continued)DR
Fig.12IdentifyConnectingRodtoCylinder
Position—Typical
(5) Remove connecting rod cap. Install Special Tool 8507 Connecting Rod Guides into the connecting rod being removed. Remove piston from cylinder bore. Repeat this procedure for each piston being removed.
CAUTION: Care must be taken not to nick crank- shaft journals, as engine damage may occur
Fig.11BoreGauge—Typical
1 - FRONT 2 - BORE GAUGE 3 - CYLINDER BORE 4 - 38 MM (1.5 in)
† Cylinder head(s) (Refer to 9 - ENGINE/CYLIN- DER HEAD - REMOVAL) and (Refer to 9 - ENGINE/ CYLINDER HEAD - REMOVAL).
(3) If necessary, remove top ridge of cylinder bores with a reliable ridge reamer before removing pistons from cylinder block. Be sure to keep tops of pis- tons covered during this operation. Pistons and connecting rods must be removed from top of cylinder block. When removing piston and connecting rod assemblies from the engine, rotate crankshaft so the each connecting rod is centered in cylinder bore.
CAUTION: DO NOT use a number stamp or a punch to mark connecting rods or caps, as damage to connecting rods could occur
NOTE: Connecting rods and bearing caps are not interchangeable and should be marked before removing to ensure correct reassembly.
(4) Mark connecting rod and bearing cap positions using a permanent ink marker or scribe tool (Fig. 12).
CAUTION: Care must be taken not to damage the fractured rod and cap joint face surfaces, as engine damage may occur.
(6) Immediately after piston and connecting rod removal, install bearing cap on the mating connect- ing rod to prevent damage to the fractured cap and rod surfaces.
(7) Carefully remove piston rings from piston(s),
starting from the top ring down.
CLEANING
CAUTION: DO NOT use a wire wheel or other abra- sive cleaning devise to clean the pistons or con- necting rods. The pistons have a Moly coating, this coating must not be damaged.
(1) Using a suitable cleaning solvent clean the pis-
tons in warm water and towel dry.
(2) Use a wood or plastic scraper to clean the ring
land grooves.
CAUTION: DO NOT remove the piston pin from the piston and connecting rod assembly.
INSPECTION
Check the connecting rod journal
for excessive wear, taper and scoring (Refer to 9 - ENGINE/EN- GINE BLOCK/CONNECTING ROD BEARINGS - STANDARD PROCEDURE).
Check the connecting rod for signs of twist or bend-
ing.
Check the piston for taper and elliptical shape before it is fitted into the cylinder bore (Refer to 9 - ENGINE/ENGINE BLOCK/PISTON & CONNECT- ING ROD - STANDARD PROCEDURE).
DR PISTON & CONNECTING ROD (Continued)
Check the piston for scoring, or scraping marks in the piston skirts. Check the ring lands for cracks and/or deterioration.
INSTALLATION
(1) Before installing piston and connecting rod assemblies into the bore, install the piston rings(Re- fer to 9 - ENGINE/ENGINE BLOCK/PISTON RINGS - STANDARD PROCEDURE).
(2) Immerse the piston head and rings in clean engine oil. Position a ring compressor over the piston and rings. Tighten ring compressor. Ensure posi- tion of rings do not change during this opera- tion.
(3) Position bearing onto connecting rod. Lubricate
bearing surface with clean engine oil.
(4) Install Special Tool 8507 Connecting Rod
Guides into connecting rod bolt threads.
(5) The pistons are marked on the piston pin bore surface with an raised “F” or arrow on top of piston indicating installation position. This mark must be pointing toward the front of engine on both cylinder banks. The connecting rod oil slinger slot faces the front of the engine.
(6) Wipe cylinder bore clean and lubricate with
engine oil.
(7) Rotate crankshaft until connecting rod journal is on the center of cylinder bore. Insert rod and pis- ton into cylinder bore and carefully position connect- ing rod guides over crankshaft journal.
(8) Tap piston down in cylinder bore using a ham- mer handle. While at the same time, guide connect- ing rod into position on rod journal.
ENGINE - 5.7L
9 - 207
† Install the intake manifold. † Oil pan and gasket/windage tray. (Refer to 9 - INSTALLA-
ENGINE/LUBRICATION/OIL PAN - TION).
(11) Fill crankcase with proper engine oil to cor-
rect level.
(12) Connect negative cable to battery.
PISTON RINGS STANDARD PROCEDURE - PISTON RING FITTING
Before reinstalling used rings or installing new
rings, the ring clearances must be checked.
(1) Wipe the cylinder bore clean. (2) Insert the ring in the cylinder bore.
NOTE: The ring gap measurement must be made with the ring positioned at least 12mm (0.50 inch.) from bottom of cylinder bore.
(3) Using a piston, to ensure that the ring is squared in the cylinder bore, slide the ring downward into the cylinder.
(4) Using a feeler gauge check the ring end gap (Fig. 13). Replace any rings not within specification.
CAUTION: Connecting Rod Bolts are Torque to Yield Bolts and Must Not Be Reused. Always replace the Rod Bolts whenever they are loosened or removed.
(9) Lubricate rod bolts and bearing surfaces with engine oil. Install connecting rod cap and bearing. Tighten bolts to 21 N·m (15 ft. lbs.) plus a 90° turn. (10) Install the following components: † Cylinder head(s). (Refer to 9 - ENGINE/CYLIN- † Cylinder head covers (Refer to 9 - ENGINE/ CYLINDER HEAD/CYLINDER HEAD COVER(S) - INSTALLATION).
DER HEAD - INSTALLATION).
1 - FEELER GAUGE
Fig.13Ring
ENGINE - 5.7L
9 - 208
PISTON RINGS (Continued)DR
PISTON RING SIDE CLEARANCE
PISTON RING SPECIFICATION CHART
NOTE: Make sure the piston ring grooves are clean and free of nicks and burrs.
Ring Position
(5) Measure the ring side clearance as shown (Fig. 14)make sure the feeler gauge fits snugly between the ring land and the ring. Replace any ring not within specification.
Upper Ring
Intermediate
Ring
Groove
Clearance
0.6715- .0.7105mm (0.0264- 0.0279
in.)
0.5455-
0.6245mm
Maximum Clearance
0.11mm
(0.004 in.)
0.10mm
(0.0214-0.0245
(0.004 in.)
in.)
Ring Position
Ring Gap
Upper Ring
0.23-0.38mm (0.0090-0.0149
in.)
Wear Limit
0.43mm (0.017 in.)
Intermediate
0.35-0.60mm
0.74mm
Ring
(0.0137-0.0236
(0.029 in.)
in.)
Oil Control Ring
(Steel Rail)
0.015-0.66mm (0.0059- 0.0259
1.55mm (0.061 in.)
in.)
(7) The No. 1 and No. 2 piston rings have a differ- ent cross section. Ensure No. 2 ring is installed with manufacturers I.D. mark (Dot) facing up, towards top of the piston.
NOTE: Piston rings are installed in the following
order:† Oil ring expander. † Upper oil ring side rail. † Lower oil ring side rail. † No. 2 Intermediate piston ring. † No. 1 Upper piston ring.
Fig.14MeasuringPistonRingSideClearance
1 - FEELER GAUGE
(6) Rotate the ring around the piston, the ring
must rotate in the groove with out binding.
DR PISTON RINGS (Continued)
ENGINE - 5.7L
9 - 209
(8) Install the oil ring expander. (9) Install upper side rail (Fig. 15) by placing one end between the piston ring groove and the expander ring. Hold end firmly and press down the portion to be installed until side rail is in position. Repeat this step for the lower side rail.
(10) Install No. 2 intermediate piston ring using a
piston ring installer (Fig. 16).
(11) Install No. 1 upper piston ring using a piston
ring installer (Fig. 16).
(12) Position piston ring end gaps as shown in (Fig. 17). It is important that expander ring gap is at least 45° from the side rail gaps, but not on the pis- ton pin center or on the thrust direction.
Fig.15SIDERAIL-INSTALLATION
1 - SIDE RAIL END
Fig.17PISTONRINGENDGAPPOSITION
1 - SIDE RAIL UPPER 2 - NO. 1 RING GAP 3 - PISTON PIN 4 - SIDE RAIL LOWER 5 - NO. 2 RING GAP AND SPACER EXPANDER GAP
VIBRATION DAMPER REMOVAL
(1) Disconnect negative cable from battery. (2) Remove accessory drive belt
(Refer to 7 - COOLING/ACCESSORY DRIVE/DRIVE BELTS - REMOVAL).
(3) Drain cooling system (Refer to 7 - COOLING -
STANDARD PROCEDURE).
(4) Remove radiator upper hose. (5) Remove upper fan shroud. (6) Using Special Tools 6958 Spanner with Adapter loosen fan and viscous assembly from
Pins 8346, water pump.
(7) Remove fan and viscous assembly. (8) Remove crankshaft damper bolt. (9) Remove damper using Special Tools 8513A
Insert and 8454 Three Jaw Puller.
Fig.16UPPERANDINTERMEDIATERINGS
INSTALLATION
CAUTION: To prevent severe damage to the Crank- shaft, Damper or Special Tool 8512–A, thoroughly clean the damper bore and the crankshaft nose before installing Damper.
(1) Slide damper onto crankshaft slightly.
CAUTION: Special Tool 8512–A, is assembled in a specific sequence. Failure to assemble this tool in this sequence can result in tool failure and severe damage to either the tool or the crankshaft.
(2) Assemble Special Tool 8512–A as follows, The nut is threaded onto the shaft first. Then the roller
ENGINE - 5.7L
9 - 210
VIBRATION DAMPER (Continued)bearing is placed onto the threaded rod (The hard- ened bearing surface of the bearing MUSTface the nut). Then the hardened washer slides onto the threaded rod (Fig. 18). Once assembled coat the threaded rod’s threads with Mopart Nickel Anti- Seize or (Loctite No. 771).
Fig.18ProperAssemblyMethodforSpecialTool
8512
1 - BEARING 2 - NUT 3 - THREADED ROD 4 - BEARING HARDENED SURFACE (FACING NUT) 5 - HARDENED WASHER
(3) Using Special Tool 8512–A, press damper onto
crankshaft.
(4) Install then tighten crankshaft damper bolt to
176 N·m (129 ft. lbs.).
(5) Install fan blade assembly (Refer to 7 - COOL- ING/ENGINE/FAN DRIVE VISCOUS CLUTCH - INSTALLATION).
(6) Install radiator upper shroud and tighten fas-
teners to 11 N·m (95 in. lbs.).
(7) Install radiator upper hose. (8) Install accessory drive belt (Refer to 7 - COOL- ING/ACCESSORY DRIVE/DRIVE BELTS - INSTAL- LATION).
(9) Refill cooling system (Refer to 7 - COOLING -
STANDARD PROCEDURE).
(10) Connect negative cable to battery.
DR
STRUCTURAL COVER DESCRIPTION
The structural dust cover is made of die cast alu- minum and joins the lower half of the transmission bell housing to the engine.
OPERATION
The structural cover provides additional power-
train stiffness and reduces noise and vibration.
REMOVAL
(1) Raise vehicle on hoist. (2) Remove the bolts retaining structural cover. (3) Remove the structural cover.
INSTALLATION
CAUTION: The structural cover must be installed as described in the following steps. Failure to do so will cause severe damage to the cover, and engine noise.
(1) Position the structural cover in the vehicle. (2) Install all bolts retaining the cover-to-engine.
DO NOT tighten the bolts at this time.
(3) Install the cover-to-transmission bolts. Do NOT
tighten at this time.
CAUTION: The structural cover must be held tightly against the corner formed by the engine and the transmission tightening sequence. Failure to do so may cause damage to the cover and engine noise.
housing
during
bell
(4) Torque the structural cover bolt that is closest to the front face of block on the passenger side of block to 54 N·m (40 ft. lbs.).
(5) Torque the structural cover bolt that is closest to the rear face of block on the drivers side to 54 N·m (40 ft. lbs.).
(6) Torque the remaining structural cover bolts that go into the block in an “X” pattern to 54 N·m (40 ft. lbs.).
(7) Torque the structural cover bolts that go into the transmission in an “X” pattern to 54 N·m (40 ft. lbs.).
DR
FRONT MOUNT REMOVAL
2WD
ENGINE - 5.7L
9 - 211
(1) Disconnect negative battery cable. (2) Raise vehicle. (3) Remove engine mount through bolts. (4) Raise engine using engine support fixture spe-
(5) Remove engine mount to insulator bolts (Fig.
cial tool # 8534.
19), (Fig. 20).
(6) Remove insulator from engine.
Fig.20LHINSULATOR
1 - BOLT 2 - INSULATOR
(12) Raise the engine far enough to be able to
remove the left and right engine mounts.
(13) Remove the engine mounts.
INSTALLATION
2WD
(1) Install insulator on the engine (Fig. 22).
NOTE: For mount to engine block and left engine bracket to front axle bolts, apply MoparT Lock and Seal Adhesive, Medium Strength Threadlocker.
(2) Install upper and lower mount mounting bolts.
Tighten bolts to 61 N·m (45 ft. lbs.).
(3) Lower the engine using engine support fixture
special tool # 8534.
(4) Install mount through bolts. (5) Tighten through bolts on both sides to 61 N·m
(45 ft. lbs.).
(6) Lower vehicle. (7) Connect negative battery cable.
4WD
NOTE: For mount to engine block and left engine bracket to front axle bolts, apply MoparT Lock and Seal Adhesive, Medium Strength Threadlocker.
(1) Install the right and left side engine mounts to
the front axle. Torque nuts to 94 N·m (70 ft. lbs.).
Fig.19RHINSULATOR
1 - BOLT 2 - INSULATOR
4WD
(1) Disconnect the negative cable from the battery. (2) Raise the vehicle. (3) Remove the skid plate. (4) Remove the front crossmember(Refer to 13 - FRAME & BUMPERS/FRAME/FRONT CROSS- MEMBER - REMOVAL).
(5) Remove the engine oil filter. (6) Support the engine using engine support fix-
ture, special tool # 8534.
(7) Support the front axle with a suitable jack. (8) Remove the (4) bolts that attach the engine
mounts to the front axle (Fig. 21).
(9) Remove the (3) bolts that attach the front axle
to the left engine bracket.
(10) Lower the front axle. (11) Remove the (6) through bolts
ENGINE - 5.7L
9 - 212
FRONT MOUNT (Continued)DR
Fig.21ENGINEINSULATORMOUNTS4X4
1 - RH INSULATOR TO AXLE BOLT 2 - NUT 3 - PINION SUPPORT MOUNT 4 - LH INSULATOR MOUNT
5 - LH INSULATOR TO AXLE BOLT 6 - FRONT AXLE 7 - NUT 8 - RH INSULATOR MOUNT
(2) Raise the front axle into the frame and install the left and right side through bolts. Torque nuts to 94 N·m (70 ft. lbs.).
(3) Insert the two upper through bolts into the right and left side engine mounts and loose assemble the two nuts onto the through bolts.
(4) Lower the engine using engine support fixture special tool # 8534, until the left and right side engine brackets rest on the through bolts, and the lower engine bracket through holes align with the engine mounts, and the left engine bracket holes align with the front axle slots (Fig. 23).
(5) Loose assemble the (3) bolts that attach the
front axle to the left engine bracket.
(6) Loose assemble the lower through bolts. (7) Torque the nuts for the (4) through bolts to 101
N·m (75 ft. lbs.).
(8) Torque the (3) bolts that attach the front axle
to the left engine bracket to 101 N·m (75 ft. lbs.).
(9) Install the engine oil filter, if removed. (10) Install the front crossmember(Refer to 13 - FRAME & BUMPERS/FRAME/FRONT CROSS- MEMBER - INSTALLATION).
(11) Install the skid plate. (12) Lower the vehicle.
Fig.22RHINSULATOR
1 - BOLT 2 - INSULATOR
DR FRONT MOUNT (Continued)
ENGINE - 5.7L
9 - 213
Fig.23ENGINEINSULATORMOUNTS4X4
1 - RH INSULATOR TO AXLE BOLT 2 - NUT 3 - PINION SUPPORT MOUNT 4 - LH INSULATOR MOUNT
5 - LH INSULATOR TO AXLE BOLT 6 - FRONT AXLE 7 - NUT 8 - RH INSULATOR MOUNT
(13) Reconnect the negative battery cable.
REAR MOUNT REMOVAL
(1) Raise the vehicle on a hoist. (2) Using a suitable jack, support transmission. (3) Remove the nuts from the transmission mount
(Fig. 24).
(4) Remove the two bolts that attach the transmis-
sion mount to the engine bracket.
(5) Raise the transmission enough to remove the
mount from the crossmember.
(6) Remove the mount.
INSTALLATION
NOTE: Threadlocking compound must be applied to the bolts before installation.
(1) Install the two bolts that attach the transmis-
sion mount to the transmission bracket.
(2) Torque the bolts to 61N·m (45 ft.lbs.) torque.
Fig.24TRANSMISSIONMOUNT
1 - MOUNT 2 - CROSSMEMBER 3 - NUT 4 - BOLT
ENGINE - 5.7L
9 - 214
REAR MOUNT (Continued)DR
(3) Lower the transmission so the transmission mount rests on the crossmember, and the studs of the transmission mount are aligned in the slots in the crossmember.
(4) Install the nuts onto the transmission mount
studs through the crossmember access slot. (5) Torque the nuts to 54N·m (40 ft. lbs.).
LUBRICATION DESCRIPTION
The lubrication system (Fig. 25) is a full flow fil-
tration pressure feed type.
DIAGNOSIS AND TESTING
DIAGNOSIS AND TESTING - CHECKING ENGINE OIL PRESSURE
(1) Remove oil pressure sending unit and install
gauge assembly C-3292.
(2) Run engine until thermostat opens. (3) Oil Pressure: † Curb Idle–25 kPa (4 psi) minimum † 3000 rpm–170 - 758 kPa (25 - 110 psi) (4) If oil pressure is 0 at idle, shut off engine. Check for a clogged oil pick-up screen or a pressure relief valve stuck open.
DIAGNOSIS AND TESTING - ENGINE OIL LEAK inspection of the engine, particularly at the area of the suspected leak.
Begin with a thorough visual
Fig.25EngineOilLubricationSystem
DR LUBRICATION (Continued)
ENGINE - 5.7L
9 - 215
If an oil leak source is not readily identifiable, the following steps should be followed:
(1) Do not clean or degrease the engine at this time because some solvents may cause rubber to swell, temporarily stopping the leak.
(2) Add an oil soluble dye (use as recommended by manufacturer). Start the engine and let idle for approximately 15 minutes. Check the oil dipstick to make sure the dye is thoroughly mixed as indicated with a bright yellow color under a black light.
(3) Using a black light, inspect the entire engine for fluorescent dye, particularly at the suspected area of oil leak. If the oil leak is found and identified, repair per service manual instructions.
(4) If dye is not observed, drive the vehicle at var- ious speeds for approximately 24 km (15 miles), and repeat inspection. If the oil leak source is not pos- itively identified at this time, proceed with the air leak detection test method.
Air Leak Detection Test Method
(1) Remove the PCV valve from the IAFM. Cap or
plug the PCV valve grommet.
(2) Attach an air hose with pressure gauge and
regulator to the dipstick tube.
CAUTION: Do not subject the engine assembly to more than 20.6 kPa (3 PSI) of test pressure.
(3) Gradually apply air pressure from 1 psi to 2.5
psi maximum while applying soapy water at the sus- pected source. Adjust the regulator to the suitable test pressure that provide the best bubbles which will pinpoint the leak source. If the oil leak is detected and identified, repair per service manual procedures.(4) If the leakage occurs at the rear oil seal area, refer to the section, Inspection for Rear Seal Area Leak.
(5) If no leaks are detected, turn off the air supply and remove the air hose and all plugs and caps. Install the PCV valve.
(6) Clean the oil off the suspect oil leak area using a suitable solvent. Drive the vehicle at various speeds approximately 24 km (15 miles). Inspect the engine for signs of an oil leak by using a black light.
INSPECTION FOR REAR SEAL AREA LEAKS
Since it is sometimes difficult to determine the source of an oil leak in the rear seal area of the engine, a more involved inspection is necessary. The following steps should be followed to help pinpoint the source of the leak.
If the leakage occurs at the crankshaft rear oil seal
area:
(1) Disconnect the battery. (2) Raise the vehicle.
(3) Remove torque converter or clutch housing cover and inspect rear of block for evidence of oil. Use a black light to check for the oil leak:
(a) Circular spray pattern generally indicates
seal leakage or crankshaft damage.
(b) Where leakage tends to run straight down, possible causes are a porous block, distributor seal, camshaft bore cup plugs oil galley pipe plugs, oil filter runoff, and main bearing cap to cylinder block mating surfaces. (4) If no leaks are detected, pressurize the crank- case as outlined in the, Inspection (Engine oil Leaks in general)
CAUTION: Do not exceed 20.6 kPa (3 psi).
(5) If the leak is not detected, very slowly turn the If a leak is crankshaft and watch for leakage. detected between the crankshaft and seal while slowly turning the crankshaft, it is possible the crankshaft seal surface is damaged. The seal area on the crankshaft could have minor nicks or scratches that can be polished out with emery cloth.
CAUTION: Use extreme caution when crankshaft polishing is necessary to remove minor nicks and scratches. The crankshaft seal flange is especially machined to complement the function of the rear oil seal.
(6) For bubbles that remain steady with shaft rotation, no further inspection can be done until dis- assembled.
OIL STANDARD PROCEDURE - ENGINE OIL SERVICE
WARNING: NEW OR USED ENGINE OIL CAN BE IRRITATING TO THE SKIN. AVOID PROLONGED OR REPEATED SKIN CONTACT WITH ENGINE OIL. CONTAMINANTS IN USED ENGINE OIL, CAUSED BY INTERNAL COMBUSTION, CAN BE HAZARDOUS TO YOUR HEALTH. THOROUGHLY WASH EXPOSED SKIN WITH SOAP AND WATER. DO NOT WASH SKIN WITH GASOLINE, DIESEL FUEL, THINNER, OR SOLVENTS, HEALTH PROBLEMS CAN RESULT. DO NOT POLLUTE, DISPOSE OF USED ENGINE OIL PROPERLY.
ENGINE - 5.7L
9 - 216
OIL (Continued) ENGINE OIL SPECIFICATIONCAUTION: Do not use non-detergent or straight mineral oil when adding or changing crankcase lubricant. Engine failure can result.
API SERVICE GRADE CERTIFIED
Use an engine oil that is API Service Grade Certi- fied. MOPARt provides engine oils that conform to this service grade.
SAE VISCOSITY
An SAE viscosity grade is used to specify the vis- cosity of engine oil. Use only engine oils with multi- ple viscosities such as 5W-30 in the 5.7L engines. These are specified with a dual SAE viscosity grade which indicates the cold-to-hot temperature viscosity range. Select an engine oil that is best suited to your particular temperature range and variation.
ENERGY CONSERVING OIL
An Energy Conserving type oil is recommended for gasoline engines. The designation of ENERGY CON- SERVING is located on the label of an engine oil con- tainer.
CONTAINER IDENTIFICATION
Standard engine oil identification notations have been adopted to aid in the proper selection of engine oil. The identifying notations are located on the label of engine oil plastic bottles and the top of engine oil cans (Fig. 26).
Fig.26APISYMBOL
OIL LEVEL INDICATOR (DIPSTICK)
The engine oil level indicator is located at the left
hand of the engine on the 5.7L engines.
CRANKCASE OIL LEVEL INSPECTION
CAUTION: Do not overfill crankcase with engine oil, pressure loss or oil foaming can result.
Inspect engine oil level approximately every 800
kilometers (500 miles). Unless the engine has exhib- ited loss of oil pressure, run the engine for about tenDR
minutes before checking oil level. Checking engine oil level on a cold engine is not accurate.
To ensure proper lubrication of an engine, the engine oil must be maintained at an acceptable level. The acceptable levels are indicated between the ADD and SAFE marks on the engine oil dipstick.
(1) Position vehicle on level surface. (2) With engine OFF, allow approximately five minutes for oil to settle to bottom of crankcase, remove engine oil dipstick. (3) Wipe dipstick clean. (4) Install dipstick and verify it is seated in the
(5) Remove dipstick, with handle held above the
tip, take oil level reading.
(6) Add oil only if level is below the ADD mark on
tube.
dipstick.
ENGINE OIL CHANGE
Change engine oil at mileage and time intervals described in Maintenance Schedules(Refer to LUBRI- CATION MAINTENANCE/MAINTENANCE SCHEDULES - DESCRIPTION).
Run engine until achieving normal operating tem-
perature.
engine off.
drain.
(1) Position the vehicle on a level surface and turn
(2) Hoist and support vehicle on safety stands. (3) Remove oil fill cap. (4) Place a suitable drain pan under crankcase
(5) Remove drain plug from crankcase and allow oil to drain into pan. Inspect drain plug threads for stretching or other damage. Replace drain plug if damaged.
(6) Install drain plug in crankcase. Torque to 34
N·m ( 25 ft. lbs.).
(7) Lower vehicle and fill crankcase with specified type and amount of engine oil described in this sec- tion.
(8) Install oil fill cap. (9) Start engine and inspect for leaks. (10) Stop engine and inspect oil level.
USED ENGINE OIL DISPOSAL
Care should be exercised when disposing used engine oil after it has been drained from a vehicle engine. Refer to the WARNING at beginning of this section.
OIL FILTER REMOVAL
All engines are equipped with a high quality full- flow, disposable type oil filter. DaimlerChrysler Cor-
DR OIL FILTER (Continued)
poration recommends a Mopart or equivalent oil filter be used.
(1) Position a drain pan under the oil filter. (2) Using a suitable oil filter wrench loosen filter. (3) Rotate the oil filter counterclockwise to remove
it from the cylinder block oil filter boss.
(4) When filter separates from cylinder block oil filter boss, tip gasket end upward to minimize oil spill. Remove filter from vehicle.
NOTE: Make sure filter gasket was removed with fil- ter.
(5) With a wiping cloth, clean the gasket sealing
surface of oil and grime.
INSTALLATION
(1) Lightly lubricate oil filter gasket with engine
oil.
(2) Thread filter onto adapter nipple. When gasket makes contact with sealing surface, (Fig. 27) hand tighten filter one half turn, or 180°,do not over tighten.
(3) Add oil, verify crankcase oil
level and start
engine. Inspect for oil leaks.
Fig.27OilFilterSealingSurface-Typical
1 - SEALING SURFACE 2 - RUBBER GASKET 3 - OIL FILTER
OIL PAN REMOVAL
(1) Disconnect the negative battery cable. (2) Install engine support fixture special tool #
8534. Do not raise engine at this time.
(3) Loosen both left and right side engine mount
through bolts. Do not remove bolts.
(4) Remove the structural dust cover, if equipped. (5) Drain engine oil. (6) Remove the front crossmember(Refer to 13 - FRAME & BUMPERS/FRAME/FRONT CROSS- MEMBER - REMOVAL).
ENGINE - 5.7L
9 - 217
CAUTION: Only raise the engine enough to provide clearance for oil pan removal. Check for proper clearance at fan shroud to fan and cowl to intake manifold.
(7) Raise engine using special tool # 8534 to pro-
vide clearance to remove oil pan.
NOTE: Do not pry on oil pan or oil pan gasket. Gas- ket is integral to engine windage tray and does not come out with oil pan.
(8) Remove the oil pan mounting bolts and oil pan.
NOTE: The double ended oil pan studs must be installed in the same location that they were removed from.
(9) Unbolt oil pump pickup tube and remove tube. (10) Inspect the integral windage tray and gasket
and replace as needed.
INSTALLATION
(1) Clean the oil pan gasket mating surface of the
block and oil pan.
and replace as needed.
(2) Inspect the integral windage tray and gasket
(3) Reinstall the oil pump pickup tube with new o-ring. Tighten tube to pump fasteners to 28 N·m (250 in. lbs.).
NOTE: The double ended oil pan studs must be installed in the same location that they were removed from.
(4) Position the oil pan and install the mounting bolts and studs.. Tighten the mounting bolts to 12
N·m (105 in.lbs.).(5) Lower the engine into mounts using special
tool # 8534.
(6) Install both the left and right side engine mount through bolts. Tighten the nuts to 68 N·m (50
ft. lbs.).(7) Remove special tool # 8534. (8) Install structural dust cover, if equipped. (9) Install the front crossmember(Refer to 13 - FRAME & BUMPERS/FRAME/FRONT CROSS- MEMBER - INSTALLATION).
(10) Fill engine oil. (11) Reconnect the negative battery cable. (12) Start engine and check for leaks.
9 - 218
ENGINE - 5.7L
OIL PUMP REMOVAL
DR
(1) Remove the oil pan and pick-up tube(Refer to 9
- ENGINE/LUBRICATION/OIL PAN - REMOVAL).
(2) Remove the timing chain cover(Refer to 9 - ENGINE/VALVE TIMING/TIMING BELT / CHAIN COVER(S) - REMOVAL).
(3) Remove the four bolts, and the oil pump.
CLEANING
(1) Wash all parts in a suitable solvent.
INSPECTION
CAUTION: Oil pump pressure relief valve and spring should not be removed from the oil pump. If these are disassembled and or removed from the pump the entire oil pump assem- bly must be replaced.
components
(1) Remove the pump cover. (2) Clean all parts thoroughly. Mating surface of the oil pump housing should be smooth. If the pump cover is scratched or grooved the oil pump assembly should be replaced.
(3) Slide outer rotor into the body of the oil pump. Press the outer rotor to one side of the oil pump body and measure clearance between the outer rotor and the body (Fig. 28). If the measurement is 0.235mm (0.009 in.) or more the oil pump assembly must be replaced.
(4) Install the inner rotor in the into the oil pump body. Measure the clearance between the inner and outer rotors (Fig. 29). If the clearance between the rotors is .150 mm (0.006 in.) or more the oil pump assembly must be replaced.
(5) Place a straight edge across the body of the oil pump (between the bolt holes), if a feeler gauge of .095 mm (0.0038 in.) or greater can be inserted between the straightedge and the rotors, the pump must be replaced (Fig. 30).
(6) Reinstall the pump cover. Torque fasteners to
15 N·m (132 in. lbs.).
NOTE: The 5.7 Oil pump is released as an assem- bly. There are no DaimlerChrysler part numbers for Sub-Assembly components. the oil pump is not functioning or out of specification it must be replaced as an assembly.
In the event
Fig.28MeasuringOuterRotorClearance
1 - FEELER GAUGE 2 - OUTER ROTOR
Fig.29MeasuringClearanceBetweenRotors-
Typical
1 - OUTER ROTOR 2 - FEELER GAUGE 3 - INNER ROTOR
DR OIL PUMP (Continued)
ENGINE - 5.7L
9 - 219
(2) Spray a small stream of water at the suspected
leak area.
(3) If a change in RPM is observed the area of the
suspected leak has been found.
(4) Repair as required.
REMOVAL
ing components:
(1) Disconnect negative cable from battery. (2) Remove resonator assembly and air inlet hose. (3) Disconnect electrical connectors for the follow- † Manifold Absolute Pressure (MAP) Sensor † Intake Air Temperature (IAT) Sensor † Throttle Position (TPS) Sensor † Coolant Temperature (CTS) Sensor (4) Disconnect brake booster hose and positive
crankcase ventilation (PCV) hose.
(5) Remove generator and set aside.
NOTE: remove freon from A/C compressor.
is not necessary to remove lines or
It
(6) Remove air conditioning compressor and set
aside..
(7) Bleed fuel system (Refer to 14 - FUEL SYS- TEM/FUEL DELIVERY - STANDARD PROCE- DURE).
(8) Remove intake manifold retaining fasteners in a crisscross pattern starting from the outside bolts and ending at the middle bolts.
(9) Remove intake manifold and IAFM as an
assembly.
Fig.30MeasuringClearanceOverRotors-Typical 1 - STRAIGHT EDGE 2 - FEELER GAUGE
INSTALLATION
(1) Position the oil pump onto the crankshaft and
install the 4 oil pump retaining bolts.
(2) Tighten the oil pump retaining bolts to 28 N·m
(250 in. lbs.).
(3) Install the timing chain cover(Refer to 9 - ENGINE/VALVE TIMING/TIMING BELT / CHAIN COVER(S) - INSTALLATION).
(4) Install the pick-up tube and oil pan(Refer to 9 - INSTALLA-
ENGINE/LUBRICATION/OIL PAN - TION).
INTAKE MANIFOLD DESCRIPTION
The intake manifold is made of a composite mate- rial and features long runners which maximizes low end torque. The intake manifold uses single plane sealing which consist of eight individual press in place port gaskets to prevent leaks.
DIAGNOSIS AND TESTING - INTAKE MANIFOLD LEAKAGE
An intake manifold air leak is characterized by lower than normal manifold vacuum. Also, one or more cylinders may not be functioning.
WARNING: USE EXTREME CAUTION WHEN THE ENGINE IS OPERATING. DO NOT STAND IN A DIRECT LINE WITH THE FAN. DO NOT PUT YOUR HANDS NEAR THE PULLEYS, BELTS OR THE FAN. DO NOT WEAR LOOSE CLOTHING.
(1) Start the engine.
CLEANING
NOTE: There is NO approved repair procedure for the intake manifold. If severe damage is found dur- ing inspection, the intake manifold must be replaced.
Before installing the intake manifold thoroughly clean the mating surfaces. Use a suitable cleaning solvent, then air dry.
INSPECTION
(1) Inspect the intake sealing surface for cracks,
nicks and distortion.
(2) Inspect the intake manifold vacuum hose fit-
tings for looseness or blockage.
(3) Inspect the manifold to throttle body mating
surface for cracks, nicks and distortion.
INSTALLATION
(1) Install intake manifold seals. (2) Position intake manifold and IAFM. (3) Install
intake manifold retaining bolts, and tighten in sequence from the middle bolts towards
ENGINE - 5.7L
9 - 220
INTAKE MANIFOLD (Continued)the outside in a crisscross pattern. Torque fasteners to 12 N·m (105 in. lbs.).
(4) Connect electrical connectors for the following components: † Manifold Absolute Pressure (MAP) Sensor † Intake Air Temperature (IAT) Sensor † Throttle Position (TPS) Sensor † Coolant Temperature (CTS) Sensor † Idle Air Control (IAC) Motor (5) Install generator. (6) Install A/C compressor. (7) Connect Brake booster hose and Positive crank-
case ventilation (PCV) hose.
(8) Install resonator assembly and air inlet hose. (9) Connect negative cable to battery.
EXHAUST MANIFOLD DESCRIPTION
The exhaust manifolds are log style with a pat- ented flow enhancing design to maximize perfor- mance. The exhaust manifolds are made of high silicon molybdenum cast iron. A perforated core graphite exhaust manifold gasket is used to improve sealing to the cylinder head. The exhaust manifolds are covered by a three layer laminated heat shield for thermal protection and noise reduction. The heat shields are fastened with a torque prevailing nut that is backed off slightly to allow for the thermal expansion of the exhaust manifold.
OPERATION
The exhaust manifolds collect the engine exhaust exiting the combustion chambers, then channels the exhaust gases to the exhaust pipes attached to the manifolds.
REMOVAL
EXHAUST MANIFOLD
(1) Disconnect negative battery cable. (2) Raise vehicle. (3) Remove exhaust pipe to manifold bolts. (4) Lower vehicle. (5) Install engine support
fixture special
tool
#8534.
(6) Raise engine enough to remove manifolds.
CAUTION: Do not damage engine harness while raising the engine.
(7) Remove heat shield. (8) Remove manifold bolts. (9) Remove manifold and gasket.
DR
CLEANING
Clean mating surfaces on cylinder head and mani- fold. Wash with solvent and blow dry with com- pressed air.
INSPECTION
Inspect manifold for cracks. Inspect mating surfaces of manifold for flatness with a straight edge. Gasket surfaces must be flat within 0.2 mm per 300 mm (0.008 inch per foot).
INSTALLATION
EXHAUST MANIFOLD
(1) Install manifold gasket and manifold. (2) Install manifold bolts and tighten to 25 N·m
(3) Install heat shield and tighten nuts to 15 N·m
(18 ft. lbs.).
(11 ft. lbs.).
(4) Lower engine.
CAUTION: Do not damage engine harness while lowering the engine.
(5) Remove engine support fixture from engine. (6) Raise vehicle. (7) Tighten right and left side engine mount
through bolts.
(8) Install exhaust flange to pipe bolts. (9) Lower vehicle. (10) Connect negative battery cable.
TIMING/CHAIN COVER REMOVAL
(1) Disconnect the battery negative cable. (2) Remove air cleaner assembly. (3) Drain cooling system. (4) Remove accessory drive belt. (5) Remove fan and fan drive assembly (Refer to 7
VISCOUSCOOLING/ENGINE/FAN
DRIVE
CLUTCH - REMOVAL).
(6) Remove coolant bottle and washer bottle. (7) Remove fan shroud.
NOTE: It is not necessary to disconnect A/C lines or discharge freon.
(8) Remove A/C compressor and set aside. (9) Remove the generator. (10) Remove upper radiator hose. (11) Disconnect both heater hoses at timing cover. (12) Disconnect lower radiator hose at engine. (13) Remove accessory drive belt tensioner and
both idler pulleys.
DR TIMING/CHAIN COVER (Continued)
(14) Remove
to 9 - ENGINE/ENGINE BLOCK/VIBRATION DAMPER - REMOVAL).
crankshaft damper(Refer
NOTE: Do not remove the hoses from the power steering pump.
(15) Remove power steering pump and set aside. (16) Remove the dipstick support bolt. (17) Drain the engine oil. (18) Remove the oil pan and pick up tube(Refer to 9 - ENGINE/LUBRICATION/OIL PAN - REMOVAL).
NOTE: It is not necessary to remove water pump for timing cover removal.
(19) Remove timing cover bolts and remove cover.
INSTALLATION
(1) Clean timing chain cover and block surface.
NOTE: Always install a new gasket on timing cover.
(2) Install cover and new gasket. Tighten fasteners
to 28 N·m (250 in. lbs.).
NOTE: The large lifting stud is torqued to 55 N·m (40 ft. lbs.).
(3) Install the oil pan and pick up tube(Refer to 9 - INSTALLA-
ENGINE/LUBRICATION/OIL PAN - TION).
(4) Install the A/C compressor. (5) Install the generator. (6) Install power steering pump. (7) Install the dipstick support bolt. (8) Install the thermostat housing. (9) Install
crankshaft
ENGINE/ENGINE BLOCK/VIBRATION DAMPER - INSTALLATION).
damper(Refer
to
(10) Install accessory drive belt tensioner assembly
and both idler pulleys.
(11) Install radiator lower hose. (12) Install both heater hoses. (13) Install radiator fan shroud. (14) Install the fan and fan drive assembly (15) Install the accessory drive belt. (16) Install the coolant bottle and washer bottle. (17) Install the upper radiator hose. (18) Install the air cleaner assembly. (19) Fill cooling system. (20) Refill engine oil. (21) Connect the battery negative cable.
ENGINE - 5.7L
9 - 221
TIMING/CHAIN AND SPROCKETS REMOVAL
(1) Disconnect battery negative cable. (2) Drain cooling system. (3) Remove Timing Chain Cover.
CAUTION: The camshaft pin and the slot in the cam sprocket must be clocked at 12:00. The crankshaft keyway must be clocked at 2:00. The crankshaft sprocket must be installed so that the dots and or paint marking is at 6:00.
(4) Re-install
the vibration damper bolt
finger tight. Using a suitable socket and breaker bar, rotate the crankshaft to align timing chain sprockets and keyways as shown (Fig. 31).
Fig.315.7LTIMINGMARKALIGNMENT
1 - Chain Tensioner 2 - Camshaft Sprocket 3 - Crankshaft Sprocket
(5) Retract tensioner shoe until hole in shoe lines up with hole in bracket. Slide a suitable pin into the holes.
(6) Remove camshaft sprocket attaching bolt and remove timing chain with crankshaft and camshaft sprockets.
(7) If tensioner assembly is to be replaced, remove the tensioner to block bolts and remove tensioner assembly.
DR
(6) Slide both sprockets evenly over their respec-
tive shafts and check alignment of timing marks.
(7) Install the camshaft bolt. Tighten the bolt to
122 N·m (90 ft. lbs.) torque.
(8) Remove tensioner pin. Again, verify align-
ment of timing marks.
(9) Install the oil pump(Refer to 9 - ENGINE/LU-
BRICATION/OIL PUMP - INSTALLATION).
(10) Install the oil pan and pick up(Refer to 9 - INSTALLA-
ENGINE/LUBRICATION/OIL PAN - TION).
(11) Install the timing chain cover(Refer to 9 - ENGINE/VALVE TIMING/TIMING BELT / CHAIN COVER(S) - INSTALLATION).
(12) Fill cooling system(Refer to 7 - COOLING -
STANDARD PROCEDURE).
(13) Connect battery negative cable. (14) Start engine and check for oil and coolant
leaks.
TIMING CHAIN/TENSIONER DESCRIPTION
The timing chain tensioner is a stamped steel con- stant tension mechanical design. It is mounted to the front of the engine, behind the timing chain drive.
OPERATION
The timing chain tension is maintained by routing the timing chain through the tensioner assembly. A nylon covered spring steel arm presses on the timing chain maintaining the correct chain tension.
ENGINE - 5.7L
9 - 222
TIMING/CHAIN AND SPROCKETS (Continued) INSTALLATION(1) If tensioner assembly is being replaced, install tensioner and mounting bolts. Torque bolts to 28 N·m (250 in. lbs.).
(2) Retract tensioner if required.
CAUTION: The camshaft pin and the slot in the cam sprocket must be clocked at 12:00. The crankshaft keyway must be clocked at 2:00. The crankshaft sprocket must be installed so that the dots and or paint marking is at 6:00.
(3) Place both camshaft sprocket and crankshaft sprocket on the bench with timing marks on exact imaginary center line through both camshaft and crankshaft bores (Fig. 32).
CAUTION: The timing chain must be installed with the single plated link aligned with the dot and or paint marking on the camshaft sprocket. The crank- shaft sprocket is aligned with the dot and or paint marking on the sprocket between two plated timing chain links.
(4) Place timing chain around both sprockets (Fig.
32).
(5) Lift sprockets and chain (keep sprockets tight
against the chain in position as shown).
Fig.325.7LTIMINGMARKALIGNMENT
1 - Chain Tensioner 2 - Camshaft Sprocket 3 - Crankshaft Sprocket
DR
ENGINE - 5.9L
9 - 223
ENGINE - 5.9L
TABLE OF CONTENTS
page
page
ENGINE - 5.9L
DESCRIPTION . . . . . . . . . . . . . . . . . . . . . . . . 224
DIAGNOSIS AND TESTINGDIAGNOSIS AND TESTING - ENGINE
DIAGNOSIS - INTRODUCTION . . . . . . . . . . 225
DIAGNOSIS AND TESTING—ENGINE
DIAGNOSIS - PERFORMANCE . . . . . . . . . . 226
DIAGNOSIS AND TESTING - ENGINE
DIAGNOSIS - MECHANICAL . . . . . . . . . . . . 228
DIAGNOSIS AND TESTING—ENGINE
DIAGNOSIS - LUBRICATION . . . . . . . . . . . . 230
DIAGNOSIS AND TESTING—CYLINDER
COMPRESSION PRESSURE . . . . . . . . . . . . 231
DIAGNOSIS AND TESTING - CYLINDER
COMBUSTION PRESSURE LEAKAGE . . . . . 231
STANDARD PROCEDURE
STANDARD PROCEDURE - FORM-IN-
PLACE GASKETS AND SEALERS . . . . . . . . 232
STANDARD PROCEDURE - REPAIR
CYLINDER HEAD COVER(S)
REMOVAL . . . . . . . . . . . . . . . . . . . . . . . . . . . . 245
CLEANING . . . . . . . . . . . . . . . . . . . . . . . . . . . 245
INSPECTION . . . . . . . . . . . . . . . . . . . . . . . . . 245
INSTALLATION . . . . . . . . . . . . . . . . . . . . . . . . 245INTAKE/EXHAUST VALVES & SEATS
DESCRIPTION . . . . . . . . . . . . . . . . . . . . . . . . 246
STANDARD PROCEDURE—VALVES, GUIDESAND SPRINGS . . . . . . . . . . . . . . . . . . . . . . . 246
REMOVAL . . . . . . . . . . . . . . . . . . . . . . . . . . . . 248
CLEANING . . . . . . . . . . . . . . . . . . . . . . . . . . . 248
INSPECTION . . . . . . . . . . . . . . . . . . . . . . . . . 248
INSTALLATION . . . . . . . . . . . . . . . . . . . . . . . . 248ROCKER ARM / ADJUSTER ASSEMBLY
REMOVAL . . . . . . . . . . . . . . . . . . . . . . . . . . . . 249
INSTALLATION . . . . . . . . . . . . . . . . . . . . . . . . 249ENGINE BLOCK
CLEANING . . . . . . . . . . . . . . . . . . . . . . . . . . . 249
INSPECTION . . . . . . . . . . . . . . . . . . . . . . . . . 249DAMAGED OR WORN THREADS . . . . . . . . 232
CAMSHAFT & BEARINGS (IN BLOCK)
STANDARD PROCEDURE—HYDROSTATIC
LOCK . . . . . . . . . . . . . . . . . . . . . . . . . . . . . . 232
STANDARD PROCEDURE - CYLINDER
BORE HONING . . . . . . . . . . . . . . . . . . . . . . 233
REMOVAL . . . . . . . . . . . . . . . . . . . . . . . . . . . . 233
INSTALLATION . . . . . . . . . . . . . . . . . . . . . . . . 234
SPECIFICATIONS5.9L ENGINE . . . . . . . . . . . . . . . . . . . . . . . . 235
TORQUE . . . . . . . . . . . . . . . . . . . . . . . . . . . 239SPECIAL TOOLS
REMOVAL—CAMSHAFT . . . . . . . . . . . . . . . . . 250
INSTALLATION—CAMSHAFT . . . . . . . . . . . . . 250
CONNECTING ROD BEARINGSSTANDARD PROCEDURE - CONNECTING
ROD BEARING FITTING . . . . . . . . . . . . . . . 251
CRANKSHAFT
DESCRIPTION . . . . . . . . . . . . . . . . . . . . . . . . 252
OPERATION . . . . . . . . . . . . . . . . . . . . . . . . . . 252
REMOVAL . . . . . . . . . . . . . . . . . . . . . . . . . . . . 252
INSTALLATION . . . . . . . . . . . . . . . . . . . . . . . . 2525.9L ENGINE . . . . . . . . . . . . . . . . . . . . . . . . 240
CRANKSHAFT MAIN BEARINGS
AIR CLEANER ELEMENT
REMOVAL . . . . . . . . . . . . . . . . . . . . . . . . . . . . 242
INSTALLATION . . . . . . . . . . . . . . . . . . . . . . . . 242CYLINDER HEAD DESCRIPTION
DESCRIPTION—CYLINDER HEAD DESCRIPTION - CYLINDER HEAD COVER
. . . . . . . 243
GASKET . . . . . . . . . . . . . . . . . . . . . . . . . . . 243
OPERATION
OPERATION—CYLINDER HEAD . . . . . . . . . 243
OPERATION - CYLINDER HEAD COVERGASKET . . . . . . . . . . . . . . . . . . . . . . . . . . . 243
DIAGNOSIS AND TESTING—CYLINDER HEAD
GASKET FAILURE . . . . . . . . . . . . . . . . . . . . 243
REMOVAL . . . . . . . . . . . . . . . . . . . . . . . . . . . . 244
CLEANING . . . . . . . . . . . . . . . . . . . . . . . . . . . 244
INSPECTION . . . . . . . . . . . . . . . . . . . . . . . . . 244
INSTALLATION . . . . . . . . . . . . . . . . . . . . . . . . 244DESCRIPTION . . . . . . . . . . . . . . . . . . . . . . . . 253
OPERATION . . . . . . . . . . . . . . . . . . . . . . . . . . 253
STANDARD PROCEDURE—CRANKSHAFTMAIN BEARING FITTING . . . . . . . . . . . . . . . 253
REMOVAL . . . . . . . . . . . . . . . . . . . . . . . . . . . . 254
INSTALLATION . . . . . . . . . . . . . . . . . . . . . . . . 254CRANKSHAFT OIL SEAL - FRONT
DESCRIPTION . . . . . . . . . . . . . . . . . . . . . . . . 254
OPERATION . . . . . . . . . . . . . . . . . . . . . . . . . . 254
REMOVAL . . . . . . . . . . . . . . . . . . . . . . . . . . . . 254
INSTALLATION . . . . . . . . . . . . . . . . . . . . . . . . 255CRANKSHAFT OIL SEAL - REAR
DESCRIPTION . . . . . . . . . . . . . . . . . . . . . . . . 255
OPERATION . . . . . . . . . . . . . . . . . . . . . . . . . . 255
REMOVAL . . . . . . . . . . . . . . . . . . . . . . . . . . . . 255
INSTALLATION . . . . . . . . . . . . . . . . . . . . . . . . 256DISTRIBUTOR BUSHING
REMOVAL . . . . . . . . . . . . . . . . . . . . . . . . . . . . 258
INSTALLATION . . . . . . . . . . . . . . . . . . . . . . . . 2589 - 224
ENGINE - 5.9L
DR
HYDRAULIC LIFTERS
INSTALLATION . . . . . . . . . . . . . . . . . . . . . . . . 270
DIAGNOSIS AND TESTING—HYDRAULIC
TAPPETS . . . . . . . . . . . . . . . . . . . . . . . . . . . 258
REMOVAL . . . . . . . . . . . . . . . . . . . . . . . . . . . . 259
CLEANING . . . . . . . . . . . . . . . . . . . . . . . . . . . 260
INSTALLATION . . . . . . . . . . . . . . . . . . . . . . . . 260OIL PAN
REMOVAL . . . . . . . . . . . . . . . . . . . . . . . . . . . . 270
CLEANING . . . . . . . . . . . . . . . . . . . . . . . . . . . 270
INSPECTION . . . . . . . . . . . . . . . . . . . . . . . . . 271
INSTALLATION . . . . . . . . . . . . . . . . . . . . . . . . 271PISTON & CONNECTING ROD
OIL PUMP
DESCRIPTION . . . . . . . . . . . . . . . . . . . . . . . . 260
STANDARD PROCEDURE - PISTON FITTING . 260
REMOVAL . . . . . . . . . . . . . . . . . . . . . . . . . . . . 261
CLEANING . . . . . . . . . . . . . . . . . . . . . . . . . . . 261
INSPECTION . . . . . . . . . . . . . . . . . . . . . . . . . 261
INSTALLATION . . . . . . . . . . . . . . . . . . . . . . . . 261PISTON RINGS
STANDARD PROCEDURE - PISTON RING
FITTING . . . . . . . . . . . . . . . . . . . . . . . . . . . . 262
VIBRATION DAMPER
REMOVAL . . . . . . . . . . . . . . . . . . . . . . . . . . . . 263
INSTALLATION . . . . . . . . . . . . . . . . . . . . . . . . 263FRONT MOUNT
REMOVAL . . . . . . . . . . . . . . . . . . . . . . . . . . . . 264
INSTALLATION . . . . . . . . . . . . . . . . . . . . . . . . 265REAR MOUNT
REMOVAL . . . . . . . . . . . . . . . . . . . . . . . . . . . . 266
INSTALLATION . . . . . . . . . . . . . . . . . . . . . . . . 267LUBRICATION
DESCRIPTION . . . . . . . . . . . . . . . . . . . . . . . . 267
OPERATION . . . . . . . . . . . . . . . . . . . . . . . . . . 267
DIAGNOSIS AND TESTINGDIAGNOSIS AND TESTING—ENGINE OIL
LEAKS . . . . . . . . . . . . . . . . . . . . . . . . . . . . . 269
DIAGNOSIS AND TESTING—ENGINE OIL
PRESSURE . . . . . . . . . . . . . . . . . . . . . . . . . 269
OIL
STANDARD PROCEDURE - ENGINE OIL
. . . . 269
OIL FILTER
REMOVAL . . . . . . . . . . . . . . . . . . . . . . . . . . . . 270
ENGINE - 5.9L DESCRIPTION
REMOVAL . . . . . . . . . . . . . . . . . . . . . . . . . . . . 272
DISASSEMBLY . . . . . . . . . . . . . . . . . . . . . . . . 272
INSPECTION . . . . . . . . . . . . . . . . . . . . . . . . . 272
ASSEMBLY . . . . . . . . . . . . . . . . . . . . . . . . . . . 274
INSTALLATION . . . . . . . . . . . . . . . . . . . . . . . . 274INTAKE MANIFOLD
DESCRIPTION . . . . . . . . . . . . . . . . . . . . . . . . 274
OPERATION . . . . . . . . . . . . . . . . . . . . . . . . . . 274
DIAGNOSIS AND TESTING—INTAKEMANIFOLD LEAKAGE
. . . . . . . . . . . . . . . . . 274
REMOVAL . . . . . . . . . . . . . . . . . . . . . . . . . . . . 275
CLEANING . . . . . . . . . . . . . . . . . . . . . . . . . . . 275
INSPECTION . . . . . . . . . . . . . . . . . . . . . . . . . 275
INSTALLATION . . . . . . . . . . . . . . . . . . . . . . . . 275EXHAUST MANIFOLD
DESCRIPTION . . . . . . . . . . . . . . . . . . . . . . . . 277
OPERATION . . . . . . . . . . . . . . . . . . . . . . . . . . 277
REMOVAL . . . . . . . . . . . . . . . . . . . . . . . . . . . . 277
CLEANING . . . . . . . . . . . . . . . . . . . . . . . . . . . 277
INSPECTION . . . . . . . . . . . . . . . . . . . . . . . . . 277
INSTALLATION . . . . . . . . . . . . . . . . . . . . . . . . 277TIMING BELT / CHAIN COVER(S)
REMOVAL . . . . . . . . . . . . . . . . . . . . . . . . . . . . 278
INSTALLATION . . . . . . . . . . . . . . . . . . . . . . . . 278TIMING BELT/CHAIN AND SPROCKETS
REMOVAL . . . . . . . . . . . . . . . . . . . . . . . . . . . . 279
INSPECTION—MEASURING TIMING CHAINSTRETCH
. . . . . . . . . . . . . . . . . . . . . . . . . . 279
INSTALLATION . . . . . . . . . . . . . . . . . . . . . . . . 279The 5.9 Liter (360 CID) eight-cylinder engine is a single cam, overhead valve V-Type lightweight, engine with hydraulic roller tappets. This engine is designed for unleaded fuel.
The engine lubrication system consists of a rotor
type oil pump and a full flow oil filter.
The cylinders are numbered from front to rear; 1, 3, 5, 7 on the left bank and 2, 4, 6, 8 on the right bank. The firing order is 1-8-4-3-6-5-7-2 (Fig. 1).
Fig.1FiringOrder
ENGINE - 5.9L
9 - 225
These malfunctions may be classified as either mechanical (e.g., a strange noise), or performance (e.g., engine idles rough and stalls).
(Refer to 9 - ENGINE - DIAGNOSIS AND TEST- ING - Preformance) or (Refer to 9 - ENGINE - DIAG- NOSIS AND TESTING - Mechanical). Refer to 14 - FUEL SYSTEM for fuel system diagnosis.
ENGINE - DIAGNOSIS AND TESTING)
Additional tests and diagnostic procedures may be necessary for specific engine malfunctions that can- not be isolated with the Service Diagnosis charts. Information concerning additional tests and diagno- sis is provided within the following: † Cylinder Compression Pressure Test (Refer to 9 - † Cylinder Combustion Pressure Leakage Test (Refer to 9 - ENGINE - DIAGNOSIS AND TESTING) † Cylinder Head Gasket Failure Diagnosis (Refer to 9 - ENGINE/CYLINDER HEAD - DIAGNOSIS AND TESTING) † Intake Manifold Leakage Diagnosis (Refer to 9 - † Lash Adjuster (Tappet) Noise Diagnosis (Refer to 9 - ENGINE/ENGINE BLOCK/HYDRAULIC LIFT- ERS (CAM IN BLOCK) - DIAGNOSIS AND TEST- ING)† Engine Oil Leak Inspection (Refer to 9 - ENGINE/LUBRICATION - DIAGNOSIS AND TEST- ING)
ENGINE/MANIFOLDS/INTAKE DIAGNOSIS AND TESTING)
MANIFOLD
DR ENGINE - 5.9L (Continued)
The engine serial number is stamped into a machined pad located on the left, front corner of the cylinder block. When component part replacement is necessary, use the engine type and serial number for reference (Fig. 2).
Fig.2EngineIdentificationNumber
DIAGNOSIS AND TESTING
DIAGNOSIS AND TESTING - ENGINE DIAGNOSIS - INTRODUCTION Engine diagnosis is helpful
in determining the causes of malfunctions not detected and remedied by routine maintenance.
ENGINE - 5.9L
9 - 226
ENGINE - 5.9L (Continued) DIAGNOSIS AND TESTING—ENGINE DIAGNOSIS - PERFORMANCEPERFORMANCE DIAGNOSIS CHART—GASOLINE ENGINES
DR
CONDITION
POSSIBLE CAUSES
CORRECTION
ENGINE WILL NOT CRANK
1. Weak or dead battery
2. Corroded or loose battery connections
3. Faulty starter or related circuit(s)
4. Seized accessory drive component
5. Engine internal mechanical failure or hydro-static lock
ENGINE CRANKS BUT WILL NOT START
1. No spark
2. No fuel
3. Low or no engine compression
ENGINE LOSS OF POWER
1. Worn or burned distributor rotor 2. Worn distributor shaft
3. Worn or incorrect gapped spark plugs
4. Dirt or water in fuel system 5. Faulty fuel pump 6. Incorrect valve timing 7. Blown cylinder head gasket 8. Low compression
9. Burned, warped, or pitted valves 10. Plugged or restricted exhaust system 11. Faulty ignition cables
1. Charge/Replace Battery. (Refer to 8 - ELECTRICAL/BATTERY SYSTEM/ BATTERY - STANDARD PROCEDURE). Check charging system. (Refer to 8 - ELECTRICAL/CHARGING - DIAGNOSIS AND TESTING).
2. Clean/tighten suspect battery/starter connections 3. Check starting system. (Refer to 8 - ELECTRICAL/STARTING - DIAGNOSIS AND TESTING) 4. Remove accessory drive belt and attempt to start engine. If engine starts,