- Download PDF Manual
-
Refer to the “uconnect威 phone” section of this Owner’s Manual. Operating Instructions - uconnect姞 studios (Satellite Radio) — If Equipped Refer to the “uconnect威 studios (Satellite Radio)” section of this Owner’s Manual.
224 UNDERSTANDING YOUR INSTRUMENT PANEL
SALES CODE REC — AM/FM/CD (6–DISC) RADIO WITH uconnect姞 gps (NAVIGATION)
menus and instructions for selecting a variety of destina- tions and routes, AM/FM stereo radio and six-disc CD changer with MP3 capability. Mapping information for navigation is supplied on a DVD that is loaded into the unit. One map DVD covers all of North America. Refer to your “Navigation User’s Manual” for detailed operating instructions. Operating Instructions — uconnect姞 studios (Satellite Radio) — If Equipped Refer to your “Navigation User’s Manual” for detailed operating instructions. REC Setting the Clock
Satellite Navigation Radio and CD Player with MP3
Capability (REC) combines a Global-Positioning System-based navigation system with an integrated color screen to provide maps, turn identification, selectionGPS Clock The GPS receiver used in this system is synchronized to the time data being transmitted by the GPS satellites. The satellites’ clock is Greenwich Mean Time (GMT). This is
the worldwide standard for time. This makes the sys- tem’s clock very accurate once the appropriate time zone and daylight savings information is set. 1. At the Main Menu screen, highlight “Clock Setup” and press ENTER OR press and hold the TIME button on the unit’s faceplate for three seconds. The Clock Setup screen appears.
UNDERSTANDING YOUR INSTRUMENT PANEL 225
2. To show the GPS clock, select “Displayed Clock: GPS Clock” and press ENTER. 3. To adjust the time zone, Select “Time Zone” and press ENTER. Select the appropriate time zone and press ENTER. 4. To turn daylight savings on or off, select “Daylight Savings” and press ENTER. Select “On” or “Off” and press ENTER. 5. Select DONE to exit from the clock setting mode. Press ENTER to save your changes. If you press CANCEL or NAV then your changes will not be saved.
226 UNDERSTANDING YOUR INSTRUMENT PANEL
User Defined Clock If you wish to set the clock to a time different than the system clock, you can manually adjust the time by choosing the “User Defined Clock” option. 1. At Clock: User Defined Clock”.
the Clock Setup screen highlight “Displayed
2. To increase the clock by hours, make sure “HR +” is highlighted and press ENTER. Press ENTER again to increase the clock by another hour. You will see on the “User Defined Time” display the number of hours you have increased the clock by. 3. To decrease the clock by one hour, use the Select Encoder to highlight the “-” sign. Press ENTER. Press ENTER again to decrease the clock by another hour. 4. To increase the clock by minutes, make sure “MIN +” is highlighted and press ENTER. Press ENTER again to increase the clock by another minute. 5. To decrease the clock by minutes, use the Select Encoder to highlight the “-“ sign. Press ENTER. Press ENTER again to decrease the clock by another minute. 6. Select “DONE” to exit from the clock setting mode. Press ENTER to save your changes. If you press CAN- CEL or NAV then your changes will not be saved.
uconnect姞 studios (SATELLITE RADIO) — IF EQUIPPED Satellite radio uses direct satellite to receiver broadcast- ing technology to provide clear digital sound, coast to coast. The subscription service provider is Sirius Satellite Radio. This service offers over 130 channels of music, sports, news, entertainment, and programming for chil- dren, directly from its satellites and broadcasting studios. NOTE: Sirius service is not available in Hawaii and has limited coverage in Alaska. System Activation Sirius Satellite Radio service is pre-activated, and you may begin listening immediately to the one year of audio service that is included with the factory-installed satellite radio system in your vehicle. Sirius will supply a wel- come kit that contains general information, including how to setup your on-line listening account at no addi- tional charge. For further information, call the toll-free
UNDERSTANDING YOUR INSTRUMENT PANEL 227
number 888-539-7474, or visit the Sirius web site at www.sirius.com, or at www.siriuscanada.ca for Cana- dian residents. Electronic Serial Number/Sirius Identification Number (ESN/SID) Please have the following information available when calling: 1. The Electronic Serial Number/Sirius Identification Number (ESN/SID). 2. Your Vehicle Identification Number. To access the ESN/SID, refer to the following procedure. ESN/SID Access with REF Radios With the ignition switch in the ACC position and the radio OFF, press the CD Eject and TIME buttons simul- taneously for three seconds. The first four digits of the 12-digit ESN/SID number will display. Press the SEEK UP button to display the next four digits. Continue to
228 UNDERSTANDING YOUR INSTRUMENT PANEL
press the SEEK UP button until all 12 ESN/SID digits display. The SEEK DOWN will page down until the first four digits display. The radio will exit the ESN/SID mode when any other button is pushed, the ignition is turned OFF, or five minutes have passed since any button was pushed. ESN/SID Access with RAQ and RAK Radios With the ignition switch in the ACC position and the radio OFF, press the CD Eject and TIME buttons simul- taneously for three seconds. All twelve ESN/SID num- bers will display. The radio will exit the ESN/SID mode when any other button is pushed, the ignition is turned OFF, or five minutes have passed since any button was pushed.
ESN/SID Access with REC Navigation Radios Please refer to your Navigation User’s Manual. With the ignition in the ACC position and the radio off, press the CD Eject and SET buttons simultaneously until the 12 digits of the ESN/SID appear on the screen. Selecting uconnect姞 studios (Satellite) Mode in REF, RAQ, And RAK Radios
Selecting Satellite Mode — REF Radio Press the MODE button repeatedly until the word ⬙SAT⬙ appears in the display. A CD may remain in the radio while in the Satellite radio mode.
Selecting Satellite Mode — RAQ and RAK Radio Press the MODE button repeatedly until the word ⬙SAT⬙ appears in the display. These radios will also display the current station name and program type. For more information, such as song title and artist, press the MSG or INFO button. A CD or tape may remain in the radio while in the Satellite radio mode. Selecting A Channel Press and release the SEEK or TUNE knob to search for the next channel. Press the top of the button to search up and the bottom of the button to search down. Holding the TUNE button causes the radio to bypass channels until the button is released. Press and release the SCAN button (if equipped) to automatically change channels every seven seconds. The radio will pause on each channel for seven seconds
UNDERSTANDING YOUR INSTRUMENT PANEL 229
before moving on to the next channel. The word ⬙SCAN⬙ will appear in the display between each channel change. Press the SCAN button a second time to stop the search. NOTE: Channels that may contain objectionable content can be blocked. Contact Sirius Customer Care at 888-539- 7474 to discuss options for channel blocking or unblock- ing. Please have your ESN/SID information available. Storing And Selecting Preset Channels In addition to the 12 AM and 12 FM preset stations, you may also commit 12 satellite stations to pushbutton memory. These satellite channel preset stations will not erase any AM or FM preset memory stations. Follow the memory preset procedures that apply to your radio. Using The PTY (Program Type) Button — If Equipped Follow the PTY button instructions that apply to your radio.
230 UNDERSTANDING YOUR INSTRUMENT PANEL
PTY Button SCAN When the desired program type is obtained, press the SCAN button within five seconds. The radio will play seven seconds of the selected channel before moving to the next channel of the selected program type. Press the SCAN button a second time to stop the search. NOTE: Pressing the SEEK or SCAN button, while performing a music-type scan, will change the channel by one and stop the search. Pressing a preset memory button during a music-type scan will call up the memory channel and stop the search. PTY Button SEEK When the desired program is obtained, press the SEEK button within five seconds. The channel will change to the next channel that matches the program type selected. Satellite Antenna To ensure optimum reception on vehicles available with a luggage rack, do not place items on the roof around the
rooftop antenna location. Metal objects placed within the line of sight of the antenna will cause decreased perfor- mance. Larger luggage items should be placed as far forward as possible. Do not place items directly on or above the antenna. Reception Quality Satellite reception may be interrupted due to one of the following reasons: • The vehicle is parked in an underground parking • Dense tree coverage may interrupt reception. • Driving under wide bridges or along tall buildings can • Placing objects over or too close to the antenna can
structure or under a physical obstacle.
cause intermittent reception.
cause signal blockage.
VIDEO ENTERTAINMENT SYSTEM (VES)™ — IF EQUIPPED
UNDERSTANDING YOUR INSTRUMENT PANEL 231
REMOTE SOUND SYSTEM CONTROLS — IF EQUIPPED The remote sound system controls are located on the rear surface of the steering wheel. Reach behind the wheel to access the switches.
The optional Video Entertainment System (VES)™ con- sists of a DVD player and LCD (liquid crystal display) screen, a battery-powered remote control, and two head- sets. The system is located in the headliner behind the front row seat. Refer to your VES™ User’s Manual for detailed operating instructions.
Remote Sound System Controls (Back View Of Steering Wheel)
232 UNDERSTANDING YOUR INSTRUMENT PANEL
The right-hand control is a rocker type switch with a button in the center. Pressing the top of the switch will increase the volume, and pressing the bottom of the switch will decrease the volume. The center button of the right-hand control will allow you to change the mode. The left-hand control is a rocker type switch with a push button in the center. The function of the left-hand control is different, depending on which mode you are in. The following describes the left-hand control operation in each mode. Radio Operation Pressing the top of the left side switch will seek up for the next listenable station and pressing the bottom of the switch will seek down for the next listenable station. The button located in the center of the left-hand control will tune to the next pre-set station that you have programmed in the radio pre-set push-buttons.
CD Player Pressing the top of the switch once will go to the next track on the CD. Pressing the bottom of the switch once will go to the beginning of the current track or to the beginning of the previous track if it is within one second after the current track; begins to play. If you press the switch up or down twice it plays the second track, three times, it will play the third, etc. The button in the center of the left-hand switch has no function in this mode.
CD/DVD MAINTENANCE To keep a CD/DVD in good condition, take the following precautions: 1. Handle the disc by its edge; avoid touching the surface. 2. If the disc is stained, clean the surface with a soft cloth, wiping from center to edge.
3. Do not apply paper or tape to the disc; avoid scratch- ing the disc. 4. Do not use solvents such as benzene, thinner, cleaners, or anti-static sprays. 5. Store the disc in its case after playing. 6. Do not expose the disc to direct sunlight. 7. Do not store the disc where temperatures may become too high. If you experience difficulty in playing a particu- NOTE: lar disc, it may be damaged (i.e., scratched, reflective coating removed, a hair, moisture or dew on the disc) oversized, or have protection encoding. Try a known good disc before considering disc player service.
UNDERSTANDING YOUR INSTRUMENT PANEL 233
RADIO OPERATION AND CELLULAR PHONES Under certain conditions, the operation of a cellular phone in your vehicle can cause erratic or noisy perfor- mance from your radio. This condition may be lessened or eliminated by relocating the cellular phone antenna. This condition is not harmful to the radio. If your radio performance does not satisfactorily “clear” by the repo- sitioning of the antenna, it is recommended that the radio volume be turned down or off during cellular phone operation.
234 UNDERSTANDING YOUR INSTRUMENT PANEL
CLIMATE CONTROLS The controls for the heating and ventilation system in this vehicle consist of a series of rotary knobs. These comfort controls can be set to obtain desired interior conditions.
Heater Only — If Equipped
Climate Control Location
Manual Heating Controls
The mode control (at the right of the control panel) can be set in any of the following positions:
NOTE: To improve your selection choices, the system allows you to operate at intermediate positions between the major modes. These intermediate positions are iden- tified by the small dots. Panel
Outside air flows through the outlets located in the instrument panel.
Recirculation Modes (Panel or Bi-Level)
Select the recirculation modes when the outside air contains smoke or odors. This feature allows for recircu- lation of interior air only. Air flows through the panel outlets in this mode. Air flows through the panel only, or through both the panel and floor vents
depending on the selected mode (panel vs bi-level).
UNDERSTANDING YOUR INSTRUMENT PANEL 235
Bi-Level
Outside air flows through the outlets located in the instrument panel and at the floor.
Mix
Outside air flows in equal proportions through the floor and defroster outlets.
Defrost
Outside air is primarily directed to the windshield through the defroster outlets located at the base of the windshield, and the demister outlets located at the edge of each side of the instrument panel.
236 UNDERSTANDING YOUR INSTRUMENT PANEL
Blower Control
The rotary knob on the left of the control panel is the blower control. Turn the knob clockwise to one of the four positions to obtain the blower speed you desire. To turn the blower off, turn the knob to the far left posi- tion.
NOTE: For vehicles equipped with Remote Start, the climate controls will not function during Remote Start operation if the blower control is left in the “O” (Off) position.
Temperature Control
The rotary knob at the center of the control panel controls the temperature of the interior air. You can choose your degree of comfort by rotating the knob. The coldest temperature setting is to the extreme left (blue region) and the warmest setting is to the extreme
right (red region) of the rotation.
Air Conditioning and Heating — If Equipped
Air Conditioning And Heating
UNDERSTANDING YOUR INSTRUMENT PANEL 237
Air Conditioning Operation
To turn on the Air Conditioning, set the fan control at any speed and press the snowflake button located at the right of the control panel. Conditioned air will be directed through the outlets selected by the mode control. A light in the snowflake button shows that the air conditioning is on. Press the button a second time to turn the air condition- ing off. Slight changes in engine speed or power may be noticed when the air conditioning compressor is on. This is a normal occurrence as the compressor will cycle on and off to maintain comfort and increase fuel economy.
238 UNDERSTANDING YOUR INSTRUMENT PANEL
The mode control (at the right of the control panel) can be set in any of the following positions:
NOTE: To improve your selection choices, the system allows you to operate at intermediate positions between the major modes. These intermediate positions are iden- tified by the small dots. Recirculation Modes (Panel or Bi-Level)
Select the recirculation modes when the outside air contains smoke, odors, high humidity, or if rapid cooling is desired. This feature allows for recir- culation of interior air only. Air flows through the panel only, or through
both the panel and floor vents depending on the selected mode (panel vs bi-level). NOTE: Selecting a Recirculation Mode does not neces- sarily consume more fuel than normal A/C mode. Panel
Outside air flows through the outlets located in the instrument panel.
Bi-Level
Outside air flows through the outlets located in the instrument panel and at the floor.
Floor
Mix
Outside air flows primarily through the floor out- lets located under the instrument panel.
Outside air flows in equal proportions through the floor and defroster outlets, and the air conditioning may be on.
Defrost
Outside air is primarily directed to the windshield through the defroster outlets located at the base of the windshield, and the demister outlets located at the edge of each side of the instrument panel, and the air conditioning may be on. NOTE: The air conditioning compressor operates in both Mix and Defrost or a blend of these modes, even if the A/C button has not been pressed. This dehumidifies the air to help dry the windshield. Blower Control
The rotary knob on the left of the control panel is the blower control. Turn the knob clockwise to one of the four positions to obtain the blower speed you desire. To turn the blower off, turn the knob to the far left position.
UNDERSTANDING YOUR INSTRUMENT PANEL 239
Temperature Control
The rotary knob at the center of the control panel controls the temperature of the interior air. You can choose your degree of comfort by rotating the knob. The coldest temperature setting is to the extreme left (blue region) and the warmest setting is to the extreme
right (red region) of the rotation. Circulation The cab is designed with features to promote outside air circulation. There are grilles in the cab back panel. These are air exhausters that provide the means for regular exchange of cab air. Side window demisters direct airflow specifically to the window glass to help prevent interior fogging of the glass. They are located in the extreme outside upper
240 UNDERSTANDING YOUR INSTRUMENT PANEL
edges of the instrument panel. The demisters also pro- vide extra air ducts for circulation. They are in operation whenever the Floor, Mix or Defrost modes are in use. To remove frost from the side windows, it is best to use the full defrost mode. NOTE: When you turn off the engine you may hear a hissing sound from under the hood for a short period of time. This is a normal condition that occurs if the air conditioning system has been on. It is not an indication of a problem with the air conditioning system. Air Conditioning with Dual Zone Temperature Control — If Equipped With the Dual Zone Temperature Control System, each front seat occupant can independently control the tem- perature of air coming from the outlets on their side of the vehicle.
Dual Zone Control Head
Air Conditioning and Heating Operation To turn on the Air Conditioning, set the fan control at any speed and press the snowflake button located on the control panel. Conditioned air will be directed through the outlets selected by the mode control. A light in the snowflake button shows that the air conditioning is on. Press the button a second time to turn the air condition- ing off.
A/C Pushbutton
With the fan control in the ON posi- tion, pushing the A/C button turns on the air conditioning compressor. An indicator light on the button shows that the Air Conditioning compressor is on. Conditioned air is now directed through the mode outlets selected. Pushing the button a second time turns the compressor OFF. Recirculation Pushbutton
Pushing the Recirculation button al- lows interior air to recirculate continu- ously in any position except defrost and defrost/floor mode for rapid cool down of interior. See “Fast Cooldown” later in this section.
the
UNDERSTANDING YOUR INSTRUMENT PANEL 241
Mode Control
The mode control allows you to choose from several patterns of air distribution.
NOTE: To improve your selection choices, the system allows you to operate at intermediate positions between the major modes. These intermediate positions are iden- tified by the small dots and give an even blend of both modes. Panel
Outside air flows through the outlets located in the instrument panel. These outlets can be adjusted to
direct the airflow.
242 UNDERSTANDING YOUR INSTRUMENT PANEL
Bi-Level
Air flows through the outlets located in the instru- ment panel and those located on the floor.
NOTE: There is a difference in temperature between the upper and lower outlets for added comfort. The warmer air goes to the floor outlets. This feature gives improved comfort during sunny but cool conditions. Heat
Outside air flows primarily through the floor out- lets located under the instrument panel.
Mix
Outside air flows in equal proportions through the floor and defroster outlets.
Defrost
Outside air is primarily directed to the windshield through the defroster outlets located at the base of
the windshield and side window demist outlets. NOTE: The air conditioning compressor operates in both Mix and Defrost or a blend of these modes, even if the A/C button has not been pressed. This dehumidifies the air to help dry the windshield. Blower Control
The rotary knob on the left of the control panel is the blower control. Turn the knob clockwise to one of the four positions to obtain the blower speed you desire. To turn the blower off, turn the knob to the far left position.
Dual Zone Temperature Control
Dual Zone Temperature Control
Use this control to regulate the temperature of the air inside the passenger compartment. This is accomplished by having separate temperature control slides for both the driver and front passenger. The blue area of the scale
UNDERSTANDING YOUR INSTRUMENT PANEL 243
indicates cooler temperatures while the red area indicates warmer temperatures. Circulation The cab is designed with features to promote outside air circulation. There are grilles in the cab back panel. These are air exhausters that provide the means for regular exchange of cab air. Side window demisters direct airflow specifically to the window glass to help prevent interior fogging of the glass. They are located in the extreme outside upper edges of the instrument panel. The demisters also pro- vide extra air ducts for circulation. They are in operation whenever the Floor, Mix or Defrost modes are in use. NOTE: When you turn off the engine you may hear a hissing sound from under the hood for a short period of time. This is a normal condition that occurs if the air conditioning system has been on. It is not an indication of a problem with the air conditioning system.
244 UNDERSTANDING YOUR INSTRUMENT PANEL
Operating Tips
Fast Cooldown For a fast cooldown, turn the blower fan rotary knob to the extreme right position, turn the mode control to the panel fresh position, press the snowflake button to turn on the air conditioning, and drive with the windows open for the first few minutes. Once the hot air has been expelled, close the windows and press the recirculation pushbutton, on dual-zone control, or switch the mode from panel/fresh to panel/recirculate on single-zone control. When a comfortable condition has been reached, choose a mode position and adjust the temperature control slide and blower speed as necessary to maintain comfort. For high humidity conditions it may be neces- sary to remain in the Recirculation mode to maintain comfort.
Window Fogging Windows will fog on the inside when the humidity inside the vehicle is high. This often occurs in mild or cool temperatures when it’s rainy or humid. In most cases turning on the air conditioning (pressing the snowflake button) will clear the fog. Adjust the temperature control, air direction and blower speed to maintain comfort. As the temperature gets colder it may be necessary to direct air onto the windshield by using MIX Mode position on the control. Adjust the temperature control and blower speed to maintain comfort. Higher blower speeds will reduce fogging. Interior fogging on the windshield can be quickly removed by selecting the defrost mode. Regular cleaning of the inside of the windows with a non-filming cleaning solution (vinegar and water works very well) will help prevent contaminates (cigarette smoke, perfumes, etc.) from sticking to the windows. Contaminates increase the rate of window fogging.
Summer Operation Air conditioned vehicles must be protected with a high quality antifreeze coolant during summer to provide proper corrosion protection and to raise the boiling point of the coolant for protection against overheating. A 50 % concentration is recommended. For proper coolant type, refer to “Recommended Fluids and Genuine Parts” in Section 7. When using the air conditioner in extremely heavy traffic in hot weather, especially when towing a trailer, addi- tional engine cooling may be required. If this situation is encountered, operate the transmission in a lower gear to increase engine RPM, coolant flow and fan speed. When stopped in heavy traffic, it may be necessary to shift into NEUTRAL and depress the accelerator slightly for fast idle operation to increase coolant flow and fan speed.
UNDERSTANDING YOUR INSTRUMENT PANEL 245
NOTE: On models equipped with Diesel engines, the idle speed will automatically increase to 1000 rpm at elevated coolant temperatures to improve engine cooling. Your air conditioning system is also equipped with an automatic recirculation system. When the system senses a heavy load or high heat conditions, it may use partial Recirculation A/C mode to provide additional comfort. Winter Operation When operating the system during the Winter months, make sure the air intake, located directly in front of the windshield, is free of ice, slush, snow, or other obstructions.
246 UNDERSTANDING YOUR INSTRUMENT PANEL
Operating Tips Chart
STARTING AND OPERATING
CONTENTS
䡵 Starting Procedures . . . . . . . . . . . . . . . . . . . . 252
▫ Normal Starting . . . . . . . . . . . . . . . . . . . . . 252
▫ Automatic Transmission . . . . . . . . . . . . . . . 252
▫ If Engine Fails To Start . . . . . . . . . . . . . . . . 252
▫ After Starting . . . . . . . . . . . . . . . . . . . . . . . 254
䡵 Engine Block Heater — If Equipped . . . . . . . . 254
䡵 Automatic Transmission . . . . . . . . . . . . . . . . . 254
▫ Automatic Transmission With Overdrive . . . . 255䡵 Four-Wheel Drive Operation — If Equipped . . . 260
▫ Manually Shifted Transfer Case Operating
Information/Precautions . . . . . . . . . . . . . . . 260
▫ Shifting Procedure - Manually Shifted
Transfer Case . . . . . . . . . . . . . . . . . . . . . . . 263
▫ Transfer Case Position Indicator Light . . . . . . 264
▫ Electronically Shifted Transfer CaseOperating Information/Precautions (Five Position Switch) — If Equipped . . . . . . . . . . 264
▫ Shifting Procedure — Electronically Shifted
Transfer Case . . . . . . . . . . . . . . . . . . . . . . . 269
248 STARTING AND OPERATING
▫ Electronically Shifted Transfer Case
Operating Information/Precautions (Four Position Switch) — If Equipped . . . . . . . . . . 272
▫ Shifting Procedure — Electronically Shifted
Transfer Case . . . . . . . . . . . . . . . . . . . . . . . 276
. . 279䡵 Axle Locker System — Power Wagon Only 䡵 Stabilizer/Sway Bar System — Power Wagon
Only . . . . . . . . . . . . . . . . . . . . . . . . . . . . . . . 282
䡵 Safe Off-Road Driving — Power Wagon
Only . . . . . . . . . . . . . . . . . . . . . . . . . . . . . . . 284
▫ Off-Road Driving Tips And VehicleCharacteristics
. . . . . . . . . . . . . . . . . . . . . . 284
. . . . . . . . 289▫ Driving In Snow, Mud And Sand ▫ Crossing Obstacles (Rocks And Other High
Points) . . . . . . . . . . . . . . . . . . . . . . . . . . . . 290
. . . . . . . . . . . . . . . . . . . . . . 293▫ Hill Climbing
▫ Driving Through Water ▫ Airing Down For Off-Road Driving ▫ Vehicle Recovery ▫ After Driving Off-Road
䡵 Limited-Slip Differential – If Equipped 䡵 Driving On Slippery Surfaces 䡵 Driving Through Water ▫ Flowing/Rising Water ▫ Shallow Standing Water
. . . . . . . . . . . . . . . 295
. . . . . . 298
. . . . . . . . . . . . . . . . . . . 299
. . . . . . . . . . . . . . . 302
. . . . . 304
. . . . . . . . . . . . 304
. . . . . . . . . . . . . . . . 305
. . . . . . . . . . . . . . . . 305
. . . . . . . . . . . . . . 305
. . . . . . 307䡵 Driving Off-Road — Ram Truck Only 䡵 Winch Usage – If Equipped (Power Wagon
Only). . . . . . . . . . . . . . . . . . . . . . . . . . . . . . . 308
▫ Things To Know Before Using YourWinch . . . . . . . . . . . . . . . . . . . . . . . . . . . . 308
▫ Understanding The Features Of Your
䡵 Power Steering
▫ Winch Accessories ▫ Operating Your Winch ▫ Rigging Techniques
Winch . . . . . . . . . . . . . . . . . . . . . . . . . . . . 310
. . . . . . . . . . . . . . . . . . 312
. . . . . . . . . . . . . . . 313
. . . . . . . . . . . . . . . . . . 325
. . . . . . . . . . . . . . . . . . . . . . 327
. . . . . . . . . . . 328
䡵 Parking Brake . . . . . . . . . . . . . . . . . . . . . . . 329
䡵 Brake System . . . . . . . . . . . . . . . . . . . . . . . 330
▫ 3500 Dual Rear Wheel Models Only . . . . . . 331
▫ Four-Wheel Anti-Lock Brake System . . . . . 331▫ Power Steering Fluid Check
䡵 Electronic Brake Control System —
If Equipped . . . . . . . . . . . . . . . . . . . . . . . . . . 333
▫ Anti-Lock Brake System (ABS) . . . . . . . . . . 333▫ Traction Control System (TCS) ▫ Brake Assist System (BAS) ▫ Hill Start Assist (HSA) ▫ Electronic Roll Mitigation (ERM) ▫ Electronic Stability Program (ESP) ▫ TSC (Trailer Sway Control)
䡵 Tire Safety Information
▫ Tire Markings ▫ Tire Identification Number (TIN) ▫ Tire Loading And Tire Pressure
䡵 Tires — General Information
▫ Tire Pressure ▫ Tire Inflation Pressures
STARTING AND OPERATING 249
. . . . . . . . . . 334
. . . . . . . . . . . . . 335
. . . . . . . . . . . . . . . 336
. . . . . . . . 339
. . . . . . . 340
. . . . . . . . . . . . 345
. . . . . . . . . . . . . . . . 346
. . . . . . . . . . . . . . . . . . . . . 346
. . . . . . . . 349
. . . . . . . . . 350
. . . . . . . . . . . . 354
. . . . . . . . . . . . . . . . . . . . . . 354
. . . . . . . . . . . . . . . 355250 STARTING AND OPERATING
▫ Tire Pressures For High Speed Operation . . . 356
▫ Radial Ply Tires . . . . . . . . . . . . . . . . . . . . . 357
▫ Tire Spinning . . . . . . . . . . . . . . . . . . . . . . . 357
▫ Tread Wear Indicators . . . . . . . . . . . . . . . . . 358
▫ Life Of Tire . . . . . . . . . . . . . . . . . . . . . . . . 359
▫ Replacement Tires . . . . . . . . . . . . . . . . . . . . 359䡵 Supplemental Tire Pressure Information —
If Equipped . . . . . . . . . . . . . . . . . . . . . . . . . . 360
䡵 Tire Chains . . . . . . . . . . . . . . . . . . . . . . . . . . 361
䡵 Snow Tires . . . . . . . . . . . . . . . . . . . . . . . . . . 363
䡵 Tire Rotation Recommendations . . . . . . . . . . . 363
▫ Dual Rear Wheels . . . . . . . . . . . . . . . . . . . . 365䡵 Tire Pressure Monitor System (TPMS) —
If Equipped . . . . . . . . . . . . . . . . . . . . . . . . . . 366
▫ Tire Pressure Monitor System (TPMS) Tire Light Load Inflation Switch Description – If Equipped . . . . . . . . . . . . . . . . . . . . . . . . 369
▫ Tire Pressure Monitor System Components . . 372
▫ General Information . . . . . . . . . . . . . . . . . . 374
䡵 Fuel Requirements . . . . . . . . . . . . . . . . . . . . . 375
▫ Reformulated Gasoline . . . . . . . . . . . . . . . . 375
▫ Gasoline/Oxygenate Blends . . . . . . . . . . . . . 376
▫ E-85 Usage In Non-Flex Fuel Vehicles . . . . . . 376
▫ MMT In Gasoline . . . . . . . . . . . . . . . . . . . . 377
▫ Materials Added To Fuel . . . . . . . . . . . . . . . 377
▫ Fuel System Cautions . . . . . . . . . . . . . . . . . 378
▫ Carbon Monoxide Warnings . . . . . . . . . . . . 379䡵 Adding Fuel
▫ Loose Fuel Filler Cap (Gas Cap) Message
䡵 Vehicle Loading
▫ Certification Label
䡵 Trailer Towing
. . . . . . . . . . . . . . . . . . . . . . . . 379
. . 381
. . . . . . . . . . . . . . . . . . . . . 381
. . . . . . . . . . . . . . . . . . 381
. . . . . . . . . . . . . . . . . . . . . . . 383
. . . . . . . . . . . 384
. . . . . . . . . . . . 388▫ Common Towing Definitions ▫ Trailer Hitch Classification ▫ Trailer Towing Weights (Maximum Trailer
Weight Ratings)
▫ Trailer And Tongue Weight
. . . . . . . . . . . . . . . . . . . . . 389
. . . . . . . . . . . . 389STARTING AND OPERATING 251
▫ Towing Requirements ▫ Towing Tips
. . . . . . . . . . . . . . . . 390
. . . . . . . . . . . . . . . . . . . . . . . 395
. . . . . . . . . . . . . . . . . . . . . . . . . 396䡵 Snowplow 䡵 Recreational Towing
(Behind Motorhome, Etc.) . . . . . . . . . . . . . . . . 397
▫ Recreational Towing – Two-Wheel DriveModels
. . . . . . . . . . . . . . . . . . . . . . . . . . . 397
▫ Recreational Towing – Four-Wheel Drive
Models
䡵 Equipment Identification Plate
. . . . . . . . . . . . . . . . . . . . . . . . . . . 397
. . . . . . . . . . . 403252 STARTING AND OPERATING
STARTING PROCEDURES Before starting your vehicle, adjust your seat, adjust both inside and outside mirrors, and fasten your seat belts. The starter should not be operated for more than 15- second intervals. Waiting a few seconds between such intervals will protect the starter from overheating.
WARNING!
Do not leave children or animals inside parked vehicles in hot weather. Interior heat buildup may cause serious injury or death.
Normal Starting Normal starting of either a warm or cold engine is obtained without pumping or depressing the accelerator pedal. Turn the key to the START position and release when the engine starts. If the engine fails to start within 10 seconds, turn the key to the OFF position, wait five seconds, then repeat the starting procedure.
Automatic Transmission Start the engine with the shift lever in the NEUTRAL or PARK position. Apply the brake before shifting to any driving range. NOTE: This vehicle is equipped with a transmission shift interlocking system. The brake pedal must be depressed to shift out of PARK.
Tip Start Feature Do not press the accelerator. Turn the ignition key briefly to START position, and release it. The starter motor will continue to run, but will automatically disengage when the engine is running. If Engine Fails To Start If the engine fails to start after you have followed the “Normal Starting” procedure, it may be flooded. Push the accelerator pedal all the way to the floor and hold it there while cranking the engine. This should clear any excess fuel in case the engine is flooded.
CAUTION!
To prevent damage to the starter, do not crank the engine for more than 15 seconds at a time. Wait 10 to 15 seconds before trying again.
WARNING!
• Never pour fuel or other flammable liquids into the throttle body air inlet opening in an attempt to start the vehicle. This could result in a flash fire causing serious personal injury. • Do not attempt to push or tow your vehicle to get it started. Vehicles equipped with an automatic transmission cannot be started this way. Unburned fuel could enter the catalytic converter and once the engine has started, ignite and damage the converter and vehicle.
(Continued)
STARTING AND OPERATING 253
WARNING! (Continued)
• If the vehicle has a discharged battery, booster cables may be used to obtain a start from a booster battery or the battery in another vehicle. This type of start can be dangerous if done improperly. Refer to “Jump Starting” in Section 6.
If the engine has been flooded, it may start to run, but not have enough power to continue running when the key is released. If this occurs, continue cranking with the accel- erator pedal pushed all the way to the floor. Release the accelerator pedal and the key once the engine is running smoothly. If the engine shows no sign of starting after two 15- second periods of cranking with the accelerator pedal held to the floor, the “Normal Starting” procedure should be repeated.
254 STARTING AND OPERATING
After Starting The idle speed is automatically controlled and will de- crease as the engine warms up.
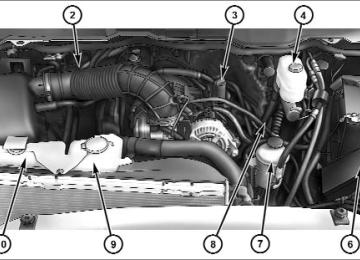
ENGINE BLOCK HEATER — IF EQUIPPED The engine block heater warms the engine, and permits quicker starts in cold weather. Connect the cord to a standard 110-115 Volt AC electrical outlet with a grounded, three-wire extension cord. The engine block heater cord is routed under the hood on the driver side of the vehicle. It has a removable cap that is located on the driver’s side of the Integrated Power Module.
WARNING!
Remember to disconnect the cord before driving. Damage to the 110-115 Volt electrical cord could cause electrocution.
AUTOMATIC TRANSMISSION
CAUTION!
a complete stop.
Damage to the transmission may occur if the follow- ing precautions are not observed: • Shift into PARK only after the vehicle has come to • Shift into or out of REVERSE only after the vehicle has come to a complete stop and the engine is at idle speed. • Do not shift from REVERSE, PARK, or NEUTRAL into any forward gear when the engine is above idle speed. • Before shifting into any gear, make sure your foot
is firmly on the brake pedal.
WARNING!
It is dangerous to move the shift lever out of PARK or NEUTRAL if the engine speed is higher than idle speed. If your foot is not firmly on the brake pedal, the vehicle could accelerate quickly forward or in reverse. You could lose control of the vehicle and hit someone or something. Only shift into gear when the engine is idling normally and when your right foot is firmly on the brake pedal.
Automatic Transmission with Overdrive The gear shift lever display located in the instrument panel cluster indicates the transmission gear range (the selector is illuminated for night driving). The shift lever is mounted on the right side of the steering column. You must depress the brake pedal to pull the shift lever out of PARK position (Brake Interlock System). To drive, move the shift lever from PARK or NEUTRAL to the desired
STARTING AND OPERATING 255
DRIVE position. Pull the shift lever toward you when shifting into REVERSE, SECOND, FIRST or PARK, or when shifting out of PARK. Gear Ranges DO NOT race the engine when shifting from PARK or NEUTRAL position into another gear range. PARK This gear position supplements the parking brake by locking the transmission. The engine can be started in this range. Never use PARK while the vehicle is in motion. Apply the parking brake when leaving the vehicle in this range. Always apply parking brake first, then place the shift lever into the PARK position. On four-wheel drive vehicles be sure that the transfer case is in a drive position!
256 STARTING AND OPERATING
WARNING!
• Never use the PARK position as a substitute for the parking brake. Always apply parking brake fully when parked to guard against vehicle move- ment and possible injury or damage. • Your vehicle could move and injure you and others if it is not completely in PARK. Check by trying to move the shift lever back and forth without first pulling it toward you after you have set it in PARK. Make sure it is in PARK before leaving the vehicle.
(Continued)
WARNING! (Continued)
• It is dangerous to move the shift lever out of PARK or NEUTRAL if the engine speed is higher than idle speed. If your foot is not firmly on the brake pedal, the vehicle could accelerate quickly forward or in reverse. You could lose control of the vehicle and hit someone or something. Only shift into gear when the engine is idling normally and when your right foot is firmly on the brake pedal.
REVERSE Use this range only after the vehicle has come to a complete stop. NEUTRAL Shift into NEUTRAL when the vehicle is standing for prolonged periods with the engine running. The engine may be started in this range. Set the parking brake if you must leave the vehicle.
DRIVE This position provides all forward gears, including 3rd gear direct and 4th or 5th gear overdrive (see Overdrive Operation). Use this range for most city and highway driving. SECOND Use this position for driving slowly in heavy city traffic or on mountain roads where more precise speed control is desirable. Use it also when climbing long grades, and for engine braking when descending moderately steep grades. To prevent excessive engine speed do not exceed 45 mph (72 km/h) in this range. FIRST Use this position for driving up very steep hills and for engine braking at low speeds 20 mph (32 km/h) or less when going downhill. To prevent excessive engine speed, do not exceed 25 mph (40 km/h) in this range.
STARTING AND OPERATING 257
NOTE: Use caution when operating a heavily loaded vehicle in SECOND or FIRST gear selections in high ambients as torque converter slip can impose significant additional heat load on the cooling system. Overdrive Operation The overdrive automatic transmission contains an elec- tronically controlled fourth and fifth (if equipped) speed (Overdrive). The transmission will automatically shift from DRIVE to Overdrive if the following conditions are present: • the shift lever is in DRIVE; • the engine coolant has reached normal operating tem- • vehicle speed is above approximately 30 mph • the “TOW HAUL O/D OFF” switch has not been
(48 km/h);
perature;
activated;
258 STARTING AND OPERATING
• transmission temperature.
has
reached
normal
operating
NOTE: • If the vehicle is started in extremely cold temperatures, the transmission may not shift into Overdrive and will automatically select the most desirable gear for opera- tion at this temperature. Normal operation will re- sume when the transmission fluid temperature has risen to a suitable level. Refer to the “Note” under “Torque Converter Clutch” in this section. • If the transmission temperature gets extremely hot, the transmission will automatically select the most desir- able gear for operation at this temperature. If the transmission temperature becomes hot enough the “Transmission Temperature Warning Light” may illu- minate and the transmission may downshift out of
Overdrive until the transmission cools down. After cool down, the transmission will resume normal operation.
from Overdrive to The transmission will downshift DRIVE if the accelerator pedal is fully depressed at vehicle speeds above approximately 35 mph (56 km/h). When To Use “TOW HAUL” and “O/D OFF” Modes When driving in hilly areas, towing a trailer, carrying a heavy load, etc., and frequent transmission shifting oc- curs, press the “TOW HAUL O/D OFF” button once to select TOW HAUL.
STARTING AND OPERATING 259
economy) and automatic closed-throttle downshifts to 3rd gear are performed (for improved braking) when driving conditions warrant. Pressing the “TOW HAUL O/D OFF” button a second time to select O/D OFF will disable 4th and 5th gear completely, which should elimi- nate any excessive transmission shifting. The “TOW HAUL” or “O/D OFF” light will illuminate in the instrument cluster to indicate when the switch has been activated. Pressing the switch a third time restores normal operation. If the “TOW HAUL” or “O/D OFF” modes are desired, the button must be pressed each time the engine is started. Torque Converter Clutch A feature, designed to improve fuel economy, has been included in the automatic transmission on your vehicle. A clutch within the torque converter engages automati- cally at calibrated speeds. This may result in a slightly different feeling or response during normal operation in
Tow Haul O/D Off Switch
This will improve performance and reduce the potential for transmission overheating or failure due to excessive shifting. When operating in “TOW HAUL” mode, 5th gear (if equipped) is disabled and 2-3 and 3-4 shift patterns are modified. Shifts into Overdrive (4th gear) are allowed during steady cruise (for improved fuel
260 STARTING AND OPERATING
the upper gears. When the vehicle speed drops or during acceleration when the transmission downshifts to second gear, the clutch automatically disengages. NOTE: • The torque converter clutch will not engage until the transmission fluid and engine coolant are warm [usu- ally after 1-3 miles (1.6 - 4.8 km) of driving]. Because the engine speed is higher when the torque converter clutch is not engaged, it may seem as if the transmis- sion is not shifting into Overdrive when cold. This is normal. Pressing the “TOW HAUL O/D OFF” button, when the transmission is sufficiently warm, will dem- onstrate that the transmission is able to shift into and out of overdrive. • If the vehicle has not been driven in several days, the first few seconds of operation after shifting the trans- mission into gear may seem sluggish. This is due to the fluid partially draining from the torque converter into
the transmission. This condition is normal and will not cause damage to the transmission. The torque con- verter will refill within five seconds of shifting from PARK into any other gear position.
FOUR-WHEEL DRIVE OPERATION — IF EQUIPPED Four-wheel drive trucks are equipped with either a manually shifted transfer case or an electronically shifted transfer case. Refer to the operating instructions for your transfer case, located in this section. Manually Shifted Transfer Case Operating Information/Precautions The transfer case provides four mode positions. • Two-wheel drive high range (2H) • Four-wheel drive high range (4H) • Neutral (N) • Four-wheel drive low range (4L)
This transfer case is intended to be driven in the 2H position for normal street and highway conditions such as dry, hard surfaced roads. When additional traction is required, the 4H and 4L positions can be used to lock the front and rear drive- shafts together and force the front and rear wheels to rotate at the same speed. This is accomplished by simply moving the shift lever to the desired positions. The 4H and 4L positions are intended for loose, slippery road surfaces only. Driving in the 4H and 4L positions on dry, hard surfaced roads may cause increased tire wear and damage to the driveline components. The “Transfer Case Position Indicator Light” in the instru- ment cluster will alert the driver that the vehicle is in four-wheel drive and that the front and rear driveshafts are locked together. This light will illuminate when the transfer case is shifted into either the 4H or 4L position. There is no light for the 2H or NEUTRAL positions.
STARTING AND OPERATING 261
When operating your vehicle in 4L, the engine speed is approximately three times that of the 2H or 4H positions at a given road speed. Take care not to overspeed the engine and do not exceed 25 mph (40 km/h). Proper operation of four-wheel drive vehicles depends on tires of equal size, type and circumference on each wheel. Any difference will adversely affect shifting and can cause damage to the transfer case. NOTE: Do not attempt to make a shift while only the front or rear wheels are spinning. The transfer case is not equipped with a synchronizer and therefore the front and rear driveshaft speeds must be equal for the shift to take place. Shifting while only the front or rear wheels are spinning can cause damage to the transfer case. Because four-wheel drive provides improved traction, there is a tendency to exceed safe turning and stopping speeds. Do not go faster than road conditions permit.
262 STARTING AND OPERATING
NOTE: Delayed shifts out of four-wheel drive may be experienced due to uneven tire wear, low or uneven tire pressures, excessive vehicle loading, or cold tempera- tures.
WARNING!
You or others could be injured if you leave the vehicle unattended with the transfer case in the NEUTRAL position without first fully engaging the parking brake. The transfer case NEUTRAL position disengages both the front and rear driveshafts from the powertrain and will allow the vehicle to move regardless of the transmission position. The parking brake should always be applied when the driver is not in the vehicle.
For additional information on the appropriate use of each transfer case mode position see the information below:
2H Rear Wheel Drive High Range - This range is for normal street and highway driving on dry hard surfaced roads. 4H Four-Wheel Drive High Range - This range locks the front and rear driveshafts together forcing the front and rear wheels to rotate at the same speed. Additional traction for loose, slippery road surfaces only. Neutral - This range disengages the front and rear driveshafts from the powertrain. To be used for flat towing behind another vehicle. Refer to “Recreational Towing” in this section. 4L Four-Wheel Drive Low Range - This range locks the front and rear driveshafts together forcing the front and rear wheels to rotate at the same speed. Additional traction and maximum pulling power for loose, slippery road surfaces only. Do not exceed 25 mph (40 km/h).
Shifting Procedure - Manually Shifted Transfer Case
Manual Transfer Case Shifter
2H ⇔ 4H Shifting between 2H and 4H can be made with the vehicle stopped or in motion. If the vehicle is in motion, shifts can be made up to 55 mph (88 km/h). With the
STARTING AND OPERATING 263
vehicle in motion, the transfer case will engage/ disengage faster if you momentarily release the accelera- tor pedal after completing the shift. Apply a constant force when shifting the transfer case lever. 2H or 4H ⇔ 4L With the vehicle rolling at 2 to 3 mph (3 to 5 km/h), shift the transmission into NEUTRAL. While the vehicle is coasting at 2 to 3 mph (3 to 5 km/h), shift the transfer case lever firmly to the desired position. Do not pause in transfer case NEUTRAL. NOTE: • Pausing in transfer case NEUTRAL in vehicles equipped with an automatic transmission may require shutting the engine OFF to avoid gear clash while completing the shift. If difficulty occurs, shift the transmission into NEUTRAL, hold foot on brake, and turn the engine OFF. Make shift to the desired mode.
264 STARTING AND OPERATING
• Shifting into or out of 4L is possible with the vehicle completely stopped, however difficulty may occur due to the mating clutch teeth not being properly aligned. Several attempts may be required for clutch teeth alignment and shift completion to occur. The preferred method is with the vehicle rolling 2 to 3 mph (3 to 5 km/h). Avoid attempting to engage or disengage 4L with the vehicle moving faster than 2 to 3 mph (3 to 5 km/h). • Do not attempt to shift into or from 4L while the
transmission is in gear.
Electronically Shifted Transfer Case Operating Information/Precautions (Five Position Switch) — If Equipped This is an electronically shifted transfer case and is operated by the transfer case switch, which is located on the instrument panel.
Transfer Case Position Indicator Light The “Transfer Case Position Indicator Light” in the instrument cluster is used to alert the driver that the front axle is fully engaged and all four wheels are driving.
Transfer Case Switch (Five Position)
This electronically shifted transfer case provides five mode positions. • Two-wheel drive high range (2WD) • Four-wheel drive automatic range (4WD AUTO) • Four-wheel drive lock range (4WD LOCK) • Four-wheel drive low range (4WD LOW) • Neutral (N) This electronically shifted transfer case is designed to be driven in the two–wheel drive position (2WD) or four- wheel drive position (4WD AUTO) for normal street and highway conditions (dry hard surfaced roads). Driving the vehicle in 2WD will have greater fuel economy benefits, as the front axle is not engaged in 2WD.
STARTING AND OPERATING 265
For variable driving conditions, the 4WD AUTO mode can be used. In this mode, the front axle is engaged, but the vehicle’s power is sent to the rear wheels. Four-wheel drive will be automatically engaged when the vehicle senses a loss of traction. Because the front axle is en- gaged, this mode will result in lower fuel economy than the 2WD mode. When additional traction is required, the 4WD LOCK and 4WD LOW positions can be used to lock the front and rear driveshafts together and force the front and rear wheels to rotate at the same speed. This is accomplished by rotating the 4WD Control Switch to the desired position. Refer to “Shifting Procedure” for specific shift- ing instructions. The 4WD LOCK and 4WD LOW posi- tions are designed for loose, slippery road surfaces only.
266 STARTING AND OPERATING
Driving in the 4WD LOCK and 4WD LOW positions on dry hard surfaced roads may cause increased tire wear and damage to the driveline components.
NEUTRAL Button
NOTE: The transfer case NEUTRAL position is selected by depressing the recessed button located on the lower left hand corner of the 4WD Control Switch. The transfer
case NEUTRAL position is to be used for recreational towing only. Refer to “Recreational Towing” in this section for specific procedures on shifting into and out of NEUTRAL. Transfer Case Position Indicator Lights — Electronically Shifted Transfer Case Only The “Transfer Case Position Indicator Lights” are located on the instrument cluster and indicate the current and desired transfer case selection. When you select a differ- ent transfer case position, the “Transfer Case Position Indicator Lights” will do the following: If all shift conditions are met: 1. The current “Transfer Case Position Indicator Light” will turn OFF. 2. The selected “Transfer Case Position Indicator Light” will flash until the transfer case completes the shift.
3. When the shift is completed, the “Transfer Case Posi- tion Indicator Light” for the selected position will stop flashing and remain ON. If one or more shift conditions are not met: 1. The “Transfer Case Position Indicator Light” for the current position will remain ON. 2. The newly selected “Transfer Case Position Indicator Light” will continue to flash. 3. The transfer case will not shift. NOTE: Before retrying a selection, make sure that all of the necessary requirements for selecting a new transfer case position have been met. To retry the selection, turn the control knob back to the current position, wait five seconds, and retry selection. To find the shift require- ments, refer to the ⬙Shifting Procedure⬙ for your transfer case, located in this section of the Owner’s Manual.
STARTING AND OPERATING 267
The “Service 4WD Warning Light” monitors the electric shift four-wheel drive system. If this light remains on after engine start up or illuminates during driving, it means that the four-wheel drive system is not function- ing properly and that service is required.
WARNING!
Always engage the parking brake when powering down the vehicle if the ⴖService 4WD Warning Light” is illuminated. Not engaging the parking brake may allow the vehicle to roll which may cause personal injury.
NOTE: Do not attempt to make a shift while only the front or rear wheels are spinning. This could cause damage to driveline components.
268 STARTING AND OPERATING
When operating your vehicle in 4WD LOW, the engine speed is approximately three times that of the 2WD, 4WD AUTO or 4WD LOCK positions at a given road speed. Take care not to overspeed the engine and do not exceed 25 mph (40 km/h). Proper operation of four-wheel drive vehicles depends on tires of equal size, type and circumference on each wheel. Any difference in tire size can cause damage to the transfer case. Because four-wheel drive provides improved traction, there is a tendency to exceed safe turning and stopping speeds. Do not go faster than road conditions permit.
WARNING!
You or others could be injured if you leave the vehicle unattended with the transfer case in the NEUTRAL position without first fully engaging the parking brake. The transfer case NEUTRAL position disengages both the front and rear driveshafts from the powertrain and will allow the vehicle to move regardless of the transmission position. The parking brake should always be applied when the driver is not in the vehicle.
For additional information on the appropriate use of each transfer case mode position, see the information below: 2WD Rear Wheel Drive High Range - This range is for normal street and highway driving on dry hard surfaced roads.
4WD AUTO Four-Wheel Drive Automatic Range - This range auto- matically engages when the vehicle senses a loss of traction. Additional traction for varying road conditions. 4WD LOCK Four-Wheel Drive Lock Range - This range locks the front and rear driveshafts together forcing the front and rear wheels to rotate at the same speed. Additional traction for loose, slippery road surfaces only. 4WD LOW Four-Wheel Drive Low Range - Locks the front and rear driveshafts together forcing the front and rear wheels to rotate at the same speed. Additional traction and maxi- mum pulling power for loose, slippery road surfaces only. Do not exceed 25 mph (40 km/h).
STARTING AND OPERATING 269
Neutral - This range disengages the front and rear driveshafts from the powertrain. To be used for flat towing behind another vehicle. Refer to “Recreational Towing” in this section. Shifting Procedure — Electronically Shifted Transfer Case NOTE: • If any of the requirements to select a new transfer case position have not been met, the transfer case will not shift. The “Transfer Case Position Indicator Light” for the previous position will remain ON and the newly selected “Transfer Case Position Indicator Light” will continue to flash until all the requirements for the selected position have been met. To retry a shift: return the control knob back to the original position, make certain all shift requirements have been met, wait five seconds and try the shift again.
270 STARTING AND OPERATING
• If all the requirements to select a new transfer case position have been met, the current “Transfer Case Position Indicator Light” will turn OFF, the selected “Transfer Case Position Indicator Light” will flash until the transfer case completes the shift. When the shift is completed, “Transfer Case Position Indicator Light” for the selected position will stop flashing and remain ON.
2WD ⇔ 4WD AUTO or 4WD LOCK Rotate the transfer case switch to the desired position. Shifts between 2WD and 4WD AUTO and 4WD LOCK can be done with the vehicle stopped or in motion. With the vehicle in motion, the transfer case will engage/ disengage faster if you momentarily release the accelera- tor pedal after turning the switch. If the vehicle is stopped, the ignition key must be in the ON position, with the engine either RUNNING or OFF. This shift cannot be completed if the key is in the accessory (ACC) position.
2WD or 4WD AUTO or 4WD LOCK ⇔ 4WD LOW NOTE: When shifting into or out of 4WD LOW some gear noise may be heard. This noise is normal and is not detrimental to the vehicle or occupants. Shifting can be performed with the vehicle rolling 2 to 3 mph (3 to 5 km/h) or completely stopped. USE EITHER OF THE FOLLOWING PROCEDURES: Preferred Procedure 1. With the engine running, slow the vehicle to 2 to 3 mph (3 to 5 km/h). 2. Shift the transmission into NEUTRAL. 3. While still rolling, rotate the transfer case switch to the desired position. 4. After the desired “Transfer Case Position Indicator Light” is ON (not flashing), shift the transmission back into gear.
Alternate Procedure 1. Bring the vehicle to complete stop. 2. With the key ON and the engine either off or running, shift the transmission into NEUTRAL. 3. Rotate the transfer case control switch to the desired position. 4. After the desired “Transfer Case Position Indicator Light” is ON (not flashing), shift the transmission back into gear.
STARTING AND OPERATING 271
NOTE: • If steps 1 or 2 of either the Preferred or Alternate Procedure are not satisfied, prior to attempting the shift, or if they no longer are being met while the shift attempt is in process, then the desired “Transfer Case Position Indicator Light” will flash continuously while the original “Transfer Case Position Indicator Light” is ON, until all requirements have been met. • The ignition key must be ON for a shift to take place and for the “Transfer Case Position Indicator Lights” to be operable. If the key is not ON, then the shift will not take place and no “Transfer Case Position Indica- tor Lights” will be on or flashing. • If your are leaving your vehicle stored for longer than
21 days, refer to the section on “Vehicle Storage.”
272 STARTING AND OPERATING
Electronically Shifted Transfer Case Operating Information/Precautions (Four Position Switch) — If Equipped This is an electronically shifted transfer case and is operated by the transfer case switch, which is located on the instrument panel.
Transfer Case Switch (Four Position)
This electronically shifted transfer case provides four mode positions. • Two-wheel drive high range (2WD) • Four-wheel drive lock range (4WD LOCK) • Four-wheel drive low range (4WD LOW) • Neutral (N) This electronically shifted transfer case is designed to be driven in the two-wheel drive position (2WD) for normal street and highway conditions on dry, hard surfaced roads. When additional traction is required, the transfer case 4WD LOCK and 4WD LOW positions can be used to lock the front and rear driveshafts together and force the front and rear wheels to rotate at the same speed. This is accomplished by rotating the transfer case switch to the desired position. Refer to “Shifting Procedure” for spe- cific shifting instructions. The 4WD LOCK and 4WD
LOW positions are designed for loose, slippery road surfaces only. Driving in the 4WD LOCK and 4WD LOW positions on dry hard surfaced roads may cause in- creased tire wear and damage to the driveline compo- nents.
NEUTRAL Button
STARTING AND OPERATING 273
NOTE: The transfer case NEUTRAL position is selected by depressing the recessed button located on the lower left hand corner of the transfer case switch. The transfer case NEUTRAL position is to be used for recreational towing only. Refer to “Recreational Towing” in this section. Transfer Case Position Indicator Lights — Electronically Shifted Transfer Case Only The “Transfer Case Position Indicator Lights” are located in the instrument cluster and indicate the current and desired transfer case selection. When you select a differ- ent transfer case position, the “Transfer Case Position Indicator Lights” will do the following: If all shift conditions are met: 1. The current “Transfer Case Position Indicator Light” will turn OFF.
274 STARTING AND OPERATING
2. The selected “Transfer Case Position Indicator Light” will flash until the transfer case completes the shift. 3. When the shift is completed, the “Transfer Case Posi- tion Indicator Light” for the selected position will stop flashing and remain ON. If one or more shift conditions are not met: 1. The “Transfer Case Position Indicator Light” for the current position will remain ON. 2. The newly selected “Transfer Case Position Indicator Light” will continue to flash. 3. The transfer case will not shift. NOTE: Before retrying a selection, make certain that all the necessary requirements for selecting a new transfer case position have been met. To retry the selection, turn the transfer case switch back to the current position, wait
five seconds, and retry selection. To find the shift require- ments, refer to the ⬙Shifting Procedure⬙ for your transfer case, located in this section of the Owner’s Manual. The “Service 4WD Warning Light” monitors the electric shift four-wheel drive system. If this light remains on after engine start up or illuminates during driving, it means that the four-wheel drive system is not function- ing properly and that service is required.
WARNING!
Always engage the parking brake when powering down the vehicle if the ⴖService 4WD Warning Light” is illuminated. Not engaging the parking brake may allow the vehicle to roll, which may cause personal injury.
NOTE: Do not attempt to make a shift while only the front or rear wheels are spinning, as this can cause damage to driveline components. When operating your vehicle in 4WD LOW, the engine speed is approximately three times that of the 2WD or 4WD LOCK positions at a given road speed. Take care not to overspeed the engine and do not exceed 25 mph (40 km/h). Proper operation of four-wheel drive vehicles depends on tires of equal size, type and circumference on each wheel. Any difference in tire size can cause damage to the transfer case. Because four-wheel drive provides improved traction, there is a tendency to exceed safe turning and stopping speeds. Do not go faster than road conditions permit.
STARTING AND OPERATING 275
WARNING!
You or others could be injured if you leave the vehicle unattended with the transfer case in the NEUTRAL position without first fully engaging the parking brake. The transfer case NEUTRAL position disengages both the front and rear driveshafts from the powertrain and will allow the vehicle to move regardless of the transmission position. The parking brake should always be applied when the driver is not in the vehicle.
276 STARTING AND OPERATING
For additional information on the appropriate use of each transfer case mode position see the information below: 2WD Rear Wheel Drive High Range - This range is for normal street and highway driving on dry hard surfaced roads. 4WD LOCK Four-Wheel Drive Lock Range - This range locks the front and rear driveshafts together forcing the front and rear wheels to rotate at the same speed. Additional traction for loose, slippery road surfaces only. 4WD LOW Four-Wheel Drive Low Range - Locks the front and rear driveshafts together forcing the front and rear wheels to rotate at the same speed. Additional traction and maxi- mum pulling power for loose, slippery road surfaces only. Do not exceed 25 mph (40 km/h).
Neutral - This range disengages the front and rear driveshafts from the powertrain. To be used for flat towing behind another vehicle. Refer to “Recreational Towing” in this section. Shifting Procedure — Electronically Shifted Transfer Case NOTE: • If any of the requirements to select a new transfer case position have not been met, the transfer case will not shift. The “Transfer Case Position Indicator Light” for the previous position will remain ON and the newly selected “Transfer Case Position Indicator Light” will continue to flash until all the requirements for the selected position have been met. To retry a shift: return the control knob back to the original position, make certain all shift requirements have been met, wait five seconds and try the shift again.
• If all the requirements to select a new transfer case position have been met, the current “Transfer Case Position Indicator Light” will turn OFF, the selected “Transfer Case Position Indicator Light” will flash until the transfer case completes the shift. When the shift is completed, the “Transfer Case Position Indica- tor Light” for the selected position will stop flashing and remain ON.
2WD⇔ 4WD LOCK Rotate the transfer case switch to the desired position. Shifts between 2WD and 4WD LOCK can be done with the vehicle stopped or in motion. With the vehicle in motion, the transfer case will engage/disengage faster if you momentarily release the accelerator pedal after turn- ing the switch. If the vehicle is stopped, the ignition key must be in the ON position with the engine either running or off. This shift cannot be completed if the key is in the ACC position.
STARTING AND OPERATING 277
NOTE: The transfer case will not allow shifts between 2WD and 4WD LOCK if the front and/or rear wheels are spinning (no traction). In this situation, the selected “Transfer Case Position Indicator Light” will flash and the original “Transfer Case Position Indicator Light” will remain ON. At this time, reduce speed and stop spinning the wheels to complete the shift. 2WD or 4WD LOCK⇔ 4WD LOW NOTE: When shifting into or out of 4WD LOW some gear noise may be heard. This noise is normal and is not detrimental to the vehicle or occupants. Shifting can be performed with the vehicle rolling 2 to 3 mph (3 to 5 km/h) or completely stopped. USE EITHER OF THE FOLLOWING PROCEDURES: Preferred Procedure 1. With engine running, slow the vehicle to 2 to 3 mph (3
to 5 km/h).278 STARTING AND OPERATING
2. Shift the transmission into NEUTRAL. 3. While still rolling, rotate the transfer case switch to the desired position. 4. After the desired “Transfer Case Position Indicator Light” is ON (not flashing), shift the transmission back into gear. Alternate Procedure 1. Bring the vehicle to complete stop. 2. With the key ON and the engine either OFF or running, shift the transmission into NEUTRAL. 3. Rotate the transfer case switch into the desired posi- tion. 4. After the desired “Transfer Case Position Indicator Light” is ON (not flashing), shift the transmission back into gear.
NOTE: • If steps 1 or 2 of either the Preferred or Alternate Procedure are not satisfied prior to attempting the shift, the desired “Transfer Case Position Indicator Light” will flash continuously while the original “Transfer Case Position Indicator Light” is ON, until all requirements have been met. • The ignition key must be ON for a shift to take place and for the “Transfer Case Position Indicator Lights” to be operable. If the key is not ON then the shift will not take place and no “Transfer Case Position Indica- tor Lights” will be on or flashing. • If your are leaving your vehicle stored for longer than
21 days, refer to the section on “Vehicle Storage.”
AXLE LOCKER SYSTEM — POWER WAGON ONLY This vehicle is equipped with electronically locking front and rear differentials. These differentials, when engaged, mechanically lock together the axle shafts forcing the wheels to spin at an equal rate. This allows the vehicle to maintain its momentum and prevents it from becoming stuck. The locking front and rear differentials should only be engaged during low-speed, extreme off-road situa- tions where one wheel is likely to not be in contact with the ground. It is not recommended to drive the vehicle with the differentials locked on pavement due to the reduced ability to turn and speed limitations.
STARTING AND OPERATING 279
CAUTION!
• Do not lock the front or rear axle on hard surfaced roads. The ability to steer the vehicle is reduced and damage to the drivetrain may occur when the axles are locked on hard surfaced roads. • Do not try to lock the rear axle if the vehicle is stuck and the tires are spinning. You can damage drivetrain components. Lock the rear axle before attempting situations or navigating terrain, which could possibly cause the vehicle to become stuck.
280 STARTING AND OPERATING
The locking axles are controlled by the axle locker switch located on the center console.
Locking Axle Switch
The switch has three positions, AXLE UNLOCK, REAR LOCK, and FRONT/REAR LOCK. Under normal driv- ing conditions, the switch should be left in the AXLE UNLOCK position. In the AXLE UNLOCK position, the
front and rear axles are unlocked. In the REAR LOCK position, the rear axle is locked. In the FRONT/REAR LOCK position, the front and rear axles are locked. NOTE: Even when the axles are in the AXLE UNLOCK position, the limited slip differential in the rear axle still provides torque biasing capability for moderate low traction environments. During the command to lock the axle, the indicator light will flash until the axle is locked. After the lock command has been successfully executed, the light will remain on solid. To lock the rear axle, place the vehicle in 4LO. Refer to “Four Wheel Drive Operation” in this section of the manual. Move the axle locker switch position to REAR LOCK while traveling less than 3 mph (5 km/h). The RR indicator light will remain on when the rear axle is locked.
NOTE: Left to right wheel speed difference may be necessary to allow the axle to fully lock. If the indicator light is flashing after placing the switch in the REAR LOCK or FRONT/REAR LOCK position, drive the ve- hicle in a turn or on loose gravel to expedite the locking action.
WARNING!
Do not use the locked axle position for normal driving. A locked front axle is intended for off-road driving only. Locking the front axle during on-road driving will reduce the steering ability. This could cause an accident and you may be seriously injured.
To lock the front axle; move the axle locker switch to FRONT/REAR LOCK while traveling less than 3 mph (5 km/h). The indicator light will be solid when the front axle is locked.
STARTING AND OPERATING 281
NOTE: The rear axle must be locked before the front axle will lock. To unlock the front axle; move the axle locker switch to REAR LOCK. The FRONT/REAR LOCK indicator light will go out when the axle is unlocked. NOTE: The axle lockers could be torque locked due to side to side loads on the axle. Driving slowly while turning the steering wheel from a left hand turn to a right hand turn or driving in REVERSE for a short distance may be required to release the torque lock and unlock the axles. To unlock the rear axle; move the axle locker switch to AXLE UNLOCK. The REAR LOCK indicator light will go out when the rear axle is unlocked.
282 STARTING AND OPERATING
STABILIZER/SWAY BAR SYSTEM — POWER WAGON ONLY Your vehicle is equipped with an electronic disconnecting stabilizer/sway bar. This system allows greater front suspension travel in off-road situations. Due to the use of taller springs, this vehicle has an increased ride height of approximately 1.9 in (48.3 mm) in the front and 1.5 in (38.1 mm) in the rear. A major advantage to increasing ride height is the positive effect it has on approach/departure and break over angles. This system is controlled by the electronic control sway bar switch located on the instrument panel.
1 — On Road 2 — Off Road The switch has two positions; On-Road and Off-Road. The system is normally in the On-Road mode, indicated by a solid green light. The stabilizer/sway bar should remain in the On-Road mode during normal driving conditions.
WARNING!
Do not disconnect the stabilizer bar and drive on hard surfaced roads or at speeds above 18 mph (29 km/h), you may lose control of the vehicle, which could result in serious injury. The front stabilizer bar enhances vehicle stability and is necessary for main- taining control of the vehicle. The system monitors vehicle speed and will attempt to reconnect the stabilizer bar at speeds over 18 mph (29 km/h). This is indicated by a flashing off road light and solid on road light. Once vehicle speed is reduced below 14 mph (22 km/h), the system will attempt to return to the Off-Road mode.
To disconnect the stabilizer/sway bar, shift to either 4HI or 4LO as shown in “Four Wheel Drive Operation” and press the top of the stabilizer/sway bar button to obtain
STARTING AND OPERATING 283
the Off-Road position. The amber indicator light will flash until the stabilizer/sway bar has been fully discon- nected. NOTE: The stabilizer/sway bar may be torque locked due to left and right suspension height differences. This condition is due to driving surface differences or vehicle loading. to disconnect/reconnect, the right and left halves of the bar must be aligned. This alignment may require that the vehicle be driven onto level ground or rocked from side to side. To return to the On-Road mode; press the bottom of the stabilizer/sway bar button.
the stabilizer/sway bar
In order
for
284 STARTING AND OPERATING
WARNING!
If the stabilizer/sway bar will not return to On-Road mode, vehicle stability is greatly reduced. Do not attempt to drive the vehicle over 18 mph (29 km/h). Driving faster than 18 mph (29 km/h) may cause loss of control of the vehicle, which could result in serious injury. Contact your local service center for assistance.
SAFE OFF-ROAD DRIVING — POWER WAGON ONLY
Off-Road Driving Tips and Vehicle Characteristics Your vehicle has excellent on and off-road capabilities. These off-road capabilities will allow you to explore those wilderness trails where few travel, providing a source of exciting and satisfying recreation. Before you
venture out, you should contact your local governmental agency to determine the designated off-road vehicle (ORV) trails or recreation areas. You should always tread lightly and only use established roads, trails or ORV recreational areas. The National Forest Service, Bureau of Land Management or local Department of Natural Re- sources are a wealth of information and usually have maps with marked trails. Skid Plates And Underbody Protection Steel skid plates protect the major driveline components of the truck including the fuel tank, transfer case and steering damper. In addition, this vehicle is equipped with boxed cross members and fore/aft rails. This addi- tional protection allows the vehicle to be utilized in severe off-road situations that would be considered im- passable by a normal truck.
STARTING AND OPERATING 285
Ramp Travel Index (RTI) The ramp travel index is the distance, in inches, that you can drive your vehicle with one wheel on a 20-degree ramp without lifting any other wheel off the ground. This distance up the ramp divided by the wheelbase of the vehicle and multiplied by 1,000 is the RTI. This vehicle has an RTI of 655, which means you can articulate one front wheel 32 inches in the air while the other three wheels remain in contact with the ground.
High Mobility Characteristics This vehicle has high off-road mobility characteristics with an approach angle A= 35 degrees, a break-over angle B= 25.5 degrees, a running ground clearance C= 14.5 inches, a departure angle D= 26.5 degrees, an axle to ground clearance E= 8.4 inches front/E= 8.25 rear and has a ramp travel index (with the smart bar in off-road mode) of 655. Also, it has a grade-ability of a 60% (31
degree) slope.286 STARTING AND OPERATING
Angles A, B, C, and D
STARTING AND OPERATING 287
Water Fording Characteristics Water fording characteristic is the vehicle’s ability to cross a body of still water, where the powertrain and drivetrain are safe from water ingestion. This vehicle has high water fording characteristics with the ability to cross a pool of water, without stopping, 24 inches deep at a maximum speed of 10 mph (16 km/h) and a pool of water 30 inches deep at a maximum speed of 5 mph (8 km/h), both with an entrance ramp angle of 1.3
degrees.CAUTION!
The door sill height is 25 inches. Water may intrude into the interior of the vehicle at greater depths.
Simultaneous Brake And Throttle Operation Many off-road driving conditions require the simulta- neous use of the brake and throttle (two footed driving). When climbing rocks, logs, or other stepped objects,
Front and Rear (Shown) Differential Height E
288 STARTING AND OPERATING
using light brake pressure with light throttle will keep the vehicle from jerking or lurching. This technique is also used when you need to stop and restart a vehicle on a steep incline. The Basics Of Off-Road Driving You will encounter many types of terrain driving off- road. You should be familiar with the terrain and area before proceeding. There are many types of surface conditions: hard packed dirt, gravel, rocks, grass, sand, mud, snow and ice. Every surface has a different effect on your vehicle’s steering, handling and traction. Control- ling your vehicle is one of the keys to successful off-road driving, so always keep a firm grip on the steering wheel and maintain a good driving posture. Avoid sudden accelerations, turns or braking. In most cases there are no road signs, posted speed limits or signal lights. Therefore you will need to use your own good judgment on what is safe and what isn’t. When on a trail you should always be looking ahead for surface obstacles and changes in
terrain. The key is to plan your future driving route while remembering what you are currently driving over.
CAUTION!
Never park your vehicle over dry grass or other combustible materials. The heat from your vehicle exhaust system could cause a fire.
WARNING!
Always wear your seat belt and firmly tie down cargo. Unsecured cargo can become projectiles in an off-road situation.
When To Use Low Range When driving off-road, shift into 4L (Low Range) for additional traction or to improve handling and control on slippery or difficult terrain. Due to the lower gearing, low range will allow the engine to operate in a higher power
range. This will allow you to idle over obstacles and down hills, with improved control and less effort. Also, use 4L (Low Range) in rain, ice, snow, mud, sand, to get heavy loads rolling, improve traction, or whenever 4H (High Range) traction will not do the job. Driving In Snow, Mud And Sand There is a drastic reduction in traction when driving in snow, mud or sand. The vehicle will be less responsive to steering, acceleration and braking inputs. Therefore you should accelerate slowly, leave greater stopping distances and avoid abrupt vehicle maneuvers. You want to keep a slow constant steady pace. The key is to maintain the vehicle’s momentum. • Snow – In heavy snow or for additional control and traction at slower speeds, shift the transmission to a low gear and shift the transfer case to 4L (Low Range) if necessary. Do not shift to a lower gear than neces- sary to maintain headway. Over-revving the engine
STARTING AND OPERATING 289
can spin the wheels and traction will be lost. If you start to slow to a stop, try turning your steering wheel no more than a 1⁄4 turn quickly back and forth, while still applying throttle. This will allow the tires to get a fresh ⬙bite⬙ and help maintain your momentum.
CAUTION!
On icy or slippery roads, do not downshift at high engine RPMs or vehicle speeds because engine brak- ing may cause skidding and loss of control. • Mud – Deep mud creates a great deal of suction around the tires and is very difficult to get through. You should use 4L (Low Range) with a gear low enough to maintain your momentum without shifting. If you start to slow to a stop, try turning your steering wheel no more than a 1⁄4 turn quickly back and forth for additional traction. Mud holes pose an increased threat of vehicle damage and getting stuck. They are
290 STARTING AND OPERATING
normally full of debris from previous vehicles getting stuck. As a good practice before entering any mud hole, get out and determine how deep it is, if there are any hidden obstacles and if the vehicle can be safely recovered if stuck. • Sand – Soft sand is very difficult to travel through with full tire pressure. When crossing soft sandy spots in a trail maintain your vehicle’s momentum and do not stop. The key to driving in soft sand using the appropriate tire pressure, accelerating slowly, avoid- ing abrupt maneuvers and maintaining the vehicle’s momentum. If you are going to be driving on large soft sandy areas or dunes, reduce your tire pressure to a minimum of 15 psi (103 kPa) to allow for a greater tire surface area. Reduced tire pressure will drastically improve your traction and handling, while driving on the soft sand, but you must return the tires to normal
air pressure before driving on pavement or other hard surfaces. Be sure you have a way to air the tires back up prior to reducing the pressure.
CAUTION!
Reduced tire pressures may cause tire unseating and total loss of air pressure. To reduce the risk of tire unseating, while at a reduced tire pressure, reduce your speed and avoid sharp turns or abrupt maneu- vers.
Crossing Obstacles (Rocks And Other High Points) While driving off road, you will encounter many types of terrain. These varying types of terrain bring different types of obstacles. Before proceeding review the path ahead to determine the correct approach and your ability to safely recover the vehicle if something goes wrong. Keeping a firm grip on the steering wheel, bring the
vehicle to a complete stop and then inch the vehicle forward until it makes contact with the object. Apply the throttle lightly while holding a light brake pressure and ease the vehicle up and over the object.
WARNING!
Crossing obstacles can cause abrupt steering system loading which could cause you to loose control of your vehicle.
Using a Spotter There are many times where it is hard to see the obstacle or determine the correct path. Determining the correct path can be extremely difficult when you are confronting many obstacles. In these cases have someone guide you over, through, or around the obstacle. Have the person stand a safe distance in front of you where they can see the obstacle, watch your tires and undercarriage, and guide you through.
STARTING AND OPERATING 291
Crossing Large Rocks When approaching large rocks, choose a path which ensures you drive over the largest with your tires. This will lift your undercarriage over the obstacle. The tread of the tire is tougher and thicker than the side wall and is designed to take the abuse. Always look ahead and make every effort to cross the large rocks with your tires.
CAUTION!
• Never attempt to straddle a rock that is large • Never attempt to drive over a rock which is large
enough to strike your axles or undercarriage.
enough to contact the door sills.
Crossing a Ravine, Gully, Ditch, Washout or Rut When crossing a ravine, gully, ditch, washout or a large rut, the angled approach is the key to maintaining your vehicle’s mobility. Approach these obstacles at a 45- degree angle and let each tire go through the obstacle
292 STARTING AND OPERATING
independently. You need to use caution when crossing large obstacles with steep sides. Do not attempt to cross any large obstacle with steep sides at an angle great enough to put the vehicle at risk of a rollover. If you get caught in a rut, dig a small trench to the right or left at a 45-degree angle ahead of the front tires. Use the removed dirt to fill the rut ahead of the turnout you just created. You should now be able to drive out following the trench you just created at a 45-degree angle.
WARNING!
There is an increased risk of rollover when crossing an obstacle, at any angle, with steep sides.
Crossing Logs To cross a log, approach it at a slight angle (approxi- mately 10 to 15 degrees). This allows one front tire to be on top of the log while the other just starts to climb the log. While climbing the log, modulate your brake and
accelerator to avoid spinning the log out from under your tires. Then ease the vehicle off the log using your brakes.
CAUTION!
Do not attempt to cross a log with a greater diameter than the running ground clearance or the vehicle will become high centered.
Getting High Centered If you get hung up or high centered on an object, get out of the vehicle and try to determine what the vehicle is hung up on, where it is contacting the underbody and what is the best direction to recover the vehicle. Depend- ing on what you are in contact with, jack the vehicle up and place a few rocks under the tires so the weight is off