- 2009 Chrysler Sebring Owners Manuals
- Chrysler Sebring Owners Manuals
- 2004 Chrysler Sebring Owners Manuals
- Chrysler Sebring Owners Manuals
- 2010 Chrysler Sebring Owners Manuals
- Chrysler Sebring Owners Manuals
- 2005 Chrysler Sebring Owners Manuals
- Chrysler Sebring Owners Manuals
- 2006 Chrysler Sebring Owners Manuals
- Chrysler Sebring Owners Manuals
- Download PDF Manual
-
are present. Components should be replaced immedi- ately if there is any evidence of degradation that could cause failure. Brakes In order to assure brake system performance, all brake system components should be inspected periodically. Suggested service intervals can be found in section 8.
WARNING!
Riding the brakes can lead to brake failure and possibly an accident. Driving with your foot resting or riding on the brake pedal can result in abnormally high brake temperatures, excessive lining wear, and possible brake damage. You may not have your full braking capacity in an emergency.
Brake and Power Steering System Hoses When servicing the vehicle for scheduled maintenance, inspect surface of hoses and nylon tubing for evidence of heat and mechanical damage. Hard and brittle rubber, cracking, checking, tears, cuts, abrasion, and excessive swelling suggest deterioration of the rubber. Particular attention should be made to examining those hose sur- faces nearest to high heat sources, such as the exhaust manifold. Inspect all hose clamps and couplings to make sure they are secure and no leaks are present. Insure nylon tubing in these areas has not melted or collapsed.
MAINTAINING YOUR VEHICLE 225
NOTE: Often, fluids such as oil, power steering fluid, and brake fluid are used during assembly plant opera- tions to ease the assembly of hoses to couplings. There- fore, oil wetness at the hose-coupling area is not neces- sarily an indication of leakage. Actual dripping of hot fluid when systems are under pressure (during vehicle operation) should be noted before hose is replaced based on leakage. Inspection of brake hoses should be done NOTE: whenever the brake system is serviced and every engine oil change.
WARNING!
Worn brake hoses can burst and cause brake failure. You could have an accident. If you see any signs of cracking, scuffing, or worn spots, have the brake hoses replaced immediately.
226 MAINTAINING YOUR VEHICLE
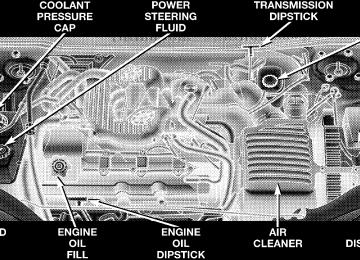
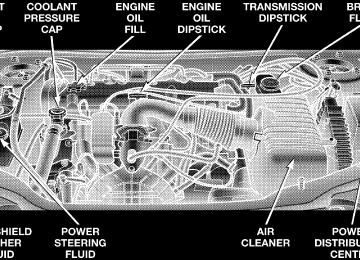
Master Cylinder The fluid level in the master cylinder should be checked when performing under hood services, or immediately if the brake system warning lamp shows system failure.
Brake Fluid Reservoir
Be sure to clean the top of the master cylinder area before removing the cap. If necessary, fill brake fluid reservoir to the top of the fill mark chevron. With disc brakes, fluid level can be expected to fall as the brake pads wear. However, low fluid level may be caused by a leak and a checkup may be needed.
Use only manufacturer’s recommended brake fluid, refer to Recommended Fluids, Lubricants and Genuine Parts for correct fluid type.
WARNING!
Use of a brake fluid that has a lower initial boiling point than MOPAR DOT 3 Brake Fluid or that is unidentified as to DOT FMVSS specification may result in sudden brake failure during hard or pro- longed braking. You could have an accident.
WARNING!
Overfilling the brake fluid reservoir can result in spilling brake fluid on hot engine parts and the brake fluid catching fire.
Use only brake fluid that has been in a tightly closed container to avoid contamination from foreign matter.
Do not allow petroleum base fluid to contaminate the brake fluid as seal damage will result! Fuel System Hoses Electronic Fuel Injection high pressure fuel systems are designed with hoses and clamps which have unique material characteristics to provide adequate sealing and resist attack by deteriorated gasoline. You are urged to use only manufacturer specified hoses and clamps, or their equivalent in material and specifi- cation, in any fuel system servicing. It is mandatory to replace all clamps that have been loosened or removed during service. Care should be taken in installing new clamps to insure they are properly torqued. Automatic Transmission Your front wheel drive vehicle has a transmission and differential assembly contained within a single housing. This is referred to as a “Transaxle.”
MAINTAINING YOUR VEHICLE 227
Selection of Lubricant It is important that the proper lubricant is used in the transmission to assure optimum transmission perfor- mance. Use only manufacturers recommended transmis- sion fluid, refer to Recommended Fluids, Lubricants and Genuine Parts for correct fluid type. It is important that the transmission fluid be maintained at the prescribed level using the recommended fluid.
CAUTION!
Using a transmission fluid other than the manufac- turers recommended fluid may cause deterioration in transmission shift quality and/or torque converter shudder. Using a transmission fluid other than the manufacturers recommended fluid will result in more frequent fluid and filter changes. Refer to Recommended Fluids, Lubricants and Genuine Parts for correct fluid type.
228 MAINTAINING YOUR VEHICLE
Procedure For Checking Fluid Level The fluid level in the automatic transaxle should be checked whenever the vehicle is serviced. Operation with an improper fluid level will greatly reduce the life of the transaxle and of the fluid. To properly check the automatic transaxle fluid level, the following procedure must be used: • The vehicle must be on level ground. • The engine should be running at curb idle speed for a minimum of 60 seconds. • Fully apply parking brake. • Place the gear selector momentarily in each gear • Wipe the dipstick clean and reinsert until seated. • If the fluid is cold (80°F / 27°C), the reading should be in the cross hatched area marked “COLD” (between the lower two holes in the dipstick).
position ending with the lever in P (PARK).
Remove dipstick and note reading.
• If the fluid is hot (180°F / 82°C), the reading should be in the cross hatched area marked ”HOT” (between the upper two holes in the dipstick). • If the fluid level shows low, add sufficient transmis-
sion fluid to bring to the proper level.
CAUTION!
Do not overfill. Dirt and water in the transaxle can cause serious damage. To prevent dirt and water from entering the transaxle after checking or replen- ishing fluid, make certain that the dipstick cap is seated properly.
Fluid and Filter Changes Automatic transmission fluid and filter should be changed as follows: Maintenance schedule “A” — No change necessary. Maintenance schedule “B” — Every 60,000 miles (96 000
km) change fluid and filter under the following condi- tions:• Police, taxi, limousine, commercial type operation, or trailer towing where the vehicle is driven regularly for more than 45 minutes of continuous operation.
NOTE: Refer to Section 8 of this manual for mainte- nance schedules. If the transaxle is disassembled for any reason, the fluid and filter should be changed. Special Additives The manufacturer recommends against the addition of any fluid additives to the transaxle. The only exception to this policy is the use of special dyes to aid in detecting fluid leaks. The use of transmission sealers should be avoided as they may adversely affect seals. Fluid Level Check Check the fluid level by removing the fill plug. The fluid level should be between the bottom of the fill hole and a point not more than 4.0 mm below the bottom of the hole. Add fluid, if necessary, to maintain the proper level. Frequency of Fluid Change Under normal operating conditions, the fluid installed at the factory will give satisfactory lubrication for the life of
MAINTAINING YOUR VEHICLE 229
the vehicle. Fluid changes are not necessary unless the lubricant has become contaminated with water. If con- taminated with water, the fluid should be changed im- mediately. Appearance Care And Protection From Corrosion
Protection of Body and Paint from Corrosion Vehicle body care requirements vary according to geo- graphic locations and usage. Chemicals that make roads passable in snow and ice, and those that are sprayed on trees and road surfaces during other seasons, are highly corrosive to the metal in your vehicle. Outside parking, which exposes your vehicle to airborne contaminants, road surfaces on which the vehicle is operated, extreme hot or cold weather and other extreme conditions will have an adverse effect on paint, metal trim, and under- body protection. The following maintenance recommendations will enable you to obtain maximum benefit from the corrosion resistance built into your vehicle.
230 MAINTAINING YOUR VEHICLE
What Causes Corrosion? Corrosion is the result of deterioration or removal of paint and protective coatings from your vehicle. The most common causes are: • Road salt, dirt and moisture accumulation. • Stone and gravel impact. • Insects, tree sap and tar. • Salt in the air near seacoast localities. • Atmospheric fallout/industrial pollutants. Washing • Wash your vehicle regularly. Always wash your ve- hicle in the shade using a mild car wash soap, and rinse the panels completely with clear water. • If insects, tar or other similar deposits have accumu- • Use Mopar auto polish to remove road film and stains and to polish your vehicle. Take care never to scratch the paint.
lated on your vehicle, wash it as soon as possible.
• Avoid using abrasive compounds and power buffing that may diminish the gloss or thin out the paint finish.
CAUTION!
Do not use abrasive or strong cleaning materials such as steel wool or scouring powder, which will scratch metal and painted surfaces.
Special Care • If you drive on salted or dusty roads or if you drive near the ocean, hose off the undercarriage at least once a month. • It is important that the drain holes in the lower edges of the doors, rocker panels and rear deck lid be kept clear and open. • If you detect any stone chips or scratches in the paint, touch them up immediately. The cost of such repairs is considered the responsibility of the owner.
• Use Mopar touch up paint on scratches or chips as soon as possible. Your dealer has touch up paint to match the color of your vehicle. • If your vehicle is damaged due to an accident or similar cause which destroys the paint and protective coating have your vehicle repaired as soon as possible. The cost of such repairs is considered the responsibil- ity of the owner. • Aluminum wheels should be cleaned regularly with mild soap and water to prevent corrosion. To remove heavy soil, select a non abrasive, non acidic cleaner. Do not use scouring pads or metal polishes. Avoid auto- matic car washes that use acidic solutions or harsh brushes that may damage the wheels’ protective fin- ish. • Your painted and chrome aluminum wheels should be treated as you would treat the finish on your car. Always use a soft non-abrasive cloth with a mild dish washing soap and water when cleaning your wheels. Never use scouring pads, steel wool or a bristle brush.
MAINTAINING YOUR VEHICLE 231
Never use cleaners that contain acid, oven cleaners or any abrasive metal cleaner as they will cause perma- nent staining and/or corrosion. • If you carry special cargo such as chemicals, fertilizers, deicer salt, etc., be sure that such materials are well packaged and sealed. • If a lot of driving is done on gravel roads, consider
mud or stone shields behind each wheel.
Interior Care Use Mopar Fabric Cleaner to clean fabric upholstery and carpeting. Use Mopar Vinyl Cleaner to clean vinyl or leather uphol- stery. Mopar Vinyl Cleaner is specifically recommended for vinyl trim. Use mild (Ivory Flake) solution to clean all surfaces. Wipe with clear water and soft (lint free) cloth. Do not use cleaners, conditioners and protectants con- taining silicon or bleach as these may cause gloss level increases and/or discoloration.
232 MAINTAINING YOUR VEHICLE
You should not increase the gloss level, especially on top of the instrument panel top surface. Higher gloss levels will increase the reflectivity in the windshield that could decrease visibility under bright light driving conditions.
WARNING!
Do not use volatile solvents for cleaning purposes. Many are potentially flammable, and if used in closed areas they may cause respiratory harm.
Leather Seat Care and Cleaning
CAUTION!
Never use polishes, oils, cleaning fluids, solvents, detergents, or ammonia based cleaners to clean the leather. The leather has already been pretreated. The application of any leather conditioner may damage the factory applied top coat.
Leather is best preserved by regular cleaning with a damp soft cloth. Small particles of dirt can act as an abrasive and damage the leather surface and should be removed immediately with a damp cloth. Stubborn soils can be removed easily with a soft cloth and Mopar Total Clean. Care should be taken to avoid soaking the leather with any liquid. Cleaning Headlights Your vehicle has plastic headlights that are lighter and less susceptible to stone breakage than glass headlights. Plastic is not as scratch resistant as glass and therefore different lens cleaning procedures must be followed. To minimize the possibility of scratching the lenses and reducing light output, avoid wiping with a dry cloth. To remove road dirt, wash with a mild soap solution fol- lowed by rinsing. Do not use abrasive cleaning components, solvents, steel wool or other aggressive material to clean the lenses. Glass Surfaces All glass surfaces should be cleaned on a regular basis with any commercial household-type glass cleaner.
Never use an abrasive type cleaner. Use caution when cleaning inside rear windows equipped with electric defrosters. Do not use scrapers or other sharp instru- ments which may scratch the elements. Instrument Panel Cover The instrument panel cover has a low glare surface which minimizes reflections in the windshield. Do not use protectants or other products which may cause undesir- able reflections. Use soap and warm water to restore the low glare surface. Cleaning Wood Trim Your vehicle’s wood trim requires no specific mainte- nance. Your wood trim can be cleaned as needed using regularly available automotive interior cleaning and pro- tecting products. Using a mild soap and water solution is also acceptable. Excess cleaning materials should be wiped dry with a soft terry cloth. Any harsh detergents, abrasives, abrasive cleaners, cleansers, or chemicals should be avoided, as these will damage the wood trim.
MAINTAINING YOUR VEHICLE 233
Cleaning Plastic Instrument Cluster Lenses The lenses in front of the instruments in this vehicle are molded in clear plastic. When cleaning the lenses, care must be taken to avoid scratching the plastic. • Clean with a wet soft rag. A mild soap solution may be used, but do not use high alcohol content or abrasive cleaners. If soap is used, wipe clean with a clean damp rag.
• Dry with a soft tissue. Seat Belt Maintenance Do not bleach, dye or clean the belts with chemical solvents or abrasive cleaners. This will weaken the fabric. Sun damage will also weaken the fabric. If the belts need cleaning, use a mild soap solution or lukewarm water. Do not remove the belts from the vehicle to wash them. Replace the belts if they appear frayed or worn or if the buckles do not work properly.
234 MAINTAINING YOUR VEHICLE
FUSES
Underhood Fuses (Power Distribution Center)
A Power Distribution Center is located in the engine compartment; near the air cleaner. This information ap- plies to vehicles built without the fuse and relay num- bering embossed on the Power Distribution Center Top Cover. Interior Fuses
Power Distribution Center
Fuse Panel Cover
The fuse access panel is behind the end cover at the left side of the instrument panel. To remove the panel, pull it out, as shown.
The identity of each fuse is indicated on the backside of the cover. Cavity
Circuit Blower Motor
Fuse 30 Amp Green 10 Amp Red 10 Amp Red 15 Amp Blue
10 Amp Red
Right High Beam Headlight, High Beam Indicator Left High Beam Headlight
Power Door Lock Switch Illu- mination, Transmission Range Switch, Daytime Running Light Module (Canada), Power Windows, Anti-lock Brake Sys- tem Module Power Door Lock and Door Lock Arm/Disarm Switches, Vanity, Reading, Map, Rear Seating, Ignition, and Trunk Lights, Illuminated Entry, Ra- dio, Power Antenna, Data Link Connector, Body Control Module, Power Amplifier
Cavity
10
11
12
13
14
Fuse 10 Amp Red 20 Amp Yellow 20 Amp Yellow 15 Amp Blue 20 Amp Yellow 10 Amp Red
10 Amp Red 20 Amp Yellow 10 Amp Red
MAINTAINING YOUR VEHICLE 235
Circuit Heated Rear Window Indica- tor Instrument cluster illumina- tion, Park and tail Lights Power Receptacle, Horns, Igni- tion, Fuel, Start Power Door Lock Motors (Body Control Module) Daytime Running Light Mod- ule (Canada) Instrument Cluster, Transmis- sion Control, Park/Neutral Switch, Body Control Module Left Low beam Headlight
Right Low Beam Headlight, Fog Light Switch Radio
VEHICLE STORAGE If you are leaving your vehicle dormant for more than 21
days you may want to take steps to protect your battery. You may: • Disconnect the negative cable from the battery. • Anytime you store your vehicle, or keep it out of service (i.e. vacation) for two weeks or more, run the air conditioning system at idle for about five minutes in the fresh air and high blower setting. This will insure adequate system lubrication to minimize the possibility of compressor damage when the system is started again.236 MAINTAINING YOUR VEHICLE
Cavity 15
16
17
1819
Fuse 10 Amp Red
10 Amp Red 10 Amp 20 Amp C/BRKR 30 Amp C/BRKR
Circuit Turn Signal and Hazard Flash- ers, Wiper Switch, Seat Belt Control Module, Wiper Relays, Rear Window Defroster Relay Airbag Control Module
Airbag Control Module Power Seat Switch, Remote Trunk Release Power Windows
CAUTION!
When replacing a blown fuse, it is important to use only a fuse having the correct amperage rating. The use of a fuse with a rating other than indicated may result in a dangerous electrical system overload. If a properly rated fuse continues to blow, it shows a problem in the circuit that must be corrected.
MAINTAINING YOUR VEHICLE 237
BULB REPLACEMENT
Headlight Bulb Replacement
1. Open the hood and remove the two headlight mount- ing screws.
REPLACEMENT LIGHT BULBS
LIGHT BULBS — Interior Bulb Number Instrument Cluster . . . . . . . . . . . . . . . . . . . . . PC 194
ABS Lamp . . . . . . . . . . . . . . . . . . . . . . . . . . . PC 161
Fog Light Indicator. . . . . . . . . . . . . . . . . . . . . PC 161
Dome Light . . . . . . . . . . . . . . . . . . . . . . . . . . . . 578
Front Reading/Map Lights. . . . . . . . . . . . . . . . . . 906
Trunk Light . . . . . . . . . . . . . . . . . . . . . . . . . . . . 562
Climate Control Light . . . . . . . . . . . . . . . . . . . . . . 37
Traction Control Light . . . . . . . . . . . . . . . . . . . PC161LIGHT BULBS — Exterior Bulb Number Headlight . . . . . . . . . . . . . . . . . . . . . . . . . . . . . 9007
Park/Turn Signal (Front) . . . . . . . . . . . . . . . . . 3157A Side / Marker (Front) . . . . . . . . . . . . . . . . . . . . . 168
Fog Light . . . . . . . . . . . . . . . . . . . . . . . . . . . . . 880L Tail/Stop/Turn Signal . . . . . . . . . . . . . . . . . . . . 3157
Back Up Light. . . . . . . . . . . . . . . . . . . . . . . . . . . 921
Center Stop Light . . . . . . . . . . . . . . . . . . . . . . . . 921
License Light. . . . . . . . . . . . . . . . . . . . . . . . . . . 2825238 MAINTAINING YOUR VEHICLE
2. Remove the push-in fasteners by prying under the head of the fasteners with a flat bladed tool.
3. Gently pry the headlight assembly away from the fender as shown in the picture. This will free the ball stud from its retainer in the fender. Pull the headlight assem- bly away from the vehicle.
MAINTAINING YOUR VEHICLE 239
6. If the bulb comes in contact with any oily surface, clean the bulb with rubbing alcohol. 7. Reinsert the bulb and socket assembly and turn the retaining ring clockwise to secure the bulb. 8. Reinstall the headlight assembly. Park, Turn Signal, Sidemarker Bulb Replacement
1. Open the hood and remove the two headlight assem- bly mounting screws. Pull the headlight assembly away from the vehicle.
4. Turn the retaining ring counterclockwise and remove the bulb and socket assembly.
5. Pull the bulb out of the socket and replace the bulb.
CAUTION!
Do not touch the new bulb with your fingers. Oil contamination will severely shorten bulb life.
240 MAINTAINING YOUR VEHICLE
2. Turn the bulb socket counterclockwise and remove the bulb and socket assembly.
Fog Light Bulb Replacement
1. Remove the screws securing the light assembly to the front fascia.
3. Pull the bulb out of the socket, replace the bulb, and reinstall the bulb and socket to the headlight assembly. Reinstall the headlight assembly.
2. Pull the light assembly away from the vehicle to expose the bulb and socket assembly. 3. Disconnect the wiring connector from the bulb and socket assembly.
4. Turn the bulb and socket assembly counterclockwise to remove it from the housing.
MAINTAINING YOUR VEHICLE 241
Center Stoplight Bulb Replacement
1. Open the trunk. Turn the bulb socket counterclockwise to remove it from the housing.
5. Install the new bulb and socket assembly, reattach the wiring connector, and reinstall the fog light assembly.
2. Pull the bulb out of the socket, replace the bulb and reinstall the bulb and socket assembly.
242 MAINTAINING YOUR VEHICLE
Rear Light Bulb Replacement
1. Open the trunk and pull the trunk liner away to expose the wiring connector and light housing plastic retainers.
2. Disconnect the wiring connector and remove the plas- tic retainers. Remove the light housing from the vehicle.
3. Turn the bulb socket counterclockwise to remove it from the housing. Remove and replace the bulb then reinstall the bulb and socket assembly. 4. Reinstall the light housing and reconnect the wiring connector. Push the trunk liner back into place. License Plate Bulb Replacement
1. Locate both small slots on the outboard side of the license lamp. Using a small screwdriver, remove the entire housing. 2. Turn the bulb socket counterclockwise to remove it from the housing. Pull the bulb out of the socket. Replace the bulb and snap it back into place on the housing of the chrome appliqué.
Headlight Aiming The headlights on your new vehicle were aimed at the factory. The factory setting was made at a no load setting. A great increase in weight will change the aiming and it may be necessary to readjust the headlights if carrying an excessive amount of weight in the trunk, rear seats or pulling a trailer. To readjust the headlights first mark the position of the headlights on a wall prior to loading the vehicle. Load the vehicle and then readjust the headlights to the original position. If any further adjustments are necessary contact your manufacturer’s dealer. A detailed service procedure is contained in the manufacturer’s Service Manual. Information on purchasing a Service Manual can be found at the back of this Owner’s Manual.
MAINTAINING YOUR VEHICLE 243
FLUIDS AND CAPACITIES
Fuel (approximate) 2.4 and 2.7 Liter Engines (87
Octane)
Engine Oil-With Filter 2.4 and 2.7 Liter Engines (Re- fer to the engine oil fill cap for the correct SAE grade)
Cooling System *
2.4 Liter Engines* (Mopar威 Antifreeze/Coolant 5 Year/
100,000 Mile Formula)
2.7 Liter Engines (Mopar威 Antifreeze/Coolant 5 Year/
100,000 Mile Formula)
* Includes 1 qt. for coolant tank.
U.S.
Metric
16 Gallons
61 Liters
5 qts.
4.7 Liters
8 qts.
7.5 Liters
9.5 qts.
9.0 Liters
244 MAINTAINING YOUR VEHICLE
RECOMMENDED FLUIDS, LUBRICANTS AND GENUINE PARTS Engine Component Engine Coolant
Fluid, Lubricant, or Genuine Part Mopar威 Antifreeze/Coolant 5 Year/100,000 Mile Formula HOAT (Hybrid Or- ganic Additive Technology) Use API Certified engine oil. SAE 5W-20 and SAE 5W-30 are recommended. Refer to the engine oil fill cap for the correct SAE grade meeting DaimlerChrysler Material Standard MS-6395. Refer to the Vehicle Emission Control Information label under the engine hood. Mopar威 Oil Filter (P/N 4105409) or equivalent. Mopar威 Oil Filter (P/N 5281090) or equivalent. 87 Octane
Fluid, Lubricant, or Genuine Part Mopar威 ATF+4 Automatic Transmission Fluid. Mopar威 Brake Fluid DOT 3 Motor Vehicle. Mopar威 ATF+4 Automatic Transmission Fluid. Mopar威 Multi-Purpose Lubricant NLGI Grade 2.
Engine Oil
Spark Plugs
Oil Filter (2.4L Engine) Oil Filter (2.7L Engine) Fuel Selection Chassis Component Automatic Transaxle Brake Master Cylinder Power Steering Reservoir Steering Gear & Linkage, Ball Joints, Prop Shafts & Yokes, Wheel Bearings
MAINTENANCE SCHEDULES
CONTENTS
䡵 Emission Control System Maintenance . . . . . . 246
䡵 Partial Zero Emissions Vehicle (PZEV) For 2.4L — If Equipped . . . . . . . . . . . . . . . . . . . . . . . . . . 246
䡵 Maintenance Schedules . . . . . . . . . . . . . . . . . . 247▫ Schedule “B” . . . . . . . . . . . . . . . . . . . . . . . . 250
▫ Schedule “A” . . . . . . . . . . . . . . . . . . . . . . . . 260M
246 MAINTENANCE SCHEDULES
EMISSION CONTROL SYSTEM MAINTENANCE The “Scheduled” maintenance services, listed in bold type must be done at the times or mileages specified to assure the continued proper functioning of the emission control system. These, and all other maintenance services included in this manual, should be done to provide best vehicle performance and reliability. More frequent main- tenance may be needed for vehicles in severe operating conditions such as dusty areas and very short trip driving. Inspection and service also should be done any time a malfunction is suspected. NOTE: Maintenance, replacement, or repair of the emission control devices and systems on your vehicle may be performed by any automotive repair establish- ment or individual using any automotive part which has been certified pursuant to U.S. EPA or, in the State of California, California Air Resources Board regulations.
Partial Zero Emissions Vehicle (PZEV) for 2.4L — If Equipped
If the 8th digit of the vehicle identification NOTE: number (VIN) contains a ⬙J⬙ then your vehicle is equipped with the Partial Zero Emissions Vehicle (PZEV) package in order to meet the state of California’s PZEV emissions standard.
Vehicle Identification Number
NOTE: There are specific instructions regarding when to change the ignition cables and spark plugs with the PZEV package in this section. This applies to both maintenance schedule A and B and will be marked with an ** or ***.
MAINTENANCE SCHEDULES
There are two maintenance schedules that show the required service for your vehicle. First is Schedule “B”. It is for vehicles that are operated under the conditions that are listed below and at the beginning of the schedule. • Day or night temperatures are below 32° F (0° C). • Stop and go driving. • Extensive engine idling. • Driving in dusty conditions. • Short trips of less than 10 miles (16 km). • More than 50% of your driving is at sustained high
speeds during hot weather, above 90° F (32° C).
MAINTENANCE SCHEDULES 247
• Trailer towing.〫 • Taxi, police, or delivery service (commercial ser- • Off-road or desert operation. • If equipped for and operating with E-85 (ethanol)
vice).〫
fuel.
If ANY of these apply to you then change your NOTE: engine oil every 3,000 miles (5,000 km) or 3 months, whichever comes first and follow schedule B of the “Maintenance Schedules” section of this manual. IF ANY of these apply to you then flush and NOTE: replace the engine coolant every 100,000 miles (160,000
km) or 60 months, whichever comes first, and follow schedule B of the ⬙Maintenance Schedules⬙ section of this manual. NOTE: Most vehicles are operated under the conditions listed for Schedule ⬙B⬙. Second is Schedule “A”. It is for vehicles that are not operated under any of the conditions listed under Sched- ule ⬙B⬙.M
248 MAINTENANCE SCHEDULES
Use the schedule that best describes your driving condi- tions. Where time and mileage are listed, follow the interval that occurs first. NOTE: Under no circumstances should oil change intervals exceed 6 months or 6,000 miles, whichever comes first.
CAUTION!
Failure to perform the required maintenance items may result in damage to the vehicle.
At Each Stop for Fuel • Check the engine oil level about 5 minutes after a fully warmed engine is shut off. Checking the oil level while the vehicle is on level ground will improve the accu- racy of the oil level reading. Add oil only when the level is at or below the ADD or MIN mark.
• Check the windshield washer solvent and add if
required.
damage.
as required.
Once a Month • Check tire pressure and look for unusual wear or • Inspect the battery and clean and tighten the terminals • Check the fluid levels of coolant reservoir, brake • Check all lights and all other electrical items for correct • Check rubber seals on each side of the radiator for
master cylinder, and transaxle and add as needed.
operation.
proper fit.
At Each Oil Change • Change the engine oil filter. • Inspect the exhaust system. • Inspect the brake linings, hoses and calipers. • Inspect the CV joints and front and rear suspension • Check the automatic transmission fluid level.
components.
MAINTENANCE SCHEDULES 249
• Check the brake master cylinder fluid level. • Check the coolant level, hoses, and clamps. In 2.7L Engines equipped with Flex Fuel Engine NOTE: (FFV), change engine oil every 5 months or 5,000 miles, whichever comes first. This applies to both Maintenance Schedule A and B.
M
250 SCHEDULE “B”
SCHEDULE “B” Follow schedule “B” if you usually operate your vehicle under one or more of the following conditions. Change the automatic transmission fluid and filter every 60,000
miles (96 000 km) if the vehicle is usually operated under one or more of the conditions marked with an 〫. • Day or night temperatures are below 32° F (0° C). • Stop and go driving. • Extensive engine idling. • Driving in dusty conditions. • Short trips of less than 10 miles (16.2 km). • More than 50% of your driving is at sustained high • Trailer towing.〫speeds during hot weather, above 90° F (32° C).
vices).〫
• Taxi, police or delivery service (commercial ser- • Off-road or desert operation. • If equipped for and operating with E-85 (ethanol)
fuel.
If ANY of these apply to you then change your NOTE: engine oil every 3,000 miles (5 000 km) or 3 months, whichever comes first and follow schedule “B” of the ⬙Maintenance Schedules⬙ section of this manual. IF ANY of these apply to you then flush and NOTE: replace the engine coolant every 100,000 miles (160,000
km) or 60 months, whichever comes first, and follow schedule B of the ⬙Maintenance Schedules⬙ section of this manual.SCHEDULE “B” 251
Miles (Kilometers) Change engine oil and engine oil filter, if not replaced at 3 months. Inspect the air cleaner filter and replace if necessary.* Inspect the front and rear brake pads, linings, rotors, rear drums and shoes. Rotate the tires.
3,000
(5 000)6,000
(10 000)9,000
(14 000)12,000
(19 000)15,000
(24 000)18,000
(29 000)M
252 SCHEDULE “B”
Miles (Kilometers) Change engine oil and engine oil filter, if not replaced at 3 months. Inspect the air cleaner filter and replace if re- quired.* Replace the air cleaner filter. Inspect and check tension for power steering belt (2.4 Liter Engine). Adjust or replace if re- quired. Inspect the front and rear brake pads, linings, rotors, rear drums and shoes. Check and replace, if necessary, the PCV valve. * Replace the spark plugs on 2.4 liter engine. ** Rotate the tires.
21,000
(34 000)24,000
(38 000)27,000
(43 000)30,000
(48 000)33,000
(53 000)36,000
(58 000)SCHEDULE “B” 253
Miles (Kilometers) Change engine oil and engine oil filter, if not replaced at 3 months. Inspect the air cleaner filter and replace if necessary.* Inspect the front and rear brake pads, linings, rotors, rear drums and shoes. Rotate the tires.
39,000
(62 000)42,000
(67 000)45,000
(72 000)48,000
(77 000)51,000
(82 000)54,000
(86 000)M
254 SCHEDULE “B”
Miles (Kilometers) Change engine oil and engine oil filter, if not re- placed at 3 months. Inspect the air cleaner filter and replace if neces- sary.* Replace the air cleaner filter. Inspect and check tension for power steering belt (2.4 Liter Engine). Adjust or replace if required. Inspect the front and rear brake pads, linings, ro- tors, rear drums and shoes. Replace the ignition cables on 2.4 liter engine. ** Replace the accessory drive belts on the 2.7 liter engine. Replace the spark plugs on the 2.4 liter engine. ** Check and replace, if necessary, the PCV valve. *‡ Change the automatic transmission fluid and fil- ter.〫 Rotate the tires. Flush and replace engine coolant at 60 months, if not done at 100,000 miles.
57,000
(91 000)60,000
(96 000)66,000
63,000
(101 000) (106 000)69,000
(110 000)72,000
(115 000)Miles (Kilometers) Change engine oil and engine oil filter, if not replaced at 3 months. Inspect the air cleaner filter and replace if necessary.* Replace the air cleaner filter. Inspect and check tension for power steering belt (2.4 Liter Engine). Adjust or replace if re- quired. Replace the engine timing belt on 2.4 liter engine. * Inspect the front and rear brake pads, linings, rotors, rear drums and shoes. Replace the spark plugs on 2.4 liter engine. ** Check and replace, if necessary, the PCV valve. *‡ Rotate the tires.
75,000
(120 000)78,000
(125 000)81,000
(130 000)84,000
(134 000)87,000
(139 000)90,000
(144 000)SCHEDULE “B” 255
M
256 SCHEDULE “B”
Miles (Kilometers) Change engine oil and engine oil filter, if not replaced at 3 months. Inspect the air cleaner filter and replace if necessary.* Replace the spark plugs on the 2.4 liter en- gine. *** Replace the ignition cables on the 2.4 liter en- gine. *** Inspect the front and rear brake pads, linings, rotors, rear drums and shoes. Replace the spark plugs on the 2.7 liter en- gine. Check and retension accessory drive belts on 2.7 liter engine. Replace the accessory drive belts on 2.4 liter engine. Rotate the tires. Flush and replace the engine coolant, if not replaced at 60 months.
93,000
(149 000)96,000
(154 000)99,000
(158 000)100,000
(160 000)102,000
(163 000)105,000
(168 000)Miles (Kilometers) Change engine oil and engine oil filter, if not replaced at 3 months. Inspect the air cleaner filter and replace if necessary.* Replace the air cleaner filter. Replace the spark plugs on the 2.4 liter en- gine. ** Replace the ignition cables on the 2.4 liter en- gine. ** Inspect the front and rear brake pads, linings, rotors, rear drums and shoes. Replace the accessory drive belts on 2.7 liter engine. Check and replace, if necessary, the PCV valve. * Change the automatic transmission fluid and filter.〫 Flush and replace engine coolant at 120
months, if not done at 100,000 miles. Rotate the tires.108,000
(174 000)111,000
(179 000)114,000
(183 000)117,000
(188 000)120,000
(193 000)123,000
(198 000)SCHEDULE “B” 257
258 SCHEDULE “B”
Miles (Kilometers) Change engine oil and engine oil filter, if not replaced at 3 months. Inspect the air cleaner filter and replace if necessary.* Inspect and check tension for power steering belt (2.4 Liter Engine). Adjust or replace if re- quired. Inspect the front and rear brake pads, linings, rotors, rear drums and shoes. Rotate the tires.
126,000
(203 000)129,000
(208 000)132,000
(212 000)135,000
(217 000)138,000
(222 000)141,000
(227 000)Miles (Kilometers) Change engine oil and engine oil filter, if not replaced at 3
months. Inspect the air cleaner filter and replace if necessary.* Replace the air cleaner filter. Replace the spark plugs on the 2.4 liter engine. ** Inspect the front and rear brake pads, linings, rotors, rear drums and shoes. Check and replace, if necessary, the PCV valve. *‡ Rotate the tires. * This maintenance is recommended by the manufacture to the owner but is not required to maintain the emis- sions warranty. ** Except for the 2.4 liter Partial Zero Emissions Vehicle (PZEV). *** 2.4 liter PZEV only.SCHEDULE “B” 259
144,000
(232 000)147,000
(237 000)150,000
(241 000)‡ This maintenance is not required if previously replaced. Inspection and service should also be performed anytime a malfunction is observed or suspected. Retain all re- ceipts.
260 SCHEDULE “A”
SCHEDULE “A” Miles (Kilometers) [Months] Change engine oil and engine oil filter. Inspect the air cleaner filter and replace if necessary.* Replace the air cleaner filter. Replace the spark plugs on 2.4 liter engine. ** Inspect the front and rear brake pads, linings, rotors, rear drums and shoes. Rotate the tires.
6,000
(10 000)12,000
(19 000)18,000
(29 000)24,000
(38 000)30,000
(48 000)36,000
(58 000)[6]
[12]
[18]
[24]
[30]
[36]
42,000
(67 000)48,000
(77 000)54,000
(86 000)60,000
(96 000)66,000
(106 000)72,000
(115 000)SCHEDULE “A” 261
[60]
[66]
Miles (Kilometers) [Months] Change engine oil and engine oil filter. Inspect the air cleaner filter and replace if required.* Replace the air cleaner filter. Inspect and check tension for power steering belt (2.4 Liter Engine). Adjust or replace if re- quired. Inspect the front and rear brake pads, linings, rotors, rear drums and shoes. Replace the spark plugs on 2.4 liter engine. ** Flush and replace the engine coolant at 60
months, if not done at 100,000 miles. Check and replace, if necessary, the PCV valve. * Replace the ignition cables on 2.4 liter en- gine. ** Replace the accessory drive belts in 2.7 liter engine. Rotate the tires.[42]
[48]
[54]
[72]
M
262 SCHEDULE “A”
Miles (Kilometers) [Months] Change engine oil and engine oil filter. Inspect the air cleaner filter and replace if required.* Replace the air cleaner filter. Inspect the front and rear brake pads, linings, rotors, rear drums and shoes. Replace the spark plugs on 2.4 liter en- gine. ** Replace the spark plugs on 2.7 liter en- gine. Check and replace, if necessary, the PCV valve. *‡ Check and retension alternator drive belts on 2.7 liter engine. Replace the accessory drive belts on 2.4L engine. Replace the ignition cables on 2.4 liter engine. ***
78,000
(125 000)84,000
(134 000)90,000
(144 000)96,000
(154 000)100,000
(160 000)102,000
(163 000)105,000
(168 000)[78]
[84]
[90]
[96]
[102]
[105]
Miles (Kilometers) [Months] Replace the spark plugs on 2.4 liter en- gine. *** Flush and replace the engine coolant, if not replaced at 60 months. Rotate the tires.
SCHEDULE “A” 263
78,000
(125 000)84,000
(134 000)90,000
(144 000)96,000
(154 000)100,000
(160 000)102,000
(163 000)105,000
(168 000)[78]
[84]
[90]
[96]
[102]
[105]
M
264 SCHEDULE “A”
Miles (Kilometers) [Months] Change engine oil and engine oil filter. Inspect the air cleaner filter and replace if required.* Replace the air cleaner filter. Inspect the front and rear brake pads, linings, rotors, rear drums and shoes. Replace the spark plugs on 2.4 liter engine. ** Check and replace, if necessary, the PCV valve. *‡ Replace the engine timing belt on 2.4 liter engine.** Replace the accessory drive belts in 2.7 liter engine. Replace the ignition cables on 2.4 liter en- gine. ** Flush and replace engine coolant at 120
months, if not done at 100,000 miles. Rotate the tires.108,000
(174 000)[108]
114,000
(183 000)[114]
120,000
(193 000)126,000
(203 000)132,000
(212 000)138,000
(222 000)[120]