- Download PDF Manual
-
See your dealer if the default presets are not functioning properly.
3. The PTO indicator light will not initially reflect the status of the PTO load until the PTO load relay is wired into the system. The PTO load relay output is enabled as a factory default. When the PTO indicator light is either blinking or on solid, the PTO relay output will be activated.
Preset Enable Conditions – Remote Operation Requires programming with the GM Service Tool and remote switch panel provided by Upfitter. 1. Confirm that cruise control
is off.
2. Turn the engine off. The
ignition key can be removed and the vehicle can be locked, if desired.
3. Set the parking brake and shift the transmission into P (Park).
4. Be sure that the hood is
closed.
Driving and Operating
73
5. From outside the vehicle, press
and release the PTO Remote Arm Switch.
6. Within five seconds, open and close the PTO Remote Engine Start/Shutdown switch.
7. The horn will chirp, and then
engine starting will be automatically initiated. The PTO system will then elevate engine rpm to PTO Standby Speed and engage the PTO load relay.
8. The PTO Remote Set switch
can now be used to accomplish the PTO Set 1 and Set 2
Engine speeds. The accelerator pedal is disabled when Remote PTO operation is selected.. The PTO load relay engages
immediately when the PTO operation is initiated by the switch input. The transmission torque converter is unlocked. The torque converter will lock upon reaching stable PTO
Chevrolet/GMC Duramax Diesel Supplement (GMNA-Localizing-U.S/Canada- 9234763) - 2016 - crc - 10/5/15
74
Driving and Operating
Standby Speed (default = 900
rpm) so maximum power is available.. The first elevated engine speed,
PTO Standby Speed, is not intended as a working speed but as a verification that the system is active and ready to go to a working speed. This speed can be modified to a working speed with the GM Service Tool. The upper limit for PTO Standby Speed is 1500 rpm.
. The remote switches and relay
connections are made at the PTO Upfitter Connector located on the chassis frame behind the cab.
. The PTO Control setting on the
Service Tool must be programmed to “Remote PTO Mode Switch” before the remote switches can be used.
. The PTO relay is programmed to be enabled in the factory default configuration.
. Refer to the service manual or
go to the Upfitter Integration website www.gmupfitter.com for details and advanced programming features.
Variable PTO Variable Enable Conditions – In-Cab Operation To enable PTO: 1. With the engine running, shift the vehicle into P (Park) and set the parking brake. Do not press the brake pedal.
2. Press and release the PTO
In-cab switch below the climate controls in the center stack. The PTO indicator will blink rapidly until the PTO load relay becomes engaged and will then be on steady. The engine will advance to the PTO Standby Speed.
3. Once PTO Standby Speed is
reached, the cruise control -/SET and +/RES buttons can be used to tap up and tap down the engine speed. Factory setting for the tap step
is 100 rpm and the setting for the ramp rate is 150 rpm/sec. The GM Service Tool can enable the capability to change the default value for tap step via the Radio Customization menu. The default values for both tap step and for ramp rate can be changed with the GM Service Tool. The accelerator pedal is disabled, and cannot be used to control PTO engine speed.
Variable Enable Conditions – Remote Operation Requires programming with the GM Service Tool and the appropriate remote switch panel provided by Upfitter. 1. Confirm that cruise control
is off.
2. Turn off the engine. The key can be removed and vehicle locked, if desired.
3. Set the parking brake and shift the transmission into P (Park).
4. The hood must be closed.
Chevrolet/GMC Duramax Diesel Supplement (GMNA-Localizing-U.S/Canada- 9234763) - 2016 - crc - 10/5/15
5. From outside the vehicle, press
and release the PTO Remote Arm Switch.
6. Within five seconds, open and close the PTO Remote Engine Start/Shutdown switch.
7. The horn will chirp, and then
engine starting will be automatically initiated. The PTO system will then elevate engine rpm to PTO Standby Speed and engage the PTO load relay.
8. The desired engine operating
speed can now be accomplished. Two versions of engine rpm control are available, switches or potentiometer, depending on which one was installed. . Switches – the PTO
Remote Set and Resume switches can be used to tap up and tap down to the desired engine speed. . Potentiometer – a PTO
Remote Throttle Potentiometer can be used
as a continuous variable throttle control to dial in the desired engine speed. ‐ The PTO load relay engages
immediately when the PTO operation is initiated by the switch input. The transmission torque converter is unlocked. The torque converter will lock upon reaching stable PTO Standby Speed (default = 900 rpm) so maximum power is available.
‐ The first elevated engine speed,
PTO Standby Speed, is not intended as a working speed but as a verification that the system is active and ready to go to a working speed.
‐ The remote switches, remote
throttle (if used), and relay connections are made at the PTO Upfitter Connector located on the chassis frame behind the cab.
‐ The engine speeds can be
adjusted between the low of PTO Standby Speed and the high of PTO Max Engine speed limits.
Driving and Operating
75
Both values can be modified from the factory default settings with the GM Service Tool.
‐ Factory setting for the tap step is 100 rpm and the setting for ramp rate is 150 rpm/sec. The default value for tap step can be modified via the Radio Customization menu. The default values for both tap step and ramp rate can be changed with the GM Service Tool.
‐ The PTO Control setting must be
programmed to “Remote PTO Mode Switch” with the GM Service Tool.
‐ The potentiometer option for
controlling PTO engine speed is selected with the GM Service Tool by setting the Remote PTO switch.
‐ The PTO load relay is “enabled”
as the factory default programmed setting.
‐ Refer to the service manual or go to the Upfitter Integration website www.gmupfitter.com for details.
Chevrolet/GMC Duramax Diesel Supplement (GMNA-Localizing-U.S/Canada- 9234763) - 2016 - crc - 10/5/15
76
Driving and Operating
Mobile PTO Mobile Enable Conditions – In-Cab Operation Only Requires programming with the GM Service Tool. 1. The engine must be running. 2. PARK brake must be released. 3. Confirm that cruise control
is off.
4. Engine rpm must be less than
1500 rpm.
5. Shift the transmission to M1,
M2, or M3.
6. Tap the brake pedal and then do not press the brake pedal.
7. Press and release the PTO
In-cab switch below the center console. Then within 10 seconds press and release the cruise control +/RES button (The PTO indicator light will blink slowly between button presses). The PTO indicator light will then blink rapidly until the PTO load becomes engaged, and then come on steady. The engine speed will
remain at the current throttle setting or advance to PTO Standby Speed, whichever value is greater. If the engine rpm is above 1500 rpm, the PTO relay will not engage until the engine rpm drops below 1500 rpm.
8. Once engaged, if additional
engine speed is desired, use either the cruise control buttons or the accelerator pedal to temporarily adjust the engine speed. ‐ The cruise control +/RES
button can be used to tap up, or if continuously held to ramp up, to the desired operating speed. The cruise control -/SET button can be used to tap down or coast down if continuously held to the desired engine speed. Top limit is PTO Max Engine Speed, default 2100 rpm and programmable to 3100 rpm. Lower limit is PTO Standby Speed, default 900 rpm with program range from base idle to 900 rpm.
‐ The accelerator pedal can be
used to achieve the desired speed. When the desired speed is reached, the cruise control -/SET button would be used to capture and maintain that speed. Normal tap up and tap down can then be used to fine tune the setting.
In Mobile PTO mode, the vehicle speed achieved is the result of the current engine speed requested and the transmission gear range selected. When the vehicle is placed in M2 or M3, the vehicle will upshift according to engine rpm set point, and vehicle speed will increase. To prevent upshifts and maintain lower vehicle speeds, place the vehicle in M1.
Chevrolet/GMC Duramax Diesel Supplement (GMNA-Localizing-U.S/Canada- 9234763) - 2016 - crc - 10/5/15
PTO System Disengage Conditions Preset or Variable Stationary Modes – In-Cab Operation To disengage PTO, do one of the following: . Press the brake pedal. The
engine returns to base idle, but the PTO load relay remains engaged. The PTO indicator light will blink slowly indicating that a PTO set speed is still stored in memory. Upon releasing the brake, the factory default programming is for the engine speed to remain at curb idle. A press and release of the cruise control +/RES button will restore engine rpm to the last PTO set speed. The PTO system can also be programmed to return engine rpm to the PTO Standby Speed setting.
. Press the cruise control Cancel
button. The engine returns to base idle, but the PTO load relay remains engaged. The PTO indicator light will blink slowly indicating that a PTO set speed
is still stored in memory. Activating the cruise control +/RES button will restore engine rpm to the last PTO set speed.
. Press and release the PTO In-cab switch. The PTO load relay disengages and the engine returns to base idle. The PTO indicator light will turn off, indicating the PTO load relay is disengaged and the stored set speed has been cleared from memory.
Stationary Modes (Preset or Variable) – Remote Control To disengage PTO: . Open the PTO Remote Engine
Start/Shutdown switch. Load relay disengages and the engine will stop. If equipped, press the PTO Emergency Stop Switch. See www.gmupfitter.com. Load relay disengages and the engine will stop.
Stationary Modes will also disengage if: . Vehicle movement is detected.
Driving and Operating
77
. The parking brake is released. . The transmission is shifted out
of P (Park).
. The ignition is cycled from RUN
to OFF.
. The PTO feedback signal is lost indicating the load is disengaged if used. See the Upfitter Reference Document.
. Cruise control becomes enabled.
Timed auto-engine shutdown: This feature will shut down the engine automatically after a predefined time. PTO must be operational for this function to be active.
. Engine shutdown based on
critical engine or PTO system fault conditions: This feature will shut down the engine when PTO is operating if a critical engine condition such as low oil, low oil pressure, hot engine, hot transmission, low fuel, or diesel particulate filter regeneration is detected by the vehicle system. If PTO operation is continued when critical engine conditions
Chevrolet/GMC Duramax Diesel Supplement (GMNA-Localizing-U.S/Canada- 9234763) - 2016 - crc - 10/5/15
78
Driving and Operating
are present, a horn chirp warning will occur after 30– 60 seconds. The engine will shut down two minutes after the horn warning. The engine can be restarted with the ignition key or with the PTO remote engine start controls. The horn warning and engine shutdown will again occur if the critical engine condition is still present.
Resume memory speed is cleared for the above actions. When PTO remote engine starting has been initialized with the ignition key in the RUN position, the shift lever will remain locked if the brake pedal is pressed and a shift from P (Park) is attempted while the engine is running and PTO is active (stand-by mode). A shift out of P (Park) will not be allowed until one of the following actions is taken by the vehicle operator: . Press the PTO Remote Engine
Start/Shutdown switch.
. Press the cruise control On
button.
. Release the parking brake. Mobile Mode To disengage PTO: . Press the brake pedal. The PTO
system releases control of engine speed, but the PTO load relay remains engaged. The engine will return to base idle unless the accelerator pedal is pressed. The PTO load relay remains engaged. The PTO indicator light will blink slowly indicating that a PTO set speed is still stored in memory. Upon releasing the brake, the factory default programming is for the engine speed to remain at curb idle awaiting an input from the cruise control +/RES button to restore engine rpm to the last PTO set speed. The system can also be programmed to return engine rpm to the PTO Standby Speed setting.
. Press the cruise control Cancel
button. The engine returns to base idle; but the PTO load relay remains engaged. The PTO indicator light will blink slowly
indicating that a PTO set speed is still stored in memory. Pressing the cruise control +/RES button will restore engine rpm to the last PTO set speed.
. Press the PTO In-cab switch.
Load relay disengages and the engine returns to base idle. The PTO telltale will turn off, indicating the PTO load relay is disengaged and the stored set speed has been cleared from memory.
Mobile Mode will also disengage if:
If PTO feedback input is lost, the engine speed is returned to the PTO Standby speed setting and the load is still engaged.
. Vehicle Speed exceeds Max
Vehicle Speed. Factory default setting = 93 km/h (58 mph). . Engine Speed exceeds Max Engine Speed for more than 15 seconds. Factory default setting = 2100 rpm.
. The cruise control On/Off button
is on.
Chevrolet/GMC Duramax Diesel Supplement (GMNA-Localizing-U.S/Canada- 9234763) - 2016 - crc - 10/5/15
. The parking brake is applied. . The shift lever is moved out of
manual shift selection, M1, M2, or M3.
Resume memory speed is cleared for the above actions. Although the PTO system attempts to limit accelerator and PTO switch inputs to comply with maximum speed and/or rpm parameters, some vehicle operating conditions such as downhill acceleration can cause the vehicle speed or engine rpm to exceed these limits. In those cases, the PTO system may disengage. Prolonged or Extended PTO Operation When operating the vehicle in stationary PTO mode, the Diesel Particulate Filter (DPF) will continue to filter the exhaust and accumulate soot. The engine control system, depending on the speed and load being applied by the PTO, may not be able to generate enough energy or adequate heat needed to clean or regenerate the DPF. Continued operation under conditions that do
not allow effective regeneration or cleaning will eventually plug the DPF and result in reduced power. The ENGINE POWER IS REDUCED Driver Information Center (DIC) message and malfunction indicator lamp will be displayed, and dealer service will be required to return the vehicle to normal, full power operation. To prevent this from occurring, frequently monitor the vehicle during PTO operation, paying particular attention to the CLEAN EXHAUST FILTER SEE OWNER MANUAL NOW DIC warning message. If the DIC message is displayed during PTO operation, see Diesel Particulate Filter 0 38 for information on how to clean or regenerate the DPF. PTO Operational Speed Control Variable PTO operational speed control provides the following functions: Cruise Control -/SET Button (In-Cab) or Remote PTO Set 1
SwitchDriving and Operating
79
SET : Press and hold the accelerator to obtain the desired engine speed, then press and release the -/SET button on the cruise control. The current engine speed will be maintained. This action can be repeated as desired to a higher rpm value. The PTO set speed cannot exceed 3100 rpm (Mobile PTO only). TAP-DOWN : Press and release the -/SET button on the cruise control to reduce the engine speed by increments of 100 rpm. The tap down engine speed increments can be adjusted by the GM Service Tool. The Service Tool can enable the option for adjustment of tap down engine speed increments through the Radio Customization menu. COAST : Press and hold the -/SET button on the cruise control to reduce the rpm at 150 rpm per second until the desired engine speed is reached or until the initial PTO Standby Speed is reached.
Chevrolet/GMC Duramax Diesel Supplement (GMNA-Localizing-U.S/Canada- 9234763) - 2016 - crc - 10/5/15
speed is reached or until the maximum allowable PTO set speed is reached. Alternatively, the engine speed acceleration can be adjusted through the Radio Customization menu. Factory Preset Parameters The following table lists the factory preset parameters. These may be altered by the GM Service Tool to configure the various PTO features.
80
Driving and Operating
In-Cab Cruise Control +/RES Button or Remote PTO Set 2
Switch RESUME : After a PTO set speed has been met, a “Resume Speed” is retained after an application of the brake pedal. Engine speed will reduce to basic idle speed. The PTO indicator light will blink slowly indicating the previous PTO set speed has been retained in memory. Press and release the +/RES button on the cruise control to resume the previous PTO set speed. TAP-UP : Press and release the +/RES button on the cruise control to increase the engine speed by increments of 100 rpm (factory preset value). The tap up engine speed increments can be adjusted by the GM Service Tool. The Service Tool can enable the option for adjustment of tap up engine speed increments through the Radio Customization menu. ACCEL : Press and hold the +/RES button on the cruise control to increase the rpm by 150 rpm per second until the desired engineChevrolet/GMC Duramax Diesel Supplement (GMNA-Localizing-U.S/Canada- 9234763) - 2016 - crc - 10/5/15
Driving and Operating
81
Programmable
Parameters
Factory Setting
Minimum Value
Maximum Value
PTO Option Configuration
VEHICLE STATIONARY,
VEHICLE STATIONARY,
PRESET SPEED
PRESET SPEED
VEHICLE STATIONARY,
VARIABLE SPEED VEHICLE MOBILE, VARIABLE SPEED
PTO Control (Switch Type)
In-Cab PTO Mode Switch
Interior Mode PTO Switch Remote PTO Mode Switch
Type of Set Switch
Operation
MOMENTARY
MOMENTARY
LATCHING
Default Engine Speed After
DISABLED
PTO On
PTO Load Feedback
PTO Relay
Keep PTO Relay Engaged
during Braking
DISABLED ENABLED ENABLED
Action after Brake Is
RETURN TO BASE
Released
Set Low Fuel Level for
Engine Shutdown
Engine Run Time while
PTO Is Active Timer
IDLE RPM
15%
420 min
DISABLED
DISABLED DISABLED DISABLED
ENABLED
ENABLED ENABLED ENABLED
RETURN TO BASE
IDLE RPM
RETURN TO
STANDBY RPM
0%
0 min
25%
3480 min
Chevrolet/GMC Duramax Diesel Supplement (GMNA-Localizing-U.S/Canada- 9234763) - 2016 - crc - 10/5/15
82
Driving and Operating
Factory Setting
Minimum Value
Maximum Value
Programmable
Parameters
PTO Max. Engine Speed Max. Engine Speed for
PTO Engagement PTO Standby RPM
2100 RPM 1500 RPM
900 RPM
PTO Set Speed 1
1200 RPM
PTO Set Speed 2
1900 RPM
Engine Speed Tap Step Engine Speed Ramp Rate Maximum Vehicle Speed
Minimum Remote
Potentiometer Threshold
Maximum Remote
Potentiometer Threshold
100 RPM 150 RPM 94 km/h
2%
95%
500 RPM 1000 RPM
500 RPM PTO Set 1
Speed cannot be set below
PTO Standby Speed 500 RPM PTO Set 1
Speed cannot be set below
PTO Standby speed 500 RPM PTO Set 2
Speed cannot be set below
PTO Standby speed
4 RPM 4 RPM 30 km/h
0%
50%
3100 RPM 1800 RPM
3100 RPM
3100 RPM
3100 RPM
500 RPM 150 RPM 94 km/h
50%
100%
Chevrolet/GMC Duramax Diesel Supplement (GMNA-Localizing-U.S/Canada- 9234763) - 2016 - crc - 10/5/15
Driving and Operating
83
Programmable
Parameters
Remote Set Switch
Transition to Low Voltage (<33% of Ignition Voltage)
Remote Set Switch
Transition to Open State (>33% of Ignition, and
<67% of Ignition Voltage)
Remote Set Switch
Transition to High Voltage (>67% of Ignition Voltage)
Horn Chirps during a Remote Start Event
Factory Setting
Minimum Value
Maximum Value
SET SPEED 1
STANDBY SPEED, SET SPEED 1, or SET SPEED 2
PTO STANDBY
STANDBY SPEED, SET SPEED 1, or SET SPEED 2
SET SPEED 2
STANDBY SPEED, SET SPEED 1, or SET SPEED 2
ENABLED
DISABLED
ENABLED
If the PTO factory preset parameters do not match the settings described above, then they may have already been altered in order to satisfy the requirements of the installed PTO system and body equipment.
The following PTO settings are also offered via the vehicle customization screens, which can be enabled by your service technician. These include the following parameters: . PTO Standby RPM . PTO Set 1 Speed . PTO Set 2 Speed . Tap Step Speed . PTO Engine Run Timer
Driver Information Center (DIC) Warning Messages If the PTO indicator light does not remain on, it indicates that not all PTO enabling conditions have been met. One or more of the following DIC messages may display if the PTO will not engage and the appropriate action must be taken. . PTO: SHIFT TO PARK (P) OR NEUTRAL (N) (Stationary only)
Chevrolet/GMC Duramax Diesel Supplement (GMNA-Localizing-U.S/Canada- 9234763) - 2016 - crc - 10/5/15
The GM service technician can access Service Tool information that will contain reasons why PTO may not engage and why PTO may unexpectedly disengage due to system conditions. See http://www.gmupfitter.com for information on the installation of wiring and programming for PTO aftermarket equipment.
84
Driving and Operating
. PTO: SET PARK BRAKE
(Stationary only)
. PTO: PRESS & RELEASE
BRAKE (Mobile only)
. PTO: RELEASE BRAKE . PTO: REDUCE VEHICLE
SPEED
. PTO: REDUCE ENGINE SPEED . PTO: DISENGAGE CRUISE
CONTROL
In addition, the PTO indicator light will light when all conditions required to engage PTO have not been met. When enabling PTO, the PTO indicator light will turn on, then turn off after one second. Under normal operating conditions, the PTO indicator light will remain on throughout the PTO operating cycle. Additional in-vehicle PTO module information can be accessed by the service technician to aid in troubleshooting. Also see the service manual for more information.
Chevrolet/GMC Duramax Diesel Supplement (GMNA-Localizing-U.S/Canada- 9234763) - 2016 - crc - 10/5/15
Vehicle Care
General Information
General Information
Accessories and
Modifications . . . . . . . . . . . . . . . . . 85
Vehicle Checks
Engine Compartment
Overview . . . . . . . . . . . . . . . . . . . . . 87
Engine Oil . . . . . . . . . . . . . . . . . . . . . 92
Engine Oil Life System . . . . . . . . 96
Automatic TransmissionFluid . . . . . . . . . . . . . . . . . . . . . . . . . 96
Engine Air Cleaner/Filter . . . . . . 101
Cooling System . . . . . . . . . . . . . . 104
Engine Coolant . . . . . . . . . . . . . . . 105
Engine Overheating . . . . . . . . . . 109
Battery (4 CylinderEngine Only) . . . . . . . . . . . . . . . . 110
Electrical System
Engine Compartment Fuse
Block . . . . . . . . . . . . . . . . . . . . . . . . 111
Accessories and Modifications Adding non-dealer accessories or making modifications to the vehicle can affect vehicle performance and safety, including such things as airbags, braking, stability, ride and handling, emissions systems, aerodynamics, durability, and electronic systems like antilock brakes, traction control, and stability control. These accessories or modifications could even cause malfunction or damage not covered by the vehicle warranty. Damage to vehicle components resulting from modifications or the installation or use of non-GM certified parts, including control module or software modifications, is not covered under the terms of the vehicle warranty and may affect remaining warranty coverage for affected parts.
Vehicle Care
85
GM Accessories are designed to complement and function with other systems on the vehicle. See your dealer to accessorize the vehicle using genuine GM Accessories installed by a dealer technician. See the warranty manual. Aftermarket Engine Performance Enhancement Products and Modifications Some aftermarket engine performance products and modifications promise a way to increase the horsepower and torque levels of the vehicle's powertrain. You should be aware that these products could have harmful effects on the performance and life of the engine, exhaust emission system, transmission, and drivetrain. The engines, transmissions, and drivetrains have been designed and built to offer industry leading durability and performance in the most demanding applications. Engine power enhancement products may enable the engine to operate at horsepower and torque levels that could damage, create
Chevrolet/GMC Duramax Diesel Supplement (GMNA-Localizing-U.S/Canada- 9234763) - 2016 - crc - 10/5/15
86
Vehicle Care
failure, or reduce the life of the engine, engine emission system, transmission, and drivetrain. Damage, failure, or reduced life of the engine, transmission, emission system, drivetrain, or other vehicle components caused by aftermarket engine performance enhancement products or modifications might not be covered under the vehicle warranty.
Chevrolet/GMC Duramax Diesel Supplement (GMNA-Localizing-U.S/Canada- 9234763) - 2016 - crc - 10/5/15
Vehicle Checks
Engine Compartment Overview
Vehicle Care
87
4-Cylinder Pickup Models
Chevrolet/GMC Duramax Diesel Supplement (GMNA-Localizing-U.S/Canada- 9234763) - 2016 - crc - 10/5/15
88
Vehicle Care
1. Coolant Surge Tank and
Pressure Cap
2. Engine Air Cleaner/Filter 3. Engine Oil Fill Cap 4. Engine Fan (Out of View) 5. Engine Oil Dipstick 6. Underhood Fuse Block 7. Brake Fluid Reservoir 8. Windshield Washer Fluid
Reservoir
9. Battery
Chevrolet/GMC Duramax Diesel Supplement (GMNA-Localizing-U.S/Canada- 9234763) - 2016 - crc - 10/5/15
Vehicle Care
89
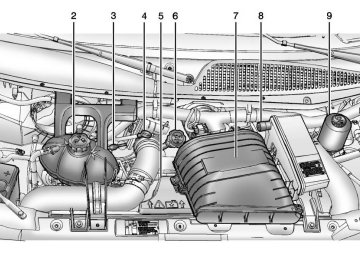
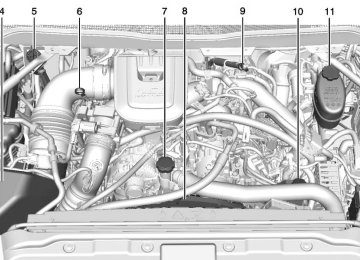
8-Cylinder Pickup Models
Chevrolet/GMC Duramax Diesel Supplement (GMNA-Localizing-U.S/Canada- 9234763) - 2016 - crc - 10/5/15
90
Vehicle Care
1. Remote Positive (+) Terminal 2. Battery 3. Coolant Surge Tank and
Pressure Cap
4. Engine Air Cleaner/Filter 5. Diesel Exhaust Fluid (DEF)
Fill Tube
6. Engine Oil Dipstick 7. Engine Oil Fill Cap 8. Engine Fan (Out of View) 9. Automatic Transmission
Dipstick
10. Power Steering Fluid Reservoir 11. Brake Fluid Reservoir 12. Windshield Washer Fluid
Reservoir
13. Auxiliary Battery 14. Underhood Fuse Block 15. Remote Negative (-) Terminal
Chevrolet/GMC Duramax Diesel Supplement (GMNA-Localizing-U.S/Canada- 9234763) - 2016 - crc - 10/5/15
Vehicle Care
91
Van Models
Chevrolet/GMC Duramax Diesel Supplement (GMNA-Localizing-U.S/Canada- 9234763) - 2016 - crc - 10/5/15
92
Vehicle Care
1. Battery 2. Coolant Surge Tank and
Pressure Cap
3. Automatic Transmission
Dipstick
4. Engine Oil Dipstick 5. Engine Fan (Out of View) 6. Engine Oil Fill Cap 7. Engine Air Cleaner/Filter 8. Air Cleaner/Filter Restriction
Indicator
9. Power Steering Fluid Reservoir 10. Brake Fluid Reservoir 11. Windshield Washer Fluid
Reservoir
Engine Oil To ensure proper engine performance and long life, careful attention must be paid to engine oil. Following these simple, but important steps will help protect your investment:
. Use engine oil approved to the proper specification and of the proper viscosity grade. See “Selecting the Right Engine Oil” in this section.
. Check the engine oil level regularly and maintain the proper oil level. See “Checking Engine Oil” and “When to Add Engine Oil” in this section.
. Change the engine oil at the
appropriate time. See “Engine Oil Life System” in the owner manual.
. Always dispose of engine oil
properly. See “What to Do with Used Oil” in this section.
Checking Engine Oil It is a good idea to check the engine oil level at each fuel fill. In order to get an accurate reading, the oil must be warm, at normal operating temperature, and the vehicle must be on level ground. The engine oil dipstick handle is a loop. See Engine Compartment Overview 0 87
for the location of the engine oil dipstick.Obtaining an accurate oil level reading is essential: 1. Turn off the engine and allow at
least five minutes for the oil to drain back into the oil pan. With a cool engine, allow 30 minutes. Checking the oil level too soon after engine shutoff will not provide an accurate oil level reading.
{ Warning
The engine oil dipstick handle may be hot; it could burn you. Use a towel or glove to touch the dipstick handle.
2. Pull out the dipstick and wipe it
with a clean paper towel or a cloth, then push it back in all the way. Remove it again, keeping the tip down.
Chevrolet/GMC Duramax Diesel Supplement (GMNA-Localizing-U.S/Canada- 9234763) - 2016 - crc - 10/5/15
When to Add Engine Oil
2.8L 4-Cylinder Engine
6.6L 8-Cylinder Engine
If the oil is below the cross-hatched area at the tip of the dipstick, add 1 L (1 qt) of the recommended oil and then recheck the level. See “Selecting the Right Engine Oil” in this section for an explanation of what kind of oil to use. For engine oil crankcase capacity, see Capacities and Specifications 0 126.
Caution
Do not add too much oil. Oil levels above or below the acceptable operating range shown on the dipstick are harmful to the engine. If you find that you have an oil level above the operating range, i.e., the engine has so much oil that the oil level gets above the cross-hatched area that shows the proper operating range, the engine could be damaged. You should drain out the excess oil or limit driving of the vehicle and seek a service professional to remove the excess amount of oil.
See Engine Compartment Overview 0 87 for the location of the engine oil fill cap. Be sure to add enough oil to put the level somewhere in the proper operating range. Push the dipstick all the way back in when through.
Vehicle Care
93
Selecting the Right Engine Oil (2.8L 4-Cylinder Engine) Selecting the right engine oil depends on both the proper oil specification and viscosity grade. See Recommended Fluids and Lubricants 0 121.
Specification Ask for and use engine oils that meet the dexos2™ specification. Engine oils that have been approved by GM as meeting the dexos2 specification are marked with the dexos2 approved logo. See www.gmdexos.com. Use of Substitute Engine Oils if dexos2 is unavailable: In the event that dexos2-approved engine oil is not available at an oil change or for maintaining proper oil level, you may use substitute engine oil that meets ACEA C3 of the appropriate viscosity grade.
Chevrolet/GMC Duramax Diesel Supplement (GMNA-Localizing-U.S/Canada- 9234763) - 2016 - crc - 10/5/15
94
Vehicle Care
Engine Oil Additives/Engine Oil Flushes — dexos2
Do not add anything to the oil. The recommended oils meeting the dexos2 specification are all that is needed for good performance and engine protection. Engine oil system flushes are not recommended and could cause engine damage not covered by the vehicle warranty. Selecting the Right Engine Oil (6.6L 8-Cylinder Engine)Specification Oils designated as API CJ-4 are required for the vehicle. The CJ-4
designation can appear either alone or in combination with other American Petroleum Institute (API) designations, such as API CJ-4/SL. These letters show API levels of quality.Caution
Failure to use the recommended engine oil or equivalent can result in engine damage not covered by the vehicle warranty.
Viscosity Grade Use SAE 5W-30 viscosity grade engine oil. Cold Temperature Operation: In an area of extreme cold, where the temperature falls below −29 °C (−20 °F), an SAE 0W-40 oil may be used. An oil of this viscosity grade will provide easier cold starting for the engine at extremely low temperatures. When selecting an oil of the appropriate viscosity grade, it is recommended to select an oil of the correct specification. See “Specification” earlier in this section.
Chevrolet/GMC Duramax Diesel Supplement (GMNA-Localizing-U.S/Canada- 9234763) - 2016 - crc - 10/5/15
Caution
Use only engine oils that have the designation CJ-4 for the diesel engine. Failure to use the recommended oil can damage the DPF and result in engine damage not covered by the vehicle warranty.
Viscosity Grade Use SAE 15W-40 viscosity grade engine oil. When it is very cold, below −18 °C (0 °F), use SAE 5W-40 to improve cold starting. These numbers on the oil container show its viscosity, or thickness. When selecting an oil of the appropriate viscosity grade, always select an oil of the correct specification. See “Specification” earlier in this section.
Vehicle Care
95
Engine Oil Additives/Engine Oil Flushes — API Do not add anything to the oil. The recommended oils with the API service symbol are all that is needed for good performance and engine protection. Engine oil system flushes are not recommended and could cause engine damage not covered by the vehicle warranty. What to Do with Used Oil Used engine oil contains certain elements that can be unhealthy for your skin and could even cause cancer. Do not let used oil stay on your skin for very long. Clean your skin and nails with soap and water, or a good hand cleaner. Wash or properly dispose of clothing or rags containing used engine oil. See the manufacturer's warnings about the use and disposal of oil products. Used oil can be a threat to the environment. If you change your own oil, be sure to drain all the oil from the filter before disposal. Never dispose of oil by putting it in the
American Petroleum Institute (API) symbol This doughnut-shaped logo (symbol) is used on most oil containers to help you select the correct oil. It means that the oil has been certified by the American Petroleum Institute. Look for this on the oil container, and use only those oils that display this logo.
Chevrolet/GMC Duramax Diesel Supplement (GMNA-Localizing-U.S/Canada- 9234763) - 2016 - crc - 10/5/15
96
Vehicle Care
trash or pouring it on the ground, into sewers, or into streams or bodies of water. Recycle it by taking it to a place that collects used oil.
Engine Oil Life System The engine oil life system calculates engine oil life based on vehicle use and displays the CHANGE ENGINE OIL SOON message when it is time to change the engine oil and filter. The oil life system should be reset to 100% only following an oil change. See “Engine Oil Life System” in the owner manual.
Automatic Transmission Fluid
When to Check and Change (4-Cylinder Pickup Models) Refer to “Automatic Transmission Fluid” in the owner manual. When to Check and Change (8-Cylinder Pickup Models) Change the fluid and filter at the intervals listed. See Maintenance Schedule 0 116.
Use the transmission fluid listed in Recommended Fluids and Lubricants 0 121. How to Check Because this operation can be a little difficult, the decision may be made to have this done by your dealer. If the decision is made to perform this operation, be sure to follow all the instructions here, or a false reading on the dipstick could result.
Caution
Too much or too little fluid can damage the transmission. Too much can mean that some of the fluid could come out and fall on hot engine parts or exhaust system parts, starting a fire. Too little fluid could cause the transmission to overheat. Be sure to get an accurate reading if checking the transmission fluid.
Wait at least 30 minutes before checking the transmission fluid level if the vehicle has been driven: . When outside temperatures are
above 32 °C (90 °F).
. At high speed for quite a while. In heavy traffic — especially in hot weather.
. While pulling a trailer.
Checking the Fluid Level Prepare the vehicle as follows: . Park the vehicle on a level
place. Keep the engine running. . With the parking brake applied, place the shift lever in P (Park). . With a foot on the brake pedal,
run the engine for at least one minute and shift to D (Drive). Then shift to N (Neutral) and then R (Reverse) to fill the hydraulic system. Then, put the shift lever in P (Park).
. Allow the engine to run at idle
(500 – 800 rpm). Slowly release the brake pedal.
Chevrolet/GMC Duramax Diesel Supplement (GMNA-Localizing-U.S/Canada- 9234763) - 2016 - crc - 10/5/15
3. Check the fluid level reading.
1. Operate the transmission in D
Vehicle Care
97
4.
Repeat the check procedure to verify the reading. If the fluid level is within the COLD band, the transmission may be operated until the fluid is hot enough to perform a hot check. If the fluid level is not within the COLD band, add or drain fluid as necessary to bring the level into the middle of the COLD band.
5. Perform a hot check at the first
opportunity after the normal operating temperature of 71 °C (160 °F) to 93 °C (200 °F) is reached. If the fluid level is in the acceptable range, push the dipstick back in all the way.
6.
Hot Check Procedure The fluid must be hot to ensure an accurate check. The fluid level rises as temperature increases.
(Drive) until the normal operating temperature of 71 °C (160 °F) to 93 °C (200 °F) is reached.
2. Pull out the dipstick and wipe it with a clean rag or paper towel. 3. Push it back in all the way, wait three seconds, and then pull it back out again. Repeat the check procedure to verify the reading.
4. Safe operating level is within
the HOT band on the dipstick. The width of the HOT band represents approximately 1.0 L (1.06 qt) of fluid at normal operating temperature. If the fluid level is not within the HOT band, add or drain fluid as necessary to bring the fluid level to within the HOT band. If the fluid level is in the acceptable range, push the dipstick back in all the way.
5.
6.
Then, without shutting off the engine, follow these steps:
Cold Check Procedure
The purpose of the cold check is to determine if the transmission has enough fluid to be operated safely until a hot check can be made. The fluid level rises as fluid temperature increases. DO NOT fill above the COLD band if the transmission fluid is below normal operating temperatures. 1. Pull out the dipstick and wipe it with a clean rag or paper towel. The transmission dipstick is near the center of the engine compartment. See Engine Compartment Overview 0 87
for location.2. Push it back in all the way, wait three seconds, and then pull it back out again.
Chevrolet/GMC Duramax Diesel Supplement (GMNA-Localizing-U.S/Canada- 9234763) - 2016 - crc - 10/5/15
98
Vehicle Care
Consistency of Readings Always check the fluid level at least twice using the procedures described previously. Consistency is important to maintaining proper fluid level. If inconsistent readings persist, check the transmission breather to be sure it is clean and unclogged. If readings are still inconsistent, contact your dealer. What Transmission Fluid to Use
Cold Operation When temperatures are very cold, the transmission will prevent certain operations to protect against damage. The information below shows shift range availability based on transmission oil temperatures: . All shift ranges available at −25 °
C (−13 °F) or above.
. 2 (Second) and 3 (Third) shift ranges only at −35 °C (−31 °F) to −25 °C (−13 °F).
. 2 (Second) shift range only at
−35 °C (−31 °F) or lower.
Torque converter clutch operation will also be prevented when air or transmission oil temperatures are below certain levels. Transmission shifting might be firmer with a cold transmission. This difference in shift quality is normal.
1. For areas where ambient
temperatures stay above −40 ° C (−40 °F), regular transmission fluid can be used. See Recommended Fluids and Lubricants 0 121.
2. For areas where ambient
temperatures fall below −40 °C (−40 °F), synthetic transmission fluid should be used. See Recommended Fluids and Lubricants 0 121. The synthetic transmission fluid can be used for all temperature ranges.
How to Add Fluid See Recommended Fluids and Lubricants 0 121 to determine what kind of transmission fluid to use. Add fluid only after checking the transmission fluid while it is hot. A cold check is used only as a reference. If the fluid level is low, add only enough of the proper fluid to bring the level up to the HOT area for a hot check. It does not take much fluid, generally less than 0.5 L (1 pt). Do not overfill.
Chevrolet/GMC Duramax Diesel Supplement (GMNA-Localizing-U.S/Canada- 9234763) - 2016 - crc - 10/5/15
Caution
Use of the incorrect automatic transmission fluid may damage the vehicle, and the damage may not be covered by the vehicle warranty. Always use the automatic transmission fluid listed in Recommended Fluids and Lubricants 0 121.
. After adding fluid, recheck the fluid level as described under “How to Check” previously in this section.
. When the correct fluid level is
obtained, push the dipstick back in all the way.
When to Check and Change (Van Models) Change the fluid and filter at the intervals listed. See Maintenance Schedule 0 116. Use the transmission fluid listed in Recommended Fluids and Lubricants 0 121.
How to Check Because this operation can be a little difficult, the decision may be made to have this done by your dealer. If the decision is made to perform this operation, be sure to follow all the instructions here, or a false reading on the dipstick could result.
Caution
Too much or too little fluid can damage the transmission. Too much can mean that some of the fluid could come out and fall on hot engine parts or exhaust system parts, starting a fire. Too little fluid could cause the transmission to overheat. Be sure to get an accurate reading if checking the transmission fluid.
Wait at least 30 minutes before checking the transmission fluid level if the vehicle has been driven: . When outside temperatures are
above 32 °C (90 °F).
Vehicle Care
99
. At high speed for quite a while. In heavy traffic — especially in hot weather.
. While pulling a trailer. To get the right reading, the fluid should be at normal operating temperature, which is 82 °C to 93 ° C (180 °F to 200 °F). Get the vehicle warmed up by driving about 24 km (15 mi) when outside temperatures are above 10 °C (50 ° F). If it is colder than 10 °C (50 °F), drive the vehicle until the engine temperature gauge moves and then remains steady for 10 minutes. A cold check can be made after the vehicle has been sitting for eight hours or more with the engine off, but this is used only as a reference. Let the engine run at idle for five minutes if outside temperatures are 10 °C (50 °F) or more. If it is colder than 10 °C (50 °F), the engine may have to idle longer. Should the fluid level be low during this cold check, the fluid must be checked when hot before adding
Chevrolet/GMC Duramax Diesel Supplement (GMNA-Localizing-U.S/Canada- 9234763) - 2016 - crc - 10/5/15
100
Vehicle Care
fluid. Checking the fluid hot will give you a more accurate reading of the fluid level.
Checking the Fluid Level Prepare the vehicle as follows: . Park the vehicle on a level
place. Keep the engine running. . With the parking brake applied, place the shift lever in P (Park). . With a foot on the brake pedal,
move the shift lever through each gear range, pausing for about three seconds in each range. Then, position the shift lever in P (Park).
. Let the engine run at idle for
three minutes or more.
Then, without shutting off the engine, follow these steps:
The transmission dipstick is near the center of the engine compartment and will be labeled with the graphic shown. See Engine Compartment Overview 0 87 for location. 1. Flip the handle up and then pull out the dipstick and wipe it with a clean rag or paper towel.
2. Push it back in all the way, wait three seconds, and then pull it back out again.
Check both sides of the dipstick, and read the lower level. The fluid level must be in the COLD area for a cold check or in the HOT or cross-hatched area for a hot check. Be sure to keep the dipstick pointed down to get an accurate reading.
3.
If the fluid level is in the acceptable range, push the dipstick in all the way, then flip the handle down to lock the dipstick in place. How to Add Fluid See Recommended Fluids and Lubricants 0 121 to determine what kind of transmission fluid to use. Using a funnel, add fluid down the transmission dipstick tube only after checking the transmission fluid while it is hot. A cold check is used only as a reference. If the fluid level is low, add only enough of the proper fluid to bring the level up to the HOT area for a hot check. It does not take much fluid, generally less than 0.5 L (1 pt). Do not overfill.
Caution
Use of the incorrect automatic transmission fluid may damage the vehicle, and the damage may not be covered by the vehicle
(Continued)
Chevrolet/GMC Duramax Diesel Supplement (GMNA-Localizing-U.S/Canada- 9234763) - 2016 - crc - 10/5/15
Vehicle Care
101
Caution (Continued)
warranty. Always use the automatic transmission fluid listed in Recommended Fluids and Lubricants 0 121.
. After adding fluid, recheck the fluid level as described under “How to Check” previously in this section.
. When the correct fluid level is
obtained, push the dipstick back in all the way. Then flip the handle down to lock the dipstick in place.
Engine Air Cleaner/Filter
4-Cylinder Pickup Models Refer to “Engine Air Cleaner/Filter” in the owner manual.
8-Cylinder Pickup Models The air cleaner/filter assembly is on the front corner of the engine compartment on the passenger side of the vehicle. See Engine Compartment Overview 0 87.
When to Inspect the Engine Air Cleaner/Filter For intervals on changing and inspecting the engine air filter, see Maintenance Schedule 0 116.
How to Inspect the Engine Air Cleaner/Filter Do not start the engine or have the engine running with the engine air filter housing open. Before removing the engine air filter, make sure that the engine air filter housing and nearby components are free of dirt and debris. Remove the engine air filter. Lightly tap and shake the engine air filter (away from the vehicle) to release dust and dirt. Inspect the engine air filter for damage, and replace if damaged. Do not clean the engine air filter or components with water or compressed air.
1. Cover Screws 2. Cover Electrical Connectors 3. Clamp
To inspect and replace the filter: 1. Disconnect the harness
connectors from the air cleaner cover electrical connector (2).
2. Loosen the screw on the
clamp (3) holding the air outlet duct in place. Do not remove the clamp. Move the air duct aside.
3. Remove the two air cleaner
housing cover screws (1).
Chevrolet/GMC Duramax Diesel Supplement (GMNA-Localizing-U.S/Canada- 9234763) - 2016 - crc - 10/5/15
102
Vehicle Care
4. Raise the air cleaner housing
cover and remove the air cleaner/filter from the air cleaner housing. Take care to dislodge as little dirt as possible.
5. Clean the filter sealing surface
6.
and the housing. Install the new engine air cleaner/filter.
8.
7. Lower the air cleaner housing cover and secure with the two screws. Install the air duct and tighten the screw on the clamp to secure it to the air cleaner housing. Install the harness electrical connectors.
9.
See Maintenance Schedule 0 116 to determine when to replace the engine air cleaner/filter.
{ Warning
Van Models
Operating the engine with the air cleaner/filter off can cause you or others to be burned. The air cleaner not only cleans the air; it helps to stop flames if the engine backfires. Use caution when working on the engine and do not drive with the air cleaner/filter off.
Caution
If the air cleaner/filter is off, dirt can easily get into the engine, which could damage it. Always have the air cleaner/filter in place when you are driving.
The air cleaner/filter assembly may have an air cleaner/filter restriction indicator that shows when the engine air cleaner/filter is dirty and needs to be serviced. The air cleaner/filter restriction indicator is on the air cleaner resonator.
When to Inspect the Engine Air Cleaner/Filter For intervals on changing and inspecting the engine air filter, see Maintenance Schedule 0 116.
Chevrolet/GMC Duramax Diesel Supplement (GMNA-Localizing-U.S/Canada- 9234763) - 2016 - crc - 10/5/15
How to Inspect the Engine Air Cleaner/Filter Do not start the engine or have the engine running with the engine air filter housing open. Before removing the engine air filter, make sure that the engine air filter housing and nearby components are free of dirt and debris. Remove the engine air filter. Lightly tap and shake the engine air filter (away from the vehicle) to release dust and dirt. Inspect the engine air filter for damage, and replace if damaged. Do not clean the engine air filter or components with water or compressed air. When the restriction indicator is in the red/orange “change” zone, replace the filter and reset the restriction indicator. The air cleaner/ filter assembly is at the front of the engine compartment.
1. Cover Screws 2. Restriction Indicator
To inspect and replace the filter and reset the restriction indicator: 1. Loosen the screws (1) on the
cover of the housing and lift up the cover.
2. Remove the air cleaner/filter
from the housing. Take care to dislodge as little dirt as possible.
3. Clean the filter sealing surface
4.
and the housing. Install the new engine air cleaner/filter.
Vehicle Care
103
5. Reinstall the cover and tighten
the screws.
6. Reset the air cleaner/filter
restriction indicator (2), if equipped, by pressing the top button on the indicator.
See Maintenance Schedule 0 116 to determine when to replace the engine air cleaner/filter. { Warning
Operating the engine with the air cleaner/filter off can cause you or others to be burned. The air cleaner not only cleans the air; it helps to stop flames if the engine backfires. Use caution when working on the engine and do not drive with the air cleaner/filter off.
Chevrolet/GMC Duramax Diesel Supplement (GMNA-Localizing-U.S/Canada- 9234763) - 2016 - crc - 10/5/15
104
Vehicle Care
Caution
If the air cleaner/filter is off, dirt can easily get into the engine, which could damage it. Always have the air cleaner/filter in place when you are driving.
Cooling System The cooling system allows the engine to maintain the correct working temperature. 4-Cylinder Pickup Models Refer to “Cooling System” in the owner manual.
8-Cylinder Pickup Models
Van Models
1. Coolant Surge Tank 2. Coolant Surge Tank
Pressure Cap
1. Coolant Surge Tank 2. Coolant Surge Tank
Pressure Cap
3. Engine Cooling Fan (Out
3. Engine Cooling Fan (Out
of View)
of View)
{ Warning
Heater and radiator hoses, and other engine parts, can be very hot. Do not touch them. If you do, you can be burned.
(Continued)
Chevrolet/GMC Duramax Diesel Supplement (GMNA-Localizing-U.S/Canada- 9234763) - 2016 - crc - 10/5/15
Warning (Continued)
Do not run the engine if there is a leak. If you run the engine, it could lose all coolant. That could cause an engine fire, and you could be burned. Get any leak fixed before you drive the vehicle.
Caution
Using coolant other than DEX-COOL® can cause premature engine, heater core, or radiator corrosion. In addition, the engine coolant could require changing sooner. Any repairs would not be covered by the vehicle warranty. Always use DEX-COOL (silicate-free) coolant in the vehicle.
Engine Coolant The cooling system in the vehicle is filled with DEX-COOL® engine coolant mixture. See Recommended Fluids and Lubricants 0 121 and Maintenance Schedule 0 116. The following explains the cooling system and how to add coolant when it is low. If there is a problem with engine overheating, see Engine Overheating 0 109. A 50/50 mixture of clean, drinkable water and DEX-COOL coolant will: . Give freezing protection down to
−37 °C (−34 °F).
. Give boiling protection up to 129
°C (265 °F).
. Protect against rust and
corrosion.
. Help keep the proper engine
temperature.
. Let the warning lights and
gauges work as they should.
Vehicle Care
105
Caution
Using coolant other than DEX-COOL® can cause premature engine, heater core, or radiator corrosion. In addition, the engine coolant could require changing sooner. Any repairs would not be covered by the vehicle warranty. Always use DEX-COOL (silicate-free) coolant in the vehicle.
What to Use Use a 50/50 mixture of clean, drinkable water and DEX-COOL coolant which will not damage aluminum parts. If using this mixture, nothing else needs to be added.
{ Warning
Adding only plain water or some other liquid to the cooling system can be dangerous. Plain water and other liquids, can boil before
(Continued)
Chevrolet/GMC Duramax Diesel Supplement (GMNA-Localizing-U.S/Canada- 9234763) - 2016 - crc - 10/5/15
106
Vehicle Care
Warning (Continued)
Caution (Continued)
Checking Coolant (8-Cylinder Pickup Models)
the proper coolant mixture will. The vehicle's coolant warning system is set for the proper coolant mixture. With plain water or the wrong mixture, the engine could get too hot but you would not get the overheat warning. The engine could catch fire and you or others could be burned. Use a 50/ 50 mixture of clean, drinkable