- 2012 Chevrolet Colorado Owners Manuals
- Chevrolet Colorado Owners Manuals
- 2004 Chevrolet Colorado Owners Manuals
- Chevrolet Colorado Owners Manuals
- 2005 Chevrolet Colorado Owners Manuals
- Chevrolet Colorado Owners Manuals
- 2007 Chevrolet Colorado Owners Manuals
- Chevrolet Colorado Owners Manuals
- 2015 Chevrolet Colorado Owners Manuals
- Chevrolet Colorado Owners Manuals
- 2016 Chevrolet Colorado Owners Manuals
- Chevrolet Colorado Owners Manuals
- 2008 Chevrolet Colorado Owners Manuals
- Chevrolet Colorado Owners Manuals
- 2006 Chevrolet Colorado Owners Manuals
- Chevrolet Colorado Owners Manuals
- 2009 Chevrolet Colorado Owners Manuals
- Chevrolet Colorado Owners Manuals
- 2010 Chevrolet Colorado Owners Manuals
- Chevrolet Colorado Owners Manuals
- Download PDF Manual
-
passenger seat. 1. Move the seat all the way forward to locate
the tool bag.
2. Locate the wing nut (A) used to retain the storage
bag and tools (B). Turn it counterclockwise to release the bag.
Put the tools to the side while you access the jack and wheel blocks.
6-79
Regular/Extended Cab For regular and extended cab vehicles, the jack and wheel blocks are located under the cover at the center of the vehicle behind the front seats.
A. Jack B. Wheel Blocks C. Wing Nut D. Jack Knob
2. Lower the jack (A) by turning the jack knob (D)
counterclockwise to release the jack from the bracket.
3. Turn the wing nut (C) holding the wheel blocks (B)
to the back of the vehicle counterclockwise to release the wheel blocks.
1. Turn the wing nut on the cover counterclockwise to
remove it.
6-80
Crew Cab For crew cab models, the jack and wheel blocks are located under the driver side rear seat. 1. Reach under the rear seat to access the jack and
wheel blocks.
Use the jack handle extensions and the wheel wrench to remove the underbody-mounted spare tire.
2. Turn the jack knob counterclockwise to lower the
jack all the way and release it from the bracket. 3. Remove the wheel blocks and the wheel block
retainer by turning the wing nut counterclockwise.
A. Jack Handle
Extensions
B. Jack
C. Jack Handle D. Wheel Wrench E. Wheel Blocks
6-81
1. Assemble the wheel wrench (D), the jack handle extensions (A) and the jack handle (C) as shown.
6-82
2. Insert the chiseled end of the jack handle (C) at a
slight angle through the hole in the rear bumper and into the funnel-shaped guide.
3. Turn the wheel wrench (D) counterclockwise to lower the spare tire to the ground. Continue to turn the wheel wrench until the spare tire can be pulled out from under the vehicle. If the spare tire does not lower to the ground, the secondary latch is engaged causing the tire not to lower. See Secondary Latch System on page 6-91.
4. Tilt the retainer when
the tire has been lowered, and slide it up the cable so it can be pulled up through the wheel opening.
Removing the Flat Tire and Installing the Spare Tire Use the following pictures and instructions to remove the flat tire and raise the vehicle. The tools you will be using include the jack (A), the wheel blocks (B), the extension tool (C), the jack handle extensions (D), and the wheel wrench (E).
5. Put the spare tire near the flat tire.
1. Do a safety check before proceeding. See Changing
a Flat Tire on page 6-78 for more information.
6-83
2. Remove the center cap by placing the chisel end of
the wheel wrench (E) into one of the slots on the wheel and gently prying the cap out.
3. Use the wheel wrench to loosen all the wheel nuts by turning it counterclockwise. Do not remove the wheel nuts yet.
6-84
{ WARNING:
Getting under a vehicle when it is jacked up is dangerous. If the vehicle slips off the jack you could be badly injured or killed. Never get under a vehicle when it is supported only by a jack.
{ WARNING:
Raising your vehicle with the jack improperly positioned can damage the vehicle and even make the vehicle fall. To help avoid personal injury and vehicle damage, be sure to fit the jack lift head into the proper location before raising the vehicle.
Front Position
4. Position the jack (A) under the vehicle as shown for
the front or rear locations.
6-85
Front Position
Front Position — XFE
If the flat tire is on the front of the vehicle, position the jack to the rear of the front tire in the pocket off of the frame.
For Extended Fuel Economy (XFE) vehicles, position the jack on the flat portion of the jacking pocket structure rearward of the jacking pocket.
6-86
Rear Position
If the flat tire is on the rear, position the jack under the rear axle and get as close as possible to the shock absorber.
5. Make sure the jack head is positioned so that the rear axle is resting securely between the grooves that are on the jack head.
6. Turn the wheel wrench clockwise to raise the
vehicle. Raise the vehicle far enough off the ground so there is enough room for the spare tire to fit under the wheel well.
7. Remove all the wheel nuts and the flat tire.
6-87
{ WARNING:
Rust or dirt on a wheel, or on the parts to which it is fastened, can make wheel nuts become loose after time. The wheel could come off and cause an accident. When changing a wheel, remove any rust or dirt from places where the wheel attaches to the vehicle. In an emergency, use a cloth or a paper towel to do this; but be sure to use a scraper or wire brush later, if needed, to get all the rust or dirt off. See Changing a Flat Tire on page 6-78.
8. Remove any rust or dirt
from the wheel bolts, mounting surfaces and spare wheel.
9. Install the spare tire.
{ WARNING:
Never use oil or grease on bolts or nuts because the nuts might come loose. The vehicle’s wheel could fall off, causing a crash.
10. Put the wheel nuts back
on with the rounded end of the nuts toward the wheel. Tighten each wheel nut by hand. Then use the wheel wrench to tighten the nuts until the wheel is held against the hub.
6-88
Front Position
Rear Position
11. Turn the wheel wrench counterclockwise to lower
the vehicle. Lower the jack completely.
6-89
12. Tighten the wheel nuts
firmly in a crisscross sequence as shown by turning the wheel wrench clockwise.
When you reinstall the regular wheel and tire, you must also reinstall the center cap. Place the cap on the wheel and tap it into place until it seats flush with the wheel. The cap only goes on one way. Be sure to line up the tab on the center cap with the indentation on the wheel.
{ WARNING:
Wheel nuts that are improperly or incorrectly tightened can cause the wheels to become loose or come off. The wheel nuts should be tightened with a torque wrench to the proper torque specification after replacing. Follow the torque specification supplied by the aftermarket manufacturer when using accessory locking wheel nuts. See Capacities and Specifications on page 6-115 for original equipment wheel nut torque specifications.
Improperly tightened wheel nuts can lead
Notice: to brake pulsation and rotor damage. To avoid expensive brake repairs, evenly tighten the wheel nuts in the proper sequence and to the proper torque specification. See Capacities and Specifications on page 6-115 for the wheel nut torque specification.
6-90
Secondary Latch System Your vehicle has an underbody-mounted tire hoist assembly that has a secondary latch system. It is designed to stop the spare tire from suddenly falling off your vehicle. For the secondary latch to work, the spare must be installed with the valve stem pointing down. See Storing a Flat or Spare Tire and Tools on page 6-94.
{ WARNING:
Before beginning this procedure read all the instructions. Failure to read and follow the instructions could damage the hoist assembly and you and others could get hurt. Read and follow the instructions listed next.
To release the spare tire from the secondary latch:
1. Check under the
vehicle to see if the cable end fitting is visible.
2. If the cable end fitting is not visible, proceed to
Step 6. If it is visible, first try to tighten the cable by turning the wheel wrench clockwise until you hear two clicks or feel it skip twice. You cannot overtighten the cable.
3. Loosen the cable by turning the wheel wrench
counterclockwise three or four turns.
6-91
4. Repeat this procedure at least two times. If the
spare tire lowers to the ground, continue with Step 5 under Removing the Spare Tire and Tools on page 6-79.
5. Turn the wrench counterclockwise until
approximately 6 inches (15 cm) of cable is exposed. 6. Stand the wheel blocks on their shortest ends, with
the backs facing each other.
7. Place the bottom edge
of the jack (A) on the wheel blocks (B), separating them so that the jack is balanced securely.
8. Attach the jack handle, extension, and wheel
wrench to the jack and place it (with the wheel blocks) under the vehicle towards the front of the rear bumper. Position the center lift point of the jack under the wheel.
9. Turn the wheel wrench clockwise to raise the jack
until it lifts the tire.
10. Continue raising the jack until the tire stops moving
upward and is held firmly in place.
6-92
{ WARNING:
Someone standing too close during the procedure could be injured by the jack. If the spare tire does not slide off the jack completely, make sure no one is behind you or on either side of you as you pull the jack out from under the spare.
13. Disconnect the jack handle from the jack and
carefully remove the jack. Use one hand to push against the spare while firmly pulling the jack out from under the spare tire with the other hand. If the spare tire is hanging from the cable, insert the hoist end of the extension into the hoist shaft hole in the bumper and turn the wheel wrench counterclockwise to lower the spare the rest of the way.
6-93
11. Remove the jack handle and insert the hoist end of the extension through the hole in the rear bumper. Turn the wheel wrench counterclockwise one turn or until the wheel retainer assembly is disengaged.
12. Reinsert the jack handle into the jack. Lower the
jack by turning the wheel wrench counterclockwise. Keep lowering the jack until the spare tire slides off the jack or is hanging by the cable.
Storing a Flat or Spare Tire and Tools
{ WARNING:
Storing a jack, a tire, or other equipment in the passenger compartment of the vehicle could cause injury. In a sudden stop or collision, loose equipment could strike someone. Store all these in the proper place.
Notice: Storing an aluminum wheel with a flat tire under your vehicle for an extended period of time or with the valve stem pointing up can damage the wheel. Always stow the wheel with the valve stem pointing down and have the wheel/tire repaired as soon as possible.
14. Tilt the tire retainer at the end of the cable and pull it through the wheel opening. Pull the tire out from under the vehicle.
15. If the cable is hanging under the vehicle, turn the
wheel wrench clockwise to raise the cable. Have the hoist assembly inspected as soon as you can. You will not be able to store a spare or flat tire using the hoist assembly until it has been replaced.
To continue changing the flat tire, see Removing the Flat Tire and Installing the Spare Tire on page 6-83.
6-94
Store the tire under the rear of the vehicle in the spare tire carrier. 1. Put the tire on the ground at the rear of the vehicle
with the valve stem pointed down.
2. Tilt the retainer downward and through the center
wheel opening. Make sure the retainer is fully seated across the underside of the wheel.
3. Assemble the wheel wrench, the jack handle
extensions, and the jack handle as shown.
6-95
6. When the tire is properly seated to the underbody, continue turning the wheel wrench clockwise until you hear two clicks or feel it skip twice. You cannot overtighten the cable.
4. Insert the chiseled end of the jack handle at a slight angle through the hole in the rear bumper and into the funnel-shaped guide.
5. Turn the wheel wrench clockwise to raise the
tire part way up. Make sure the retainer is seated in the wheel opening and the valve stem is pointed down. Continue raising the tire, watch to make sure it does not get caught on anything on the underbody. If the tire does get caught, loosen two or three turns and push and pull the tire and then retighten. Repeat this procedure as many times as needed to ensure proper stowage.
6-96
7. Make sure the tire is stored securely. Push, pull (A),
and then try to turn (B) the tire. If the tire moves, check to make sure the tire valve stem is pointing down, then use the wheel wrench to loosen and then tighten the cable.
To store the tools: 1. Return the tools to the storage bag. 2. Attach the storage bag to the floor under the front
passenger seat.
3. Reinstall the wing nut to secure the bag to the
vehicle.
To store the jack and wheel blocks: Regular/Extended Cab
1. Install the wheel blocks (B) first. 2. Reinstall the wing nut (C) by turning it clockwise to
secure the wheel blocks to the vehicle.
3. Lower the jack (A) all the way and insert the jack
into the bracket.
4. Raise the jack by turning the handle clockwise to
secure the jack within the bracket.
A. Jack B. Wheel Blocks C. Wing Nut
5. Put the cover in position and insert and tighten the
wing nut to secure it.
6-97
Crew Cab
A. Jack B. Wheel Blocks C. Wing Nut 1. Attach the wheel blocks (B) to the jack (A) with the
wheel block retainer and the wing nut (C).
2. Reinstall the jack and wheel block assembly in the mounting bracket. Be sure to position the holes in the base of the jack onto the pins in the mounting bracket.
3. Turn the handle to raise the jack until it is secure,
but do not overtighten the jack in the bracket.
6-98
If the vehicle has four-wheel drive and the
Spare Tire Compact Spare Tire Your vehicle may have a compact spare tire. Although the compact spare tire was fully inflated when your vehicle was new, it can lose air over time. Check the inflation pressure regularly. It should be 60 psi (420 kPa). Notice: compact spare tire is installed on the vehicle, do not drive in four-wheel drive until you can have the flat tire repaired and/or replaced. You could damage the vehicle, and the repair costs would not be covered by your warranty. Never use four-wheel drive when the compact spare tire is installed on the vehicle. After installing the compact spare on your vehicle, you should stop as soon as possible and make sure your vehicle’s spare tire is correctly inflated. The compact spare is made to perform well at speeds up to 62 mph (100 km/h) for distances up to 500 miles (804 km). For heavy payloads or towing, and for low traction or four-wheel-drive conditions, repair or replace the full-size tire. Of course, it is best to replace your vehicle’s spare with a full-size tire as soon as you can. The spare tire will last longer and be in good shape in case you need it again.
Notice: When the compact spare is installed, do not take the vehicle through an automatic car wash with guide rails. The compact spare can get caught on the rails which can damage the tire, wheel and other parts of the vehicle. Do not use your compact spare on other vehicles. And do not mix your compact spare tire or wheel with other wheels or tires. They will not fit. Keep your spare tire and its wheel together. Notice: Tire chains will not fit the compact spare. Using them can damage the vehicle and can damage the chains too. Do not use tire chains on the compact spare. Full-Size Spare Tire Your vehicle may have a full-size spare tire, which, when new, was fully inflated. A spare tire may lose air over time, so check its inflation pressure regularly. See Inflation - Tire Pressure on page 6-62 and Loading the Vehicle on page 5-33 for information regarding proper tire inflation and loading your vehicle. For instruction on how to remove, install, or store a spare tire, see Removing the Flat Tire and Installing the Spare Tire on page 6-83 and Storing a Flat or Spare Tire and Tools on page 6-94.
If the vehicle has four-wheel drive and the
Your vehicle may have a different size spare tire than the road tires originally installed on your vehicle. This spare was developed for use on your vehicle, so it is alright to drive on it. If your vehicle has four-wheel drive and the different size spare tire is installed, keep the vehicle in two-wheel drive. Notice: different size spare tire is installed on the vehicle, do not drive in four-wheel drive until you can have your flat tire repaired and/or replaced. You could damage the vehicle, and the repair costs would not be covered by your warranty. Never use four-wheel drive when the different size spare tire is installed on the vehicle. After installing the spare tire on your vehicle, you should stop as soon as possible and make sure the spare is correctly inflated. The spare tire is made to perform well at speeds up to 62 mph (100 km/h) for distances up to 500 miles (804 km). For heavy payloads or towing, and for low traction or four-wheel-drive conditions, repair or replace the full-size tire. Have the damaged or flat road tire repaired or replaced as soon as you can and installed back onto your vehicle. This way, the spare tire will be available in case you need it again. Do not mix tires and wheels of different sizes, because they will not fit. Keep your spare tire and its wheel together.
6-99
Appearance Care
Interior Cleaning The vehicle’s interior will continue to look its best if it is cleaned often. Although not always visible, dust and dirt can accumulate on the upholstery. Dirt can damage carpet, fabric, leather, and plastic surfaces. Regular vacuuming is recommended to remove particles from the upholstery. It is important to keep the upholstery from becoming and remaining heavily soiled. Soils should be removed as quickly as possible. The vehicle’s interior may experience extremes of heat that could cause stains to set rapidly. Lighter colored interiors may require more frequent cleaning. Use care because newspapers and garments that transfer color to home furnishings may also transfer color to the vehicle’s interior. When cleaning the vehicle’s interior, only use cleaners specifically designed for the surfaces being cleaned. Permanent damage may result from using cleaners on surfaces for which they were not intended. Use glass cleaner only on glass. Remove any accidental over-spray from other surfaces immediately. To prevent over-spray, apply cleaner directly to the cleaning cloth.
Notice: Using abrasive cleaners when cleaning glass surfaces on the vehicle, could scratch the glass and/or cause damage to the rear window defogger. When cleaning the glass on the vehicle, use only a soft cloth and glass cleaner. Many cleaners contain solvents that may become concentrated in the vehicle’s breathing space. Before using cleaners, read and adhere to all safety instructions on the label. While cleaning the vehicle’s interior, maintain adequate ventilation by opening the vehicle’s doors and windows. Dust may be removed from small buttons and knobs using a small brush with soft bristles. Products that remove odors from the vehicle’s upholstery and clean the vehicle’s glass can be obtained from your dealer/retailer. Do not clean the vehicle using: • A knife or any other sharp object to remove a soil
from any interior surface.
• A stiff brush. It can cause damage to the vehicle’s
interior surfaces.
• Heavy pressure or aggressive rubbing with a
cleaning cloth. Use of heavy pressure can damage the interior and does not improve the effectiveness of soil removal.
6-100
• Laundry detergents or dishwashing soaps with degreasers can leave residue that streaks and attracts dirt. For liquid cleaners, about 20 drops per gallon (3.78 L) of water is a good guide. Use only mild, neutral-pH soaps.
• Too much cleaner that saturates the upholstery. • Organic solvents such as naptha, alcohol, etc. that
can damage the vehicle’s interior.
Fabric/Carpet Use a vacuum cleaner with a soft brush attachment frequently to remove dust and loose dirt. A canister vacuum with a beater bar in the nozzle may only be used on floor carpet and carpeted floor mats. For any soil, always try to remove it first with plain water or club soda. Before cleaning, gently remove as much of the soil as possible using one of the following techniques: • For liquids: gently blot the remaining soil with a
paper towel. Allow the soil to absorb into the paper towel until no more can be removed.
• For solid dry soils: remove as much as possible
and then vacuum.
To clean: 1. Saturate a lint-free, clean white cloth with water or
club soda.
2. Wring the cloth to remove excess moisture. 3. Start on the outside edge of the soil and gently rub toward the center. Continue cleaning, using a clean area of the cloth each time it becomes soiled. 4. Continue to gently rub the soiled area until the
cleaning cloth remains clean.
5. If the soil is not completely removed, use a mild
soap solution and repeat the cleaning process that was used with plain water.
If any of the soil remains, a commercial fabric cleaner or spot lifter may be necessary. When a commercial upholstery cleaner or spot lifter is to be used, test a small hidden area for colorfastness first. If the locally cleaned area gives any impression that a ring formation may result, clean the entire surface. After the cleaning process has been completed, a paper towel can be used to blot excess moisture from the fabric or carpet.
6-101
Leather A soft cloth dampened with water can be used to remove dust. If a more thorough cleaning is necessary, a soft cloth dampened with a mild soap solution can be used. Allow the leather to dry naturally. Do not use heat to dry. Never use steam to clean leather. Never use spot lifters or spot removers on leather. Many commercial leather cleaners and coatings that are sold to preserve and protect leather may permanently change the appearance and feel of the leather and are not recommended. Do not use silicone or wax-based products, or those containing organic solvents to clean the vehicle’s interior because they can alter the appearance by increasing the gloss in a non-uniform manner. Never use shoe polish on leather.
Instrument Panel, Vinyl, and Other Plastic Surfaces A soft cloth dampened with water may be used to remove dust. If a more thorough cleaning is necessary, a clean soft cloth dampened with a mild soap solution can be used to gently remove dust and dirt. Never use spot lifters or removers on plastic surfaces. Many commercial cleaners and coatings that are sold to preserve and protect soft plastic surfaces may permanently change the appearance and feel of the interior and are not recommended. Do not use silicone or wax-based products, or those containing organic solvents to clean the vehicle’s interior because they can alter the appearance by increasing the gloss in a non-uniform manner. Some commercial products may increase gloss on the instrument panel. The increase in gloss may cause annoying reflections in the windshield and even make it difficult to see through the windshield under certain conditions.
6-102
Care of Safety Belts Keep belts clean and dry.
{ WARNING:
Do not bleach or dye safety belts. It may severely weaken them. In a crash, they might not be able to provide adequate protection. Clean safety belts only with mild soap and lukewarm water.
Weatherstrips Silicone grease on weatherstrips will make them last longer, seal better, and not stick or squeak. Apply silicone grease with a clean cloth. During very cold, damp weather frequent application may be required. See Recommended Fluids and Lubricants on page 7-10.
Washing Your Vehicle The best way to preserve the vehicle’s finish is to keep it clean by washing it often. Notice: Certain cleaners contain chemicals that can damage the emblems or nameplates on the vehicle. Check the cleaning product label. If it states that it should not be used on plastic parts, do not use it on the vehicle or damage may occur and it would not be covered by the warranty. Do not wash the vehicle in direct sunlight. Use a car washing soap. Do not use cleaning agents that are petroleum based or that contain acid or abrasives, as they can damage the paint, metal or plastic on the vehicle. Approved cleaning products can be obtained from your dealer/retailer. Follow all manufacturers’ directions regarding correct product usage, necessary safety precautions and appropriate disposal of any vehicle care product. Rinse the vehicle well, before washing and after to remove all cleaning agents completely. If they are allowed to dry on the surface, they could stain. Dry the finish with a soft, clean chamois or an all-cotton towel to avoid surface scratches and water spotting.
6-103
High pressure car washes may cause water to enter the vehicle. Avoid using high pressure washes closer than 12 inches (30 cm) to the surface of the vehicle. Use of power washers exceeding 1,200 psi (8 274 kPa) can result in damage or removal of paint and decals.
Cleaning Exterior Lamps/Lenses Use only lukewarm or cold water, a soft cloth and a car washing soap to clean exterior lamps and lenses. Follow instructions under Washing Your Vehicle on page 6-103.
Finish Care Occasional waxing or mild polishing of the vehicle by hand may be necessary to remove residue from the paint finish. Approved cleaning products can be obtained from your dealer/retailer. If the vehicle has a basecoat/clearcoat paint finish, the clearcoat gives more depth and gloss to the colored basecoat. Always use waxes and polishes that are non-abrasive and made for a basecoat/clearcoat paint finish. Notice: Machine compounding or aggressive polishing on a basecoat/clearcoat paint finish may damage it. Use only non-abrasive waxes and polishes that are made for a basecoat/clearcoat paint finish on the vehicle.
6-104
Foreign materials such as calcium chloride and other salts, ice melting agents, road oil and tar, tree sap, bird droppings, chemicals from industrial chimneys, etc., can damage the vehicle’s finish if they remain on painted surfaces. Wash the vehicle as soon as possible. If necessary, use non-abrasive cleaners that are marked safe for painted surfaces to remove foreign matter. Exterior painted surfaces are subject to aging, weather and chemical fallout that can take their toll over a period of years. To help keep the paint finish looking new, keep the vehicle garaged or covered whenever possible. Protecting Exterior Bright Metal Parts Bright metal parts should be cleaned regularly to keep their luster. Washing with water is all that is usually needed. However, chrome polish may be used on chrome or stainless steel trim, if necessary. Use special care with aluminum trim. To avoid damaging protective trim, never use auto or chrome polish, steam or caustic soap to clean aluminum. A coating of wax, rubbed to high polish, is recommended for all bright metal parts.
Windshield and Wiper Blades Clean the outside of the windshield with glass cleaner. Clean the rubber blades using a lint free cloth or paper towel soaked with windshield washer fluid or a mild detergent. Wash the windshield thoroughly when cleaning the blades. Bugs, road grime, sap, and a buildup of vehicle wash/wax treatments may cause wiper streaking. Replace the wiper blades if they are worn or damaged. Wipers can be damaged by: • Extreme dusty conditions • Sand and salt • Heat and sun • Snow and ice, without proper removal
Aluminum or Chrome-Plated Wheels and Trim The vehicle may have either aluminum or chrome-plated wheels. Keep the wheels clean using a soft clean cloth with mild soap and water. Rinse with clean water. After rinsing thoroughly, dry with a soft clean towel. A wax may then be applied. Notice: Chrome wheels and other chrome trim may be damaged if the vehicle is not washed after driving on roads that have been sprayed with magnesium, calcium or sodium chloride. These chlorides are used on roads for conditions such as ice and dust. Always wash the vehicle’s chrome with soap and water after exposure. Notice: Using strong soaps, chemicals, abrasive polishes, cleaners, brushes, or cleaners that contain acid on aluminum or chrome-plated wheels, could damage the surface of the wheel(s). The repairs would not be covered by the vehicle warranty. Use only approved cleaners on aluminum or chrome-plated wheels. The surface of these wheels is similar to the painted surface of the vehicle. Do not use strong soaps, chemicals, abrasive polishes, abrasive cleaners,
6-105
Sheet Metal Damage If the vehicle is damaged and requires sheet metal repair or replacement, make sure the body repair shop applies anti-corrosion material to parts repaired or replaced to restore corrosion protection. Original manufacturer replacement parts will provide the corrosion protection while maintaining the vehicle warranty.
Finish Damage Any stone chips, fractures or deep scratches in the finish should be repaired right away. Bare metal will corrode quickly and may develop into major repair expense. Minor chips and scratches can be repaired with touch-up materials available from your dealer/retailer. Larger areas of finish damage can be corrected in your dealer’s/retailer’s body and paint shop.
cleaners with acid, or abrasive cleaning brushes on them because they could damage the surface. Do not use chrome polish on aluminum wheels. Notice: Using chrome polish on aluminum wheels could damage the wheels. The repairs would not be covered by the vehicle warranty. Use chrome polish on chrome wheels only. Use chrome polish only on chrome-plated wheels, but avoid any painted surface of the wheel, and buff off immediately after application. Notice: Driving the vehicle through an automatic car wash that has silicone carbide tire cleaning brushes, could damage the aluminum or chrome-plated wheels. The repairs would not be covered by the vehicle warranty. Never drive a vehicle that has aluminum or chrome-plated wheels through an automatic car wash that uses silicone carbide tire cleaning brushes.
Tires To clean the tires, use a stiff brush with tire cleaner. Notice: Using petroleum-based tire dressing products on the vehicle may damage the paint finish and/or tires. When applying a tire dressing, always wipe off any overspray from all painted surfaces on the vehicle.
6-106
Underbody Maintenance Chemicals used for ice and snow removal and dust control can collect on the underbody. If these are not removed, corrosion and rust can develop on the underbody parts such as fuel lines, frame, floor pan, and exhaust system even though they have corrosion protection. At least every spring, flush these materials from the underbody with plain water. Clean any areas where mud and debris can collect. Dirt packed in close areas of the frame should be loosened before being flushed. Your dealer/retailer or an underbody car washing system can do this.
Chemical Paint Spotting Some weather and atmospheric conditions can create a chemical fallout. Airborne pollutants can fall upon and attack painted surfaces on the vehicle. This damage can take two forms: blotchy, ring-shaped discolorations, and small, irregular dark spots etched into the paint surface. Although no defect in the paint job causes this, we will repair, at no charge to the owner, the surfaces of new vehicles damaged by this fallout condition within 12 months or 12,000 miles (20 000 km) of purchase, whichever occurs first.
Vehicle Identification
Vehicle Identification Number (VIN)
This legal identifier is in the front corner of the instrument panel, on the driver side. It can be seen through the windshield from outside. The VIN also appears on the Certification/Tire and Service Parts labels and certificates of title and registration. Engine Identification The eighth character in the VIN is the engine code. This code identifies the vehicle’s engine, specifications, and replacement parts. See “Engine Specifications” under Capacities and Specifications on page 6-115 for the vehicle’s engine code.
6-107
Service Parts Identification Label This label, on the inside of the glove box, has the following information: • Vehicle Identification Number (VIN) • Model designation • Paint information • Production options and special equipment Do not remove this label from the vehicle. Electrical System Add-On Electrical Equipment Notice: Do not add anything electrical to the vehicle unless you check with your dealer/retailer first. Some electrical equipment can damage the vehicle and the damage would not be covered by the vehicle’s warranty. Some add-on electrical equipment can keep other components from working as they should. Add-on equipment can drain the vehicle battery, even if the vehicle is not operating. The vehicle has an airbag system. Before attempting to add anything electrical to the vehicle, see Servicing Your Airbag-Equipped Vehicle on page 2-76 and Adding Equipment to Your Airbag-Equipped Vehicle on page 2-77.
6-108
Windshield Wiper Fuses The windshield wiper motor is protected by a circuit breaker and a fuse. If the motor overheats due to heavy snow, etc., the wiper will stop until the motor cools. If the overload is caused by some electrical problem, have it fixed.
Fuses and Circuit Breakers The wiring circuits in the vehicle are protected from short circuits by a combination of fuses and circuit breakers. This greatly reduces the chance of fires caused by electrical problems. Look at the silver-colored band inside the fuse. If the band is broken or melted, replace the fuse. Be sure you replace a bad fuse with a new one of the identical size and rating. If you ever have a problem on the road and do not have a spare fuse, you can borrow one that has the same amperage. Just pick some feature of the vehicle that you can get along without — like the radio or cigarette lighter — and use its fuse, if it is the correct amperage. Replace it as soon as you can.
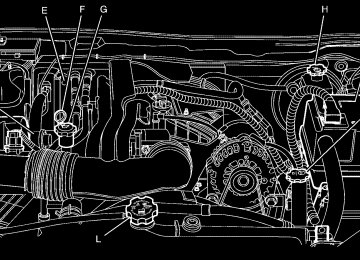
Engine Compartment Fuse Block
The engine compartment fuse block is located on the driver side of the engine compartment. See Engine Compartment Overview on page 6-12 for more information on location. To remove the cover, push in on the tab on the end of the cover and lift. To reinstall the cover, line up the tab and push down on the cover until the tab clicks into place. Notice: Spilling liquid on any electrical components on the vehicle may damage it. Always keep the covers on any electrical component.
6-109
6-110
Fuses
ABS 1
ABS 2
AUX PWR 1
AUX PWR 2
BCK/UP BLWR CLSTR CNSTR VENTCRUISE
DR/LCK DRL
ERLS
ETC FOG/LAMP
FRT PRK LAMP
FRT/AXLE FSCM
Usage
ABS 1 (ABS Logic) ABS 2 (ABS Pump) Accessory Power 1
Accessory Power 2
Back-up Lights Climate Control Fan Cluster Fuel Canister Vent Solenoid Cruise Control Switch, Inside Rearview Mirror, Transfer Case Control Module, Brake Switch, Clutch Disable Power Door Locks (If Equipped) Daylight Running Lamps Mass Air Flow (MAF) Sensor, Can Purge Solenoid, Air Injector Reactor (AIR) Relay Electronic Throttle Control (ETC) Fog Lamps (If Equipped) Front Park/Turn Lamps, Driver and Passenger Side Power Window Switches Lighting Front Axle Actuator Fuel System Control Module6-111
The trailer brake relay is located on the bottom side of the battery harness.
Fuses
O2 SNSR
A/C
A/C CMPRSR
ABS
Usage
Oxygen Sensors, Air Injection Reactor (AIR) Relay Air Conditioning Control Head, Power Seats Air Conditioning Compressor Antilock Brake System (ABS), ABS Module, Four-Wheel Drive, Gravity Sensor
Fuses
RT HDLP RVC S/ROOF STOP STRTR TBC TCM TCCM TRAILER BRAKE TRANS TRN/HAZRD FRT TRN/HAZRD REAR
VSES/STOP
WPR WSW
Usage
Passenger Side Headlamp Regulated Voltage Control Sunroof (If Equipped) Stop Lamps Starter Solenoid Relay Truck Body Controller Transmission Control Module Transfer Case Control Module
Trailer Brake
Transmission Solenoid Turn/Hazard/Courtesy/Cargo Lamps/Mirrors
Rear Turn/Hazard Lights
Vehicle Stability Enhancement System/Stop Wiper Wiper/Washer Switch
Fuses
Usage
BACKUP LAMP Backup Lamp HORN HTD/SEAT
Horn Heated Seat (If Equipped) Ignition, Clutch Starter Switch, Neutral Safety Back-Up Switch, Ignition Coils 1-5, Air Conditioning Relay Injectors Driver Side Headlamp Power Control Module (PCM) B Power Control Module (PCM) Power Seat Circuit Breaker (If Equipped) Power Windows (If Equipped) Radio Rear Parking Lamp 1, Passenger Side Taillamp, License Plate Lamps Driver Side Rear Taillamp, Passenger Side Airbag Indicator Lighting, Instrument Panel Dimming Power (2WD/4WD switch lighting)
IGN
INJ LT HDLP PCM B PCMI
PWR/SEAT
PWR/WNDW RDO REAR PRK LAMP
REAR PRK LAMP2
6-112
Relays
A/C CMPRSR BEAM SEL DRL FOG/LAMP BK UP LP HDLP HORN
IGN 3 HVAC
PRK/LAMP
PWR/TRN
RAP
Usage
Relays
Usage
Air Conditioning Compressor Beam Selection Daylight Running Lamps Fog Lamps (If Equipped) Back Up Lamp Headlamps Horn Ignition 3, Climate Control, Climate Control Head Fuse, Power Seat Fuse Front Parking Lamp Fuse, Rear Parking Lamps Powertrain, Electronic Throttle Control Fuse, Oxygen Sensor Fuse Retained Accessory Power (Power Window Fuse, Wiper/Washer Switch Fuse), Sunroof Fuse
RUN/CRNK
STRTR
VSES
WPR WPR 2
Run/Crank, Airbag System Fuse, Cruise Control Fuse, Ignition Fuse, Back-Up Lamps, ABS Fuse, Front Axle, PCM-1, Injectors Fuse, Transmission Fuse, ERLS Starter Relay (PCM Relay) Vehicle Stability Enhancement System Wipers (On/Off) Wiper 2 (High/Low)
Miscellaneous A/C CLTCH MEGA FUSE WPR
Usage
Diode — Air Conditioning, Clutch Mega Fuse Diode — Wiper
6-113
2.9L and 3.7L
5.3L
Fuses
Usage
Trailer Park Lamp Communication Interface Module Supplemental Inflatable Restraint System, Sensing and Diagnostic Module Trailer Auxiliary Maxi-Fuse
6-114
Capacities and Specifications The following approximate conversion capacities are given in English and metric conversions. See Recommended Fluids and Lubricants on page 7-10 for more information.
Capacities and Specifications
Application
Air Conditioning Refrigerant R134a
Cooling System
2.9L L4 Engine 3.7L L5 Engine 5.3L V8 Engine
Engine Oil with Filter
2.9L L4 Engine 3.7L L5 Engine 5.3L V8 Engine
Fuel Tank
Capacities
Metric
English
For the air conditioning system refrigerant charge amount, see the refrigerant caution label located under the hood. See your dealer/retailer for more
information.
9.8 L 10.0 L 13.0 L
4.7 L 5.7 L 5.7 L 74 L
10.4 qt 10.6 qt 13.7 qt
5.0 qt 6.0 qt 6.0 qt 19.5 gal
6-115
Capacities and Specifications (cont’d)
Transmission
Application
Automatic (Pan Removal and Filter Replacement) Manual – Rear-Wheel Drive (Drain and Refill) Manual – Four-Wheel Drive (Drain and Refill)
Capacities
Metric
English
4.7 L 2.2 L 2.3 L 140 Y
5.0 qt 2.3 qt 2.4 qt 100 lb ft
Wheel Nut Torque All capacities are approximate. When adding, be sure to fill to the approximate level, as recommended in this manual. Recheck fluid level after filling.
Type
VIN Code
Transmission
Spark Plug Gap
Engine Specifications
Automatic
Manual
Automatic Automatic
1.01 mm (0.040 in)
1.01 mm (0.040 in) 1.01 mm (0.040 in)
2.9L L4
3.7L L5
5.3L V86-116
Section 7
Maintenance Schedule
Maintenance Schedule ......................................7-2
Introduction ...................................................7-2
Scheduled Maintenance ...................................7-3
Owner Checks and Services ............................7-8Recommended Fluids and Lubricants ...............7-10
Maintenance Replacement Parts .....................7-12
Engine Drive Belt Routing ..............................7-13
Maintenance Record .....................................7-147-1
Maintenance Schedule Introduction Notice: Maintenance intervals, checks, inspections, recommended fluids, and lubricants are necessary to keep this vehicle in good working condition. Damage caused by failure to follow scheduled maintenance might not be covered by the vehicle warranty. Proper vehicle maintenance helps to keep the vehicle in good working condition, improves fuel economy, and reduces vehicle emissions for better air quality. Because of all the different ways people use vehicles, maintenance needs vary. The vehicle might need more frequent checks and services. Please read the information under Scheduled Maintenance. To keep the vehicle in good condition, see your dealer/retailer. The maintenance schedule is for vehicles that: • carry passengers and cargo within recommended
limits on the Tire and Loading Information label. See Loading the Vehicle on page 5-33.
• are driven on reasonable road surfaces within legal
driving limits.
• are driven off-road in the recommended manner.
See Off-Road Driving on page 5-13.
• use the recommended fuel. See Gasoline Octane
on page 6-6.
7-2
{ WARNING:
Performing maintenance work on a vehicle can be dangerous. In trying to do some jobs, you can be seriously injured. Do your own maintenance work only if you have the required know-how and the proper tools and equipment for the job. If you have any doubt, see your dealer/retailer to have a qualified technician do the work. See Doing Your Own Service Work on page 6-4.
At your General Motors dealer/retailer, you can be certain that you will receive the highest level of service available. Your dealer /retailer has specially trained service technicians, uses genuine GM replacement parts, as well as, up to date tools and equipment to ensure fast and accurate diagnostics. The proper replacement parts, fluids, and lubricants to use are listed in Recommended Fluids and Lubricants on page 7-10 and Maintenance Replacement Parts on page 7-12. We recommend the use of genuine parts from your dealer/retailer.
Rotation of New Tires To maintain ride, handling, and performance of the vehicle, it is important that the first rotation service for new tires be performed when they have 8 000 to 13 000 km (5,000 to 8,000 miles). See Tire Inspection and Rotation on page 6-69.
Scheduled Maintenance When the Change Oil Message Displays Change engine oil and filter. See Engine Oil on page 6-15. An Emission Control Service. When the Change Oil message displays, service is required for the vehicle as soon as possible, within the next 1 000 km/600 miles. If driving under the best conditions, the engine oil life system might not indicate the need for vehicle service for more than a year. The engine oil and filter must be changed at least once a year and the oil life system must be reset. Your dealer/retailer has trained service technicians who will perform this work and reset the system. If the engine oil life system is reset accidentally, service the vehicle within 5 000 km/3,000 miles since the last service. Reset the oil life system whenever the oil is changed. See Engine Oil Life System on page 6-18.
When the Change Oil message displays, certain services, checks, and inspections are required. The services described for Maintenance I should be performed at every engine oil change. The services described for Maintenance II should be performed when: • Maintenance I was performed the last time the
engine oil was changed.
• It has been 10 months or more since the Change
Oil message has displayed or since the last service.
Maintenance I • Change engine oil and filter. See Engine Oil on
page 6-15. An Emission Control Service.
• Engine coolant level check. See Engine Coolant on
page 6-28.
• Windshield washer fluid level check. See Windshield
Washer Fluid on page 6-35.
• Tire inflation check. See Inflation - Tire Pressure on
page 6-62.
• Tire wear inspection. See Tire Inspection and
Rotation on page 6-69.
• Rotate tires. See Tire Inspection and Rotation on
page 6-69.
7-3
• Body hinges and latches, key lock cylinders, and folding seat hardware lubrication. Lubricate hood safety lever pivot and prop rod pivot and tailgate latch bolt, handle assembly pivot points, and hinges. See Recommended Fluids and Lubricants on page 7-10. More frequent lubrication may be required when vehicle is exposed to a corrosive environment. Applying silicone grease on weatherstrips with a clean cloth makes them last longer, seal better, and not stick or squeak.
• Restraint system component check. See Checking
the Restraint Systems on page 2-78.
• Automatic transmission fluid level check and adding fluid, if needed. See Automatic Transmission Fluid on page 6-21.
• Four-wheel drive vehicles: Transfer case fluid level
check and adding fluid, if needed.
• Engine air cleaner filter inspection. See Engine Air
Cleaner/Filter on page 6-19.
• Fluids visual leak check (or every 12 months,
whichever occurs first). A leak in any system must be repaired and the fluid level checked.
• Engine air cleaner filter inspection (vehicles driven
in dusty conditions only). See Engine Air Cleaner/ Filter on page 6-19.
• Brake system inspection (or every 12 months,
whichever occurs first).
Maintenance II • Perform all services described in Maintenance I. • Steering and suspension inspection. Visual
inspection for damaged, loose, or missing parts or signs of wear.
• Engine cooling system inspection. Visual inspection
of hoses, pipes, fittings, and clamps and replacement, if needed.
• Windshield wiper blade inspection for wear,
cracking, or contamination and windshield and wiper blade cleaning, if contaminated. See Windshield and Wiper Blades on page 6-105. Worn or damaged wiper blade replacement. See Windshield Wiper Blade Replacement on page 6-53.
7-4
Additional Required Services At Each Fuel Stop • Engine oil level check. See Engine Oil on page 6-15. • Engine coolant level check. See Engine Coolant on
page 6-28.
• Windshield washer fluid level check. See Windshield
Washer Fluid on page 6-35.
Once a Month • Tire inflation check. See Inflation - Tire Pressure on
page 6-62.
• Tire wear inspection. See Tire Inspection and
Rotation on page 6-69.
Once a Year • Starter switch check. See Owner Checks and
Services on page 7-8.
• Parking brake and automatic transmission P (Park)
mechanism check. See Owner Checks and Services on page 7-8.
• Automatic transmission shiftlock control system
check. See Owner Checks and Services on page 7-8.
• Ignition transmission lock check. See Owner Checks
and Services on page 7-8.
• Engine cooling system and pressure cap pressure
check. Radiator and air conditioning condenser outside cleaning. See Cooling System on page 6-26. • Exhaust system and nearby heat shields inspection
for loose or damaged components.
• Accelerator pedal check for damage, high effort, or
binding. Replace if needed.
First Engine Oil Change After Every 40 000 km/25,000 Miles • Fuel system inspection for damage or leaks.
7-5
First Engine Oil Change After Every 80 000 km/50,000 Miles • Engine air cleaner filter replacement. See Engine
Air Cleaner/Filter on page 6-19.
• Automatic transmission fluid change (severe
service) for vehicles mainly driven in heavy city traffic in hot weather, in hilly or mountainous terrain, when frequently towing a trailer, or used for taxi, police, or delivery service. See Automatic Transmission Fluid on page 6-21.
First Engine Oil Change After Every 160 000 km/100,000 Miles • Automatic transmission fluid change (normal service). See Automatic Transmission Fluid on page 6-21.
• Spark plug replacement. An Emission Control
Service.
First Engine Oil Change After Every 240 000 km/150,000 Miles • Engine cooling system drain, flush, and refill, cooling system and cap pressure check, and cleaning of outside of radiator and air conditioning condenser (or every 5 years, whichever occurs first). See Engine Coolant on page 6-28. An Emission Control Service.
• Engine accessory drive belt inspection for fraying,
excessive cracks, or obvious damage and replacement, if needed. An Emission Control Service.
7-6
Scheduled Maintenance
Service
Maintenance I Maintenance II
Change engine oil and filter. Reset oil life system. Engine coolant level check. Windshield washer fluid level check. Tire inflation pressures check. Tire wear inspection. Rotate tires. Fluids visual leak check. Engine air cleaner filter inspection (vehicles driven in dusty conditions only). Brake system inspection. Steering and suspension inspection. Engine cooling system inspection. Windshield wiper blades inspection. Body components lubrication. Restraint system components check. Automatic transmission fluid level check. Four-wheel drive only: Transfer case fluid level check. Engine air cleaner filter inspection (vehicles not driven in dusty conditions).
• • • • • • • • •
• • • • • • • • • • • • • • • • •
7-7
Owner Checks and Services Starter Switch Check
{ WARNING:
When you are doing this inspection, the vehicle could move suddenly. If the vehicle moves, you or others could be injured.
1. Before starting this check, be sure there is enough
room around the vehicle.
2. Firmly apply both the parking brake and the regular
brake. See Parking Brake on page 3-29. Do not use the accelerator pedal, and be ready to turn off the engine immediately if it starts.
3. For automatic transmission vehicles, try to start the
engine in each gear. The starter should work only in P (Park) or N (Neutral). If the starter works in any other position, your vehicle needs service.
For manual transmission vehicles, put the shift lever in Neutral, push the clutch pedal down halfway, and try to start the engine. The starter should work only when the clutch pedal is pushed down all the way to the floor. If the starter works when the clutch pedal is not pushed all the way down, your vehicle needs service.
Automatic Transmission Shift Lock Control System Check
{ WARNING:
When you are doing this inspection, the vehicle could move suddenly. If the vehicle moves, you or others could be injured.
1. Before starting this check, be sure there is enough room around the vehicle. It should be parked on a level surface.
2. Firmly apply the parking brake. See Parking Brake
on page 3-29. Be ready to apply the regular brake immediately if the vehicle begins to move.
7-8
3. With the engine off, turn the ignition to ON/RUN, but do not start the engine. Without applying the regular brake, try to move the shift lever out of P (Park) with normal effort. If the shift lever moves out of P (Park), contact your dealer/retailer for service.
Ignition Transmission Lock Check While parked, and with the parking brake set, try to turn the ignition to LOCK/OFF in each shift lever position. • For automatic transmission vehicles, the ignition
should turn to LOCK/OFF only when the shift lever is in P (Park). The ignition key should come out only in LOCK/OFF.
• For manual transmission vehicles, the ignition
should turn to LOCK/OFF only when you press the key release button.
On all vehicles, the ignition key should come out only in LOCK/OFF. Turn the steering wheel to the left and to the right. It should only lock when turned to the right. Contact your dealer/retailer if service is required.
Parking Brake and Automatic Transmission P (Park) Mechanism Check
{ WARNING:
When you are doing this check, the vehicle could begin to move. You or others could be injured and property could be damaged. Make sure there is room in front of the vehicle in case it begins to roll. Be ready to apply the regular brake at once should the vehicle begin to move.
Park on a fairly steep hill, with the vehicle facing downhill. Keeping your foot on the regular brake, set the parking brake. • To check the parking brake’s holding ability: With
the engine running and the transmission in N (Neutral), slowly remove foot pressure from the regular brake pedal. Do this until the vehicle is held by the parking brake only.
• To check the P (Park) mechanism’s holding ability:
With the engine running, shift to P (Park). Then release the parking brake followed by the regular brake.
Contact your dealer/retailer if service is required.
7-9
Recommended Fluids and Lubricants Fluids and lubricants identified below by name, part number, or specification can be obtained from your dealer/retailer.
Usage
Engine Oil
Engine Coolant
Hydraulic Brake
System
Windshield
Washer
Fluid/Lubricant Engine oil which meets GM Standard GM6094M and displays the American Petroleum Institute Certified for Gasoline Engines starburst symbol. To determine the proper viscosity for your vehicle’s engine, see Engine Oil on page 6-15. 50/50 mixture of clean, drinkable water and use only DEX-COOL® Coolant. See Engine Coolant on page 6-28. DOT 3 Hydraulic Brake Fluid (GM Part No. U.S. 12377967, in Canada 89021320).
Optikleen® Washer Solvent.
Usage
Fluid/Lubricant
Parking Brake Cable Guides
Power Steering
System
Automatic
Transmission
Manual
Transmission
Hydraulic
Clutch System
Key Lock Cylinders
Chassis
Lubrication
Chassis Lubricant (GM Part No. U.S. 12377985, in Canada 88901242) or lubricant meeting requirements of NLGI #2, Category LB or GC-LB. GM Power Steering Fluid (GM Part No. U.S. 89021184, in Canada 89021186). DEXRON®-VI Automatic Transmission Fluid. Manual Transmission Fluid (GM Part No. U.S. 89021806, in Canada 89021807). Hydraulic Clutch Fluid (GM Part No. U.S. 12345347, in Canada 10953517) or equivalent DOT-3 brake fluid. Multi-Purpose Lubricant, Superlube (GM Part No. U.S. 12346241, in Canada 10953474). Chassis Lubricant (GM Part No. U.S. 12377985, in Canada 88901242) or lubricant meeting requirements of NLGI #2, Category LB or GC-LB.
7-10
Usage
Fluid/Lubricant
Usage
Fluid/Lubricant
Front and Rear Axle
Transfer Case
Rear Driveline Center Spline and Universal
Joints
Constant Velocity
Universal Joint
Hood Latch Assembly, Secondary
Latch, Pivots,
Spring
Anchor, and Release Pawl
SAE 75W-90 Synthetic Axle Lubricant (GM Part No. U.S. 89021677, in Canada 89021678) meeting GM Specification 9986115. Synchromesh Transmission Fluid (GM Part No. U.S. 12345349, in Canada 10953465). Chassis Lubricant (GM Part No. U.S. 12377985, in Canada 88901242) or lubricant meeting requirements of NLGI #2, Category LB or GC-LB. Chassis Lubricant (GM Part No. U.S. 12377985, in Canada 88901242) or lubricant meeting requirements of NLGI #2, Category LB or GC-LB.
Lubriplate Lubricant Aerosol (GM Part No. U.S. 12346293, in Canada 992723) or lubricant meeting requirements of NLGI #2, Category LB or GC-LB.
Hood and Door Hinges, Body Door Hinge Pins, Liftgate
Hinge and Linkage,
Folding Seats, and Fuel Door
Hinge
Multi-Purpose Lubricant, Superlube (GM Part No. U.S. 12346241, in Canada 10953474).
Outer Tailgate Handle Pivot Points and
Hinges
Weatherstrip Conditioning
Weatherstrip
Squeaks
Multi-Purpose Lubricant, Superlube (GM Part No. U.S. 12346241, in Canada 10953474).
Weatherstrip Lubricant (GM Part No. U.S. 3634770, in Canada 10953518) or Dielectric Silicone Grease (GM Part No. U.S. 12345579, in Canada 992887). Synthetic Grease with Teflon, Superlube (GM Part No. U.S. 12371287, in Canada 10953437).
7-11
Maintenance Replacement Parts Replacement parts identified below by name, part number, or specification can be obtained from your dealer/retailer.
Part
GM Part Number
ACDelco Part Number
15942429
19210283
19210285
8901752412625058
1260987710389562
10389563—
PF46
PF61
PF4841-103
41-985— —
Engine Air Cleaner/Filter Engine Oil Filter
2.9L L4 Engine 3.7L L5 Engine 5.3L V8 Engine
Spark Plugs
2.9L L4 and 3.7L L5 Engines 5.3L V8 Engine
Wiper Blades
Driver Side — 22 in (55 cm) Passenger Side — 19 in (48 cm)
7-12
Engine Drive Belt Routing
2.9L and 3.7L Engines
5.3L Engine
7-13
Maintenance Record After the scheduled services are performed, record the date, odometer reading, who performed the service, and the type of services performed in the boxes provided. Retain all maintenance receipts.
Date
Odometer Reading
Serviced By
Services Performed
Maintenance Record
7-14
Date
Odometer Reading
Serviced By
Services Performed
Maintenance Record (cont’d)
7-15
Date
Odometer Reading
Serviced By
Services Performed
Maintenance Record (cont’d)
7-16
Section 8
Customer Assistance Information
Customer Assistance and Information ...............8-2
Customer Satisfaction Procedure ......................8-2
Online Owner Center ......................................8-5
Customer Assistance for Text Telephone(TTY) Users ...............................................8-6
Customer Assistance Offices ............................8-6
GM Mobility Reimbursement Program ................8-7
Roadside Assistance Program ..........................8-8
Scheduling Service Appointments ....................8-10
Courtesy Transportation Program ....................8-10
Collision Damage Repair ................................8-12Reporting Safety Defects ................................8-15
Reporting Safety Defects to the United States
Government ..............................................8-15
Reporting Safety Defects to the Canadian
Government ..............................................8-16
Reporting Safety Defects to
General Motors .........................................8-16
Service Publications Ordering Information .........8-16
Vehicle Data Recording and Privacy ................8-17
Event Data Recorders ...................................8-18
OnStar® ......................................................8-19
Radio Frequency Identification (RFID) ..............8-19
Radio Frequency Statement ...........................8-198-1
Customer Assistance and Information
Customer Satisfaction Procedure Your satisfaction and goodwill are important to your dealer and to Chevrolet. Normally, any concerns with the sales transaction or the operation of the vehicle will be resolved by the dealer’s sales or service departments. Sometimes, however, despite the best intentions of all concerned, misunderstandings can occur. If your concern has not been resolved to your satisfaction, the following steps should be taken:
STEP ONE: Discuss your concern with a member of dealership management. Normally, concerns can be quickly resolved at that level. If the matter has already been reviewed with the sales, service, or parts manager, contact the owner of the dealership or the general manager.
STEP TWO: If after contacting a member of dealership management, it appears your concern cannot be resolved by the dealership without further help, in the U.S., call the Chevrolet Customer Assistance Center at 1-800-222-1020. In Canada, call General Motors of Canada Customer Communication Centre at 1-800-263-3777 (English), or 1-800-263-7854 (French).
We encourage you to call the toll-free number in order to give your inquiry prompt attention. Have the following information available to give the Customer Assistance Representative: • Vehicle Identification Number (VIN). This is available from the vehicle registration or title, or the plate at the top left of the instrument panel and visible through the windshield.
• Dealership name and location. • Vehicle delivery date and present mileage. When contacting Chevrolet, remember that your concern will likely be resolved at a dealer’s facility. That is why we suggest following Step One first.
8-2
STEP THREE — U.S. Owners: Both General Motors and your dealer are committed to making sure you are completely satisfied with your new vehicle. However, if you continue to remain unsatisfied after following the procedure outlined in Steps One and Two, you can file with the Better Business Bureau (BBB) Auto Line Program to enforce your rights.
The BBB Auto Line Program is an out of court program administered by the Council of Better Business Bureaus to settle automotive disputes regarding vehicle repairs or the interpretation of the New Vehicle Limited Warranty. Although you may be required to resort to this informal dispute resolution program prior to filing a court action, use of the program is free of charge and your case will generally be heard within 40 days. If you do not agree with the decision given in your case, you may reject it and proceed with any other venue for relief available to you.
You may contact the BBB Auto Line Program using the toll-free telephone number or write them at the following address:
BBB Auto Line Program Council of Better Business Bureaus, Inc. 4200 Wilson Boulevard Suite 800
Arlington, VA 22203-1838
Telephone: 1-800-955-5100
dr.bbb.org/goautoThis program is available in all 50 states and the District of Columbia. Eligibility is limited by vehicle age, mileage, and other factors. General Motors reserves the right to change eligibility limitations and/or discontinue its participation in this program.
8-3
STEP THREE — Canadian Owners: In the event that you do not feel your concerns have been addressed after following the procedure outlined in Steps 1 and 2, General Motors of Canada Limited wants you to be aware of its participation in a no-charge Mediation/Arbitration Program. General Motors of Canada Limited has committed to binding arbitration of owner disputes involving factory-related vehicle service claims. The program provides for the review of the facts involved by an impartial third party arbiter, and may include an informal hearing before the arbiter. The program is designed so that the entire dispute settlement process, from the time you file your complaint to the final decision, should be completed in about 70 days. We believe our impartial program offers advantages over courts in most jurisdictions because it is informal, quick, and free of charge.
For further information concerning eligibility in the Canadian Motor Vehicle Arbitration Plan (CAMVAP), call toll-free 1-800-207-0685, or call the General Motors Customer Communication Centre, 1-800-263-3777
(English), 1-800-263-7854 (French), or write to:The Mediation/Arbitration Program c/o Customer Communication Centre General Motors of Canada Limited Mail Code: CA1-163-005
1908 Colonel Sam Drive Oshawa, Ontario L1H 8P7Your inquiry should be accompanied by the Vehicle Identification Number (VIN).
8-4
Online Owner Center Online Owner Center (U.S.) — www.gmownercenter.com/chevrolet Information and services customized for your specific vehicle — all in one convenient place. • Digital owner manual, warranty information,
and more
• Online service and maintenance records • Find Chevrolet dealers for service nationwide • Exclusive privileges and offers • Recall notices for your specific vehicle • OnStar® and GM Cardmember Services Earnings
summaries
Other Helpful Links: Chevrolet — www.chevrolet.com Chevrolet Merchandise — www.chevymall.com Help Center — www.chevrolet.com/helpcenter • FAQ • Contact Us
My GM Canada (Canada) — www.gm.ca My GM Canada is a password-protected section of www.gm.ca where you can save information on GM vehicles, get personalized offers, and use handy tools and forms with greater ease. Here are a few of the valuable tools and services you will have access to: • My Showroom: Find and save information on
vehicles and current offers in your area.
• My Dealers/Retailers: Save details such as address
and phone number for each of your preferred GM dealers/retailers.
• My Driveway: Access quick links to parts and
service estimates, check trade-in values, or schedule a service appointment by adding the vehicles you own to your driveway profile.
• My Preferences: Manage your profile and use tools
and forms with greater ease.
To sign up, visit the My GM Canada section within www.gm.ca.
8-5
From Puerto Rico:
1-800-496-9992 (English) 1-800-496-9993 (Spanish)
From U.S. Virgin Islands:
1-800-496-9994
Canada — Customer Assistance
General Motors of Canada Limited Customer Communication Centre, CA1-163-005
1908 Colonel Sam Drive Oshawa, Ontario L1H 8P7
gmcanada.com 1-800-263-3777 (English) 1-800-263-7854 (French) 1-800-263-3830 (For Text Telephone devices (TTYs)) Roadside Assistance: 1-800-268-6800Customer Assistance for Text Telephone (TTY) Users To assist customers who are deaf, hard of hearing, or speech-impaired and who use Text Telephones (TTYs), Chevrolet has TTY equipment available at its Customer Assistance Center. Any TTY user in the U.S. can communicate with Chevrolet by dialing: 1-800-833-CHEV (2438). (TTY users in Canada can dial 1-800-263-3830.)
Customer Assistance Offices Chevrolet encourages customers to call the toll-free number for assistance. However, if a customer wishes to write or e-mail Chevrolet, the letter should be addressed to: United States — Customer Assistance
Chevrolet Motor Division Chevrolet Customer Assistance Center P.O. Box 33170
Detroit, MI 48232-5170
Chevrolet.com 1-800-222-1020
1-800-833-2438 (For Text Telephone devices (TTYs)) Roadside Assistance: 1-800-CHEV-USA (243-8872)8-6
Overseas — Customer Assistance Please contact the local General Motors Business Unit. Mexico, Central America and Caribbean Islands/Countries (Except Puerto Rico and U.S. Virgin Islands) — Customer Assistance