- 2007 Cadillac STS Owners Manuals
- Cadillac STS Owners Manuals
- 2006 Cadillac STS Owners Manuals
- Cadillac STS Owners Manuals
- 2008 Cadillac STS Owners Manuals
- Cadillac STS Owners Manuals
- 2009 Cadillac STS Owners Manuals
- Cadillac STS Owners Manuals
- 2005 Cadillac STS Owners Manuals
- Cadillac STS Owners Manuals
- 2010 Cadillac STS Owners Manuals
- Cadillac STS Owners Manuals
- 2011 Cadillac STS Owners Manuals
- Cadillac STS Owners Manuals
- Download PDF Manual
-
if the GPS satellite signals are unobstructed and available.
The vehicle must have a working electrical system, including adequate battery power, for the OnStar equipment to operate. There are other problems OnStar cannot control that may prevent OnStar from providing OnStar service at any particular time or place. Some examples are damage to important parts of the vehicle in a crash, hills, tall buildings, tunnels, weather or wireless phone network congestion. Your Responsibility Increase the volume of the radio if the OnStar advisor cannot be heard. If the light next to the OnStar buttons is red, the system may not be functioning properly. Press the OnStar button and request a vehicle diagnostic. If the light appears clear (no light is appearing), your OnStar subscription has expired and all services have been deactivated. Press the OnStar button to confirm that the OnStar equipment is active.
Universal Home Remote System The Universal Home Remote System provides a way to replace up to three hand-held Radio-Frequency (RF) transmitters used to activate devices such as garage door openers, security systems, and home lighting. This device complies with Part 15 of the FCC Rules. Operation is subject to the following two conditions: 1. This device may not cause harmful interference. 2. This device must accept any interference received,
including interference that may cause undesired operation.
This device complies with RSS-210 of Industry Canada. Operation is subject to the following two conditions: 1. This device may not cause interference. 2. This device must accept any interference received,
including interference that may cause undesired operation of the device.
Changes or modifications to this system by other than an authorized service facility could void authorization to use this equipment.
2-53
Universal Home Remote System Operation (With Three Round LED)
The vehicle may have the Universal Home Remote System. If there are three round Light Emitting Diode (LED) indicator lights above the Universal Home Remote buttons, follow the instructions below. This system provides a way to replace up to three remote control transmitters used to activate devices such as garage door openers, security systems, and home automation devices.
Do not use this system with any garage door opener that does not have the stop and reverse feature. This includes any garage door opener model manufactured before April 1, 1982. Read the instructions completely before attempting to program the transmitter. Because of the steps involved, it may be helpful to have another person available to assist you in programming the transmitter. Be sure to keep the original remote control transmitter for use in other vehicles, as well as, for future programming. Only the original remote control transmitter is needed for Fixed Code programming. The programmed buttons should be erased when the vehicle is sold or the lease ends. See “Erasing Universal Home Remote Buttons” later in this section. Park the vehicle outside of the garage when programming a garage door. Be sure that people and objects are clear of the garage door or gate that is being programmed.
2-54
Programming Universal Home Remote — Rolling Code For questions or help programming the Universal Home Remote System, call 1-866-572-2728 or go to learcar2u.com. Most garage door openers sold after 1996 are Rolling Code units. Programming a garage door opener involves time-sensitive actions, so read the entire procedure before starting. Otherwise, the device will time out and the procedure will have to be repeated. To program up to three devices:
1. From inside the vehicle, press the two outside
buttons at the same time for one to two seconds, and immediately release them.
2. Locate in the garage, the garage door opener
receiver (motor-head unit). Locate the “Learn” or “Smart” button. It can usually be found where the hanging antenna wire is attached to the motor-head unit and may be a colored button. Press this button. After pressing this button, complete the following steps in less than 30 seconds.
3. Immediately return to the vehicle. Press and hold
the Universal Home Remote button that will be used to control the garage door until the garage door moves. The indicator light, above the selected button, should slowly blink. This button may need to be held for up to 20 seconds.
2-55
4. Immediately, within one second, release the button
when the garage door moves. The indicator light will blink rapidly until programming is complete.
5. Press and release the same button again. The garage door should move, confirming that programming is successful and complete. To program another Rolling Code device such as an additional garage door opener, a security device, or home automation device, repeat Steps 1-5, choosing a different function button in Step 3 than what was used for the garage door opener. If these instructions do not work, the garage door opener is probably a Fixed Code unit. Follow the Programming instructions that follow for a Fixed Code garage door opener. Programming Universal Home Remote — Fixed Code For questions or help programming the Universal Home Remote System, call 1-866-572-2728 or go to learcar2u.com. Most garage door openers sold before 1996 are Fixed Code units. Programming a garage door opener involves time-sensitive actions, so read the entire procedure before starting. Otherwise, the device will time out and the procedure will have to be repeated.
2-56
To program up to three devices:
1. To verify that the garage door opener is a Fixed Code unit, remove the battery cover on the hand held transmitter supplied by the manufacturer of the garage door opener motor. If there are a row of dip switches similar to the graphic above, the garage door opener is a Fixed Code unit. If you do not see a row of dip switches, return to the previous section for Programming Universal Home Remote – Rolling Code. The hand held transmitter can have between eight to 12 dip switches depending on the brand of transmitter.
The garage door opener receiver (motor head unit) could also have a row of dip switches that can be used when programming the Universal Home Remote. If the total number of switches on the motor head and hand held transmitter are different, or if the dip switch settings are different, use the dip switch settings on the motor head unit to program the Universal Home Remote. The motor head dip switch settings can also be used when the original hand held transmitter is not available.
Example of Eight Dip Switches with Two Positions
Example of Eight Dip Switches with Three Positions
The panel of switches might not appear exactly as they do in the examples above, but they should be similar. The switch positions on your hand-held transmitter could be labeled, as follows: (cid:129) A switch in the up position could be labeled
as “Up,” “+,” or “On.”
(cid:129) A switch in the down position could be labeled
as “Down,” “−,” or “Off.”
(cid:129) A switch in the middle position could be labeled
as “Middle,” “0,” or “Neutral.”
2-57
2. Write down the eight to 12 switch settings from left
to right as follows: (cid:129) When a switch is in the up position, write “Left.” (cid:129) When a switch is in the down position,
write “Right.” If a switch is set between the up and down position, write “Middle.” The switch settings written down in Step 2 will now become the button strokes to be entered into the Universal Home Remote in Step 4. Be sure to enter the switch settings written down in Step 2, in order from left to right, into the Universal Home Remote, when completing Step 4.
3. From inside your vehicle, first firmly press all three buttons at the same time for about three seconds. Release the buttons to put the Universal Home Remote into programming mode.
4. The indicator lights will blink slowly. Enter each
switch setting from Step 2 into your vehicle’s Universal Home Remote. You will have two and one-half minutes to complete Step 4. Now press one button on the Universal Home Remote for each switch setting as follows:
If you wrote “Left,” press the left button in the vehicle. If you wrote “Right,” press the right button in the vehicle. If you wrote “Middle,” press the middle button in the vehicle.
2-58
(cid:129) (cid:129) (cid:129) (cid:129) 5. After entering all of the switch positions, again, firmly press and release all three buttons at the same time. The indicator lights will turn on.
6. Press and hold the button that will be used to control the garage door until the garage door moves. The indicator light above the selected button should slowly blink. This button may need to be held for up to 55 seconds.
7. Immediately release the button when the garage door moves. The indicator light will blink rapidly until programming is complete.
8. Press and release the same button again. The garage door should move, confirming that programming is successful and complete. To program another Fixed Code device such as an additional garage door opener, a security device, or home automation device, repeat Steps 1-8, choosing a different button in Step 6 than what was used for the garage door opener. Using Universal Home Remote Press and hold the appropriate button for at least half of a second. The indicator light will come on while the signal is being transmitted.
Reprogramming Universal Home Remote Buttons Any of the three buttons can be reprogrammed by repeating the instructions. Erasing Universal Home Remote Buttons The programmed buttons should be erased when the vehicle is sold or the lease ends. To erase either Rolling Code or Fixed Code on the Universal Home Remote device: 1. Press and hold the two outside buttons at the same time for approximately 20 seconds, until the indicator lights, located directly above the buttons, begin to blink rapidly.
2. Once the indicator lights begin to blink, release both
buttons. The codes from all buttons will be erased. For help or information on the Universal Home Remote System, call the customer assistance phone number under Customer Assistance Offices on page 7-6.
2-59
Storage Areas
Sunroof
Glove Box Lift up on the glove box lever to open it.
Cupholders The vehicle has two cupholders in the center console area.
Center Console Storage The vehicle has a center console storage area located between the front seats. It includes storage areas, and accessory power outlet(s) on the rear of the console.
Convenience Net Use the convenience net, located in the rear, to store small loads as far forward as possible. The net should not be used to store heavy loads.
2-60
If the vehicle has a power sunroof, the switches are located on the overhead console.
To open or close the sunroof, the ignition must be on or Retained Accessory Power (RAP) must be active. See Retained Accessory Power (RAP) on page 2-27. Express Open: The express open feature will operate from the closed or partially open position. To express open the power sunroof, fully press the driver’s side switch rearward once. To stop the sunroof glass in a desired position other than to the express-open position, press the switch again, in either direction, to stop the movement. If the sunshade is in the closed position, it will open with the sunroof, or it can be opened manually.
Vent Open: To open the power sunroof to the vent position from the closed position, press and hold the passenger’s side sunroof switch forward. The rear of the sunroof panel will tilt upward to the full vent position. The sunshade must be opened manually. Express Close: The express close feature will operate from the open or partially open position. To express close the power sunroof, fully press the driver’s side switch forward once. To stop the sunroof glass in a desired position other than closed, press the switch again in either direction. The sunshade must be closed manually. Close: To close the power sunroof, operate the controls according to one of the following:
From the open position, press and hold the driver’s side sunroof switch forward. The sunshade must be closed manually. From the vent position, press and hold the passenger’s side sunroof switch rearward.
Anti-Pinch: If an object is in the path of the sunroof while it is closing, the anti-pinch feature will detect the object and stop the sunroof from closing at the point of the obstruction. The sunroof will then return to the full-open or vent position. To close the sunroof once it has re-opened, refer to the two options previously described under the “Close” feature instructions.
Do not keep the sunroof open for long periods of time while the vehicle is not in use. Debris can collect in the tracks and possibly damage the sunroof operation or plug the water draining system. Vehicle Personalization The vehicle has personalization that allows you to program certain features to a preferred setting for up to two drivers. The back of the keyless access transmitters are labelled 1 or 2. Additional keyless access transmitters programmed to the vehicle, as 3 and/or 4, do not have a number on the back and are not capable of being personalized. The number of programmable features varies depending upon which vehicle options are purchased. On all vehicles, features such as climate control settings, radio and XM™ preset settings, exterior lighting at unlock and remote lock unlock confirmation, and language have already been programmed. Your vehicle also has an automatic door locking feature that is always on. You cannot turn the automatic door locking feature off. See Programmable Automatic Door Locks on page 2-14. Some vehicles have additional features that can be programmed including the seat, steering column, and outside rearview mirror position. If your vehicle has the base audio system, the following information explains the vehicle personalization on your vehicle.
2-61
(cid:129) (cid:129) If your vehicle has the Navigation system, see “Personalization” in the Index of the Navigation System manual for information on vehicle personalization. If your vehicle has the ability to program additional personalization features, the driver’s preferences are recalled by pressing any button on the keyless access transmitter, 1 or 2, by selecting Driver 1 or 2 on the radio display, or when a valid keyless access transmitter is detected upon opening the driver’s door. If more than one valid keyless access transmitter is detected upon opening the driver’s door, the driver preferences for the lowest driver number will be recalled. Certain features can be programmed not to recall until the ignition is turned off. The default settings were preset but may have been changed. To change feature preferences, use the following procedure. Entering the Personal Settings Menu To enter the feature programming mode: 1. The ignition must be either on, in ACCESSORY,
or in RAP and the transmission in P (Park) or the vehicle speed less than 6 mph (9 km/h). To avoid excessive drain on the battery, it is recommended that the headlamps are turned off.
2-62
2. Press any button on the appropriate keyless access transmitter to identify yourself as Driver 1 or Driver 2.
3. Turn on the radio by pressing the power/
volume knob.
4. Press the CNFG radio button or the tune/select
knob located on the right side of the radio to enter the radio’s main menu.
5. Turn the tune/select knob and scroll to SETUP. 6. Press the tune/select knob to enter the
SETUP menu.
7. Turn the tune/select knob and scroll to PERSONAL SETTINGS MENU, then press the tune/select knob to turn the feature on. A check mark appears after this selection when it is turned on and the entire list of personalization features will appear.
8. Turn the tune/select knob and scroll to the feature
you want to change, then press the tune/select knob to turn the feature on or off. If the feature is turned on, a check mark will appear next to the feature name. Some features have submenus that show additional features that can be turned on or off. After entering a submenu, turn the tune/select knob and scroll to the feature you want to change, then press the tune/ select knob to turn the feature on or off.
Personal Settings Menu Items The PERSONAL SETTINGS MENU must be selected with a check mark to program the personalization features. If it is not selected, press the tune/select knob until the check mark appears. If it is selected, the entire list of features will be available to program. DRIVER GREETING This feature allows you to type in a customized name or greeting that will appear on the display whenever the corresponding keyless access transmitter, 1 or 2, is used or Driver 1 or Driver 2 is selected on the radio display. If a customized name or greeting is not programmed, the system will show Driver 1 or Driver 2 to correspond with the numbers on the back of the keyless access transmitters. In this case, the customized driver greeting feature is factory shipped as off. To turn the driver greeting feature on and to program a customized name or greeting: 1. Enter the PERSONAL SETTINGS MENU by
following the instructions listed previously under “Entering the Personal Settings Menu.”
2. Turn the tune/select knob until DRIVER GREETING
is highlighted.
3. Press the tune/select knob to turn on the DRIVER
GREETING feature. You will see a cursor on the screen.
4. Turn the tune/select knob until you reach the
first letter you want; the letter will be highlighted. There is a complete alphabet with both upper and lower case letters and the numbers zero through nine. Also included are spaces and other non-letter characters such as the ampersand (&).
5. Press the tune/select knob once to select the letter.
The letter will then appear on the display and the cursor will advance to the next letter. If you make a mistake, press the F5 button, located on the radio, repeatedly to cycle back through all of the characters until you reach the character you wish to change. Then turn the tune/select knob until the letter you want is highlighted and press the tune/ select knob to select the new letter.
6. Repeat Steps 4 and 5 until the name or greeting
you want is complete. You can program up to 16 characters.
2-63
The name or greeting you programmed is now set. You can either exit the programming mode by following the instructions later in this section or program the next feature available on your vehicle by pressing the F6 (BACK) button, located on the radio, to return to the PERSONAL SETTINGS MENU. You will now see a check mark next to the driver greeting menu item, which means that the driver greeting feature is on and a customized driver greeting is being used. To turn off the customized driver greeting, and go back to displaying either Driver 1 or Driver 2: 1. Enter the PERSONAL SETTINGS MENU by
following the instructions listed previously under “Entering the Personal Settings Menu.”
2. Turn the tune/select knob until DRIVER GREETING
is highlighted.
3. Press the tune/select knob to turn on the DRIVER
GREETING feature. The check mark will be cleared and the customized driver greeting is off.
To change a customized driver greeting after exiting the screen to spell the name, turn the driver greeting feature off, and then back on.
KEY FOB REMINDER This feature sounds the horn three times when the driver’s door is closed and there is a keyless access transmitter left inside of the vehicle. This will only occur when the vehicle is off. Programmable Modes
Mode 1: ON (default)
Mode 2: OFF To program the vehicle to a different mode: 1. Enter the PERSONAL SETTINGS MENU by
following the instructions listed previously under “Entering the Personal Settings Menu.”
2. Turn the tune/select knob until KEY FOB
REMINDER is highlighted.
3. Press the tune/select knob to switch back and forth
between on and off. When the mode is turned on, a check mark will appear next to the feature name.
The mode you selected is now set. You can either exit the programming mode by following the instructions later in this section or program the next feature available on your vehicle.
2-64
REMOTE START With remote start you can choose which features are activated when the vehicle is started remotely. These features include the climate control system, the rear defogger, and the seat temperature, if your vehicle has this feature. See Remote Vehicle Start on page 2-11
for more information.Mode 1: ON (default)
Mode 2: OFF To program the vehicle to a different mode: 1. Enter the PERSONAL SETTINGS MENU by
following the instructions listed previously under “Entering the Personal Settings Menu.”
2. Turn the tune/select knob until REMOTE START is
highlighted.
3. Press the tune/select knob to switch back and forth
between on and off.
When REMOTE START is on, a check mark will appear next to the feature name. You can then choose to activate any or all of the following features by turning the tune/select knob to highlight the feature, then pressing the knob to turn it on.
CLIMATE CONTROL: The climate control system will engage when the vehicle is started using the remote start feature. It will be at the same climate control setting that was last used by the driver using that keyless entry transmitter.
REAR WINDOW DEFOG: If this feature is active, the rear defogger will engage when the vehicle is started using the remote start feature.
SEAT TEMP (Temperature) CONTROL: If your vehicle has this feature and this feature is active, the seats will be heated or cooled when the vehicle is started using the remote start feature. The mode you selected is now set. You can either exit the programming mode by following the instructions later in this section or program the next feature available on your vehicle by pressing the F6 (BACK) button, located on the radio, to return to the PERSONAL SETTINGS MENU.
2-65
REMOTE RECALL MEMORY If your vehicle has the optional memory package, you will have this feature. When this feature is turned on, you can recall any previously programmed seat position and mirror position when the unlock button on the keyless access transmitter is pressed. Programmable Modes Mode 1: ON Mode 2: OFF (default) The exception to the default is the recall seat to driver position which is on. To program the vehicle to a different mode: 1. Enter the PERSONAL SETTINGS MENU by
following the instructions listed previously under “Entering the Personal Settings Menu.”
2. Turn the tune/select knob until REMOTE RECALL
MEMORY is highlighted.
3. Press the tune/select knob to switch back and forth
between on and off. When the mode is turned on, a check mark will appear next to the feature name.
If this feature is selected, START BUTTON RECALL cannot be selected. The mode you selected is now set. You can either exit the programming mode by following the instructions later in this section or program the next feature available on your vehicle.
2-66
START BUTTON RECALL If your vehicle has the optional memory package, you will have this feature. When this feature is turned on, you can recall any previously programmed seat, mirror, and steering column position when the start button on the ignition is pressed. Programmable Modes
Mode 1: ON
Mode 2: OFF (default) To program the vehicle to a different mode: 1. Enter the PERSONAL SETTINGS MENU by
following the instructions listed previously under “Entering the Personal Settings Menu.”
2. Turn the tune/select knob until START BUTTON
RECALL is highlighted.
3. Press the tune/select knob to switch back and forth
between on and off. When the mode is turned on, a check mark will appear next to the feature name.
If this feature is selected, REMOTE RECALL MEMORY cannot be selected. The mode you selected is now set. You can either exit the programming mode by following the instructions later in this section or program the next feature available on your vehicle.
AUTO EXIT SEAT If your vehicle has the optional memory package, you will have this feature. When this feature is turned on, you can recall any previously programmed exit position for the driver’s seat when the vehicle is off, the shift lever is in P (Park), and the driver’s door is opened. Programmable Modes
AUTO EXIT COLUMN If your vehicle has the optional memory package, you will have this feature. When this feature is turned on, you can recall any previously programmed exit position for the steering column when the vehicle is off, the shift lever is in P (Park), and the driver’s door is opened. Programmable Modes
Mode 1: ON
Mode 1: ON
Mode 2: OFF (default) To program the vehicle to a different mode: 1. Enter the PERSONAL SETTINGS MENU by
following the instructions listed previously under “Entering the Personal Settings Menu.”
2. Turn the tune/select knob until AUTO EXIT SEAT is
highlighted.
Mode 2: OFF (default) To program the vehicle to a different mode: 1. Enter the PERSONAL SETTINGS MENU by
following the instructions listed previously under “Entering the Personal Settings Menu.”
2. Turn the tune/select knob until AUTO EXIT
COLUMN is highlighted.
3. Press the tune/select knob to switch back and forth
between on and off. When the mode is turned on, a check mark will appear in the box next to the feature name.
3. Press the tune/select knob to switch back and forth
between on and off. When the mode is turned on, a check mark will appear in the box next to the feature name.
The mode you selected is now set. You can either exit the programming mode by following the instructions later in this section or program the next feature available on your vehicle.
The mode you selected is now set. You can either exit the programming mode by following the instructions later in this section or program the next feature available on your vehicle.
2-67
LIGHTS FLASH AT UNLOCK This feature allows the exterior lamps to flash when the keyless access transmitter is used to unlock the vehicle. All doors must be closed for this feature to work, and the lamps will not flash if the parking lamps or headlamps are on. If LIGHTS FLASH AT UNLOCK is turned on and either KEYLESS FT DOOR UNLOCK or KEYLESS DOORS UNLOCK is turned on, the exterior lamps will flash when the doors are passively unlocked. See “KEYLESS FT (Front) DOOR UNLOCK” and “KEYLESS DOORS UNLOCK” later in this section for more information.
Programmable Modes
Mode 1: ON (default)
Mode 2: OFF To program the vehicle to a different mode: 1. Enter the PERSONAL SETTINGS MENU by
following the instructions listed previously under “Entering the Personal Settings Menu.”
2. Turn the tune/select knob until LIGHTS FLASH AT
UNLOCK is highlighted.
3. Press the tune/select knob to switch back and forth
between on and off. When the mode is turned on, a check mark will appear next to the feature name.
The mode you selected is now set. You can either exit the programming mode by following the instructions later in this section or program the next feature available on your vehicle. LIGHTS FLASH AT LOCK This feature allows the exterior lamps to flash once when the keyless access transmitter is used to lock the vehicle. All doors must be closed for this feature to work, and the lamps will not flash if the parking lamps or headlamps are on. If LIGHTS FLASH AT LOCK is turned on and either KEYLESS FT DOOR UNLOCK or KEYLESS DOORS UNLOCK is turned on, the exterior lamps will flash when the doors are passively unlocked. See “KEYLESS FT (Front) DOOR UNLOCK” and “KEYLESS DOORS UNLOCK” later in this section for more information.
2-68
Programmable Modes Mode 1: ON (default) Mode 2: OFF To program the vehicle to a different mode: 1. Enter the PERSONAL SETTINGS MENU by
following the instructions listed previously under “Entering the Personal Settings Menu.”
2. Turn the tune/select knob until LIGHTS FLASH AT
LOCK is highlighted.
3. Press the tune/select knob to switch back and forth
between on and off. When the mode is turned on, a check mark will appear next to the feature name.
You can select this feature by itself, or you can combine it with Horn Chirps At Lock so that both the exterior lamps flash and the horn chirps when you lock your vehicle. The mode you selected is now set. You can either exit the programming mode by following the instructions later in this section or program the next feature available on your vehicle.
EXT. (Exterior) LIGHTS AT UNLOCK This feature turns on the exterior lamps when the keyless access transmitter is used to unlock the vehicle. The lamps will remain on for about 20 seconds unless a door is opened, the ignition is in ACCESSORY, on, or START, or the keyless access transmitter is used to lock the vehicle. Programmable Modes
Mode 1: ON (default)
Mode 2: OFF To program the vehicle to a different mode: 1. Enter the PERSONAL SETTINGS MENU by
following the instructions listed previously under “Entering the Personal Settings Menu.”
2. Turn the tune/select knob until EXT. LIGHTS AT
UNLOCK is highlighted.
3. Press the tune/select knob to switch back and forth
between on and off. When the mode is turned on, a check mark will appear next to the feature name.
The mode you selected is now set. You can either exit the programming mode by following the instructions later in this section or program the next feature available on your vehicle.
2-69
HORN CHIRPS AT LOCK This feature sounds the horn once when the keyless access transmitter is used to lock the vehicle. All doors must be closed for this feature to work. Programmable Modes
TWILIGHT DELAY This feature allows you to set the amount of time you want the exterior lamps to remain on after you exit the vehicle. Programmable Modes
Mode 1: ON
Mode 2: OFF (default) To program the vehicle to a different mode: 1. Enter the PERSONAL SETTINGS MENU by
following the instructions listed previously under “Entering the Personal Settings Menu.”
2. Turn the tune/select knob until HORN CHIRPS AT
LOCK is highlighted.
3. Press the tune/select knob to switch back and forth
between on and off. When the mode is turned on, a check mark will appear next to the feature name.
The mode you selected is now set. You can either exit the programming mode by following the instructions later in this section or program the next feature available on your vehicle.
Mode 1: 0:00 seconds (off)
Mode 2: 0:05 seconds (default)
Mode 3: 0:15 seconds
Mode 4: 0:30 seconds
Mode 5: 1:30 minutes
Mode 6: 2:00 minutes
Mode 7: 3:00 minutes
Mode 8: 4:00 minutes
2-70
To determine the mode to which the vehicle is programmed or to program the vehicle to a different mode: 1. Enter the PERSONAL SETTINGS MENU by
following the instructions listed previously under “Entering the Personal Settings Menu.”
2. Turn the tune/select knob until TWILIGHT DELAY is
highlighted.
3. Press the tune/select knob to scroll through the available delay settings and set your selection. If you choose Mode 1, the exterior lamps will not illuminate when you exit the vehicle. Only one mode can be selected at a time.
The mode you selected is now set. You can either exit the programming mode by following the instructions later in this section or program the next feature available on your vehicle.
DRIVER UNLOCK AT OFF This feature allows the driver’s door to automatically unlock when the ignition is turned off. Programmable Modes Mode 1: ON Mode 2: OFF (default) To program the vehicle to a different mode: 1. Enter the PERSONAL SETTINGS MENU by
following the instructions listed previously under “Entering the Personal Settings Menu.”
2. Turn the tune/select knob until DRIVER UNLOCK
AT OFF is highlighted.
3. Press the tune/select knob to switch between on
and off. When the mode is turned on, a check mark will appear next to the feature name.
The mode you selected is now set. You can either exit the programming mode by following the instructions later in this section or program the next feature available on your vehicle.
2-71
DOORS UNLOCK AT OFF This feature allows all of the doors to automatically unlock when the ignition is turned off. Programmable Modes
DRIVER UNLOCK IN PARK The feature allows the driver’s door to automatically unlock when the transmission is shifted into P (Park). Programmable Modes
Mode 1: ON
Mode 1: ON
Mode 2: OFF (default) To program the vehicle to a different mode: 1. Enter the PERSONAL SETTINGS MENU by
following the instructions listed previously under “Entering the Personal Settings Menu.”
2. Turn the tune/select knob until DOORS UNLOCK
AT OFF is highlighted.
3. Press the tune/select knob to switch between on
and off. When the mode is turned on, a check mark will appear next to the feature name.
Mode 2: OFF (default) To program the vehicle to a different mode: 1. Enter the PERSONAL SETTINGS MENU by
following the instructions listed previously under “Entering the Personal Settings Menu.”
2. Turn the tune/select knob until DRIVER UNLOCK
IN PARK is highlighted.
3. Press the tune/select knob to switch back and forth
between on and off. When the mode is turned on, a check mark will appear next to the feature name.
The mode you selected is now set. You can either exit the programming mode by following the instructions later in this section or program the next feature available on your vehicle.
The mode you selected is now set. You can either exit the programming mode by following the instructions later in this section or program the next feature available on your vehicle.
2-72
DOORS UNLOCK IN PARK The feature allows all of the doors to automatically unlock when the transmission is shifted into P (Park). Programmable Modes
Mode 1: ON (default)
Mode 2: OFF To program the vehicle to a different mode: 1. Enter the PERSONAL SETTINGS MENU by
following the instructions listed previously under “Entering the Personal Settings Menu.”
2. Turn the tune/select knob until DOORS UNLOCK
IN PARK is highlighted.
3. Press the tune/select knob to switch back and forth
between on and off. When the mode is turned on, a check mark will appear next to the feature name.
The mode you selected is now set. You can either exit the programming mode by following the instructions later in this section or program the next feature available on your vehicle.
KEYLESS FT (Front) DOOR UNLOCK This feature automatically unlocks the appropriate front door when you approach the vehicle with the keyless access transmitter and pull the respective door handle. See Door Locks on page 2-13 for more information. Programmable Modes
Mode 1: ON
Mode 2: OFF (default) To program the vehicle to a different mode: 1. Enter the PERSONAL SETTINGS MENU by
following the instructions listed previously under “Entering the Personal Settings Menu.”
2. Turn the tune/select knob until KEYLESS FT DOOR
UNLOCK is highlighted.
3. Press the tune/select knob to switch back and forth
between on and off. When the mode is turned on, a check mark will appear next to the feature name.
The mode you selected is now set. You can either exit the programming mode by following the instructions later in this section or program the next feature available on your vehicle.
2-73
KEYLESS DOORS UNLOCK This feature automatically unlocks all of the doors when you approach the vehicle with the keyless access transmitter and pull either front door handle. See Door Locks on page 2-13 for more information. Programmable Modes
Mode 1: ON (default)
Mode 2: OFF To program the vehicle to a different mode: 1. Enter the PERSONAL SETTINGS MENU by
following the instructions listed previously under “Entering the Personal Settings Menu.”
2. Turn the tune/select knob until KEYLESS DOORS
UNLOCK is highlighted.
3. Press the tune/select knob to switch back and forth
between on and off. When the mode is turned on, a check mark will appear next to the feature name.
The mode you selected is now set. You can either exit the programming mode by following the instructions later in this section or program the next feature available on your vehicle.
LOCK DELAY This feature delays the locking of the vehicle’s doors for eight seconds after a power door lock switch or the lock button on the keyless access transmitter is pressed. The eight second delay occurs after the last door is closed. If the keyless access transmitter is left inside of the vehicle, the doors will not lock. Programmable Modes
Mode 1: ON (default)
Mode 2: OFF To program the vehicle to a different mode: 1. Enter the PERSONAL SETTINGS MENU by
following the instructions listed previously under “Entering the Personal Settings Menu.”
2. Turn the tune/select knob until LOCK DELAY is
highlighted.
3. Press the tune/select knob to switch back and forth
between on and off. When the mode is turned on, a check mark will appear next to the feature name.
The mode you selected is now set. You can either exit the programming mode by following the instructions later in this section or program the next feature available on your vehicle.
2-74
KEYLESS LOCK DELAY This feature allows you to select whether the doors automatically lock during normal vehicle exit. When the ignition is turned off and all doors become closed, the vehicle will determine how many keyless access transmitters remain in the vehicle interior. If at least one keyless access transmitter has been removed from the interior of the vehicle, the doors will lock after 10 seconds. For example, if there are two keyless access transmitters in the vehicle and one is removed, the other will be locked in. The keyless access transmitter locked in the vehicle can still be used to start the vehicle or unlock the doors, if needed. A person approaching the outside of the locked vehicle without an authorized keyless access transmitter, however, will not be able to open the door, even with a transmitter in the vehicle. You may temporarily disable the passive door locking feature by pressing the door unlock switch for three seconds on an open door. Passive door locking will then remain disabled until a door lock switch is pressed or until the power mode transitions from the off power mode.
Programmable Modes
Mode 1: ON
Mode 2: OFF (default) To program the vehicle to a different mode: 1. Enter the PERSONAL SETTINGS MENU by
following the instructions listed previously under “Entering the Personal Settings Menu.”
2. Turn the tune/select knob until KEYLESS LOCK
DELAY is highlighted.
3. Press the tune/select knob to switch back and forth
between on and off. When the mode is turned on, a check mark will appear next to the feature name.
The mode you selected is now set. You can either exit the programming mode by following the instructions later in this section or program the next feature available on your vehicle.
2-75
FRONT PASS (Passenger) WINDOW LOCK This feature allows you to choose whether or not to have the front passenger window deactivated as part of the window lockout button. If you would like the front passenger window to be deactivated when the window lockout button is pushed, turn this feature on. If this feature is left off, the window lockout button located on the door will deactivate only the rear windows. See Power Windows on page 2-19 for more information. Programmable Modes Mode 1: ON Mode 2: OFF (default) To program the vehicle to a different mode: 1. Enter the PERSONAL SETTINGS MENU by
following the instructions listed previously under “Entering the Personal Settings Menu.”
2. Turn the tune/select knob until FRONT PASS
WINDOW LOCK is highlighted.
3. Press the tune/select knob to switch back and forth
between on and off. When the mode is turned on, a check mark will appear next to the feature name.
The mode you selected is now set. You can either exit the programming mode by following the instructions later in this section or program the next feature available on your vehicle.
2-76
CHIME VOLUME HIGH This feature allows you to adjust the volume level of the vehicle’s warning chimes. The chime volume cannot be turned off, only adjusted. Programmable Modes
Mode 1: NORMAL (default)
Mode 2: HIGH To program the vehicle to a different mode: 1. Enter the PERSONAL SETTINGS MENU by
following the instructions listed previously under “Entering the Personal Settings Menu.”
2. Turn the tune/select knob until CHIME VOLUME
HIGH is highlighted.
3. Press the tune/select knob to switch back and forth between the normal and high settings. A check mark indicates that the chime volume is set to HIGH.
The mode you selected is now set. You can either exit the programming mode by following the instructions later in this section or program the next feature available on your vehicle.
SUSPENSION MODE If your vehicle has this feature, you can select between performance or touring modes. Performance mode is used where road conditions or personal preference demand more control. Touring mode is used for normal city and highway driving. Programmable Modes Mode 1: PERFORMANCE Mode 2: TOURING (default) To program the vehicle to a different mode: 1. Enter the PERSONAL SETTINGS MENU by
following the instructions listed previously under “Entering the Personal Settings Menu.”
2. Turn the tune/select knob until SUSPENSION
MODE is highlighted.
3. Press the tune/select knob to enter the
SUSPENSION MODE submenu.
4. Turn the tune/select knob to highlight TOURING or
PERFORMANCE.
5. Press the tune/select knob to select the setting. The mode you selected is now set. You can either exit the programming mode by following the instructions later in this section or program the next feature available on your vehicle by pressing the F6 (BACK) button, located on the radio, to return to the PERSONAL SETTINGS MENU.
Exiting the Personal Settings Menu Once you have finished making your selections on the base audio system, you will automatically return to the main audio screen after 15 seconds. You can also press the F6 (BACK) button, located on the radio, to return to the main audio screen. Memory Seat, Mirrors and Steering Wheel If the vehicle has the memory feature, you can program and recall memory settings for the following features for up to two drivers:
The driver’s seat position The outside rearview mirrors position The power tilt wheel and telescopic steering column position
The following settings and presets are set automatically:
The language, radio and XM™ presets, tone, volume, playback mode (AM/FM or CD), last displayed stations, and compact disc position The last climate control setting The Head-Up Display (HUD) position, if your vehicle has this feature
(cid:129) Other personalization settings, for example, remote
start settings See Vehicle Personalization on page 2-61.
2-77
(cid:129) (cid:129) (cid:129) (cid:129) (cid:129) (cid:129) For vehicles with the base audio system, memory features are programmed and recalled through the radio from the DRIVER SELECTION and the DRIVER EXIT SETTINGS submenus. See “Entering the Driver Selection Submenu” and “Entering the Driver Exit Settings Submenu” later in this section for more information on recalling and programming the memory settings using the base audio system. For vehicles with the Navigation system, memory features are programmed and recalled through the navigation display. See “Personalization” in the Index of the Navigation System manual for more information on programming and recalling the memory settings using the Navigation system. For vehicles with the Navigation system, you can also recall the memory features by using voice recognition, if your vehicle has this feature. See “Voice Recognition” in the Index of the Navigation System manual for more information.
Entering the Driver Selection Submenu To enter the memory programming mode for your driver settings: 1. The ignition must be either on, in ACCESSORY, or
in RAP and the transmission in P (Park) or the vehicle speed less than 6 mph (9 km/h).
2. Press any button on the appropriate keyless access transmitter to identify yourself as Driver 1 or Driver 2.
3. Turn on the radio by pressing the power/
volume knob.
4. Press the CNFG radio button to enter the main
menu of the radio.
5. Turn the tune/select knob and scroll to SETUP. 6. Press the tune/select knob to enter the
SETUP menu.
7. Turn the tune/select knob and scroll to DRIVER
SELECTION.
8. Press the tune/select knob to enter the DRIVER SELECTION submenu. The following items will appear: (cid:129) DRIVER 1
(cid:129) DRIVER 2
(cid:129) RECALL DRIVER SETTINGS (cid:129) STORE DRIVER SETTINGS2-78
Driver Selection Submenu Items DRIVER 1/DRIVER 2
The numbers on the back of each keyless access transmitter correspond to DRIVER 1 and DRIVER 2. If you would like to recall or store driver settings for the driver that does not correspond to the number on the back of the keyless access transmitter that you are using: 1. Enter the memory programming mode for yourdriver settings by following the instructions listed previously under “Entering the Driver Selection Submenu.”
2. From the DRIVER SELECTION submenu, turn the tune/select knob to highlight the driver number that you want, either DRIVER 1 or DRIVER 2.
3. Set your choice by pressing in the tune/select knob. If you would like to recall or store driver settings for the selected driver, see “RECALL DRIVER SETTINGS” or “STORE DRIVER SETTINGS” later in this section. If you would like to recall or store exit settings for the selected driver, see “RECALL EXIT SETTINGS” or “STORE EXIT SETTINGS” later in this section.
RECALL DRIVER SETTINGS To recall driver settings: 1. Enter the memory programming mode for your
driver settings by following the instructions listed previously under “Entering the Driver Selection Submenu.”
2. From the DRIVER SELECTION submenu, turn the
tune/select knob to scroll to RECALL DRIVER SETTINGS and press in the knob. If the vehicle is in P (Park), one beep will sound and your previously saved driving position will then be recalled. If the vehicle is not in P (Park), three beeps will sound and your previously saved driving position will not be recalled.
A memory recall can be stopped by pressing any memory seat or mirror position button. If you would like the stored driving positions to be recalled when unlocking your vehicle with the keyless access transmitter or when starting your vehicle, see “REMOTE RECALL MEMORY” or “START BUTTON RECALL” under Vehicle Personalization on page 2-61.
2-79
STORE DRIVER SETTINGS To store driver settings: 1. Adjust your settings for the driver’s seat, the outside
rearview mirrors, and the steering column to a comfortable driving position.
2. Enter the memory programming mode for your
driver settings by following the instructions listed previously under “Entering the Driver Selection Submenu.”
3. From the DRIVER SELECTION submenu, turn
the tune/select knob to scroll to STORE DRIVER SETTINGS and press in the knob. Two beeps will sound to confirm that your driver settings are saved.
4. Set the HUD position, if your vehicle has this feature, the climate control temperature, fan speed and mode settings, the radio presets, tone, volume, playback mode (AM/FM, XM™, or CD), and compact disc position. Your memory settings are now programmed. Any changes that are made to the HUD, audio system, and climate controls while driving will be automatically stored when the ignition is turned off.
5. Repeat the procedure for a second driver by
programming the other driver number.
Entering the Driver Exit Settings Submenu To enter the memory programming mode for your exit settings: 1. The ignition must be either on, in ACCESSORY, or
in RAP and the transmission in P (Park) or the vehicle speed less than 6 mph (9 km/h).
2. Press any button on the appropriate keyless access transmitter to identify yourself as Driver 1 or Driver 2.
3. Turn on the radio by pressing the power/
volume knob.
4. Press the CNFG radio button to enter the main
menu of the radio.
5. Turn the tune/select knob and scroll to SETUP. 6. Press the tune/select knob to enter the
SETUP menu.
7. Turn the tune/select knob and scroll to DRIVER
EXIT SETTINGS.
8. Press the tune/select knob to enter the DRIVER EXIT SETTINGS submenu. The following items will appear: (cid:129) RECALL EXIT SETTINGS (cid:129) STORE EXIT SETTINGS
2-80
Driver Exit Settings Submenu Items RECALL EXIT SETTINGS To recall exit settings: 1. Enter the memory programming mode for your exit settings by following the instructions listed previously under “Entering the Driver Exit Settings Submenu.”
2. From the DRIVER EXIT SETTINGS submenu, turn the tune/select knob to scroll to RECALL EXIT SETTINGS and press in the knob. If the vehicle is in P (Park), one beep will sound and your previously saved exit position will then be recalled. If the vehicle is not in P (Park), three beeps will sound and your previously saved exit position will not be recalled. A memory recall can be stopped by pressing any memory seat or mirror position button.
If you would like the stored exit positions to be recalled when your vehicle is in P (Park), the vehicle is off, and the driver’s door is opened, see “AUTO EXIT SEAT” and “AUTO EXIT COLUMN” under Vehicle Personalization on page 2-61.
STORE EXIT SETTINGS To store exit settings: 1. Adjust your settings for the driver’s seat, the outside
rearview mirrors, and the steering column to a comfortable exit position.
2. Enter the memory programming mode for your exit settings by following the instructions listed previously under “Entering the Driver Exit Settings Submenu.”
3. From the DRIVER EXIT SETTINGS submenu,
turn the tune/select knob to scroll to STORE EXIT SETTINGS and press in the knob. Two beeps will sound to confirm that your new exit settings are saved.
4. Repeat the procedure for a second driver by
programming the other driver number.
2-81
✍ NOTES
2-82
Section 3
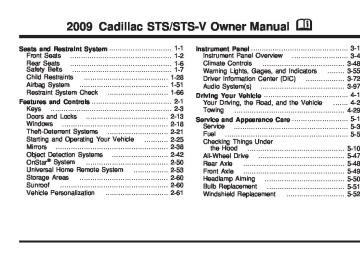
Instrument Panel
Instrument Panel Overview ...............................3-4
Hazard Warning Flashers ................................3-6
Horn .............................................................3-6
Power Tilt Wheel and TelescopicSteering Column .........................................3-6
Heated Steering Wheel ...................................3-7
Turn Signal/Multifunction Lever .........................3-7
Turn and Lane-Change Signals ........................3-8
Headlamp High/Low-Beam Changer ..................3-9
Forward Collision Alert (FCA) System ................3-9
Flash-to-Pass ...............................................3-13
Windshield Wipers ........................................3-13
Rainsense™ II Wipers ...................................3-14
Windshield Washer .......................................3-15
Headlamp Washer ........................................3-16
Cruise Control ..............................................3-16
Adaptive Cruise Control .................................3-20
Headlamps ..................................................3-32
Wiper Activated Headlamps ............................3-36
Headlamps on Reminder ................................3-36
Daytime Running Lamps (DRL) .......................3-36
Fog Lamps ..................................................3-38
Twilight Sentinel® ..........................................3-38
Exterior Lighting Battery Saver ........................3-40Instrument Panel Brightness ...........................3-40
Entry Lighting ...............................................3-41
Parade Dimming ...........................................3-41
Reading Lamps ............................................3-41
Battery Load Management .............................3-41
Electric Power Management ...........................3-42
Inadvertent Power Battery Saver .....................3-42
Head-Up Display (HUD) .................................3-43
Accessory Power Outlet(s) .............................3-46
Ashtray(s) and Cigarette Lighter ......................3-47
Climate Controls ............................................3-48
Dual Climate Control System ..........................3-48
Outlet Adjustment .........................................3-52
Rear Climate Control System .........................3-53
Passenger Compartment Air Filter ...................3-54
Warning Lights, Gages, and Indicators ............3-55
Instrument Panel Cluster ................................3-56
Speedometer and Odometer ...........................3-57
Tachometer .................................................3-57
Safety Belt Reminders ...................................3-57
Airbag Readiness Light ..................................3-58
Passenger Airbag Status Indicator ...................3-59
Charging System Light ..................................3-61
Brake System Warning Light ..........................3-623-1
Section 3
Instrument Panel
Antilock Brake System (ABS)
Warning Light ...........................................3-63
Traction Control System (TCS)
Warning Light ...........................................3-63
Lane Departure Warning Light ........................3-64
Engine Coolant TemperatureWarning Light ...........................................3-64
Engine Coolant Temperature Gage ..................3-65
Tire Pressure Light .......................................3-65
Malfunction Indicator Lamp .............................3-66
Oil Pressure Light .........................................3-69
Security Light ...............................................3-69
Fog Lamp Light ............................................3-70
Lights On Reminder ......................................3-70
Cruise Control Light ......................................3-70
Highbeam On Light .......................................3-70
Fuel Gage ...................................................3-71Driver Information Center (DIC) .......................3-72
DIC Operation and Displays ...........................3-72
DIC Warnings and Messages .........................3-79
Other Messages ...........................................3-96
Audio System(s) .............................................3-97
Setting the Clock ..........................................3-98
Radio(s) ......................................................3-98
Using an MP3 ............................................3-111
XM Radio Messages ...................................3-114
Navigation/Radio System ..............................3-116
Bluetooth® .................................................3-116
Radio Personalization ..................................3-126
Theft-Deterrent Feature ................................3-130
Audio Steering Wheel Controls ......................3-131
Radio Reception .........................................3-133
Backglass Antenna ......................................3-134
XM™ Satellite Radio Antenna System ............3-1343-2
✍ NOTES
3-3
Instrument Panel Overview
3-4
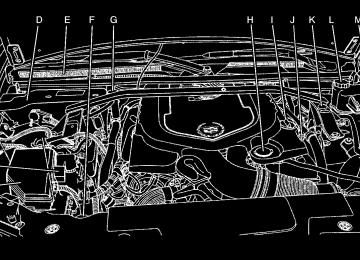
The main components of the instrument panel are the following:
A. Outlet Adjustment on page 3-52. B. Instrument Panel Brightness on page 3-40. DIC Operation and Displays on page 3-72. Head-Up Display (HUD) on page 3-43 (If Equipped).
C. Turn Signal/Multifunction Lever on page 3-7. Headlamps on page 3-32. Cruise Control on page 3-16. Adaptive Cruise Control on page 3-20
(If Equipped). Forward Collision Alert (FCA) System on page 3-9 (If Equipped).D. Instrument Panel Cluster on page 3-56. E. Windshield Wipers on page 3-13. F. Audio System(s) on page 3-97. Navigation/Radio
System on page 3-116 (If Equipped).
G. Audio Steering Wheel Controls on page 3-131
(If Equipped). Adaptive Cruise Control on page 3-20
(If Equipped). Heated Steering Wheel on page 3-7
(If Equipped).H. Power Tilt Wheel and Telescopic Steering Column
on page 3-6.
I. Horn on page 3-6. J. Ignition Positions on page 2-26. K. Dual Climate Control System on page 3-48. L. Hazard Warning Flashers on page 3-6. M. Cupholders on page 2-60. N. Traction Control System (TCS) on page 4-10. O. Shift Lever. See Automatic Transmission Operation
on page 2-30.
P. Glove Box on page 2-60.
3-5
Power Tilt Wheel and Telescopic Steering Column
Hazard Warning Flashers
| (Hazard Warning Flasher): Press this button located on the console, near the shift lever, to make the front and rear turn signal lamps flash on and off. This warns others that you are having trouble. Press again to turn the flashers off. When the hazard warning flashers are on, the turn signals do not work.
Horn Press near or on the horn symbols on the steering wheel pad to sound the horn.
The power tilt and telescope wheel control is located on the left side of the steering column. Push the control up or down to tilt the steering wheel up or down.
3-6
Push the control forward or rearward to move the steering wheel towards the front or rear of the vehicle. To set the memory position, see Vehicle Personalization on page 2-61 and Memory Seat, Mirrors and Steering Wheel on page 2-77.
Heated Steering Wheel For vehicles with a heated steering wheel, the button for this feature is located on the steering wheel.
( : Press to turn the heated steering wheel on or off. A light on the button displays when the feature is turned on.
The steering wheel takes about three minutes to start heating.
Turn Signal/Multifunction Lever
The lever on the left side of the steering column includes the following: G : Turn and Lane-Change Signals O : Headlamps 3 : Headlamp High/Low-Beam Changer
# : Fog Lamps I : Cruise Control (cid:129) Adaptive Cruise Control (If Equipped).
Forward Collision Alert (FCA) (If Equipped). Flash-To-Pass Feature.
Information for these features is on the pages following.
3-7
(cid:129) (cid:129) Turn and Lane-Change Signals
An arrow on the instrument panel cluster flashes in the direction of the turn or lane change.
Move the lever all the way up or down to signal a turn. Raise or lower the lever until the arrow starts to flash to signal a lane change. Hold it briefly until the lane change is complete. The arrow will automatically flash three times.
The lever returns to its starting position when it is released. If after signaling a turn or lane change the arrow flashes rapidly or does not come on, a signal bulb may be burned out. Have the bulbs replaced. If the bulb is not burned out, check the fuse. See Fuses and Circuit Breakers on page 5-123. Turn Signal On Chime If the turn signal is left on for about 1 mile (1.6 km), a warning chime will sound and the TURN SIGNAL ON message will appear on the Driver Information Center (DIC) display. See “Turn Signal On” under DIC Warnings and Messages on page 3-79 for more information.
3-8
Headlamp High/Low-Beam Changer Push forward on the turn signal/multifunction lever to change the headlamps from low to high beam. Pull the lever back and then release it to change from high to low beam. If you turn the vehicle off with the high beams on, the next time you start your vehicle the low beams will be on. To re-activate high beams, pull lever toward you and then push it forward again.
This light on the instrument panel cluster will be on, indicating high-beam usage.
Forward Collision Alert (FCA) System If the vehicle has this system, read this entire section before using it. The system operates on a radio frequency subject to Federal Communications Commission (FCC) Rules and with Industry Canada. This device complies with Part 15 of the FCC Rules. Operation is subject to the following two conditions: 1. This device may not cause interference, and 2. This device must accept any interference received,
including interference that may cause undesired operation of the device.
This device complies with RSS-210 of Industry Canada. Operation is subject to the following two conditions: 1. This device may not cause interference, and 2. This device must accept any interference received,
including interference that may cause undesired operation of the device.
Changes or modifications to this system by other than an authorized service facility could void authorization to use this equipment.
3-9
The Forward Collision Alert (FCA) controls are located on the end of the multifunction lever.
9 (Off): Turns the system off. R (On): Turns the system on. The Head-Up Display must be on and properly adjusted. If the HUD is not on, FCA will not be enabled and you will not be provided with FCA audible and visual warnings. See Head-Up Display (HUD) on page 3-43
for more information.The Forward Collision Alert (FCA) system provides an audible and visual warning if you approach a vehicle too rapidly. FCA also provides a visual warning with no audible warning if you are following another vehicle much too closely. FCA uses the Adaptive Cruise Control radar to detect a vehicle directly ahead, in your path, within a distance of 328 ft (100 m) and operates at speeds above 20 mph (32 km/h).
{ CAUTION:
FCA is only a warning system and does not apply the brakes. When you are approaching a vehicle or object too rapidly or when you are following a vehicle too closely that is ahead of you, FCA may not provide you with enough time to avoid a collision. FCA is not designed to warn the driver of pedestrians or animals. Your complete attention is always required while driving and you should be ready to take action and apply the brakes. For more information, see Defensive Driving on page 4-2.
3-10
{ CAUTION:
Warning the Driver
The alert symbol will flash on the HUD and a warning beep will sound when driver action may be required.
(cid:129) On winding roads, FCA may not detect a
vehicle ahead. You could crash into a vehicle ahead of you. Do not rely on FCA on winding roads.
(cid:129) When weather limits visibility, such as in fog,
rain, or snow, FCA performance is limited. There may not be enough warning distance to the vehicle in front of you. Do not rely on FCA in low visibility conditions.
{ CAUTION:
When FCA is enabled, the Adaptive Cruise Control switch is on. If you press another Adaptive Cruise Control button, you might go into cruise when you do not want to. You could be startled and even lose control. Be careful not to press adaptive cruise buttons unless you want to use cruise control.
The driver warning is active when: (cid:129) You are approaching a vehicle too quickly. (cid:129) You are following a vehicle ahead much too closely. See Defensive Driving on page 4-2 for more information.
3-11
Detecting the Vehicle Ahead The vehicle ahead symbol will only appear on the HUD when a vehicle ahead of you is detected in your path. If this symbol does not appear, or disappears briefly, FCA will not respond to vehicles you may see ahead. The symbol may disappear on curves, highway exit ramps, or hills. Also, when another vehicle enters the same lane as you, the FCA system will not detect the vehicle until it is completely in your driving lane.
{ CAUTION:
When the Adaptive Cruise Control radar is blocked by snow, ice, or dirt, it may not detect a vehicle ahead. FCA may not help you avoid a collision under these conditions. Do not use FCA when the radar is blocked by snow, ice, or dirt. Keep your radar clean. See “Cleaning the System” under Adaptive Cruise Control on page 3-20.
{ CAUTION:
FCA may not detect and warn soon enough to stationary or slow-moving vehicles or other objects ahead of you. You could crash into an object ahead of you. Do not rely on FCA when approaching stationary or slow-moving vehicles or other objects.
Unnecessary Warnings FCA may occasionally provide an unnecessary warning to guard rails, signs, and other stationary objects. This is normal operation, your vehicle does not need service. Other Messages There are three messages that may appear on the Driver Information Center (DIC). They are CLEAN RADAR, RADAR CRUISE NOT READY and SERVICE RADAR CRUISE. See DIC Warnings and Messages on page 3-79.
3-12
Cleaning the System The radar can become blocked by snow, ice, or dirt. If so, you may need to turn off the engine and clean the lens. See “Cleaning the System” under Adaptive Cruise Control on page 3-20. Flash-to-Pass This feature allows you to use the high-beam headlamps to signal the driver in front of you that you want to pass. Pull and hold the turn signal/multifunction lever toward you to use this feature. When this is done the following will occur:
If the headlamps are off, in low-beam or in Daytime Running Lamps (DRL) mode, the high-beam headlamps will turn on. They will stay on as long as the lever is held there. Release the lever to turn them off. If the headlamps are in high-beam mode, they will switch to low beam. To return to high-beam, push the lever forward.
Windshield Wipers
The windshield wiper lever is located on the right side of the steering column. Move the lever to one of the following positions: 7 (Mist): Move to mist for a single wiping cycle and then release it. The lever will return to its original position. Hold the lever in this position for continuous wiping cycles. 9 (Off): Turns off the wipers. & (Delay): For a delayed wiping cycle. Turn the delay adjustment band to set the length of the delay.
3-13
(cid:129) (cid:129) x (Delay Adjustment): Use this band to set the length of the delay between wipes when using the delay feature. The closer the band is moved toward mist, the longer the delay. The windshield wiper lever must be in delay for this feature to work. 6 (Low Speed): For slow, steady wiping cycles. 1 (High Speed): For rapid wiping cycles. If the windshield wipers are in use for about six seconds while you are driving, the exterior lamps will come on automatically if the exterior lamp control is in AUTO. See Wiper Activated Headlamps on page 3-36 for more information. Clear snow and ice from the wiper blades before using them. If the blades are frozen to the windshield, loosen or thaw them. If they become damaged, install new blades. For more information, see Windshield Wiper Blade Replacement on page 5-52. Heavy snow or ice can overload the wiper motor. A circuit breaker will stop the motor until it cools down. For STS-V, the vehicle is equipped with a feature that disables the wiper system when the hood is open and the vehicle is stopped. Opening the hood will automatically park the wipers if they are not parked.
Rainsense™ II Wipers For vehicles with this feature, the moisture sensor is mounted on the interior side of the windshield behind the rearview mirror. It is used to automatically operate the wipers by monitoring the amount of moisture build-up on the windshield. Wipes occur as needed to clear the windshield depending on driving conditions and the sensitivity setting. In light rain or snow, fewer wipes will occur. In heavy rain or snow, wipes will occur more frequently. The Rainsense wipers operate in a delay mode as well as a continuous low or high speed as needed. If the system is left on for long periods of time, occasional wipes may occur without any moisture on the windshield. This is normal and indicates that the Rainsense system is activated. To activate the Rainsense system, turn the wiper band to delay mode and select one of the four sensitivity levels indicated on the wiper stalk. The position closest to off is the lowest sensitivity setting, level one. This allows more rain or snow to collect on the windshield between wipes. Turning the wiper band away from you to higher sensitivity levels increases the sensitivity of the system and frequency of wipes. The highest sensitivity setting, level four, is closest to low. A single wipe occurs each time the wiper stalk is turned to a higher sensitivity level to indicate that the sensitivity level has been increased.
3-14
Notice: Going through an automatic car wash with the wipers on can damage them. Turn the wipers off when going through an automatic car wash. The mist and wash cycles operate as normal and are not affected by the Rainsense function. The Rainsense system can be overridden at any time by manually turning the wiper band to low or high speed. When Rainsense is active, the headlamps turn on automatically. The headlamps will turn off again once the wipers turn off if it is light enough outside. If it is dark, they will remain on. See Wiper Activated Headlamps on page 3-36. Notice: Do not place stickers or other items on the exterior glass surface directly in front of the moisture sensor. Doing this could cause the moisture sensor to malfunction.
Windshield Washer The windshield washer button is located at the end of the windshield wiper lever on the right side of the steering column.
K (Washer Fluid): Press and hold to spray windshield washer fluid on the windshield. The washer will spray until the button is released. The wipers will continue to clear the window for about six seconds after the button is released and then stop or return to the preset speed.
{ CAUTION:
In freezing weather, do not use your washer until the windshield is warmed. Otherwise the washer fluid can form ice on the windshield, blocking your vision.
If the fluid in the windshield washer fluid reservoir is low, the message CHECK WASHER FLUID will appear on the Driver Information Center (DIC) display. It will take 60 seconds after the bottle is refilled for this message to turn off. For information on the correct washer fluid mixture to use, see Windshield Washer Fluid on page 5-38 and Recommended Fluids and Lubricants on page 6-13.
3-15
Headlamp Washer For vehicles with headlamp washers, they are located to the inside of the headlamps.
Press L located at the end of the windshield wiper lever, to wash the headlamps and windshield. After the first wash, the headlamps will be washed after the fifth press of the windshield washer button. The headlamps must be on to be washed. If the washer fluid is low, the headlamp washers will not work. See Windshield Washer on page 3-15 for additional information.
3-16
Cruise Control With cruise control, a speed of about 25 mph (40 km/h) or more can be maintained without keeping your foot on the accelerator. Cruise control does not work at speeds below about 25 mph (40 km/h). If the brakes are applied, the cruise control shuts off.
{ CAUTION:
Cruise control can be dangerous where you cannot drive safely at a steady speed. So, do not use the cruise control on winding roads or in heavy traffic. Cruise control can be dangerous on slippery roads. On such roads, fast changes in tire traction can cause excessive wheel slip, and you could lose control. Do not use cruise control on slippery roads.
If the vehicle is in cruise control when the Traction Control System (TCS) begins to limit wheel spin or the stability control system activates, the cruise control automatically disengages. See Traction Control System (TCS) on page 4-10 and StabiliTrak® System on page 4-6
or Enhanced StabiliTrak® on page 4-6. When road conditions allow you to safely use it again, the cruise control can be turned back on.These controls are located on the end of the multifunction lever.
Setting Cruise Control
{ CAUTION:
9 (Off): Turns the system off. R (On): Turns the system on. + (Resume/Accelerate): Use this position to make the vehicle resume a previously set speed or accelerate when cruise is already active. T (Set/Decrease): Press to set the speed or to decrease the speed when cruise is already active.
[ (Cancel): Press this button on the steering wheel to cancel cruise control without erasing the set speed from memory.
If you leave your cruise control on when you are not using cruise, you might hit a button and go into cruise when you do not want to. You could be startled and even lose control. Keep the cruise control switch off until you want to use cruise control.
1. Move the cruise control switch to on. 2. Get up to the speed desired. 3. Press T at the end of the lever and release it. 4. Take your foot off the accelerator pedal.
This light on the instrument panel cluster comes on while cruise control is on.
3-17
Resuming a Set Speed If the cruise control is at the set speed desired and then the brake is applied, the cruise control is disengaged. But it does not need to be reset. Once the vehicle speed reaches about 25 mph (40 km/h) or more, move the cruise control switch briefly from R to S . The vehicle will go back up to your chosen speed and stay there. If the switch is held at resume/accelerate the vehicle keeps going faster until the switch is released or the brake is applied. Do not hold the switch at resume/ accelerate, unless you want the vehicle to go faster.
Increasing Speed While Using Cruise Control There are two ways to go to a higher speed: (cid:129) Use the accelerator pedal to get to the higher speed. Press T at the end of the lever, then release the button and the accelerator pedal. The vehicle will cruise at the higher speed.
(cid:129) Move the cruise switch from R to S . Hold it there
until the desired speed is reached, and then release the switch. To increase the vehicle speed in very small amounts, move the switch briefly to S . Each time this is done, the vehicle goes about 1 mph (1.6 km/h) faster.
If using the accelerator pedal and the set button at end of the lever to increase cruise set speed, the new set speed must be at least 5 mph higher than current speed for this method to work. If it is not 5 mph higher, move the cruise switch to off, then on, and then reset the speed using the set button.
3-18
Reducing Speed While Using Cruise Control There are two ways to reduce your speed while using cruise control: (cid:129) Press T at the end of the lever until the lower
speed desired is reached, then release it. To slow down in very small amounts, briefly press T . Each time this is done, the vehicle goes about 1 mph (1.6 km/h) slower.
Passing Another Vehicle While Using Cruise Control Use the accelerator pedal to increase your vehicle speed. When you take your foot off the pedal, the vehicle slows down to the cruise control speed you set earlier.
Using Cruise Control on Hills How well the cruise control works on hills depends upon the vehicle speed, load, and the steepness of the hills. When going up steep hills, you might have to step on the accelerator pedal to maintain the vehicle’s speed. When going downhill, you might have to brake to keep the vehicle’s speed down. Applying the brake will turn off the cruise control. If you need to apply the brake due to the grade of the downhill slope, you might not want to attempt to use the cruise control feature. Ending Cruise Control There are three ways to end cruise control. (cid:129) Step lightly on the brake pedal. This will end the
current cruise control session.
(cid:129) Move the cruise control switch to 9 to turn off the
system completely.
(cid:129) Press the [ button on the steering wheel. Erasing Speed Memory The cruise control set speed memory is erased when the cruise control or the ignition is turned off.
3-19
(cid:129) Adaptive Cruise Control If the vehicle has adaptive cruise control, read this entire section before using this feature. The system operates on a radio frequency subject to Federal Communications Commission (FCC) Rules and with Industry Canada. This device complies with Part 15 of the FCC Rules. Operation is subject to the following two conditions: 1. This device may not cause interference. 2. This device must accept any interference received,
including interference that may cause undesired operation of the device.
This device complies with RSS-210 of Industry Canada. Operation is subject to the following two conditions: 1. This device may not cause interference. 2. This device must accept any interference received,
including interference that may cause undesired operation of the device.
Changes or modifications to this system by other than an authorized service facility could void authorization to use this equipment. Adaptive Cruise Control is an enhancement to traditional cruise control and is not a safety system. It allows you to keep cruise control engaged in moderate traffic conditions without having to constantly be reset.
3-20
Adaptive Cruise Control uses radar to detect a vehicle directly ahead in your path, within a distance of 328 ft (100 m), and operates at speeds above 30 mph (48 km/h). When it is engaged by the driver, the system can apply limited braking or acceleration of the vehicle, automatically, to maintain a selected following distance to the vehicle ahead. The vehicle’s braking during Adaptive Cruise Control is comparable to a person applying moderate pressure to the vehicle’s brake pedal. To disengage Adaptive Cruise Control, apply the brake. If no vehicle is in your path, your vehicle will react like traditional cruise control.
{ CAUTION:
Adaptive Cruise Control will not apply hard braking or bring the vehicle to a complete stop. It will not respond to stopped vehicles, pedestrians or animals. When you are approaching a vehicle or object, Adaptive Cruise Control may not have time to slow your vehicle enough to avoid a collision. Your complete attention is always required while driving and you should be ready to take action and apply the brakes. For more information, see Defensive Driving on page 4-2.
CAUTION:
(Continued)
(cid:129) When weather limits visibility, such as when in fog, rain, or snow conditions, Adaptive Cruise Control performance is limited. There may not be enough distance to adapt to the changing traffic conditions. Do not use cruise control when visibility is low.
The cruise controls are located on the end of the multifunction lever.
{ CAUTION:
(cid:129) On winding roads, Adaptive Cruise Control may not detect a vehicle ahead. You could crash into a vehicle ahead of you. Do not use Adaptive Cruise Control on winding roads. (cid:129) Adaptive Cruise Control may not have time to slow your vehicle enough to avoid a crash when you are driving in conditions where vehicles may suddenly slow or stop ahead of you, enter your lane, or cross your vehicle’s path. If you are driving in these conditions, do not use Adaptive Cruise Control. The warning beep and alert symbol may indicate that you are driving in conditions where Adaptive Cruise Control should not be used. See “Alerting the Driver” in this section.
(cid:129) On slippery roads, fast changes in tire traction can cause needless wheel spinning, and you could lose control. Do not use cruise control on slippery roads.
CAUTION:
(Continued)
3-21
The Adaptive Cruise controls are located on the left side of the steering wheel. 9 (Off): Turns the system off. R (On): Turns the system on. S (Resume/Increase): Use this position to make the vehicle resume a previously set speed or increase the set speed when Adaptive Cruise Control is already active. T (Set/Decrease): Press to set the speed or to decrease the set speed when Adaptive Cruise Control is already active.
[ (Cancel): Press this button located on the steering wheel to cancel adaptive cruise control.
Engaging Adaptive Cruise Control With the Set Button
{ CAUTION:
If you leave your Adaptive Cruise Control switch on when you are not using cruise, you might hit a button and go into cruise when you do not want to. You could be startled and even lose control. Keep the Adaptive Cruise Control switch off until you want to use cruise control.
{ CAUTION:
If you operate Adaptive Cruise Control without your Head-up Display (HUD) properly adjusted, your Adaptive Cruise Control settings may not be visible. You could forget your settings and be startled by Adaptive Cruise Control response and even lose control. Keep your HUD on and properly adjusted when using Adaptive Cruise Control.
3-22
The set speed is selected by the driver. This is the speed you will travel if there is no vehicle detected in your path. To set Adaptive Cruise Control, do the following:
1. Make sure the Head-Up Display (HUD) is on and
properly adjusted. You cannot engage Adaptive Cruise Control unless the HUD is on. See Head-Up Display (HUD) on page 3-43 for more information.
2. Move the switch to on. 3. Get up to the desired speed. 4. Press T at the end of the lever and release the
button.
5. Take your foot off the accelerator pedal. Once Adaptive Cruise Control is set, it might immediately apply the brakes if it detects a vehicle ahead that is too close or moving slower than your vehicle.
This symbol appears on the Head-Up Display (HUD) to indicate that Adaptive Cruise Control is active. The number indicates the set speed.
United States version shown, Canada similar
See Head-Up Display (HUD) on page 3-43 for more information. Make sure the set speed is visible on the HUD so you know the speed your vehicle will accelerate to if a vehicle is not detected in your path. Keep in mind speed limits, surrounding traffic speeds, and weather conditions when adjusting your set speed. If your vehicle is in Adaptive Cruise Control when the traction control system begins to limit wheel spin, the Adaptive Cruise Control will automatically disengage.