|
Post #1
 17th January 2008 - 06:42 AM 17th January 2008 - 06:42 AM
|
|---|---|
|
Got some big offset wheels? Guard roller can't get it done? Don't want ridiculous looking riveted-on guards? This is one of the few ways to get around it I will start by saying, this isn't the hardest mod to do at all, but it takes time and is awfully brutal to do something that's nice. Since this wasn't my own car, and rob wanted to model his car around his wheels, then this was the go. Brand new Work Equip 03's. 8.5" wide, with -22 offset. These are possibly one of the best wheels there is that could grace an 86.  Obviously, they will never ever ever fit under standard guards, even with the slightly stretched tyres as seen below.  So, guard flare time. First, get one of your minions to jack up the car  We're going to be cutting slits in the guard, allowing us to pull out significantly more metal than with a guard roller. It won't warp the area above the guard either!  Yours truly cutting the shit out the guard. Would be a nightmare to any car owner seeing this happen .. but it only gets worse.  Now, you can pull out the outer lip by itself, or if you are requiring even more clearance, you can pull out the inner lip. You can vaguely see what i mean.  More of above  Now you can see where the outer lip finishes (white), and the inner lip has been pulled out (silvery-brown area). Looking terrible isn't it?  Now you can start to see how much the guard is coming out over stock. Where the masking tape is, the guard went straight down, now instead has come out on an angle well over an inch.  Test fitting the wheel, you can see that we're getting pretty close to the size we need to clear the wheel/tyre combo.  On the second furthest right cut, and the furthest left cut, you can see that the lip has been ground down a bit on an angle by the grinder to keep the shape of the guard a little.  Next step can be done by silicon, or by welding. I'd suggest the latter, but we didn't have the time, nor care for it. See below for more info.  We didn't show it, but the inner guard and outer guard were tack welded together, and were stopping additional flaring. We had to cut these tacks, and remove the offending pieces of inner guard. This now left a gap between the inner and outer. Unprotected metal + moisture = rust, which most ae86's will have enough of this to start with. So we sealed it up with silicon! Simple!  On with the fibreglass! Remember, wear gloves, and dont rub your eyes when you're handling the stuff. It hurts, trust jesus!  With the fibreglass on, and now sanded back, we started with the body filler. Sure, we put heaps on, and 90% of it is going to be sanded off anyway, but we didnt have time on our hands.  After a couple of layers of filler and sanding, we were getting fairly happy with the shape. Dremel with a cut-off blade was then used to neatly cut (lol) a better shape to the guard.  A few coats of primer-filler (primer, thats slightly thicker, so can fill in little scratches and dimples), a few dabs of nitro-cellulose(?) putty (to fill in bigger imperfections), now all we had to do was wait for the paint and such to dry overnight.  Next morning, sanded it back and put some more filler in places we werent happy with, and applied more primer filler.  Loads of little imperfections, scratches, or humps. Very very minor so they were just filled with putty.  One can of export's finest, and things were looking bettereerrerrer.  Not bad for a can job, at night, with the weather against us.  And the finished product. Sexy time. 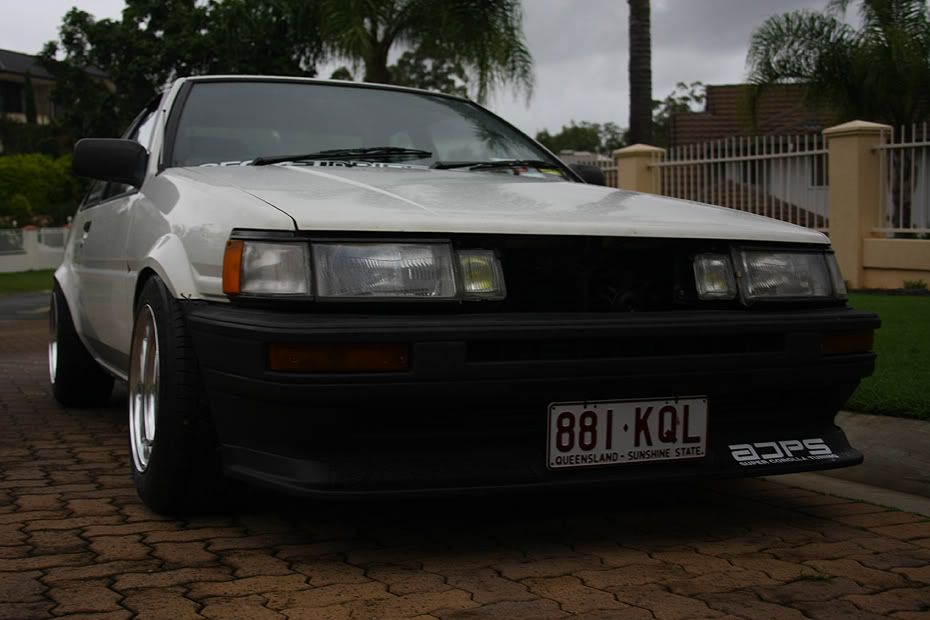 Yum  We rushed this somewhat, as rob is an impatient kent, and it still took 2 'full' days. The main time burner is the drying of fibreglass, body filler, and paint .. There will be problems with the spulling and,grammers,,,of this article. But leave that be, i'm tired. Thanks, Seamus |
|


|
|
|---|
|
|
|---|
|
|
sedate looking
Post #13
Looks ok, sorry never been big on 60's style flares... |
|---|
 i like how you done all the pics step by step to show some people how its done
 |
|
DreamensioN
Post #17
hahaha... I was scrolling through the pic thinking it was gonna be a hacked backyard job. Then as I got towards the end I was really impressed. |
|---|
|
|
|---|


|
|
warney
Post #24
QUOTE(JD_Stazza_Brendan @ Jan 18 2008, 07:32 AM) [snapback]1281825581[/snapback] WOW,,, Must be a bit nervous when you make the first cut. Na not when its someone elses car it dont matter  Looks good Tocko  Shame Rob got a white car as white cars suck Shame Rob got a white car as white cars suck Enjoy your holiday and will chat once ya back
|
|---|

|
|
|---|
|
|
|---|
|
|
warney
Post #32
QUOTE(mooky @ Feb 10 2008, 10:14 PM) [snapback]1281914682[/snapback] if i bought that car i would put two new quaters on it and do it properly ,,,i dont like the way you did that at all What if you cant get them ???? How do you think panel beaters do it ? They stretch the shit out of the guards...... |
|---|
|
|
warney
Post #34
QUOTE(mooky @ Feb 10 2008, 10:22 PM) [snapback]1281914723[/snapback] i would fab up some new flares in the same shape as the old one but a wider and a bigger arch and totally remove the old ones and weld on the new fabbed flares higher so it looks factory not hacked to shit and siliconed back up "This is one of the few ways to get around it" Its a option , what if you couldnt make the flared guards ? His saying its another way out , and later on down the track flares could be an option ??? |
|---|
|
|
mooky
Post #35
QUOTE QUOTE QUOTE(layinlow @ Feb 10 2008, 06:35 PM) thats ruff dude Show us yours ? Ohh thats right you aint done it before man i woulndt be a smart ass when what you did is not a good way to do it ,,, it is what it is ,a really ruff way to do it if that is all you are wanting for you car then cut and silicone a way but you cant hide the fact ,that way is ruff |
|---|
-
Member Login
If you have a BoostCruising account enter your user name and password into the yellow box.
Alternatively, you can quickly login with Facebook.
If you don't have an account create one below.
Create Account -

Login using your Facebook account!