Fiberglass Console Construction Begins - Nissan navara console construct  

Page 1 of 3
Jump to page
THE RIG
Post #26

so that last pic ratdawg is with the fabric still on?

ratdawg
Post #27

The last pic is it after i have re applied the fabric so that it covers the whole outside - i did this so i didnt have to body fill the seam halfway down the outside of the box - as would have been the case in the previous pics.

Seems pretty obvious now lol.

|2oo
Post #28

looks good, i found if you apply the fg to the inside of the fabric it saves you alot of sanding smile.gif also use some spray on glue on the fabric before resin to stop it sagging

should look tops when its finished how is it going to be finished?

ratdawg
Post #29

cheers man, yeah, once i have applied the resin to the cloth, and it becomes hard, chop strand fiberglass will be applied from underneath for both reinforcement, an in the case that i sand through the cloth it will provide a backiing for the filler.

Filler will be applied to the finished fiberglass console (thin layer all over) and then it will be primed and sprayed. cheers for the interest and tips.

ratdawg
Post #30

sorry for the delay in the console construct - blame it on uni assignments lol.

but yeah, i got the polyester resin and the MEKP and gloves, and respirator etc.

These pics are of the console with the reisn applied. I have not soaked the front of the console in resin, seeing as im am making a dash facia which will be attached to the end of the console, this will house the scrren and head unit etc.

ratdawg
Post #31

all dry and ready for filler and the dash facia construct.

87kid
Post #32

looking dope man. well done!

ratdawg
Post #33

cheers for the interest.

soon (like today or tomorrow) ill pickup some csm and filler so that i can reinforce underneath, smooth surface and make a mould for recasting.

NISMOgemini
Post #34

you should go find a console lid from another car thats similare in size, and cut it into the top section for some storage space

ratdawg
Post #35

Im not gunna have storage space - maybe - but because i am going to make a dash facia that houses a screen and head unit, i will probably have to remove the swirches i.e. air con. if i end up relocating them to the console, ill just modify the current console and re-fiberglass - shouldnt be too hard, and just make a fiberglass lid that is countersunk in the console - so as to keep the smooth finish that i am after.

BARKLAY
Post #36

i had to reinforce my console with sheet steel (from underneath) because the fibreglass cracked along the edges... but then my curve does go all the way to the top of the dash... just my recommendation before you continue on

NISMOgemini
Post #37

if u lay out the matting under it properly it wont crack.. i made a similare console for my brothers tarage except it had a 12" sub in it and never cracked at all

ratdawg
Post #38

k, well because i have covered the whole mdf substructure fully in a single piece of material from top to bottom, i dont think it will crack at edges seeing as there is no fiberglass edge.
the fiberglass will be layered underneath with the addition of some cardboard reinforcements?


ratdawg
Post #39

Just picked up some more supplies for this and some future projects. = sxc lol

Was going to do some more of the console but it looks like its going to rain so ill prob just wait till tomorrow unless it clears up.

93lux
Post #40

sweet lookin awsum so far man. hows the console gonna get mounted to the floor?

ratdawg
Post #41

I will remove the flooring whic is like vinyl, tape down a few layers of aluminum foil and then fiberglass the contours of the floor, ill let thi sharden and then this will be the bottom of the console, - its hard to explain, but will mean the conolse sits exactly to the shape of the floor, this will then be mounted through bolts / clips etc - wait and see the pics to get a better ides.

cheers

ratdawg
Post #42

Today i got on with the console, by reinforcing the resined outer fabric. I did this by placing chop strand mat (csm) along the fabric from underneath, this was then resined and left to dry. When dry, i did another layer of csm this time adding some rolled up catalogues for reinforcement. I will do probably a few more layers of csm just to make sure it its strong enough.

Once this is done, i will fill the out side and smooth it all out.

I also have to start building my dash facia which will be added to the end of the console.

NOTE: edges of the csm were shredded (roughed up) before i resined them in place.

ratdawg
Post #43

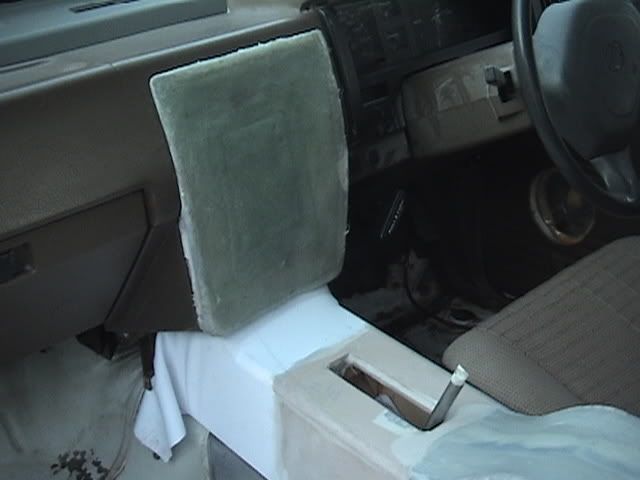
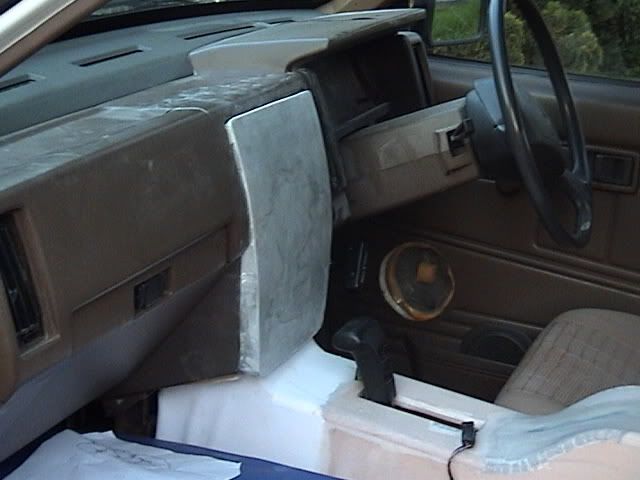
Today i began construction of the dash facia which will connect to the end of the cosnole i am making.

I began by removing the original facia and cutting away any of the plastic that potruded too far forward.

I then masked of the surrounding area and work area using aluminum foil and masking tape.

I them fiberglassed the area i wanted - this fiberglass piece will be the backing of the facia and provide a piece to work on.

ratdawg
Post #44

Just fitted the console to see how it all fits, its getting there slowley but surely, i have to go over the dash facia part a few more times for reinforcement and then stretch material of the surface to obtain the finish i want - shouldnt be too long now lol.

THE RIG
Post #45

looks great dawg,looks pretty wide too,sitting right next to the seats.can you still click ya seatbelts in easy enough?

ratdawg
Post #46

cheers, yeah the seats arent as close to console further back so there is a space for seat belt clickers

FromDeeEast
Post #47

awesome keep up the good work

BND63
Post #48

That looks great man.

the alfoil is a bitch to keep down ay...

a tip for next time use a paintbrush and some water and wet the area to be glassed and the back of the alfoil - the dull side. Pat it down to the area, use a different brush to run over it to get it to stay down.

i figured that out when i did my sub box for the wagon.

Keep up the good work.

ratdawg
Post #49

cheers for the tips, will do.

ratdawg
Post #50

Started to get this dash facia finished, by adding bits of fiberglass and shaping it to the required size. I then covered this in material and resined. After this is dry, i will add a layer or two of fiberglass and fill and asnd the outside.

ratdawg
Post #51

Now the dash facia piece is resined, i have cut out the back and am reinforcing from inside because i will be sanding the front down a little to make it even with rest of dash.

BND63
Post #52

What resin you using, epoxy or polyester?

ratdawg
Post #53

im using polyester because its cheaper lol, and because of the purpose i am using it for it doesnt really matter that much either way.

BND63
Post #54

Thought so, it hasn't shrunken or distorted?

ratdawg
Post #55

yeah it has a little, but this will be fixed with filler - it doesnt matter if i use too much filler either as i will be making moulds of these pieces and recasting later to get a fully fiberglass final product.

ratdawg
Post #56

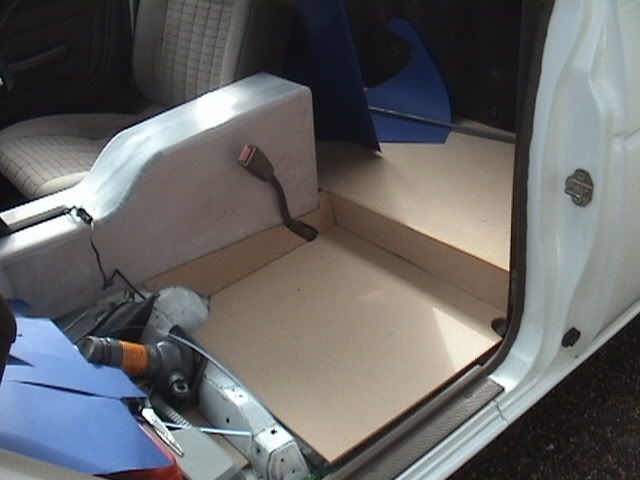
when thinking of ways to mount console, i decided that it would be best to smooth the whole floor, so today, i took out the vinyl flooring and gave the interior a clean out.

I will make a false floor from mdf and then fiberglass of the top when done, i will remove most of the mdf (leaving a fiberglass shell) and lay down a layer or two of insulation between the floor and the fiberglass.

Note - the pics of console - because i removed floor and did a bit more fiberglassing to the dash piece, these two pieces do not fit properly - will be fixed later.

IPB Image

IPB Image

IPB Image

IPB Image

ratdawg
Post #57

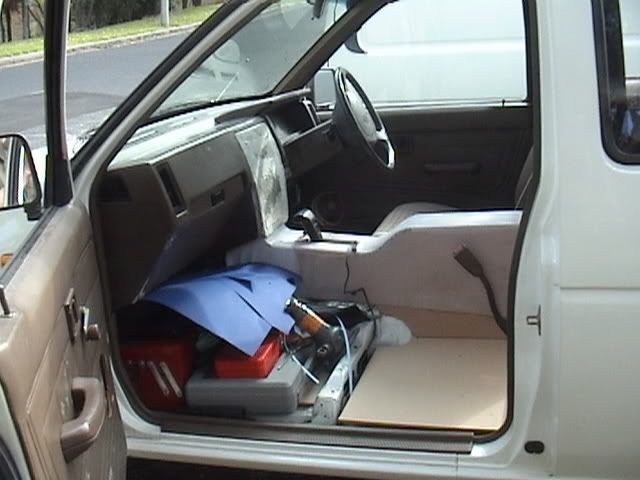
I started to build the false mdf floor today, which will later be covered in fiberglass to make a shell, the mdf will be removed and replaced with insulation and deadener.

I wanted the design of the floor to have nice clean straight lines as i plan to cover the fiberglass in carpet and dont want too many complex curves etc that require heat and pressure to conform the carpet to.

I have also designed with easy access in mind, so that while the panels will fit nicely together and there will be no gaps, there will be hidden access points for maintenance etc.

Sorry for pics, i locked car and left keys inside and was too lazy to go get them so i took pics through the window

IPB Image

IPB Image

IPB Image

ratdawg
Post #58

Havent had much time because of gay assignments, but did a little more with smoothing the floor today.

Still have to finish and reduce the size of some pieces as i need to allow for a few layers of fiberglass and the carpet when finished.

IPB Image

IPB Image

IPB Image

I really need to get a shed or workshop lol my truck is filling with tools cause im too lazy to pack away lol.

ratdawg
Post #59

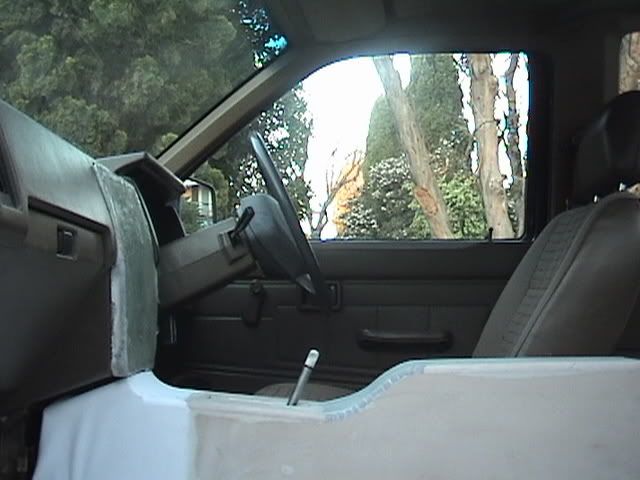
At the moment just gradually building up the dash facia using a milkshake mix. Just making it all level and so when it it positioned it is smooth and level with the rest of the dash.
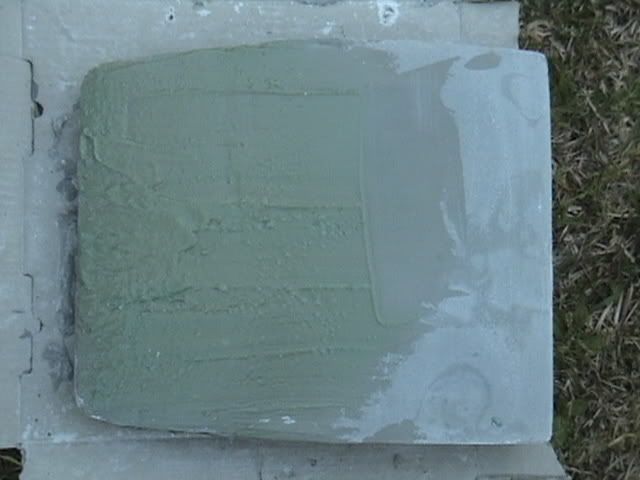
The pic below is probably about the 4/5th layer of the stuff - the previous layers having been sanded between coats.

IPB Image

ratdawg
Post #60

Ive pretty much finished smoothing the dash piece now - using multiple layers of milkshake and sanding between each coat.

IPB Image

I now have to smooth off the sides and sand it back a bit so that it fits properly.

IPB Image

IPB Image

I then will most probably attach this piece to the end of the console and smooth it all down.

  • Member Login

    If you have a BoostCruising account enter your user name and password into the yellow box.

    Alternatively, you can quickly login with Facebook.

    If you don't have an account create one below.

    Create Account
  • Login with Facebook

    Login using your Facebook account!

Page 1 of 3
Jump to page
THIS TOPIC HAS BEEN ARCHIVED
1 User(s) are reading this topic (1 Guests and 0 Anonymous Users)
0 Members:
Loading...
x