- 2010 Toyota Matrix Owners Manuals
- Toyota Matrix Owners Manuals
- 2004 Toyota Matrix Owners Manuals
- Toyota Matrix Owners Manuals
- 2009 Toyota Matrix Owners Manuals
- Toyota Matrix Owners Manuals
- 2012 Toyota Matrix Owners Manuals
- Toyota Matrix Owners Manuals
- 2003 Toyota Matrix Owners Manuals
- Toyota Matrix Owners Manuals
- 2014 Toyota Matrix Owners Manuals
- Toyota Matrix Owners Manuals
- 2013 Toyota Matrix Owners Manuals
- Toyota Matrix Owners Manuals
- 2011 Toyota Matrix Owners Manuals
- Toyota Matrix Owners Manuals
- 2005 Toyota Matrix Owners Manuals
- Toyota Matrix Owners Manuals
- 2007 Toyota Matrix Owners Manuals
- Toyota Matrix Owners Manuals
- 2006 Toyota Matrix Owners Manuals
- Toyota Matrix Owners Manuals
- 2008 Toyota Matrix Owners Manuals
- Toyota Matrix Owners Manuals
- Download PDF Manual
-
’05 MATRIX_U (L/O 0409)
SECTION 1− 1
OPERATION OF INSTRUMENTS AND CONTROLS Overview of instruments and controls Instrument panel overview Instrument cluster overview Indicator symbols on the instrument panel
. . . . . . . . . . . . . . . . . . . . . . . . . . . . . . . . . . . . . . . . . . . . . . . . . . . . . . . . . . . . . . . . . . . . . . . . . . . . . . . . . . . . . . . . . . . . . . . .
2005 MATRIX from Sep. ’04 Prod. (OM12892U)
’05 MATRIX_U (L/O 0409)
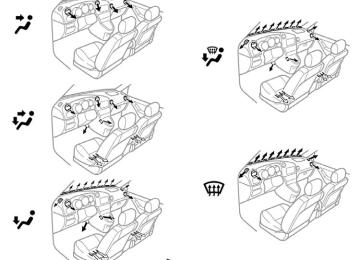
Instrument panel overview "View A
1. Side defroster outlets 2. Side vents 3. Instrument cluster 4. Center vents 5. Personal lights 6. Electric moon roof switches and
personal light
7. Power door lock switches 8. Power window switches 9. Glove box 10. Portable ashtray 11. Cup holders 12. Power outlet (12 VDC) 13. Parking brake lever 14. Auxiliary boxes 15. Automatic transmission selector lever
or manual transmission gear shift lever
16. Hood lock release lever 17. Window lock switch
2005 MATRIX from Sep. ’04 Prod. (OM12892U)
’05 MATRIX_U (L/O 0409)
"View B (vehicles without navigation system)
1. Power rear view mirror control switches 2. Interior/instrument panel light control
dial
3. Headlight, turn signal and front fog
light switches
4. Wiper and washer switches 5. Air conditioning controls 6. Rear window defogger switch 7. Emergency flasher switch 8. Clock 9. Front passenger’s seat belt reminder
light/front passenger occupant classification indicator light
10. Car audio 11. Auxiliary box or power outlet (115 VAC) 12. Power outlet (12 VDC) or cigarette
lighter
13. Ignition switch 14. Cruise control switch 15. Tilt steering lock release lever 16. “TRAC OFF” (traction control system
off) switch
17. Engine immobilizer system/Toyota vehicle intrusion protection system indicator light
2005 MATRIX from Sep. ’04 Prod. (OM12892U)
’05 MATRIX_U (L/O 0409)
18. Tire pressure warning system reset
switch
19. Glass hatch opener switch
2005 MATRIX from Sep. ’04 Prod. (OM12892U)
’05 MATRIX_U (L/O 0409)
"View B (vehicles with navigation system)
1. Power rear view mirror control switches 2. Interior/instrument panel light control
dial
3. Headlight, turn signal and front fog
light switches
4. Wiper and washer switches 5. Air conditioning controls 6. Emergency flasher switch 7. Rear window defogger switch 8. Front passenger’s seat belt reminder
light/front passenger occupant classification indicator light
9. Navigation system 10. Auxiliary box or power outlet (115 VAC) 11. Power outlet (12 VDC) or cigarette
lighter
12. Ignition switch 13. Cruise control switch 14. Tilt steering lock release lever 15. “TRAC OFF” (traction control system
off) switch
16. Engine immobilizer system/Toyota vehicle intrusion protection system indicator light
2005 MATRIX from Sep. ’04 Prod. (OM12892U)
’05 MATRIX_U (L/O 0409)
17. Tire pressure warning system reset
switch
18. Glass hatch opener switch
2005 MATRIX from Sep. ’04 Prod. (OM12892U)
’05 MATRIX_U (L/O 0409)
Instrument cluster overview
1. Tachometer 2. Service reminder indicators and
indicator lights
3. Speedometer
4. Fuel gauge 5. Low fuel level warning light 6. Engine coolant temperature gauge
7. Trip meter reset knob 8. Odometer, two trip meters and outside
temperature display
2005 MATRIX from Sep. ’04 Prod. (OM12892U)
’05 MATRIX_U (L/O 0409)
Indicator symbols on the instrument panel
or
Brake system warning light∗1
or
Anti−lock brake system warning light∗1
Driver’s seat belt reminder light∗1
Open door warning light∗1
Front passenger’s seat belt reminder light∗1
SRS warning light∗1
Vehicle stability control system/traction control system warning light∗1
Discharge warning light∗1
Low tire pressure warning light∗1
Low engine oil pressure warning light∗1
or
Malfunction indicator lamp∗1
Low windshield washer fluid level warning light ∗1,
∗3
Engine oil replacement reminder light∗1
Front passenger occupant classification indicator light
2005 MATRIX from Sep. ’04 Prod. (OM12892U)
’05 MATRIX_U (L/O 0409)
Headlight low beam indicator light
Tail light indicator light
Headlight high beam indicator light
Turn signal indicator lights
Overdrive−off indicator light
Slip indicator light/traction control system off indicator light
Cruise control indicator light∗2
∗1: For details, see “Service reminder indicators and warning
∗2:
buzzers” on page 107 in Section 1−6. If this light flashes, see “Cruise control” on page 132 in Section 1−7.
∗3: This symbol equipped only on vehicles sold in Canada.
2005 MATRIX from Sep. ’04 Prod. (OM12892U)
’05 MATRIX_U (L/O 0409)
10
2005 MATRIX from Sep. ’04 Prod. (OM12892U)
’05 MATRIX_U (L/O 0409)
SECTION 1- 10
OPERATION OF INSTRUMENTS AND CONTROLS Other equipment Clock Cigarette lighter and portable ashtray Power outlets (12 VDC) Power outlet (115 VAC) Compass Glove box Auxiliary box Rear console box Cup holders Seatback tables Luggage storage boxes Tie- down hooks and tire tie- down belts Luggage deck rails Luggage cover Floor mat
. . . . . . . . . . . . . . . . . . . . . . . . . . . . . . . . . . . . . . . . . . . . . . . . . . . . . . . . . . . . . . . . . . . . . . . . . . . . . . . . . . . . . . . . . . . . . . . . . . . . . . . . . . . . . . . . . . . . . . . . . . . . . . . . . . . . . . . . . . . . . . . . . . . . . . . . . . . . . . . . . . . . . . . . . . . . . . . . . . . . . . . . . . . . . . . . . . . . . . . . . . . . . . . . . . . . . . . . . . . . . . . . . . . . . . . . . . . . . . . . . . . . . . . . . . . . . . . . . . . . . . . . . . . . . . . . . . . . . . . . . . . . . . . . . . . . . . . . . . . . . . . . . . . . . . . . . . . . . . . . . . . . . . . . . . . . . . . . . . . . . . . . . . . . . . . . . . . . . . . . . . . . . . . . . . . . . . . . . . . . . . . . . . . . . . . . . . . . . . . . . . . . . . . . . . . . . . . . . . . . . . . . . . . . . . . . . . . . . . . . . . . . . . . . . . . . . . . . . . . . . . . . . . . . . . . . . . . . . . . . . . . . . . . . . . . . . . . . . . . . . . . . . . . . . . . . . . . . . . . . . . . . . . . . . . . . . . . . . . . . . . . . . . . . . . . . . . . . . . . . . . . . . . . . . . . . . . . . . . . . . . . . . . . . . . . . . . . . . . . . . . . . . . . . . . . . . . . . . . . . . . . . . . . . . . . .
166
166
167
168
169
173
173
174
176
176
177
178
179
180
181165
2005 MATRIX from Sep. ’04 Prod. (OM12892U)
’05 MATRIX_U (L/O 0409)
Clock
Cigarette lighter and portable ashtray
To reset the hour: Push the “H” button. To reset the minutes: Push the “M” button. The key must be in the “ACC” or “ON” position. If the electrical power source has been disconnected from the clock, the time dis- play will automatically be set to 1:00 (one o’clock). When lights are turned on, the brightness of the time indi- cator will be reduced.
instrument panel
the
CIGARETTE LIGHTER To use the cigarette lighter, press it in. After it finishes heating up, it automati- cally pops out ready for use. If the engine is not running, the key must be in the “ACC” position. Do not hold the cigarette lighter pressed in. Use a Toyota genuine cigarette lighter or equivalent for replacement.
PORTABLE ASHTRAY The ashtray can be removed and used outside the vehicle. To use the ashtray, open the lid. When finished with your cigarette, thor- oughly extinguish it in the ashtray to pre- vent other cigarette butts from catching fire. After using the ashtray, close the lid completely. To remove the ashtray, pull it out from the front cup holder.
166
2005 MATRIX from Sep. ’04 Prod. (OM12892U)
’05 MATRIX_U (L/O 0409)
Power outlets (12 VDC)
CAUTION
To reduce the chance of in case of an accident or sudden stop while driving, always completely close the ashtray after use.
injury
Instrument panel
Rear console box
The power outlets are designed power supply for car accessories. The key must be in the “ACC” or “ON” position for the power outlets to be used.
for
NOTICE
(cid:1) To prevent the fuse from being blown, do not use the electricity over the total vehicle capacity of 12
V/120W (instrument panel and rear console box outlets together).(cid:1) To prevent the battery from being discharged, do not use the power outlets longer than necessary when the engine is not running.
(cid:1) Close the power outlet lids when the power outlets are not in use. Inserting anything other than an ap- propriate plug that fits the outlet, or allowing any liquid to get into the outlet may cause electrical fail- ure or short circuits.
167
2005 MATRIX from Sep. ’04 Prod. (OM12892U)
’05 MATRIX_U (L/O 0409)
Power outlet (115 VAC)
This power outlet is designed for use as a power supply for electric ap- pliances in the vehicle. The key must be in the “ON” position for the power outlet to be used. The maximum capacity for this power out- let is 115 VAC/100W. If you attempt to use an appliance that requires more than 115 VAC or 100W, the protection circuit will activate and cut the power supply. The power supply will restart automatically when you use an appliance that operates within the 115 VAC/100W limits.
To use the power outlet, push the main switch on the instrument panel. An indicator light will illuminate to indicate that the power outlet is ready for use. Push the main switch once again to turn the power outlet off. When the power out- let is not in use, make sure that the main switch is turned off.
NOTICE
(cid:1) To prevent the battery from being discharged, do not use the power outlet longer than necessary when the engine is not running.
168
(cid:1) Close the power outlet lid when the power outlet is not in use. Inserting anything other than an appropriate plug that fits the outlet may cause electrical failure or short circuits.
The power outlet is not designed for the following electric appliances even though their power consumption is un- der 115 VAC/100W. These appliances may not operate properly. (cid:1) Appliances with high initial peak watt- age: cathode- ray tube type televisions, compressor- driven refrigerators, electric pumps, electric tools, etc.
(cid:1) Measuring devices which process pre- cise data: medical equipment, measur- ing instruments, etc.
(cid:1) Other appliances requiring an extremely stable power supply: microcomputer- controlled electric blankets, touch sen- sor lamps, etc.
Certain electrical appliances may cause radio noise.
2005 MATRIX from Sep. ’04 Prod. (OM12892U)
’05 MATRIX_U (L/O 0409)
Compass
indicates
the vehicle
the direction The compass that the above case, it shows that the vehicle is heading north.
is heading.
In
Displays
NE SE SW NW
Directions
North
Northeast
East
Southeast
South
Southwest
West
Northwest
The compass may not show the correct direction in the following conditions: (cid:1) The vehicle is stopped immediately af-
ter turning.
(cid:1) The compass does not adjust while the
vehicle is stopped.
(cid:1) The ignition switch is turned off imme-
diately after turning.
(cid:1) The vehicle is on an inclined surface.
The direction is indicated on the inside rear view mirror. If the ignition switch was turned off with the system on, the system will automati- cally turn back on when the ignition switch is turned on. To turn on the compass, push and hold the “ ” switch until the display turns on. To turn off the compass, push and hold ” switch until the display turns the “ off.
(cid:1) The vehicle is in a place where the earth’s magnetic field is subject to in- terference by artificial magnetic fields (underground parking, under a steel tower, between buildings, roof parking, near a crossing, near a large vehicle, etc.).
(cid:1) The vehicle is magnetized. (There is a magnet or a metal object on or near the inside rear view mirror.)
the deviation
(cid:1) The battery has been disconnected. If your vehicle is out of the set zone, refer to “CALIBRATING THE COMPASS” below to set the zone number. If the compass works to calibrate the direction automati- cally while the vehicle is in motion. For additional precision or calibrating, see COMPASS” below.
for complete THE
“CALIBRATING
is small,
169
2005 MATRIX from Sep. ’04 Prod. (OM12892U)
’05 MATRIX_U (L/O 0409)
Compass sensor
The compass sensor is in the inside rear view mirror.
NOTICE
Do not put magnets or a metal object on or near the inside rear view mirror of the vehicle. Doing this may cause malfunction of the compass sensor.
170
the
from
CALIBRATING THE COMPASS (deviation calibration) the compass The direction display on true direction deter- deviates mined by the earth’s magnetic field. The angle of deviation varies according to the geographic position of the vehicle. To adjust this deviation, stop the vehicle, then push and hold the both personal light switches until the zone number appears on the display. Then push the right side or left side personal light switch, referring to the following map to select the number of the zone where the vehicle is.
2005 MATRIX from Sep. ’04 Prod. (OM12892U)
’05 MATRIX_U (L/O 0409)
Samoa: 5
Guam:
Saipan: 8
After calibration, leaving the system for several seconds returns it to the compass mode.
CAUTION
Do not adjust the display while the vehicle is moving. Be sure to adjust the display only when the vehicle is stopped.
Zone number
171
2005 MATRIX from Sep. ’04 Prod. (OM12892U)
’05 MATRIX_U (L/O 0409)
the direction display on
CALIBRATING THE COMPASS (circling calibration) Sometimes the compass may not change after a turn. To rectify this, stop the vehicle and push and hold the both personal light switches until “C” appears on the display. If “C” appears on the display because of a drastic change in the magnetic field, perform circling calibration.
in a circle, drive around
Drive the vehicle in a circle at 8 km/h (5
mph) or less. If there is not enough space to drive the block. After driving 1 to 3 circles in the above method, calibration is completed when the direction is shown on the display. If calibration cannot be performed because of the magnetized vehicle etc., take your vehicle to Toyota dealer.172
Perform circling calibration just after you have purchased your Toyota. And then always perform circling calibration after the battery has been removed, re- placed or disconnected. (cid:1) Do not perform circling calibration of the compass the earth’s magnetic field is subject to in- terference by artificial magnetic fields (underground parking, under a steel tower, between buildings, roof parking, near a crossing, near a large vehicle, etc.).
in a place where
(cid:1) During calibration, do not operate elec- tric systems (moon roof, power win- dows, etc.) as they may interfere with the calibration.
2005 MATRIX from Sep. ’04 Prod. (OM12892U)
CAUTION
(cid:1) When doing the circling calibration, be sure to secure a wide space, and watch out for people and ve- hicles in the neighborhood. Do not violate any local traffic rules while performing circling calibration.
(cid:1) Do not adjust the display while the vehicle is moving. Be sure to adjust the display only when the vehicle is stopped.
’05 MATRIX_U (L/O 0409)
Glove box
Auxiliary box (type A)
To open the glove box door, pull the lever.
To use the box, pull on the handle.
CAUTION
To reduce the chance of in case of an accident or a sudden stop, always keep the glove box door closed while driving.
injury
CAUTION
(cid:1) To reduce the chance of injury in case of an accident or a sudden stop, always keep the auxiliary box closed while driving.
(cid:1) Do not use this auxiliary box as an
ashtray.
173
2005 MATRIX from Sep. ’04 Prod. (OM12892U)
’05 MATRIX_U (L/O 0409)
Auxiliary box (type B)
Auxiliary box (type C)
Rear console box (type A)
To use the box, push the lid.
CAUTION
To use the box, push the knob. To remove the auxiliary box, open the box and pull it up.
To access the rear console box, pull up the lock release lever while raising the rear console box lid.
To reduce the chance of in case of an accident or a sudden stop, always keep the auxiliary box closed while driving.
injury
CAUTION
CAUTION
(cid:1) To reduce the chance of injury in case of an accident or a sudden stop, always keep the auxiliary box closed while driving.
(cid:1) Do not use this auxiliary box as an
ashtray.
To reduce the chance of in case of an accident or a sudden stop, always keep the console box closed while driving.
injury
174
2005 MATRIX from Sep. ’04 Prod. (OM12892U)
’05 MATRIX_U (L/O 0409)
Rear console box (type B)
UPPER TRAY To access the upper tray, raise the con- sole box lid without touching the lock release lever.
CONSOLE BOX To access the rear console box, pull up the lock release lever while raising the rear console box lid.
CAUTION
To reduce the chance of in case of an accident or a sudden stop, always keep the console box closed while driving.
injury
175
2005 MATRIX from Sep. ’04 Prod. (OM12892U)
’05 MATRIX_U (L/O 0409)
Cup holders
Seatback tables
The cup holder is designed for holding cups or drink- cans securely. Rear cup holder—To use the holder, pull it out.
CAUTION
(cid:1) Do not place anything else other than cups or drink- cans in the cup items may be holder, as such thrown about in the compartment and possibly injure people in the vehicle during sudden braking or in an accident.
Front passenger’s seatback
reduce
(cid:1) Rear cup holder—To
the chance of injury in case of an acci- dent or sudden stop while driving, keep the cup holder closed when it is not in use.
Rear right side seatback
2005 MATRIX from Sep. ’04 Prod. (OM12892U)
Front
Rear
176
’05 MATRIX_U (L/O 0409)
Luggage storage boxes
You can use the front passenger’s seat- back and rear right side seatback as a temporary table only when the vehicle is stopped. To use the seatback table, fold the seat- back down. For detailed information, see “—Fold- down front passenger’s seat” on page 39 or “Fold- down rear seat” on page 40 in Section 1- 3.
CAUTION
To avoid serious injury: (cid:1) Do not set up the seatback table
while the vehicle is moving.
(cid:1) Do not sit on the seatback table.
Front
NOTICE
To prevent damage to the seat, avoid putting heavy loads on the temporary table.
Rear
To open the luggage storage box, turn the knobs to the “UNLOCK” position and open the lid. To close the luggage storage box, lower the lid and turn the knobs to the “LOCK” position.
CAUTION
To reduce the chance of in case of an accident or a sudden stop, always keep luggage storage boxes closed and locked while driv- ing.
injury
the
177
2005 MATRIX from Sep. ’04 Prod. (OM12892U)
’05 MATRIX_U (L/O 0409)
Tie- down hooks and tire tie- down belts
Keep the hook stored in its original posi- tion as shown when it is not in use.
Rear luggage storage box— To keep the lid open, attach the hook as shown above.
NOTICE
Do not close the back door with the hook attached, or the hook may be damaged.
To secure your luggage, use the tie- down hooks as shown above. The tire tie- down belts are designed to secure the flat tire. You can also use the belts to secure your luggage. (To secure the flat tire, see “—Stowing flat tire” on page 239 in Section 4.) See “—Stowage precautions” on page 207
in Section 2 for precautions when loading luggage.178
2005 MATRIX from Sep. ’04 Prod. (OM12892U)
’05 MATRIX_U (L/O 0409)
Luggage deck rails
To tighten
To hook
To loosen
To unhook
To use shown in the illustration.
tire
the
tie- down belts, do as
CAUTION
To avoid personal injury, keep the tie- down hooks retracted and the tire tie- down belts stored in the luggage storage box when not in use.
the
To use luggage deck rails, you must install genuine Toyota accessories or their equivalent for the deck rails. Follow the manufacturer’s instructions and precautions when installing a genuine Toyota accessory or equivalent. See “—Stowage precautions” on page 207
in Section 2 for precautions when loading luggage.CAUTION
When you secure cargo with the lug- gage deck rails, be sure follow the instructions below in order to avoid the cargo coming loose: (cid:1) Do not place cargo exceeding 31 kg (70 lb.) on the luggage deck rails. (cid:1) To prevent luggage or cargo from sliding forward during braking, make sure the deck rail accessories such as tie- down hooks are secure- ly attached on the deck rails.
locked
the rear seats are they are not
folded (cid:1) When down, into place and may move. After driving on rough roads or at high speeds, cargo attached the seat back rails may have moved out of place. Check the cargo and secure it again if necessary.
to
179
2005 MATRIX from Sep. ’04 Prod. (OM12892U)
Luggage cover
180
’05 MATRIX_U (L/O 0409)
To use the luggage cover: 1. Attach the left side hooks of the lug- left side upper
gage cover to the tie- down hooks.
2. Attach the right side hooks of the luggage cover to the right side up- per tie- down hooks.
3. Pull the belt ends of the right side hooks to secure the luggage cover.
CAUTION
Do not place anything on the luggage cover. Such thrown about and possibly injure people in the vehicle during sudden braking or a collision.
items may be
To remove the luggage cover, loosen the right side belts of the hooks as shown above. Then remove the hooks from tie- down hooks. When you remove the luggage cover, fold up and store it in the luggage storage box.
2005 MATRIX from Sep. ’04 Prod. (OM12892U)
’05 MATRIX_U (L/O 0409)
Floor mat
Use a floor mat of the correct size. If the floor carpet and floor mat have two holes, then it is designed for use with two locking clips. Fix the floor mat with lock- ing clips into the holes in the floor carpet.
CAUTION
Make sure the floor mat is properly placed on the floor carpet. If the floor mat slips and the movement of the pedals during driv- ing, it may cause an accident.
interferes with
181
2005 MATRIX from Sep. ’04 Prod. (OM12892U)
’05 MATRIX_U (L/O 0409)
182
2005 MATRIX from Sep. ’04 Prod. (OM12892U)
’05 MATRIX_U (L/O 0409)
SECTION 1− 2
OPERATION OF INSTRUMENTS AND CONTROLS Keys and Doors Keys Engine immobilizer system Wireless remote control Side doors Power windows Back door Glass hatch Toyota vehicle intrusion protection system (TVIP) Hood Fuel tank cap Electric moon roof
. . . . . . . . . . . . . . . . . . . . . . . . . . . . . . . . . . . . . . . . . . . . . . . . . . . . . . . . . . . . . . . . . . . . . . . . . . . . . . . . . . . . . . . . . . . . . . . . . . . . . . . . . . . . . . . . . . . . . . . . . . . . . . . . . . . . . . . . . . . . . . . . . . . . . . . . . . . . . . . . . . . . . . . . . . . . . . . . . . . . . . . . . . . . . . . . . . . . . . . . . . . . . . . . . . . . . . . . . . . . . . . . . . . . . . . . . . . . . . . . . . . . . . . . . . . . . . . . . . . . . . . . . . . . . . . . . . . . . . . . . . . . . . . . . . . . . . . . . . . . . . . . . . . . . . . . . . . . . . . . . . . . . . . . . . . . . . . . . . . . . . . . . . . . . . . . . . . . . . . . . . . . . . . . . . . . . . . . . . . . . . . . . . . . . . . . . . . . . . . . . . . . . . . . . . . . . . . . . . . . . . . . . . . . . . . . . . . . . . . . . . . . . . . . . . . . . . . . . . . . . . . . . . . . . . . . . . . . . . . . . . . .
12
14
16
20
24
26
27
28
30
31
3311
2005 MATRIX from Sep. ’04 Prod. (OM12892U)
’05 MATRIX_U (L/O 0409)
Keys
When using valet parking, leave the sub key with the attendant. Since the side doors and back door can be locked without a key, you should al- ways carry a spare master key in case you accidentally lock your keys inside the vehicle.
Your vehicle is supplied with two kinds of keys. 1. Master keys (black)—These keys work in every lock. Your Toyota dealer will need one of them to make a new key with a built−in transponder chip.
2. Sub key (gray)—This key also works in
every lock.
A transponder chip for engine immobilizer system has been placed in the head of the master and sub keys. These chips are needed to enable the system to function correctly, so be careful not to lose these keys. If you make your own duplicate key, you will not be able to cancel the system or start the engine.
12
NOTICE
the
When using a key containing a trans- ponder chip, observe following precautions: z When starting the engine, do not use the key with a key ring resting on the key grip and do not press the key ring against the key grip. Otherwise the engine may not start, or may stop soon after it starts.
2005 MATRIX from Sep. ’04 Prod. (OM12892U)
’05 MATRIX_U (L/O 0409)
z Do not cover the key grip with any material that cuts off electromagnet- ic waves.
z Do not knock the key hard against
other objects.
z Do not leave the key exposed to high temperatures for a long period, such as on the dashboard and hood under direct sunlight. z Do not put the key
in water or
wash it in an ultrasonic washer.
z Do not bend the key grip.
z Do not use the key with electromag-
netic materials.
z When starting the engine, do not use the key with other transponder keys around (including keys of oth- er vehicles) and do not press other key plates against the key grip. Otherwise the engine may not start, or may stop soon after it starts. If this happens, remove the key once and then insert it again after remov- ing other transponder keys (includ- ing keys of other vehicles) from the ring or while gripping or covering them with your hand to start the engine.
13
2005 MATRIX from Sep. ’04 Prod. (OM12892U)
’05 MATRIX_U (L/O 0409)
Engine immobilizer system
immobilizer system
The engine is a theft prevention system. When you in- sert the key in the ignition switch, the transponder chip the key’s head transmits an electronic code to the ve- hicle. The engine will start only when the electronic code in the chip corre- sponds to the registered ID code for the vehicle.
in
KEY NUMBER PLATE Your key number is shown on the plate. Keep the plate in a safe place such as your wallet, not in the vehicle. If you should lose your keys or if you need additional keys, duplicates can be made by a Toyota dealer using the key number. We recommend writing down the key num- ber and storing it in a safe place.
14
Without Toyota vehicle intrusion protec- tion system
With Toyota vehicle intrusion protection system
2005 MATRIX from Sep. ’04 Prod. (OM12892U)
indicator
light will start
The system is automatically set when the key is removed from the ignition switch. The flashing to show the system is set. If any of the following indicator conditions occurs, contact your Toyota dealer. D The
light stays on except when intrusion protection system is setting or activat- ing. intrusion protection system (TVIP)” on page 28
in this Section.)“Toyota vehicle
the Toyota
indicator
vehicle
(See
D The indicator light does not start flash- ing when the key is removed from the ignition switch.
D The indicator light flashes inconsistent-
ly.
Inserting the registered key in the ignition switch automatically cancels the system, which enables the engine to start. The indicator light will go off. For your Toyota dealer to make you a new key with built−in transponder chip, your dealer will need your key number and master key. However, there is a limit to the number of additional keys your Toyota dealer can make for you.
’05 MATRIX_U (L/O 0409)
If you make your own duplicate key, you will not be able to cancel the sys- tem or start the engine.
NOTICE
remove or disas- Do not modify, semble the engine immobilizer sys- tem. If any unauthorized changes or modifications are made, proper opera- tion of the system cannot be guaran- teed.
For vehicles sold in U.S.A.
This device complies with Part 15 of the FCC Rules. Operation is subject to the following two conditions: (1) This device may not cause harmful interference, and (2) this device must accept any interference received, includ- ing interference that may cause unde- sired operation.
CAUTION
Changes or modifications not ex- pressly approved by the party respon- sible for compliance could void the user’s authority to operate the equip- ment.
For vehicles sold in Canada
This device complies with RSS−210 of Industry Canada. Operation is subject to the following two conditions: (1) This device may not cause interfer- ence, and (2) this device must accept any interference that may cause undesired operation of the device.
interference,
including
15
2005 MATRIX from Sep. ’04 Prod. (OM12892U)
’05 MATRIX_U (L/O 0409)
Wireless remote control—
1. “LOCK” switch 2. “UNLOCK” switch 3. “HATCH GLASS” switch 4. “PANIC” switch
16
The wireless remote control system is designed to lock or unlock all the side doors and back door, open the glass hatch or activate the “PANIC” mode from a distance within approximately 1
m (3 ft.) of the vehicle. When you operate any switch, push slowly and securely. The wireless remote control transmitter is an electronic component. Observe the fol- lowing instructions in order not to cause damage to the transmitter. D Do not leave the transmitter in places the temperature becomes highwhere such as on the dashboard.
it
D Do not disassemble it. D Avoid knocking
it hard against other
objects or dropping it.
D Avoid putting it in water. You can use up to 4 wireless remote con- trol the same vehicle. Contact your Toyota dealer for detailed information.
transmitters
for
If the wireless remote control transmitter does not actuate the doors or alarm, or operate from a normal distance: D Check for closeness to a radio trans- mitter such as a radio station or an airport which can interfere with normal operation of the transmitter.
D The battery may have been consumed. Check the battery in the transmitter. To replace the battery, see “—Replacing transmitter battery” on page 18.
If you lose your transmitter, contact your Toyota dealer as soon as possible to avoid the possibility of theft, or an acci- dent. (See “If you lose your wireless re- mote control transmitter” on page 248 in Section 4.)
This complies with Part 15 of the FCC rules. Operation is subject to the follow- ing two conditions: (1) This device may not cause harmful interference, and (2) this device must accept any interference received, includ- ing interference that may cause unde- sired operation.
2005 MATRIX from Sep. ’04 Prod. (OM12892U)
—Locking and unlocking doors
Locking operation
Unlocking operation
’05 MATRIX_U (L/O 0409)
this
time,
To lock and unlock all the side doors and back door, push the switches of the transmitter slowly and securely. To lock: Push the “LOCK” switch. All the side doors and back door are locked si- multaneously. At turn signal lights flash once. Check to see that all the side doors and back door are securely locked. If any of side doors or back door is not securely closed, or if the key is in the ignition switch, locking cannot be per- formed by the “LOCK” switch. “UNLOCK” switch To unlock: Push once to unlock the driver’s door alone. Pushing the switch twice within 3 seconds unlocks all the side doors and back door simultaneously. At turn signal lights flash twice. When the interior light dial is in the door position, and all the side doors and back door are unlocked simultaneously with a wireless remote control transmitter, the in- terior lights come on for about 15 seconds and then fade out, even if the door is not opened. (For further information, see “Inte- rior/instrument panel light control” on page 97 in Section 1−5.)
time,
this
the
You have 30 seconds to open a door after using the wireless remote unlock feature. If a door is not opened by then, all the side doors and back door will be automati- cally locked again. If the “LOCK” or “UNLOCK” switch is kept pressed in, the locking or unlocking opera- tion is not repeated. Release the switch and then push again.
17
2005 MATRIX from Sep. ’04 Prod. (OM12892U)
’05 MATRIX_U (L/O 0409)
—Opening glass hatch
—Activating panic mode
—Replacing transmitter battery For replacement, use a CR2032 lithium battery or equivalent.
CAUTION
Special care should be taken to pre- vent small children from swallowing the removed transmitter battery or components.
NOTICE
the glass hatch, push
To open the “HATCH GLASS” switch of the transmit- ter for 1 second. If the ignition key is in the “ON” position, the glass hatch cannot be opened by the “HATCH GLASS” switch. See “Glass hatch” on page 27 Section.
this
in
flashes
intermittently and
Pushing the “PANIC” switch blows the horn the headlights, turn signal lights and interi- or lights. The “PANIC” switch is used to deter ve- hicle theft when you witness anyone at- tempting into or damage your vehicle. The alarm will last for one minute. To stop alarm midway, do the following: D Push any of the switch on the wireless
to break
remote control transmitter.
D Turn the ignition key from the “LOCK”
to “ON” position.
The “PANIC” mode does not work when the ignition key is in the “ON” position.
18
z During
the
replacing
transmitter battery, do not push the “LOCK”, “UNLOCK” and “HATCH GLASS” switches many times.
z When replacing the transmitter bat- tery, be careful not to lose the com- ponents.
z Replace only with
the same or equivalent type recommended by a Toyota dealer.
z Dispose of used batteries according
to the local laws.
Replace the transmitter battery by follow- ing these procedures:
2005 MATRIX from Sep. ’04 Prod. (OM12892U)
’05 MATRIX_U (L/O 0409)
1. Using a coin or equivalent, open the
2. Remove the discharged transmitter bat-
3. Put in a new transmitter battery with
transmitter case.
tery.
NOTICE
Do not bend the terminals.
positive (+) side up.
Close the transmitter case securely.
NOTICE
z Make sure
the positive side and negative side of the transmitter bat- tery are faced correctly.
z Do not replace the battery with wet hands. Water may cause unexpected rust.
z Do not touch or move any compo- nents inside the transmitter, or it may interfere with proper operation.
19
2005 MATRIX from Sep. ’04 Prod. (OM12892U)
’05 MATRIX_U (L/O 0409)
When the interior light control dial is in the door position, and all the side doors and back door are unlocked simultaneous- ly with a key or wireless remote control transmitter, the interior lights come on for about 15 seconds and then fade out, even if further information, see “Interior/instrument panel light control” on page 97 in Section 1−5.)
is not opened. (For
the door
Side doors—
z Be careful not to bend the electrode when inserting the transmitter bat- tery and that dust or oils do not adhere to the transmitter case.
z Close the transmitter case securely.
After replacing the battery, check that the transmitter operates properly. If the trans- mitter still does not operate properly, con- tact your Toyota dealer.
LOCKING AND UNLOCKING WITH KEY Insert the key into the keyhole and turn it. To lock: Turn the key forward. To unlock: Turn the key backward. Vehicles with power door lock system— All the side doors and back door lock and unlock simultaneously with either front door. In the driver’s door lock, turning the key once will unlock the driver’s door and twice in succession will unlock all the side doors and back door simultaneously.
20
2005 MATRIX from Sep. ’04 Prod. (OM12892U)
’05 MATRIX_U (L/O 0409)
CAUTION
Do not pull the inside handle of the front doors while driving. The doors will open and an accident may occur. Toyota strongly recommends that all children be placed in the rear seat of the vehicle.
Closing the door with the lock knob in the lock position will also lock the door. Be careful not to lock your keys in the ve- hicle. Vehicles with power door lock system— Doors cannot be locked when either front door is open and the key is in the igni- tion.
Driver’s side
LOCKING AND UNLOCKING WITH INSIDE LOCK KNOB Move the lock knob. To lock: Push the knob forward. To unlock: Pull the knob backward. The front doors can be opened by pulling the inside handle even if the lock knobs are in the locked position.
Passenger’s side
21
2005 MATRIX from Sep. ’04 Prod. (OM12892U)
lock: Push the switch down on the
LOCKING AND UNLOCKING WITH POWER DOOR LOCK SWITCH Push the switch. To front side. To unlock: Push the switch down on the rear side. Operating the switch simultaneously locks or unlocks all the side doors and back door. If you do either of the followings, no side door or back door can be unlocked with the power door lock switch. D Lock all the side doors and back door with the key or wireless remote control transmitter when all the side doors and back door are closed.
D Open the driver’s door or front passen- ger’s door and move the inside lock knobs of both front doors to the lock position, then close the front doors.
The power door lock switch can be reset in the following ways. D Turn the ignition key to “ON”. D Unlock all
the side doors and back door with the key or wireless remote control transmitter.
22
’05 MATRIX_U (L/O 0409)
D Unlock the driver’s door or front pas- lock senger’s door with knob, and the side doors and back door with the power door lock switch.
then unlock all
inside
the
to
the
lock
lever
the “LOCK”
REAR DOOR CHILD−PROTECTORS Move position as shown on the label. When the child−protector is locked, you cannot open the rear door by the inside door handle. We recommend using this feature whenever small children are in the vehicle.
2005 MATRIX from Sep. ’04 Prod. (OM12892U)
CAUTION
Before driving, be sure that the doors are closed and locked, especially when small children are in the ve- hicle. Along with the proper use of seat belts, locking the doors helps prevent the driver and passengers from being thrown out from the ve- hicle during an accident. It also helps prevent the doors from being opened unintentionally.
’05 MATRIX_U (L/O 0409)
—Automatic door locking and unlocking functions (vehicles with automatic transmission) You can select the following modes of the automatic locking and unlocking functions. The initial mode is mode 1. D Mode 1—Automatic
locking
linked
with the shift position All the side doors and back door are automatically locked when the shift le- ver is moved out of the “P” position with the “ON” position and all the doors are closed.
ignition switch
the
in
D Mode 2—Functions cancelled
function—All
Automatic door locking and unlocking functions do not activate in this mode. D Mode 3—Automatic locking and un- locking linked with the shift position Locking the side doors and back door are automatically locked when the shift lever is moved out of the “P” position with the ignition switch in the “ON” position and all the doors are closed. Unlocking function—All the side doors and back door are automatically un- locked when the shift lever is moved to ignition switch in the “ON” position.
the “P” position with
the
function—All
D Mode 4—Automatic locking and un- locking linked with the shift position and ignition switch Locking the side doors and back door are automatically locked when the shift lever is moved out of the “P” position with the ignition switch in the “ON” position and all the doors are closed. Unlocking function—All the side doors and back door are automatically un- locked when is turned from the “ON” position to the “ACC” or “LOCK” position.
ignition switch
the
CHANGING THE MODE The mode toggles through from mode 1 to mode 4. To change the mode, do the following: 1. Set the interior light control dial to the door position. (See “Interior/instrument panel light control” on page 97 in Sec- tion 1−5.)
2. Shift the shift lever into the “P” posi- tion and close all the side doors and back door.
3. Turn
the ignition switch to the “ON”
position.
23
2005 MATRIX from Sep. ’04 Prod. (OM12892U)
’05 MATRIX_U (L/O 0409)
Power windows
Automatic operation (to open only): Push the switch completely down and then release it. The window will fully open. To stop the window partway, lightly pull the switch up and then release it.
The windows can be operated with the switch on each side door. The power windows work when the ignition switch is in the “ON” position. OPERATING THE DRIVER’S WINDOW Use the switch on the driver’s door. Normal operation: The window moves as long as you hold the switch. To open: Lightly push down the switch. To close: Pull up the switch.
4. Within 5 seconds after
ignition switch is turned to the “ON” position, push and hold lock switch on the front side for about 5
seconds.the power door
the
5. The interior light will flash to indicate
that the mode has been changed.
The flashing of the interior light indicates the mode which has been selected. D Flashing function
once,
the
has
changed to mode 1.
D Flashing
twice,
the
function
has
changed to mode 2.
D Flashing three times, the function has
changed to mode 3.
D Flashing four times, the function has
changed to mode 4.
If the battery is disconnected or run down, the mode initial mode (mode 1).
is changed
into
24
2005 MATRIX from Sep. ’04 Prod. (OM12892U)
’05 MATRIX_U (L/O 0409)
Window lock switch
CAUTION
THE
PASSENGERS’
OPERATING WINDOWS Use the switch on each passenger’s door or the switches on the driver’s door that control each passenger’s win- dow. The window moves as long as you hold the switch. To open: Push down the switch. To close: Pull up the switch. If you push in the window lock switch on the driver’s door, the passengers’ windows cannot be operated.
To avoid serious personal injury, you must do the following. D Before you close the power win- dows, always make sure there is nobody around the power windows. You must also make sure the heads, hands and other parts of the bodies of all occupants are kept completely If someone’s neck, head or hands get caught it could result in death or serious in- jury. When anyone closes the power windows, make sure he or she op- erates the windows safely.
in a closing window,
the vehicle.
inside
D When small children are in the ve- hicle, never let them use the power window switches without supervi- sion. Use the window lock switch to prevent from making unex- pected use of the switches.
them
25
2005 MATRIX from Sep. ’04 Prod. (OM12892U)
’05 MATRIX_U (L/O 0409)
Back door
D Be sure to remove the ignition key
when you leave your vehicle.
D Never leave anyone (particularly a small child) alone in your vehicle, especially with the ignition key still inserted. Otherwise, he/she could use the power window switches and get in a window. Unat- tended person (particularly a small child) can be involved in a serious accident.
trapped
When closing the back door, the inside handle can be used to make the reach easier. To close the back door, lower it and press down on it. After closing the back door, try pulling it up to make sure it is secure- ly closed. See “—Stowage precautions” on page 207
in Section 2 for precautions when loading luggage.LOCKING AND UNLOCKING WITH KEY Insert the key into the keyhole and turn it. To lock: Turn the key clockwise. If you turn the key fully clockwise, the glass hatch will open. (See “Glass hatch” on page 27 in this Section.) To unlock: Turn the key counterclockwise. To open the back door, pull the lock re- lease lever. Operating the power door lock switch or wireless remote control transmitter simul- taneously locks or unlocks the back door. (See “—Locking and unlocking doors” on page 17 and “Side doors” on page 20 in this Section.)
2005 MATRIX from Sep. ’04 Prod. (OM12892U)
26
CAUTION
Keep the back door and glass hatch closed while driving. This not only keeps the luggage from being thrown out but also prevents exhaust gases from entering the vehicle.
NOTICE
To prevent damage to the back door and glass hatch dampers, do not ap- ply any force, paint or let any other foreign matter on them.
’05 MATRIX_U (L/O 0409)
Glass hatch
OPENING THE GLASS HATCH WITH THE KEY Insert the key into the keyhole and turn it fully clockwise (one step further than the back door locking position). The glass hatch can be opened with the wireless remote control transmitter. See “—Opening glass hatch” on page 18 in this Section.
OPENING THE GLASS HATCH WITH THE GLASS HATCH OPENER SWITCH Push when the vehicle is stopped.
the glass hatch opener switch
CAUTION
Do not open the glass hatch while the vehicle is moving.
27
2005 MATRIX from Sep. ’04 Prod. (OM12892U)
the
followings,
If you do either of the glass hatch cannot be opened with the glass hatch opener switch. D Lock all the side doors and back door with the key or wireless remote control transmitter when the front doors are closed.
D Open the driver’s door or front passen- ger’s door and move the inside lock knobs of both front doors to the lock position, then close the front doors.
The glass hatch opener switch can be reset in the following ways. D Turn the ignition key to “ON”. D Unlock all the doors with the key or
wireless remote control transmitter.
D Unlock the driver’s door or front pas- lock the doors
senger’s door with knob, and then unlock all with the power door lock switch.
inside
the
’05 MATRIX_U (L/O 0409)
Toyota vehicle intrusion protection system (TVIP)
CLOSING THE GLASS HATCH Lower the glass hatch and push the lower center of it until it is locked. When you open the back door with the glass hatch opened, the glass hatch will be closed. After closing the back door, you should check the glass hatch fully closed. See “—Stowage precautions” on page 207
in Section 2 for precautions when loading luggage.CAUTION
Keep the back door and glass hatch closed while driving. This not only keeps the luggage from being thrown out but also prevents exhaust gases from entering the vehicle.
NOTICE
To prevent damage to the back door and glass hatch dampers, do not ap- ply any force, paint or let any other foreign matter on them.
is a
theft deterrent system.
TVIP If someone attempts to damage or break into your vehicle, the system sounds the alarm while flashing the lights.
28
2005 MATRIX from Sep. ’04 Prod. (OM12892U)
’05 MATRIX_U (L/O 0409)
4. Lock all the side doors and back door with the key or wireless remote control transmitter. At this time, the TVIP indi- cator light comes on. The system will be set in 30 seconds. When the system is set, the indicator light will start flashing again.
5. Make sure
light flashes. Then you may leave the ve- hicle.
indicator
that
the
lights. Also,
Never leave anyone in the vehicle when you set the system because unlocking from the inside activates the alarm. Activating the alarm If the system detects a threat to the it sounds the alarm for one vehicle, minute while flashing headlights and turn signal interior lights turn on when the interior light dial is in the door position. The system detects a threat under any of the following conditions: D Either of the front doors is unlocked by means other than the key or wireless remote control transmitter. If the key is not in the ignition switch, all the side doors and back door will be automatically locked again.
the
D Any of the side doors, back door or
glass hatch are forcibly opened. The alarm will activate when the back door is unlocked with a key. Cancel the system before unlocking the back door. D The side windows are tapped or bro-
ken.
D The battery
terminal and then reconnected.
is disconnected
D The ignition is hotwired. After one minute, the alarm automatically stops and the indicator light starts flashing again. Reactivating the alarm Once set, until you cancel the system, the system automatically resets the alarm af- ter the alarm has stopped. The alarm will activate again under the same circumstances described in “Activat- ing the alarm”. Stopping the alarm You can stop the alarm in either of the following ways: D Unlock any of the side doors and back door with the key or wireless remote control transmitter.
D Place the ignition switch in the “ON”
position.
29
2005 MATRIX from Sep. ’04 Prod. (OM12892U)
SETTING THE SYSTEM You can set the system as follows. 1. Remove
the key
from
the
ignition
switch.
is
removed
The indicator light will start flashing when the key ignition switch. (See “Engine immobilizer system” on page 14 for details.) 2. Have all passengers get out of
from
the
the
vehicle.
3. Close all the side doors, back door and
glass hatch securely.
’05 MATRIX_U (L/O 0409)
Hood
CANCELLING THE SYSTEM You can cancel the system as described in “Stopping the alarm”. If you cancel the system by unlocking any of the side doors but no door is opened