- Download PDF Manual
-
Your vehicle is equipped with an occu- pant detection system in the front passenger's seat. The occupant detection system is designed to detect the presence of a properly-seated front passenger and determine if the passenger's front air bag should be enabled (may inflate) or not. The driver's front air bag is not affected or controlled by the occu- pant detection system.
Safety features of your vehicle
Main components of occupant detection system (cid:129) A detection device located within
the front passenger seat track.
(cid:129) Electronic system to determine whether passenger air bag sys- tems should be activated or deac- tivated.
(cid:129) An indicator light located on the instrument panel which illuminates the words PASSENGER AIR BAG “OFF” indicating the front passen- ger air bag system is deactivated. (cid:129) The instrument panel air bag warn- ing light is interconnected with the occupant detection system.
3 41
(cid:129) The ODS (Occupant Detection System) may not function properly if the passenger takes actions which can defeat the detection system. These include:
(1) Failing to sit in an upright position. (2) Leaning against the door or cen-
ter console.
(3) Sitting towards the sides or the
front of the seat.
(4) Putting legs on the dashboard or resting them on other locations which reduce the passenger weight on the front seat.
(5) Improperly wearing the safety belt. (6) Reclining the seat back.
YDM USA 3.QXP 5/1/2016 12:43 PM Page 42
Safety features of your vehicle
If the front passenger seat is occupied by a person that the system deter- mines to be of adult size, and he/she sits properly (sitting upright with the seatback in an upright position, cen- tered on the seat cushion with their seat belt on, legs comfortably extend- ed and their feet on the floor), the PASSENGER AIR BAG “OFF” indica- tor will turn off and the front passen- ger's air bag will be able to inflate, if necessary, in frontal crashes. You will find the PASSENGER AIR BAG “OFF” indicator on the center facia panel. This system detects the condi- tions 1~4 in the following table and acti- vates or deactivates the front passen- ger air bag based on these conditions. Always be sure that you and all vehicle occupants are seated and restrained properly (sitting upright with the seat in an upright position, centered on the seat cushion, with the person’s legs comfortably extended, feet on the floor, and wearing the safety belt prop- erly) for the most effective protection by the air bag and the safety belt.
42
YDM USA 3.QXP 5/1/2016 12:43 PM Page 43
Condition and operation in the front passenger occupant detection system
Condition detected by the occupant
detection system
1. Adult *1 or child age 13 and up*2
2. Infant or child restraint system
with 12 months old*3 *4
3. Unoccupied
4. Malfunction in the system
Indicator/Warning light
Devices
PASSENGER AIR BAG “OFF” indica-
tor light
SRS warning
light
Front passenger
air bag
Off
On
On Off
Off
Off
Off On
Activated
Deactivated
Deactivated
Activated
*1) The system judges a person of adult size as an adult. When a smaller adult sits in the front passenger seat, the system may recognize him/her as a child depending on his/her physique and posture.
*2) Do not allow children to ride in the front passenger seat. When a smaller child than the same age sits in the front passenger seat, the system may recognize him/her as an infant depending on his/her physique or posture.
*3) Never install a child restraint system on the front passenger seat. *4) The PASSENGER AIR BAG "OFF" indicator may turn on or off when a child above 12 months to 12 years old (with or without child restraint system) sits in the front passenger seat. This is a normal condition.
Safety features of your vehicle
WARNING - ODS system Riding in an improper position adversely affects the occupant detection system (ODS) and may result in the deactivation of front passenger air bag. It is important for the driver to instruct the passenger as to the proper seating instructions as contained in this manual.
(Continued)
3 43
YDM USA 3.QXP 5/1/2016 12:43 PM Page 44
Safety features of your vehicle
(Continued)
B990A08O - Never put a heavy load in the
front passenger seat.
1KMN3663
- Never sit with the hips shifted towards the front of the seat.1KMN3665
- Never place the feet on thedashboard.
OVQ036014N - Never place the feet on the
front passenger seatback.
1KMN3662
- Never excessively recline thefront passenger seatback.
44
1KMN3664
- Never lean on the door or cen-ter console.
- Never sit on one side of the
front passenger seat.
YDM USA 3.QXP 5/1/2016 12:43 PM Page 45
If the PASSENGER AIR BAG “OFF” indicator is still on, ask the passen- ger to move to the rear seat.
WARNING - “AIR BAG OFF” light
Do not allow an adult passenger to ride in the front seat when the PASSENGER AIR BAG “OFF” indicator is illuminated, because the air bag will not deploy in the event of a crash. The driver must instruct the passenger to reposi- tion himself in the seat. Failure to properly position yourself may lead to air bag deactivation resulting in air bag non-deploy- ment in a collision. If the PAS- SENGER AIR BAG “OFF” indica- tor remains illuminated after the passenger repositions them- selves properly and the car is restarted, it is recommended that passenger move to the rear seat because the passenger's front air bag will not deploy.
Safety features of your vehicle
✽✽ NOTICE The PASSENGER AIR BAG “OFF” indicator illuminates for about 4 sec- onds after the ignition switch is turned to the ON position or after the engine is started. If the front passenger seat is occupied, the occu- pant detection sensor will then clas- sify the front passenger after several more seconds.
Any child age 12 and under should ride in the rear seat. Children too large for child restraints should use the available lap/shoulder belts. No matter what type of crash, children of all ages are safer when restrained in the rear seat.
✽✽ NOTICE Do not modify or replace the front passenger seat. Don't place anything on or attach anything such as a blan- ket, front seat covers or after market seat heater to the front passenger seat. This can adversely affect the occupant detection system.
3 45
B990A01O When an adult is seated in the front passenger seat, if the PASSENGER AIR BAG “OFF” indicator is on, turn the ignition switch to the LOCK posi- tion and ask the passenger to sit properly (sitting upright with the seat back in an upright position, centered on the seat cushion with their seat belt on, legs comfortably extended and their feet on the floor). Restart the engine and have the person remain in that position. This will allow the system to detect the person and to enable the passenger air bag.
YDM USA 3.QXP 5/1/2016 12:43 PM Page 46
Safety features of your vehicle
WARNING - ODS
Interference (cid:129) Do not place a heavy load or an active electronic device (ex. laptop computer, after market D M B / n av i g a t i o n / s a t e l l i t e audio, video game machine, MP3, etc.) in the front passen- ger seatback pocket or on the front passenger seat.
(cid:129) Do not hang onto the front
passenger seat.
(cid:129) Do not hang any items such as seatback table on the front passenger seatback.
(cid:129) Do not place feet on the front
passenger seatback.
(cid:129) Do not place any items under
the front passenger seat.
(cid:129) Do not place sharp objects on the front passenger seat. These may damage the occu- pant detection system, if they puncture the seat cushion.
(Continued)
46
(Continued) (cid:129) Do not spill any liquids on the
seat.
Any of the above could interfere with the proper operation of the ODS sensor thereby increasing the risk of an injury in an acci- dent.
If the occupant detection system is not working properly, the SRS air bag warning light on the instrument panel will illuminate because the pas- senger's front air bag is connected with the occupant detection system. If there is a malfunction of the occupant detection system, the PASSENGER AIR BAG “OFF” indicator will not illu- minate and the passenger's front air bag will inflate in frontal impact crash- es even if there is no occupant in the front passenger's seat.
✽✽ NOTICE Air bags can only be used once - have an authorized Kia dealer replace the air bag immediately after deployment.
Driver's and passenger's front air bag
Driver’s front air bag
Passenger’s front air bag
OYDDSA2025
OYDDSA2026
Your vehicle is equipped with an Advanced Supplemental Restraint (Air Bag) System and lap/shoulder belts at both the driver and passen- ger seating position.YDM USA 3.QXP 5/1/2016 12:43 PM Page 47
Safety features of your vehicle
Additionally, your vehicle is equipped with an occupant detection system in the front passenger's seat. The occu- pant detection system detects the presence of a passenger in the front passenger's seat and will turn off the front passenger's air bag under cer- tain conditions. For more detail, see "Occupant detection system" in this section. Do not place any objects that may cause magnetic fields near the front seat. These may cause a malfunction of the seat track position sensor.
The indications of the system's pres- ence are the letters "AIR BAG" embossed on the air bag pad cover in the steering wheel and the pas- senger's side front panel pad above the glove box.
The advanced SRS offers the ability to control the air bag inflation with two levels. A first stage level is pro- vided for moderate-severity impacts. A second stage level is provided for more severe impacts.
The SRS consists of air bags installed under the pad covers in the center of the steering wheel and the passenger's side front panel above the glove box. The purpose of the SRS is to provide the vehicle's driver and/or the front passenger with additional protection than that offered by the seat belt sys- tem alone in case of a frontal impact of sufficient severity. The SRS uses sensors to gather information about the driver's seat position, the driver's and front passenger's seat belt usage and impact severity.
The passenger’s front air bag is designed to help reduce the injury of children sitting close to the instru- ment panel in low speed collisions. However, children are safer if they are restraint in the rear seat.
According to the impact severity, seating position and seat belt usage, the SRSCM (SRS Control Module) controls the air bag inflation. Failure to properly wear seat belts can increase the risk or severity of injury in an accident.
3 47
YDM USA 3.QXP 5/1/2016 12:43 PM Page 48
Safety features of your vehicle
Manufacturers are required by gov- ernment regulations to provide a contact point concerning modifica- tions to the vehicle for persons with disabilities, which modifications may affect the vehicle’s advanced air bag system. That contact is Kia’s toll-free Customer Assistance center at 1- 800-333-4KIA. However, Kia does not endorse nor will it support any changes to any part or structure of the vehicle that could affect the advanced air bag system, including the occupant detection system.
WARNING - Replacement / Modifications The front passenger seat, dash- board or door should not be replaced except by an authorized Kia dealer using original Kia parts designed for this vehicle and model. Any other such replace- ment or modification could adversely affect the operation of the occupant detection system and your advanced air bags.
48
Rear impact
Side impact
1JBB3520
Advanced air bags are combined with pre-tensioner seat belts to help provide enhanced occupant protec- tion in frontal crashes. Front air bags are not intended to deploy in colli- sions in which sufficient protection can be provided by the pre-tensioner seat belt alone.
WARNING - SRS Wiring
Do not tamper with or discon- nect SRS wiring or other com- ponents of the SRS system. Doing so could result in injury, due to accidental deployment of the air bags or by rendering the SRS inoperative.
Front air bags are not intended to deploy in side-impact, rear-impact or rollover crashes. In addition, front air bags will not deploy in frontal crash- es below the deployment threshold.
Rollover
1JBA3514
1JBA3522
YDM USA 3.QXP 5/1/2016 12:43 PM Page 49
Side air bag
Front
The purpose of the air bag is to pro- vide the vehicle's driver and/or the front passenger with additional pro- tection than that offered by the seat belt alone. The side air bags are designed to deploy only during certain side- impact collisions, depending on the crash severity of impact. The side air bags are not designed to deploy in all side impact situations.
WARNING - Unexpected deployment
Avoid impact to the side air bag sensor when the ignition switch is ON to prevent unexpected deployment of the side air bag.
OYDDSA2027
OYDDSA2037
❈ The actual air bags in the vehicle may differ
from the illustration.
Your vehicle is equipped with a side air bag in each front seat.
Safety features of your vehicle
The side air bag is supplemental to the driver's and the passenger's seat belt systems and is not a substitute for them. Therefore your seat belts must be worn at all times while the vehicle is in operation. For best protection from the side air bag system and to avoid being injured by the deploying side air bag, both front seat occupants should sit in an upright position with the seat belt properly fastened. The driver's hands should be placed on the steer- ing wheel at the 9:00 and 3:00 posi- tions. The passenger's arms and hands should be placed on their laps.
WARNING - Deployment
Do not install any accessories including seat covers, on the side or near the side air bag as this may affect the deployment of the side air bags.
3 49
YDM USA 3.QXP 5/1/2016 12:43 PM Page 50
Safety features of your vehicle
If seat or seat cover is damaged, have the vehicle checked and repaired by an authorized Kia dealer. Inform that your vehicle is equipped with side air bags and an occupant detection system.
WARNING - Flying objects
Do not place any objects (an umbrella, bag, etc.) between the front door and the front seat. Such objects may become dan- gerous projectiles if the side air bag inflates.
50
Curtain air bag
OYDDSA2039
OYDDSA2038
❈ The actual air bags in the vehicle may differ
from the illustration.
Curtain air bags are located along both sides of the roof rails above the front and rear doors.
They are designed to help protect the heads of the front seat occupants and the rear outboard seat occupants in certain side impact collisions. The curtain air bags are designed to deploy only during certain side impact collisions, depending on the severity of impact. The curtain air bags are not designed to deploy in all side impact situations, collisions from the front or rear of the vehicle or in most rollover situations. Do not allow the passengers to lean their heads or bodies onto doors, put their arms on the doors, stretch their arms out of the window, or place objects between the doors and pas- sengers when they are seated on seats equipped with side and/or cur- tain air bags.
✽✽ NOTICE Never try to open or repair any com- ponents of the side curtain air bag system. This should only be done by an authorized Kia dealer.
Safety features of your vehicle
Air bag collision sensors
YDM USA 3.QXP 5/1/2016 12:43 PM Page 51
Why didn’t my air bag go off in a collision? (Inflation and non- inflation conditions of the air bag) There are many types of accidents in which the air bag would not be expected to provide additional protection. These include rear impacts, sec- ond or third collisions in multiple impact accidents, as well as low speed impacts.
(1) SRS control module /
Rollover sensor
(2) Front impact sensor
OYDM036004/OYDDSA2029/OYDM036006/OYDDSA2031
(3) Side impact sensor (4) Pressure side impact sensor
3 51
YDM USA 3.QXP 5/1/2016 12:43 PM Page 52
Safety features of your vehicle
WARNING - Air bag sensors
(cid:129) Do not hit or allow any objects to impact the locations where air bag or sensors are installed. This may cause unexpected air bag deployment, which could result in serious per- sonal injury or death.
(cid:129) If the installation location or angle of the sensors is altered in any way, the air bags may deploy when they should not or they may not deploy when they should. Therefore, do not try to perform maintenance on or around the air bag sensors. Have the vehi- cle checked and repaired by an authorized Kia dealer.
52
Air bag inflation conditions
Problems may arise if the sensor installation angles are changed due to the deformation of the front bumper, body or B pillar where side collision sensors are installed. Have the vehicle checked and repaired by an authorized Kia dealer. Installing aftermarket bumper guards or replacing a bumper with non-gen- uine parts may adversely affect your vehicle’s collision and air bag deploy- ment performance.
1JBA3513
Front air bags Front air bags are designed to inflate in a frontal collision depending on the severity of impact of the front col- lision.
YDM USA 3.QXP 5/1/2016 12:44 PM Page 53
1JBA3516
OYDDSA2040
❈ The actual air bags in the vehicle may differfrom the illustration.
Side air bags Side air bags (side and/or curtain air bags) are designed to inflate when an impact is detected by side collision sensors depending on the severity of impact resulting from a side impact collision.
Although the front air bags (driver's and front passenger's air bags) are designed to inflate in frontal colli- sions, they also may inflate in other types of collisions if the front impact sensors detect a sufficient frontal force in another type of impact. Side and curtain air bags are designed to inflate only in side impact collisions or rollover situa- tions, but they may inflate in other collisions if they side impact sensors detect a sufficient impact. If the vehicle chassis is impacted by bumps or objects on unimproved roads or sidewalks, air bags may deploy. Drive carefully on unim- proved roads or on surfaces not designed for vehicle traffic to prevent unintended air bag deployment.
Safety features of your vehicle
Air bag non-inflation conditions
1JBA3515
(cid:129) In certain low-speed collisions the air bags may not deploy. The air bags are designed not to deploy in such cases because they may not provide benefits beyond the pro- tection of the seat belts in such col- lisions.3 53
YDM USA 3.QXP 5/1/2016 12:44 PM Page 54
Safety features of your vehicle
OED036100
(cid:129) Air bags are not designed to inflate in rear collisions, because occu- pants are moved backward by the force of the impact. In this case, inflated air bags would not be able to provide any additional benefit.1JBA3516
(cid:129) Front air bags may not inflate in side impact collisions, because occupants move to the direction of the collision, and thus in side impacts, front air bag deployment would not provide additional occu- pant protection.1JBA3521
(cid:129) In a slant or angled collision, the force of impact may direct the occupants in a direction where the air bags would not be able to pro- vide any additional benefit, and thus the sensors may not deploy any air bags.54
YDM USA 3.QXP 5/1/2016 12:44 PM Page 55
Safety features of your vehicle
1JBA3517
(cid:129) Just before impact, drivers often brake heavily. Such heavy braking lowers the front portion of the vehi- cle causing it to “ride” under a vehi- cle with a higher ground clearance. Air bags may not inflate in this "under-ride" situation because deceleration forces that are detect- ed by sensors may be significantly replaced by such “under-ride” colli- sions.1JBA3522
(cid:129) Front air bags may not inflate in rollover accidents because front air bag deployment would not provide additional occupant protection. However, side and curtain air bags may inflate when the vehicle is rolled over.1JBA3518
(cid:129) Air bags may not inflate if the vehi- cle collides with objects such as utility poles or trees, where the point of impact is concentrated to one area and the full force of the impact is not delivered to the sen- sors.3 55
Adding equipment to or modi- fying your air bag-equipped vehicle If you modify your vehicle by chang- ing your vehicle's frame, bumper sys- tem, front end or side sheet metal or ride height, this may affect the opera- tion of your vehicle's air bag system.
YDM USA 3.QXP 5/1/2016 12:44 PM Page 56
Safety features of your vehicle
SRS Care The SRS is virtually maintenance-free and there are no parts you can safely service by yourself. If the SRS air bag warning light does not illuminate, or continuously remains on, have your vehicle immediately inspected by an authorized Kia dealer.
Any work on the SRS system, such as removing, installing, repairing, or any work on the steering wheel must be performed by an authorized Kia dealer. Improper handling of the SRS system may result in serious person- al injury.
For cleaning the air bag pad covers, use only a soft, dry cloth or one which has been moistened with plain water. Solvents or cleaners could adversely affect the air bag covers and proper deployment of the system.
WARNING - Tampering with SRS
Do not tamper with or discon- nect SRS wiring, or other com- ponents of the SRS system. Doing so could result in the accidental inflation of the air bags or by rendering the SRS inoperative.
If components of the air bag system must be discarded, or if the vehicle must be scrapped, certain safety precautions must be observed. An authorized Kia dealer knows these precautions and can give you the necessary information. Failure to fol- low these precautions and proce- dures could increase the risk of per- sonal injury.
56
YDM USA 3.QXP 5/1/2016 12:44 PM Page 57
Air bag warning label
OYDM036015
OYDNSA2033
labels, some Air bag warning required by the U.S. National Highway Traffic Safety Administration (NHTSA), are attached to alert the driver and passengers of potential risks of the air bag system.Safety features of your vehicle
3 57
YDM USA 4a.QXP 2016-05-03 17:44 Page 1
Features of your vehicle
Keys . . . . . . . . . . . . . . . . . . . . . . . . . . . . . . . . . . . . . . 4-4
• Record your key number . . . . . . . . . . . . . . . . . . . . . . . 4-4
• Key operations . . . . . . . . . . . . . . . . . . . . . . . . . . . . . . . . 4-4
Smart key . . . . . . . . . . . . . . . . . . . . . . . . . . . . . . . . . 4-6
• Smart key functions . . . . . . . . . . . . . . . . . . . . . . . . . . . 4-6
• Smart key precautions . . . . . . . . . . . . . . . . . . . . . . . . . 4-7
Remote keyless entry . . . . . . . . . . . . . . . . . . . . . . . . 4-9
• Remote keyless entry system operations. . . . . . . . . . . 4-9
• Transmitter precautions . . . . . . . . . . . . . . . . . . . . . . . 4-10
• Battery replacement . . . . . . . . . . . . . . . . . . . . . . . . . . 4-11
• Immobilizer system . . . . . . . . . . . . . . . . . . . . . . . . . . . 4-12
Theft-alarm system . . . . . . . . . . . . . . . . . . . . . . . . 4-14
• Armed stage . . . . . . . . . . . . . . . . . . . . . . . . . . . . . . . . . 4-14
• Theft-alarm stage . . . . . . . . . . . . . . . . . . . . . . . . . . . . 4-15
• Disarmed stage. . . . . . . . . . . . . . . . . . . . . . . . . . . . . . . 4-15
Door locks . . . . . . . . . . . . . . . . . . . . . . . . . . . . . . . . 4-17
• Operating door locks from outside the vehicle . . . . 4-17
• Operating door locks from inside the vehicle. . . . . . 4-17
• Impact sensing door unlock system. . . . . . . . . . . . . . 4-19
• Auto door lock/unlock feature . . . . . . . . . . . . . . . . . . 4-19
• Speed sensing door lock system . . . . . . . . . . . . . . . . . 4-20
• Child-protector rear door lock. . . . . . . . . . . . . . . . . . 4-20Trunk (4 door) . . . . . . . . . . . . . . . . . . . . . . . . . . . . 4-21
• Opening the trunk . . . . . . . . . . . . . . . . . . . . . . . . . . . . 4-21
• Closing the trunk. . . . . . . . . . . . . . . . . . . . . . . . . . . . . 4-22
• Emergency trunk safety release. . . . . . . . . . . . . . . . . 4-22
Smart trunk . . . . . . . . . . . . . . . . . . . . . . . . . . . . . . 4-23
Tailgate (5 Door). . . . . . . . . . . . . . . . . . . . . . . . . . . 4-27
• Opening the tailgate . . . . . . . . . . . . . . . . . . . . . . . . . . 4-27
• Closing the tailgate . . . . . . . . . . . . . . . . . . . . . . . . . . . 4-27
• Emergency tailgate safety release . . . . . . . . . . . . . . . 4-28
Windows . . . . . . . . . . . . . . . . . . . . . . . . . . . . . . . . . 4-30
• Power windows . . . . . . . . . . . . . . . . . . . . . . . . . . . . . . 4-31
Hood. . . . . . . . . . . . . . . . . . . . . . . . . . . . . . . . . . . . . 4-35
• Opening the hood . . . . . . . . . . . . . . . . . . . . . . . . . . . . 4-35
• Closing the hood . . . . . . . . . . . . . . . . . . . . . . . . . . . . . 4-35
Fuel filler lid . . . . . . . . . . . . . . . . . . . . . . . . . . . . . . 4-37
• Opening the fuel filler lid . . . . . . . . . . . . . . . . . . . . . . 4-37
• Closing the fuel filler lid . . . . . . . . . . . . . . . . . . . . . . . 4-37
Sunroof . . . . . . . . . . . . . . . . . . . . . . . . . . . . . . . . . . 4-40
• Sunroof open warning. . . . . . . . . . . . . . . . . . . . . . . . . 4-40
• Sliding the sunroof . . . . . . . . . . . . . . . . . . . . . . . . . . . 4-41
• Tilting the sunroof . . . . . . . . . . . . . . . . . . . . . . . . . . . . 4-42
• Sunshade . . . . . . . . . . . . . . . . . . . . . . . . . . . . . . . . . . . 4-43
• Resetting the sunroof . . . . . . . . . . . . . . . . . . . . . . . . . 4-43YDM USA 4a.QXP 2016-05-03 17:44 Page 2
Steering wheel. . . . . . . . . . . . . . . . . . . . . . . . . . . . . 4-44
• Electric power steering (EPS) . . . . . . . . . . . . . . . . . . 4-44
• Tilt and telescoping steering. . . . . . . . . . . . . . . . . . . . 4-45
• Horn . . . . . . . . . . . . . . . . . . . . . . . . . . . . . . . . . . . . . . . 4-45
• Heated steering wheel . . . . . . . . . . . . . . . . . . . . . . . . . 4-46
• FLEX STEER (5door) . . . . . . . . . . . . . . . . . . . . . . . . 4-47
Mirrors . . . . . . . . . . . . . . . . . . . . . . . . . . . . . . . . . . 4-49
• Inside rearview mirror . . . . . . . . . . . . . . . . . . . . . . . . 4-49
• Outside rearview mirror. . . . . . . . . . . . . . . . . . . . . . . 4-50
Instrument cluster . . . . . . . . . . . . . . . . . . . . . . . . . 4-54
• Instrument Cluster Control . . . . . . . . . . . . . . . . . . . . 4-55
• LCD window Control . . . . . . . . . . . . . . . . . . . . . . . . . 4-56
• Gauges . . . . . . . . . . . . . . . . . . . . . . . . . . . . . . . . . . . . . 4-56
• Transaxle Shift Indicator . . . . . . . . . . . . . . . . . . . . . . 4-59
LCD window . . . . . . . . . . . . . . . . . . . . . . . . . . . . . . 4-60
• Over view . . . . . . . . . . . . . . . . . . . . . . . . . . . . . . . . . . . 4-60
• LCD Modes (for Type B, C instrument cluster) . . . 4-65
Warning and indicator lights . . . . . . . . . . . . . . . . 4-76
• Warning lights . . . . . . . . . . . . . . . . . . . . . . . . . . . . . . . 4-76
• Indicator Lights . . . . . . . . . . . . . . . . . . . . . . . . . . . . . . 4-85
Rearview camera . . . . . . . . . . . . . . . . . . . . . . . . . . 4-89
Lighting . . . . . . . . . . . . . . . . . . . . . . . . . . . . . . . . . . 4-90
• Battery saver function. . . . . . . . . . . . . . . . . . . . . . . . . 4-90
• Headlight escort function . . . . . . . . . . . . . . . . . . . . . . 4-90
• Lighting control . . . . . . . . . . . . . . . . . . . . . . . . . . . . . . 4-91• High beam operation. . . . . . . . . . . . . . . . . . . . . . . . . . 4-92
• Turn signals and lane change signals . . . . . . . . . . . . 4-93
• Front fog light . . . . . . . . . . . . . . . . . . . . . . . . . . . . . . . 4-94
• AFLS (Adaptive Front Lighting System) . . . . . . . . . 4-95
Wipers and washers . . . . . . . . . . . . . . . . . . . . . . . . 4-96
• Windshield wipers . . . . . . . . . . . . . . . . . . . . . . . . . . . . 4-96
• Windshield washers (front) . . . . . . . . . . . . . . . . . . . . 4-97
• Rear window wiper and washer switch (5 door) . . . 4-98
Interior light . . . . . . . . . . . . . . . . . . . . . . . . . . . . . . 4-99
• Automatic turn off function . . . . . . . . . . . . . . . . . . . . 4-99
• Map lamp . . . . . . . . . . . . . . . . . . . . . . . . . . . . . . . . . . . 4-99
• Room lamp . . . . . . . . . . . . . . . . . . . . . . . . . . . . . . . . . 4-100
• Luggage room lamp . . . . . . . . . . . . . . . . . . . . . . . . . 4-101
• Glove box lamp . . . . . . . . . . . . . . . . . . . . . . . . . . . . . 4-102
• Vanity mirror lamp . . . . . . . . . . . . . . . . . . . . . . . . . . 4-102
Welcome system . . . . . . . . . . . . . . . . . . . . . . . . . . 4-103
• Headlamp welcome . . . . . . . . . . . . . . . . . . . . . . . . . . 4-103
• Interior light welcome. . . . . . . . . . . . . . . . . . . . . . . . 4-103
• Puddle lamp and pocket lamp . . . . . . . . . . . . . . . . . 4-103
Defroster . . . . . . . . . . . . . . . . . . . . . . . . . . . . . . . . 4-104
• Rear window defroster . . . . . . . . . . . . . . . . . . . . . . . 4-104
• Front wiper deicer . . . . . . . . . . . . . . . . . . . . . . . . . . . 4-104
Manual climate control system . . . . . . . . . . . . . . 4-105
• Heating and air conditioning . . . . . . . . . . . . . . . . . . 4-106
• System operation . . . . . . . . . . . . . . . . . . . . . . . . . . . . 4-111YDM USA 4a.QXP 2016-05-03 17:44 Page 3
• Climate control air filter . . . . . . . . . . . . . . . . . . . . . . 4-113
• Checking the amount of air conditionerrefrigerant and compressor lubricant . . . . . . . . . . 4-114
• Air Conditioning refrigerant label. . . . . . . . . . . . . . 4-114
Automatic climate control system. . . . . . . . . . . . 4-115
• Automatic heating and air conditioning . . . . . . . . . 4-116
• Manual heating and air conditioning . . . . . . . . . . . 4-117
• System operation . . . . . . . . . . . . . . . . . . . . . . . . . . . . 4-123
Windshield defrosting and defogging. . . . . . . . . 4-125
• Manual climate control system . . . . . . . . . . . . . . . . 4-125
• Automatic climate control system . . . . . . . . . . . . . . 4-126
• Defogging logic. . . . . . . . . . . . . . . . . . . . . . . . . . . . . . 4-127
Clean air . . . . . . . . . . . . . . . . . . . . . . . . . . . . . . . . 4-129
Storage compartment. . . . . . . . . . . . . . . . . . . . . . 4-130
• Center console storage . . . . . . . . . . . . . . . . . . . . . . . 4-130
• Glove box . . . . . . . . . . . . . . . . . . . . . . . . . . . . . . . . . . 4-130
• Sunglass holder . . . . . . . . . . . . . . . . . . . . . . . . . . . . . 4-131
• Luggage tray (5 door) . . . . . . . . . . . . . . . . . . . . . . . . 4-131
Interior features . . . . . . . . . . . . . . . . . . . . . . . . . . 4-132
• Cigarette lighter. . . . . . . . . . . . . . . . . . . . . . . . . . . . . 4-132
• Ashtray . . . . . . . . . . . . . . . . . . . . . . . . . . . . . . . . . . . . 4-132
• Cup holder . . . . . . . . . . . . . . . . . . . . . . . . . . . . . . . . . 4-133
• Sliding armrest . . . . . . . . . . . . . . . . . . . . . . . . . . . . . 4-133
• Sunvisor . . . . . . . . . . . . . . . . . . . . . . . . . . . . . . . . . . . 4-134• Seat warmer . . . . . . . . . . . . . . . . . . . . . . . . . . . . . . . . 4-134
• Climate control seat . . . . . . . . . . . . . . . . . . . . . . . . . 4-136
• Power outlet . . . . . . . . . . . . . . . . . . . . . . . . . . . . . . . . 4-137
• LCD monitor (clock) . . . . . . . . . . . . . . . . . . . . . . . . . 4-138
• Clothes hanger . . . . . . . . . . . . . . . . . . . . . . . . . . . . . . 4-139
• Floor mat anchor(s). . . . . . . . . . . . . . . . . . . . . . . . . . 4-139
• Luggage net (holder) . . . . . . . . . . . . . . . . . . . . . . . . . 4-140
• Covering shelf (5 Door). . . . . . . . . . . . . . . . . . . . . . . 4-141
• Navigation system . . . . . . . . . . . . . . . . . . . . . . . . . . . 4-142YDM USA 4a.QXP 2016-05-03 17:24 Page 4
Features of your vehicle
KEYS Record your key number
The key code num- ber is stamped on the key code tag attached to the key set. Should you lose your keys, this number will enable an authorized Kia dealer to duplicate the keys easily. Remove the key code tag and store it in a safe place. Also, record the key code number and keep it in a safe and handy place, but not in the vehicle.
44
Key operations
■ Type A
■ Type B
OYDDCO2001
Type B To unfold the key, press the release button and the key will unfold auto- matically. To fold the key, fold the key manually while pressing the release button.
CAUTION - Key button operation
Do not fold the key without pressing the release button. This may damage the key.
OYDDCO2231/OYDECO2231
Type A Used to start the engine, lock and unlock the doors.
WARNING - Aftermarket
keys
Use only Kia original parts for the ignition key in your vehicle. If an aftermarket key is used, the ignition switch may not return to ON after START. If this happens, the starter will continue to oper- ate causing possible fire due to excessive current in the wiring.
YDM USA 4a.QXP 2016-05-03 17:24 Page 5
■ Type C
OYDDCO2002
Type C To remove the mechanical key, press and hold the release button and remove the mechanical key. To reinstall the mechanical key, put the key into the hole and push it until a click sound is heard.
WARNING - Ignition key (Smart key)
Never leave the keys in your vehicle with unsupervised chil- dren. Leaving children unat- tended in a vehicle with a man- ual ignition key or a smart key is dangerous. Children copy adults and they could place the key in the igni- tion switch or press the start button. The key would enable children to operate power win- dows or other controls, or even make the vehicle move, which could result in serious bodily injury or death.
Features of your vehicle
4 5
YDM USA 4a.QXP 2016-05-03 17:24 Page 6
Features of your vehicle
SMART KEY (IF EQUIPPED)
OYDDCO2007
With a smart key, you can lock or unlock a door and even start the engine without inserting the key. The functions of the buttons on a smart key are similar to the remote keyless entry. (Refer to the "Remote keyless entry" in this chapter.)64
Smart key functions Carrying the smart key, you may lock and unlock the vehicle doors. Also, you may start the engine. Refer to the following, for more details.
Locking
OYDDCO2008
Pressing the button of the front out- side door handles with all doors closed and any door unlocked, locks all the doors. The hazard warning lights will blink and the chime will sound once to indicate that all doors are locked. The button will only oper- ate when the smart key is within 0.7~1 m (28~40 in.) from the outside door handle. If you want to make sure that a door has locked or not, you should check the door lock but- ton inside the vehicle or pull the out- side door handle.YDM USA 4a.QXP 2016-05-03 17:24 Page 7
Even though you press the button, the doors will not lock and the chime will sound for 3 seconds if any of the following occurs: • The smart key is in the vehicle. (cid:129) The ignition switch is in the ACC or
ON position.
(cid:129) Any door except the trunk/tailgate
is opened.
Unlocking Pressing the button of the driver's outside door handle with all doors closed and locked, unlocks the dri- ver's door. The hazard warning lights will blink and the chime will sound twice to indicate that the driver's door is unlocked. Pressing the button in the front pas- senger's outside door handle with all doors closed and locked, unlocks all the doors. The hazard warning lights will blink and the chime will sound twice to indicate that all doors are unlocked. The button will only oper- ate when the smart key is within 28~40 in. (0.7~1 m) from the outside door handle.
Start-up You can start the engine without inserting the key. For detailed infor- mation refer to "Starting the engine with a smart key" in section 5.
Features of your vehicle
Smart key precautions (cid:129) If you lose your smart key, you will not be able to start the engine. Tow the vehicle, if necessary, and con- tact an authorized Kia dealer.
(cid:129) A maximum of 2 smart keys can be registered to a single vehicle. If you lose a smart key, you should immediately take the vehicle and key to your authorized Kia dealer to protect it from potential theft.
(cid:129) The smart key will not work if any
of following occurs: - The smart key is close to a radio transmitter such as a radio sta- tion or an airport which can inter- fere with normal operation of the smart key.
- The smart key near a mobile two- way radio system or a cellular phone.
- Another vehicle’s smart key is being
operated close to your vehicle.
When the smart key does not work correctly, open and close the door with the mechanical key. If you have a problem with the smart key, contact an authorized Kia dealer.
4 7
YDM USA 4a.QXP 2016-05-03 17:24 Page 8
Features of your vehicle
(cid:129) If the smart key is in close proximity to your cell phone or smart phone, the signal from the smart key could be blocked by normal operation of your cell phone or smart phone. This is especially important when the phone is active such as making call, receiving calls, text messaging, and/or sending/receiving emails. Avoid placing the smart key and your cell phone or smart phone in the same pants or jacket pocket and maintain distance between the two devices.
adequate
CAUTION - Transmitter
Keep the smart key away from water or any liquid as it can become damaged and not func- tion properly.
This device complies with Part 15
of the FCC rules. Operation is subject to the following two conditions: 1. This device may not cause harm-ful interference, and
2. This device must accept any inter- ference received, including inter- ference that may cause undesired operation.
✽✽ NOTICE Changes or modifications not expressly approved by the party responsible for compliance could void the user’s authority to operate the equipment. If the keyless entry system is inoperative due to changes or modifications not expressly approved by the party responsible for compliance, it will not be cov- ered by your manufacturer’s vehicle warranty.
84
YDM USA 4a.QXP 2016-05-03 17:24 Page 9
REMOTE KEYLESS ENTRY (IF EQUIPPED) Remote keyless entry system operations
Lock (1) All doors are locked if the lock button is pressed. If all doors (and trunk/tail- gate) are closed, the hazard warning lights will blink once to indicate that all doors (and trunk/tailgate) are locked. Also, if the lock button is pressed once more within 4 seconds, the hazard warning lights will blink and the chime will sound once to confirm that the door is locked. However, if any door remains open, the hazard warning lights (and/or the chime) will not operate. But if all doors are closed after the lock button is pressed, the hazard warning lights will blink once.
■ Type A
■ Type B
OYDDCO2003
OYDDCO2004
Features of your vehicle
Unlock (2) The driver's door is unlocked if the unlock button is pressed once. The hazard warning lights will blink (for smart key, the chime also sounds) twice to indicate that the driver's door is unlocked. All doors are unlocked if the unlock button is pressed once more within 4
seconds. The hazard warning lights will blink (for smart key, the chime also sounds) twice again to indicate that all doors are unlocked. After pressing this button, the doors will lock automatically unless you open any door within 30 seconds.✽✽ NOTICE If the keyless entry system is inoper- ative due to exposure to water or liq- uids, it will not be covered by your manufacturer's vehicle warranty.
4 9
YDM USA 4a.QXP 2016-05-03 17:24 Page 10
Features of your vehicle
Trunk/tailgate open (3) (if equipped) The trunk/tailgate is opened if the button is pressed for more than 1
second. Once the trunk/tailgate is opened and then closed, the trunk/tailgate will lock automatically.Alarm (4) The horn sounds and the hazard warning lights blink for about 30 sec- onds if this button is pressed for more than 0.5 seconds. To stop the horn and lights, press any button on the transmitter.
10
(cid:129) If the transmitter is in close proximi- ty to your cell phone or smart phone, the signal from the transmitter could be blocked by normal operation of your cell phone or smart phone.This is especially important when the phone is active such as making call, receiving calls, text messaging, and/or sending/receiving emails. Avoid placing the transmitter and your cell phone or smart phone in the same pants or jacket pocket and maintain distance between the two devices.
adequate
Transmitter precautions The transmitter (or smart key) will not work if any of following occurs: (cid:129) The ignition key is in the ignition
switch.
(cid:129) You exceed the operating distance
limit (about 90 feet [30 m]).
(cid:129) The battery in the transmitter (or
smart key) is weak.
(cid:129) Other vehicles or objects may be
blocking the signal.
(cid:129) The weather is extremely cold. (cid:129) The transmitter (or smart key) is close to a radio transmitter such as a radio station or an airport which can interfere with normal operation of the transmitter.
When the transmitter (or smart key) does not work properly, open and close the door with the ignition key. If you have a problem with the trans- mitter (or smart key), contact an authorized Kia dealer.
YDM USA 4a.QXP 2016-05-03 17:24 Page 11
This device complies with Part 15
of the FCC rules. Operation is subject to the following two conditions: 1. This device may not cause harm-ful interference, and
2. This device must accept any inter- ference received, including inter- ference that may cause undesired operation.
✽✽ NOTICE Changes or modifications not expressly approved by the party responsible for compliance could void the user’s authority to operate the equipment. If the keyless entry sys- tem is inoperative due to changes or modifications not expressly approved by the party responsible for compli- ance, it will not be covered by your manufacturer’s vehicle warranty.
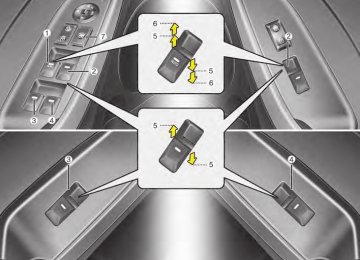
Battery replacement ■ Type A
■ Type B, C
OYDDCO2005
OYDDCO2006
A battery should last for several years, but if the transmitter or smart key is not working properly, try replacing the battery with a new one. If you are unsure how to use or replace the bat- tery, contact an authorized Kia dealer.
Features of your vehicle
Type A 1. Pry open the transmitter cover. 2. Replace the battery with a new battery (CR2032). When replacing the battery, make sure the battery position.
3. Install the battery in the reverse
order of removal.
Type B 1. Remove the mechanical key. 2. Pry open the rear cover. 3. Replace the battery with a new battery (CR2032). When replacing the battery, make sure the battery position.
4. Install the battery in the reverse
order of removal.
4 11
YDM USA 4a.QXP 2016-05-03 17:24 Page 12
Features of your vehicle
(cid:129) The transmitter or smart key is designed to give you years of trou- ble-free use, however it can mal- function if exposed to moisture or static electricity. If you are unsure how to use or replace the battery, contact an authorized Kia dealer. (cid:129) Using the wrong battery can cause the transmitter or smart key to mal- function. Be sure to use the correct battery.
An inappropriately dis- posed battery can be harm- ful to the environment and human health. Dispose the battery according to your local law(s) or regulation.
CAUTION - Transmitter
damage
The transmitter or smart key can malfunction if dropped,exposed to moisture, static electricity, heat or direct sunlight.
12
Immobilizer system (if equipped)
OHD046100
Your vehicle may be equipped with an electronic engine immobilizer sys- tem to reduce the risk of unautho- rized vehicle use. Your immobilizer system is com- prised of a small transponder in the ignition key and electronic devices inside the vehicle. With the immobilizer system, when- ever you insert your ignition key into the ignition switch and turn it to ON, it checks and determines and verifies that the ignition key is valid.If the key is determined to be valid, the engine will start. If the key is determined to be invalid, the engine will not start.
To deactivate the immobilizer system: Insert the ignition key into the key cylinder and turn it to the ON position.
To activate the immobilizer sys- tem: Turn the ignition key to the OFF posi- tion. The immobilizer system acti- vates automatically. Without a valid ignition key for your vehicle, the engine will not start. Your Immobilizer password is a cus- tomer unique password and should be kept confidential. Do not leave this number anywhere in your vehicle.
✽✽ NOTICE Keep each key separately in order to avoid a starting malfunction.
(cid:129) YDM USA 4a.QXP 2016-05-03 17:24 Page 13
Features of your vehicle
This device complies with Part 15
of the FCC rules. Operation is subject to the following two conditions: 1. This device may not cause harm-ful interference, and
2. This device must accept any inter- ference received, including inter- ference that may cause undesired operation.
✽✽ NOTICE Changes or modifications not expressly approved by the party responsible for compliance could void the user's authority to operate the equipment.
Do not put metal accessories near the ignition switch. Metal accessories may interrupt the transponder signal and may prevent the engine from being started. If you need additional keys or lose your keys, consult an authorized Kia dealer.
CAUTION - Immobilizer
damage
Do not expose your immobilizer system to moisture,static elec- tricity and rough handling.This may damage your immobilizer.
CAUTION - Immobilizer alterations
Do not change, alter or adjust the immobilizer system because it could cause the immobilizer system to malfunction.
4 13
YDM USA 4a.QXP 2016-05-03 17:24 Page 14
Features of your vehicle
THEFT-ALARM SYSTEM (IF EQUIPPED)
Armed stage
Disarmed
stage
Theft-alarm
stage
This system is designed to provide protection from unauthorized entry into the vehicle. This system is operat- ed in three stages: the first is the "Armed" stage, the second is the "Theft-alarm" stage, and the third is the "Disarmed" stage. If triggered, the system provides an audible alarm with blinking of the hazard warning lights.
Armed stage Park the vehicle and stop the engine. Arm the system as described below. 1. Remove the ignition key from the ignition switch and exit the vehicle. 2. Make sure that all doors (and trunk/tailgate) and engine hood are closed and latched.
3. (cid:129) Lock the doors by depressing the door lock button on the transmit- ter (or smart key). After completion of the steps above, the hazard warning lights will blink once to indicate that the system is armed. If any door, trunk/tailgate or engine hood remains open, the hazard warning lights won’t operate and theft-alarm will not arm. After this, if all doors, trunk/tailgate and engine hood are closed, the hazard warning lights blink once.
(cid:129) Lock the doors by pressing the button of the front outside door handles with the smart key in your possession. After completion of the steps above, the hazard warning lights will blink once to indicate that the system is armed. If any door remains open, the hazard warning lights won’t oper- ate and theft-alarm will not arm. Close the door and try again to lock the doors. If trunk/tailgate or engine hood remains open, the hazard warn- ing lights won’t operate and theft- alarm will not arm. Close the trunk/tailgate or engine hood. The hazard warning lights blink once and theft-alarm arms.
14
YDM USA 4a.QXP 2016-05-03 17:24 Page 15
The theft-alarm system can be acti- vated by an authorized Kia dealer. If you want this feature, consult an authorized Kia dealer.
Do not arm the system until all passengers have left the vehicle. If the system is armed while a pas- senger(s) remains in the vehicle, the alarm may be activated when the passenger(s) leaves the vehicle. If any door (or trunk/tailgate) or engine hood is opened within 30 seconds after the system enters the armed stage, the system will be disarmed to prevent unnecessary alarm.
remaining
Theft-alarm stage The alarm will be activated if any of the following occurs while the system is armed. (cid:129) A front or rear door is opened without using the mechanical key or trans- mitter (or smart key).
(cid:129) The trunk/tailgate is opened with- out using the mechanical key or transmitter (or smart key).
(cid:129) The engine hood is opened. The horn will sound and the hazard warning lights will blink continuously for approximately 27 seconds (2times). To turn off the system, unlock the doors with the transmitter (or smart key).
Features of your vehicle
Disarmed stage The system will be disarmed when:
Transmitter - The door unlock button is pressed. - The engine is started. (within 3
seconds)
- The ignition switch is in the "ON"
position for 30 seconds or more.
Smart key - The door unlock button is pressed. - The button of the front outside door is pressed while carrying the smart key.
- The engine is started. (within 3
seconds)
After the doors are unlocked, the haz- ard warning lights will blink twice to indicate that the system is disarmed. After pressing the unlock button, if any door (or trunk/tailgate) is not opened within 30 seconds, the system will be rearmed.
4 15
YDM USA 4a.QXP 2016-05-03 17:24 Page 16
Features of your vehicle
(cid:129) Avoid trying to start the engine while the alarm is activated. The vehicle starting motor is disabled during the theft-alarm stage. If the system is not disarmed with the transmitter, insert the key into the ignition switch, turn the ignition switch to the ON position and wait for 30 seconds. Then the system will be disarmed.
(cid:129) If you lose your keys, consult your
authorized Kia dealer.
(cid:129) If the system is not disarmed with the transmitter, insert the key into the ignition switch and start the engine. Then the system will be disarmed.
(cid:129) If you lose your keys, consult your
authorized Kia dealer.
16
YDM USA 4a.QXP 2016-05-03 17:24 Page 17
DOOR LOCKS Operating door locks from outside the vehicle
Unlock
Unlock
Lock
Lock
OYDDCO2009
(cid:129) Turn the key toward the rear of the vehicle to unlock and toward the front of the vehicle to lock.(cid:129) If you lock/unlock the door with a vehicle doors will (if
key, all lock/unlock equipped with power door locks)
automatically.
(cid:129) From the driver’s door, turn the key toward the rear of the vehicle once to unlock the driver’s door and once more within 4 seconds to unlock all doors. (if equipped with power door locks)
(cid:129) Doors can also be locked and unlocked with the transmitter key (or smart key). (if equipped)
(cid:129) Once the doors are unlocked, they may be opened by pulling the door handle.
(cid:129) When closing the door, push the door by hand. Make sure the doors are closed securely.
✽✽ NOTICE • In cold and wet climates, door lock and door mechanisms may not work properly due to freezing con- ditions.
• If the door is locked/unlocked multiple times in rapid succession with either the vehicle key or door lock switch, the system may stop operating temporarily in order to protect the circuit and prevent damage to system components.
Features of your vehicle
Operating door locks from inside the vehicle With the door lock button
Lock
Unlock
OYDDCO2010
(cid:129) To unlock a door, pull the door lock button (1) to the "Unlock" position. The red mark (2) on the button will be visible.(cid:129) To lock a door, push the door lock button (1) to the "Lock" position. If the door is locked properly, the red mark (2) on the door lock button will not show.
(cid:129) To open a door, pull the door han-
dle (3) outward.
4 17
YDM USA 4a.QXP 2016-05-03 17:24 Page 18
Features of your vehicle
(cid:129) If the inner door handle of the front door is pulled when the door lock button is in the lock position, the button will unlock and the door will open. (if equipped)
(cid:129) Front doors cannot be locked if the ignition key is in the ignition switch (or if the smart key is in the vehicle) and any front door is opened. (if equipped)
If a power door lock ever fails to func- tion while you are in the vehicle, try one or more of the following tech- niques to exit: (cid:129) Operate the door unlock feature repeatedly (both electronic and manual) while simultaneously pulling on the door handle.
(cid:129) Operate the other door locks and
handles, front and rear.
(cid:129) Lower a front window and use the key to unlock the door from outside.
18
With central door lock switch (if equipped)
■ Driver's door
■ Passenger’s door
OYDM046401N
OUB041180N
Operate by pressing the central door lock switch. (cid:129) Press the switch to the "Lock" posi- tion (1), all vehicle doors will lock.
YDM USA 4a.QXP 2016-05-03 17:24 Page 19
(cid:129) Press the switch to the "Unlock" position (2), all vehicle doors will unlock.
(cid:129) If the key is in the ignition switch (or if the smart key is in the vehicle) and any front door is opened, the doors will not lock when the "Lock" position (1) of the central door lock switch is pressed. (if equipped)
Features of your vehicle
Impact sensing door unlock system (if equipped) All doors will automatically unlock when an impact causes the air bags to deploy.
Auto door lock/unlock feature (if equipped) (cid:129) All doors will automatically lock when the transaxle shift lever is shifted out of P (Park).
(cid:129) All doors will automatically unlock when the transaxle shift lever is shifted into P (Park).
WARNING - Doors
The doors should always be fully closed and locked while the vehicle is in motion to pre- vent accidental opening of the door.
WARNING - Unattended
children / animals
Never leave children or animals unattended in your vehicle. An enclosed vehicle can become extremely hot, causing death or severe injury to unattended chil- dren or animals who cannot escape the vehicle.
4 19
YDM USA 4a.QXP 2016-05-03 17:24 Page 20
Features of your vehicle
Speed sensing door lock sys- tem (if equipped) All doors will be automatically locked after the vehicle speed exceeds 9
mph. And all doors will be automati- cally unlocked when you turn the engine off or when you remove the ignition key. (if equipped) An authorized Kia dealer can acti- vate or deactivate some auto door lock/ unlock features as follows; (cid:129) Auto door unlock by using the dri-ver's door lock button
(cid:129) Auto door lock/unlock by shifting the transaxle shift lever out of P (Park) or into P (Park)
(cid:129) Auto door unlock when the ignition key is removed from the ignition switch (for smart key, when the ENGINE START/STOP button is turned to the OFF position)
If you want to activate or deactivate some door lock/unlock feature, con- sult an authorized Kia dealer.
20
Child-protector rear door lock
Lock
Unlock
OYDDCO2012
The child safety lock is provided to help prevent children from acciden- tally opening the rear doors from inside the vehicle. The rear door safety locks should be used whenev- er children are in the vehicle. 1. Open the rear door. 2. Insert a key (or screwdriver) into the hole and turn it to the lock ( ) posi- tion. the child safety lock (1) located on the rear edge of the door to the lock position. When the child safety lock is in the lock position, rear door will not open even when the inner door handle is pulled.3. Close the rear door. To open the rear door, pull the out- side door handle (2). Even though the doors may be unlocked, the rear door will not open by pulling the inner door handle until the rear door child safety lock is unlocked.
WARNING - Rear door
locks
Use the rear door safety locks whenever children are in the vehicle. If a child accidently opens the rear doors while the vehicle is motion, he can fall out.
YDM USA 4a.QXP 2016-05-03 17:24 Page 21
TRUNK (4 DOOR) Opening the trunk
OYDM046003N (cid:129) Press the trunk unlock button for more than 1 second on the trans- mitter (or smart key).
(cid:129) Press the button on the trunk han- dle with the smart key in your pos- session. Once the trunk is opened and then closed, the trunk locks automati- cally.
OYDDCO2014
(cid:129) To open the trunk from inside the vehicle, pull the trunk lid release lever. Once the trunk is opened and then closed, the trunk locks automati- cally.✽✽ NOTICE In cold and wet climates, trunk lock and trunk mechanisms may not work properly due to freezing conditions.
Features of your vehicle
WARNING
The trunk swings upward. Make sure no objects or people are near the rear of the vehicle when opening the trunk.
CAUTION
Make certain that you close the trunk before driving your vehi- cle.Possible damage may occur to attached hardware if the trunk is not closed prior to driving.
4 21
YDM USA 4a.QXP 2016-05-03 17:24 Page 22
Features of your vehicle
Closing the trunk To close, lower the trunk lid, then press down on it until it locks. To be sure the trunk lid is securely fas- tened, always check by trying to pull it up again.
WARNING - Exhaust Fumes
The trunk lid should always be kept completely closed while the vehicle is in motion. If it is left open or ajar, poisonous exhaust gases may enter the car and serious illness or death may result.
WARNING
No one should be allowed to occupy the trunk at any time. The trunk is a very dangerous location in the event of a crash.
22
Emergency trunk safety release
No one should be allowed to occupy the trunk at any time. The trunk is a very dangerous location in the event of a crash. Use the release lever for emergen- cies only. Use extreme caution, especially while the vehicle is in motion.
OYD046004L Your vehicle is equipped with an emergency trunk release lever locat- ed inside the trunk. If someone is inadvertently locked in the trunk, moving the handle in the direction of the arrow will release the trunk latch mechanism and open the.
YDM USA 4a.QXP 2016-05-03 17:24 Page 23
SMART TRUNK (IF EQUIPPED)
OYDM046318N On a vehicle equipped with a smart key, the trunk can be opened with no-touch activation using the Smart Trunk system.
How to use the Smart Trunk The trunk can be opened with no- touch activation satisfying all the conditions below. (cid:129) After 15 seconds when all doors
are closed and locked
(cid:129) Positioned in the detecting area for
more than 3 seconds.
✽✽ NOTICE • The Smart Trunk does not operate
when: - The smart key is detected within 15 seconds after the doors are closed and locked, and is contin- uously detected.
- The smart key is detected within 15 seconds after the doors are closed and locked, and 1.5 m from the front door handles. (for vehicles equipped with Welcome Light)
- A door is not locked or closed. - The smart key is in the vehicle.
Features of your vehicle
1. Setting To activate the Smart Trunk, (1) Change the LCD modes to User
setting mode
(2) Select the Door mode (3) Check the Smart Trunk. For more details, refer to "LCD Windows" in this chapter
4 23
YDM USA 4a.QXP 2016-05-03 17:24 Page 24
Features of your vehicle
WARNING
• Make sure objects in the rear cargo area do not come out when opening the trunk on the slope way. It may cause serious injury.
(cid:129) The key should be kept out of reach of children. Children may inadvertently open the Smart Trunk while playing around the rear area of the vehicle.
(cid:129) Make certain that you close the trunk before driving your vehicle. (cid:129) Make sure there are no people or objects around the trunkbefore opening or closing the trunk.
(cid:129) Make sure to deactivate the Smart trunk function when washing your vehicle. Otherwise, the trunk may open inadvertently.
OYDM046319
OYDM046320N
3. Automatic opening The hazard warning lights will blink and chime will sound 2 times and then the trunk will open.
2. Detect and Alert If you are positioned in the detecting area (20~40 inches (50~100 cm) behind the vehicle) carrying a smart key, the hazard warning lights will blink and chime will sound for about 3 sec- onds to alert you the smart key has been detected and the trunk will open.
✽✽ NOTICE Do not approach the detecting area if you do not want the trunk to open. If you have unintentionally entered the detecting area and the hazard warn- ing lights and chime starts to operate, leave the detecting area with the smart key. The trunk will stay closed.
24
YDM USA 4a.QXP 2016-05-03 17:24 Page 25
How to deactivate the Smart Trunk function using the smart key
OYDDCO2007
1. Door lock 2. Door unlock 3. Trunk open 4. Alarm If you press any button of the smart key during the Detect and Alert stage, the Smart Trunk function will be deactivated. Make sure to be aware of how to deactivate the Smart Trunk function for emergency situations.
Features of your vehicle
(Continued) • In case you have deactivated the Smart Trunk function by pressing the smart key button and opened a door, the smart trunk function can be activated again by closing and locking all doors.
✽✽ NOTICE • If you press the door unlock but- ton (2), the Smart Trunk function will be deactivated temporarily. But, if you do not open any door for 30 seconds, the smart trunk function will be activated again.
• If you press the trunk open button (3) for more than 1 second, the trunk opens.
• If you press the door lock button (1) or trunk open button (3) when the Smart Trunk function is not in the Detect and Alert stage, the smart trunk function will not be deactivated.
(Continued)
4 25
YDM USA 4a.QXP 2016-05-03 17:24 Page 26
Features of your vehicle
Detecting area
OYDM046052
(cid:129) The Smart Trunk operates with a welcome alert if the smart key is detected within 20~40 inches (50~100 cm) from the trunk.(cid:129) The alert stops at once if the smart key the detecting area during the Detect and Alert stage.
is positioned outside
26