- 2000 Honda Prelude Owners Manuals
- Honda Prelude Owners Manuals
- 1998 Honda Prelude Owners Manuals
- Honda Prelude Owners Manuals
- 1997 Honda Prelude Owners Manuals
- Honda Prelude Owners Manuals
- 1995 Honda Prelude Owners Manuals
- Honda Prelude Owners Manuals
- 1990 Honda Prelude Owners Manuals
- Honda Prelude Owners Manuals
- 1996 Honda Prelude Owners Manuals
- Honda Prelude Owners Manuals
- 1994 Honda Prelude Owners Manuals
- Honda Prelude Owners Manuals
- 1993 Honda Prelude Owners Manuals
- Honda Prelude Owners Manuals
- 1992 Honda Prelude Owners Manuals
- Honda Prelude Owners Manuals
- 1991 Honda Prelude Owners Manuals
- Honda Prelude Owners Manuals
- Download PDF Manual
-
PULL
In fog or very light rain, push the lever down to the MIST position for temporary high speed operation of the wipers. The wipers will return to the motor will shut off as soon as you release the lever.
"rest" position and
the
Washer Pull the wiper switch lever toward you to turn on the washer. Check the washer fluid regularly, especially during bad weather or whenever the washer has been in frequent use. The float in the neck of reservoir indicates the fluid level.
WINDSHIELD WASHER RESERVOIR CAPACITY: 2.51(2.6 US qt, 2.2 Imp qt)
FLOAT
WASHER FLUID RESERVOIR
Main Menust Windshield Wipers/Washer/Defogger (cont'd)
Use a good quality commercial washer fluid for all-weather cleaning.
CAUTION:
Do not use radiator antifreeze in the windshield washer; it will damage the paint. Do not use a vinegar/water combination in the windshield washer; it will damage the pump. Prolonged operation of the washer without fluid may damage the pump.
In freezing weather, warm the windshield with the defrosters before using the washer. This will help prevent icing which could seriously impair visibility.
turn
the switch
Rear Window Defogger Push to the defogger on or off. The indicator will light when the defogger is on. The defogger will turn off automatically 24 minutes after it is turned on.
CAUTION: When cleaning the inside of the rear window, be careful not to damage the printed heater wires on the rear window. Wipe the window horizontally along the wires, not up and down.
Main Menust Rearview Mirrors Keep the inside and outside mirrors clean and adjusted for best visibility. Be sure to adjust mirrors before you start.
Mirrors
The inside mirror has day and night positions. The night position reduces glare from the headlights of vehicles behind you. Flip the small tab on the bottom of the mirror forward or backward to select day or night position.
(2.0 S,2.0 Si) The outside mirror can be adjusted by moving the knob located on each door.
DAY/NIGHT ADJUSTMENT TAB
KNOB
Power Mirrors (Si) With the ignition switch in the " I I" position, move the main switch to L (for driver's side) or R (for passenger's side), then use the adjustment switch to adjust the mirror to the correct angle. After the mirrors have been adjusted, return the main switch to the center (off) position.
MAIN SWITCH
ADJUSTMENT SWITCH
NOTE: Be sure to adjust mirror angles before you start driving.
Main Menust Lights
FIRST STOP
RIGHT TURN
Turn Signals Push the turn signal lever down to signal a left turn, and up for a right t u r n. The i n d i c a t or and appropriate signal lights will blink. The lever will return automatically to its original position when the steering wheel to straight ahead. For lane changing, you can signal by pushing the lever part way up or down (to the first stop) and holding it there; the lever will return to its original position when you release it. If either turn signal indicator lights up but does not blink, blinks faster than usual, or does not light up at all, check for a burned out bulb or fuse.
is returned
LEFT TURN
FIRST STOP
FIRST POSITION
Turn
SECOND POSITION
lights, position
Headlights Turn the light switch to the first ) for taillights, side position marker lights, lights, and license plate instrument panel lights. Turn to the second position ( ) to raise and add the headlights. When the switch is returned from the second to the first position, the headlights will go off but will not retract; they retract when the light switch is turned to OFF. If the driver's door is opened when the light switch is turned to either " o n" position, a chime will sound to remind you to turn off your lights. If you wish to raise or retract the headlights when the light switch is off (to use them as a passing signal for example), you may do so by pushing the headlight motor switch, located on the left side of the instrument panel; see page 32 for instructions on its use.
CAUTION: Do not operate the headlight switch or headlight motor switch if anyone's hands are near the headlights.
Main Menuts NOTE:
If the headlight motor switch is pushed in, the headlights will not retract when the light switch is turned off. If the headlights neither rise nor retract, they can be operated manually; see page 123. If you're driving in wet snow or freezing rain, keep the headlights in the raised position by using the headlight motor switch; this way,they can still be used if the headlight motors freeze. If the headlights have frozen in either the up or down position, remove all ice before operating the headlight motors.
High Beam/Low Beam Switch The headlights may be switched between low beam and high beam by pulling the turn signal lever towards you until a click is felt. The blue high beam indicator light will be on when the high beam is on.
Pull and release
Headlight Flasher The headlights need not be turned on to use them as a passing signal in the daytime. First raise them with the headlight motor switch, then lightly pull and release the light switch.
CAUTION: Do not operate the headlight switch or headlight motor switch if anyone's hands are near the headlights.
(cont'd)
Main Menuts Lights (cont'd)
retract
raise and/or
Headlight Motor Switch Push the headlight motor switch to the headlights while they are off. The headlights should be raised in this manner whenever you intend to use them as a passing signal, or if there the headlight motors freezing.
is a possibility of
Push
CAUTION: Do not operate the headlight motor switch if anyone's hands are near the headlights.
NOTE:
The headlight motor switch will not retract the headlights if they are already turned on. If the headlights neither rise nor retract, they can be operated manually; see page 123
If the headlights have frozen in either the up or down position, remove all ice before operating the headlight motors.Fog Lamp Switch (Si) Push the switch to operate the fog lamps. The fog lamps will light only when the headlights are on at low beam.
Push
Main Menuts Hazard Warning System This system should be used only when your car is stopped under e m e r g e n cy or h a z a r d o us conditions. To activate, push the hazard warning switch The front and rear turn signals will blink simultaneously and both indicator lights will flash. Push the switch the system off.
again
turn
to
Panel Brightness Control When the light switch is in either of the two "ON" positions, the intensity of the instrument lights can be adjusted by turning the panel brightness control dial.
Bright
Dark
Interior Light The interior light has a three position switch. The light is off all the time in the OFF position. In the middle position, it goes on only when a door is opened. In the ON position, it is on all the time.
ON
DOOR ACTIVATED
OFF
(cont'd)
Main Menuts Lights (cont'd)
(Si)
Keyhole tight When the driver's door handle is pulled, the keyhole light goes on. This is convenient for finding the keyhole location in the dark. The light goes out after several seconds.
light will
Ignition Switch Light the This switch for several seconds after the driver's door is closed.
(Si) illuminate
Trunk Light The trunk compartment light goes on when the trunk lid is opened.
TRUNK LIGHT
Main Menuts Cruise Control
Cruise Control The Cruise Control system allows you to set and automatically maintain any speed above 30 mph (45 km/h) without keeping your foot on the accelerator. As its name implies, it is meant for cruising on straight, uncongested highways or freeways. is not recommended to be used in traffic, on winding roads or in bad weather conditions where the driver should have total control.
It
to
MASTER SWITCH
To Set the Cruise Control: Push the CRUISE CONTROL master switch on the dash; the indicator light will come on. Accelerate the desired speed, then, push and release the SET switch on the steering wheel. The Cruise C o n t r ol the instrument panel will come on. The speed you were going when you released the SET switch is the speed the Cruise Control will hold. You can then "fine tune" the set speed by briefly holding and releasing the SET switch to decrease it a few mph or pushing the RESUME switch to slightly increase it.
light on
RESUME SWITCH
SET SWITCH
Push
To Cancel the Cruise Control: Push the CRUISE CONTROL master switch and the indicator light will go off (this also erases the memory of the set speed), if you must temporarily disengage the system (but you wish to retain the memory of the set speed): tap the brake pedal, or the clutch pedal (manual transmission) or move the automatic trans- mission shift lever to N (Neutral). If you are still going above 30 mph (45 km/h), you can return to the set speed by simply pushing the RESUME switch. If the car has decelerated below approximately 30 mph (45 km/h),you can return to the set speed by using the ac- celerator conventionally until your speed is above 30 mph (45 km/h) and then pushing the RESUME switch.
(cont'd)
Main Menuts Cruise Control (cont'd)
To Change the Set Speed: To a faster speed — For gradual acceleration with your foot off the accelerator, push and hold the RESUME switch until you reach the desired speed; release the switch and the system's memory will be re-programmed to the new speed. For faster acceleration, push the accelerator until you reach the desired speed, then push and release the SET switch to re-program the system.
To a slower speed — push and hold the SET switch and the car will coast; when you reach the desired slower speed, release the switch and the system will be re-programmed.
For temporary acceleration above the set speed, such as for passing, use the accelerator pedal conventionally. When you want to return to the set speed, take your foot off the accelerator and coast without applying the brakes.
The Cruise Control automates the function of the accelerator pedal to maintain your car at a constant speed. This can be a convenience on long trips, but it can also be a danger if there are many other cars on the road or if the road is unfamiliar. Pay strict attention to the responsibility of driving whenever using the Cruise Control.
CAUTION: Because the Cruise Control directly activates the accelerator pedal, don't rest your foot under the pedal when the Cruise Control is on; it may pull the pedal down onto your foot.
NOTE:
With Cruise Control on, your speed will still vary slightly, particularly when going up or down hills. Do not drive with your foot on the brake or clutch pedal (manual transmission), as this will cause the Cruise Control to disengage.
Main Menuts Clock
Digital Clock The time is displayed continuously when the ignition is on. At all other times, push in on the lid to display the time. To adjust the time: 1. Lower the lid. 2. Push the minute button (MIN) and hold it until the numbers advance to the desired minutes.
3. Push
the hour button (HOUR) and hold it until the numbers advance to the desired hour.
4.The RESET button allows you to synchronize your clock to the
closest hour. If the time on the clock is before the half hour, pressing the RESET button will return the time to the previous hour. If the time is beyond the half hour, the RESET button will change the time to the next hour.
NOTE: Be careful not to push the HOUR, MIN or RESET buttons accidentally. Pushing any of them will change the clock's time setting.
Main Menuts Cigarette Lighter and Ashtrays
Cigarette Lighter Push in to heat up. It will automati- cally release when the element is hot. DO NOT hold it in while it is heating up.
Push
Front Ashtray Open the ashtray by lifting its lid. To remove it, hold the lid, and pull it toward you.
Rear Ashtray Open the ashtray by pulling its top edge. To remove it, open the ashtray, then pull it up and out. To install, reverse the removal procedure.
Hold the lid, and pull.
To remove, pull up then out.
CAUTION: Do not use the ashtrays as trash containers; use them only for extinguished cigarettes. Putting lit cigarettes or matches in an ashtray with other combustible materials may cause a fire.
Main Menuts Glove Box,Parking Brake and Hood
Glove Box Open by pulling the handle.Close with a firm push .The glove box can be locked by using the master key; turn the key clockwise to LOCK. The glove box light will go on when is opened and the headlights are on.
the glove box door
MASTER KEY
Lock
Do not drive the car with the glove box door open; it could cause injury in an accident.
Pull up
Parking Brake To apply the parking brake, pull up on the lever. To release it, pull up slightly, push the button, and lower the lever; when fully released, the BRAKE warning light will go out.
Hood To open, pull back on the handle under the left side of the dash. The hood latch is spring-loaded, so the hood will pop up slightly. Release the safety catch under the front center of the hood by pushing the handle up. Lift the hood and prop it open with the support rod. To close, take the support rod down, and return it to its clip , then lower the hood until it is approximately one foot from the closed position, then let it drop. Be sure the hood is securely latched before driving away.
Pull to release
CLIP
SUPPORT ROD
Main Menuts MAIN SWITCH
DRIVER'S SWITCH
Power Windows (Si)
The power windows can be operated only when the ignition switch is in the " I I" position. The operation of the windows is controlled by the main switch located in the master control panel on the armrest of the driver's door. When the main switch is off, only the driver's door window can be opened and closed. When the main switch is on, both door windows can be opened and closed by the driver, using the appropriate switch in the master control panel, and the passenger window can be opened by the passenger, using the switch located on the armrest of the passenger door. When opening or closing a window, push and hold the switch in either the "up" or "down" direction until the window reaches the desired position, then release.
NOTE: The driver's window can be opened fully, without the driver having to hold the switch down, simply by pushing the switch past the first "stop."
Be sure, before closing any window, that all hands, arms and other obstructions are clear of the window frame and glass; severe personal injury could result. Always keep the main switch in the off position when children are in the car; injury may result from unintentional window operation.
Main Menuts Heating and Cooling
The vents, heater and air conditioner are combined in one system; adjusting four basic controls to different settings can provide a full range of interior temperatures for safe and comfortable driving, (Air conditioner is optional on the 2.0 S and 2.0 Si models.)
Ventilation The flow-through ventilation system can provide fresh air to the interior when the car is moving or stopped, even with the sunroof and windows closed.
NOTE: For proper air flow, the flow-through vents must not be covered. Keep the air inlet at the base of the windshield free of leaves or other debris.
AIR INLET
AIR OUTLET
AIR OUTLET
You can adjust the controls to direct cool or warm outside air throughout the car for defogging windows, heating, or cooling by turning on the fan.
(cont'd)
Main Menuts Heating and Cooling (cont'd)
Dash Vents The side and center vents can be tilted up or down, and their louvers turned right or left, to change the direction of air flow.
WINDSHIELD DEFROSTER OUTLETS
SIDE DEFROSTER OUTLET
SIDE DEFROSTER OUTLET
SIDE VENT
SIDE VENTS
FLOOR OUTLETS
CENTER VENTS
Main Menuts What the Controls Do:
FUNCTION BUTTONS AND INDICATOR LIGHTS
RECIRCULATION BUTTON AND INDICATOR LIGHT
FRESH AIR BUTTON AND INDICATOR LIGHT
FAN SWITCH
COMPRESSOR LIGHT
TEMPERATURE LEVER
AIR CONDITIONER SWITCH AND INDICATOR LIGHT
Fan Switch Turning the dial clockwise will increase the fan speed, and the fan will circulate warm, cool, or outside air, depending on where the temperature lever and function buttons are set. Function Buttons Push the appropriate button to direct air to and from the heater, defroster and vents. Each function button has an indicator light that comes on when the button is pushed in. Air Conditioner Switch (optional on the 2.0 S and 2.0 Si models) With the fan on, push the A/C switch to operate the air conditioner; the indicator light will come on. Push the switch again to turn the air conditioner off. NOTE: If the air conditioner compressor light comes on, turn off the A/C switch (with the engine running) and turn it on again. If the light does not come on again, the system is functioning normally, if the light does come on again, turn off the A/C switch and do not use the system until it can be checked by an authorized Honda dealer. Temperature Lever Slide the lever from left to right to make air warmer when the appropriate function is selected. Fresh Air When the button is pushed, the indicator light will go on and outside air will be allowed to circulate inside the car. When the button is pushed, the indicator light comes on, outside air is shut off, and the air inside the car is recirculated. So, when the heater or air conditioner is on and you want to warm up or cool down the interior more quickly, or keep smoke or dust out of the car without losing the heat or cool function, simply push the
and Recirculation
Buttons
button.
Main Menuts Heating and Cooling (cont'd)
NOTE: The windows may become fogged if the system is in the position for an extended period of time with the air conditioner off. As soon as the interior is warmed, switch to the position.
How to Use the Controls To Ventilate and Move the temperature lever to the left, and push the buttons. Turn the fan switch on and outside air will flow through the side and center vents. To change air distribution, select the position and outside air will also flow from the heater ducts at the floor level.
To Cool with A/C (optional on the 2.0 S and 2.0 Si models) To cool the car down quickly, start the engine, then turn the fan switch to high, push the A/C button on and open the windows briefly. Then close the windows, slide the temperature lever to the left, push the inside air will recirculate to the
air conditioner for maximum cooling.
buttons, so
and
When the interior has cooled sufficiently, switch the fan to the fresh desired speed, then push the (outside) air to the air conditioner. When using the air conditioner in heavy traffic, or while driving up long hills, watch the coolant temperature gauge: if the needle moves near the "H" end of the scale, turn the air conditioner off by pushing the A/C button ; leave it off until the needle goes back well into the middle of the scale.
button to direct
Main Menuts To Heat Switch the fan on, slide the temperature lever to the right, push the button, and warmed (outside) air will begin flowing from
the floor outlet.
Selecting the button, will direct a small amount of air through the dash vents in addition to the floor outlets.
button instead of the
to allow outside air to enter.
begin to fog while heating in the
To warm up the interior quickly, push in the inside air will recirculate to the heater. If the windows switch to To Defrost door windows, slide the To defrost or defog the windshield and temperature lever to the right, push the (defrost) button, switch on. Warmed switch to the (outside) air will then flow from the windshield and side defroster vents.
button so position,
setting, and turn the fan
Main Menuts Heating and Cooling (cont'd)
To Dehumidify with A/C(optional on the 2.0 S and 2.0 Si models) Because an air conditioner dehumidifies as it works, you can use it in cool or cold weather to help defog the windows. Just switch the fan on, push the A/C button on, select the desired function and adjust the temperature lever to a comfortable setting.
NOTE: This setting is desirable for most operating conditions in ambient temperatures above approximately 32°F (0°C).
To Turn Everything OFF Slide the temperature lever to the left, turn the fan switch off and push the
button on.
NOTE: This setting should only be used in cold weather for the first few minutes of driving to prevent cold air from blowing into the cabin. Under normal operating conditions, the fan should always be kept ON to prevent the accumulation of stale air in the system.
Main Menuts Stereo Sound System
(2.0 SI2.0 Si)
Bass C o n t r ol
Treble Control
(Si)
Bass Control
Treble Control
ON/OFF Switch
On the 2.0 S and 2.0 Si models: Turn the switch clockwise to turn the unit on, to increase volume and to raise the power antenna; turn it counterclockwise to decrease volume, to turn the unit off and to retract the antenna. The antenna will also retract automatically if the ignition is switched off. On the Si model: Push the button to turn the unit on and to raise the power antenna; push it again to turn it off and to retract the antenna. The antenna will also retract automatically if the ignition is switched off.
Volume Control
On the 2.0 S and 2.0 Si models: Turn the ON/OFF switch clockwise to counterclockwise to decrease volume. On the Si model: Push the switch up to increase volume and down to decrease volume.
increase volume and
(cont'd)
Main Menuts Stereo Sound System (cont'd)
(2.0 S/2.0 Si)
Frequency Display
(Si)
Frequency Display
Balance Control
Balances sound between left and right speakers.
NOTE: When the headlights are on, the radio panel illumination is on, even if the radio is turned off. The panel lighting can be turned off by first pushing the Balance Control button to its out position and then pulling it out slightly further.
Fader Control
Balances sound between front and rear speakers. Radio Operation
AM/FM Band Selector
Push to select AM or FM band. The corresponding band indicator will light.
Manual Tuning
button to tune to a lower frequency station. button to tune to a higher frequency station.
Push the Push the NOTE: If you hold either button in for more than half a second, the tuning frequency will count up or down rapidly.
Main Menuts Seek Tuning
Each time you push this button up or down, the tuner will automatically seek the next higher or lower frequency station.
Preset Station Selection
1 .Select AM or FM band by depressing the Band Selector. Find the
station you want by Manual Tuning or Seek Tuning. Press and hold one of the Preset Buttons.
2. In a few seconds, a beep will sound and the light in the button will 3. come on. The station is now preset in the memory. You may
preset 1 AM and 1 FM station per button. (total, 6 of each on the 2.0 S and 2.0 Si models and 8 of each on the Si model).
4. You can tune to a preset station by pushing its corresponding
preset button.
NOTE: On the Si model The Auto Preset button must be off before the Preset Station Selection can be used.
Auto Select Button (Si only)
If you are visiting a new broadcast area, you can quickly enter into memory the stronger stations in that area by simply pushing the Auto Select Button. The radio will then automatically scan the AM and FM bands and temporarily memorize up to eight stations in each. With the Auto Select Button on, these stations can then be tuned by pushing the preset buttons. Manually-preset stations remain memorized for use when you return to your normal broadcast area, but are only selectable with the Auto Select Button off.
Stereo indicator
This lights up when an FM broadcast in stereo is being received. It will flash when the signal strength diminishes. If it flashes, good stereo reception cannot be expected. Stereo reception is available only for FM stereo broadcasts, not for AM stereo broadcasts.
(cont'd)
Main Menuts Stereo Sound System (cont'd)
Tape Operation
(2.0 S/2.0 Si)
(Si)
Tape Direction Indicator
With the cassette inserted " A" side up, the indicator ( ) will light when the " A" side is playing; the indicator ( ) will light when the " B" side is playing.
Program Selector (PROG)
Push to change the direction of tape play. Auto Reverse Feature: The tape direction automatically reverses when the end of the tape is reached in Play or FF mode and plays the other side.
Fast Forward/Rewind (FF/REW)
Note which Tape Direction Indicator is lighted, then push the appropriate button to rapidly wind the tape in the same direction (FF) or in the opposite direction (REW)
Play (PLAY)
Push the PLAY button (indicator on) to resume tape play and stop rewind or fast forward operation.
Main Menuts Repeat Button (REPEAT)
Push the REPEAT button (indicator on) to return to the beginning of a song or section of programming and repeat its play. Push the button again (indicator off) to cancel the repeat function and resume normal play.
DOLBY® Noise Reduction (
Push in when playing tapes recorded in Dolby (the Dolby NR Indicator will light). Push again (out) when playing tapes not recorded in Dolby. Use of the wrong setting will affect high frequency response.
NOTE:
The Dolby NR circuit will not operate during radio reception. Dolby noise reduction system is manufactured under license from Dolby Laboratories Licensing Corporation. "Dolby" and the double-D symbol are trademarks of Dolby Laboratories Licensing Corporation.
Skip Button
The circuit senses silent passages between songs or programs on a tape. Push upward to automatically advance to the beginning of the next song, or downward return to the beginning of the song just played. NOTE: Tapes that contain short silent passages between songs, a high level of noise between songs, or silent passages within a song may not be suitable for this function.
Metal Indicator (METAL)
Most metal or CrO2 cassettes are coded with slots on their back edge. If such a cassette is inserted, the player will detect the slots and automatically switch full enjoyment of metal/CrO2 tapes. The indicator light will go on when coded cassettes are played.
the proper equalization
for
to
Eject
Push this button to stop and eject the tape. Ignition Key-OFF Eject: The cassette being played will be automatically ejected when the ignition or the unit is turned off. NOTE: When one side of the tape ends, "Auto-Reverse" will automatically begin playing the other side, therefore, you must push the eject button to stop or remove the tape.
(cont'd)
Main Menuts Stereo Sound System (cont'd)
CLEAN Indicator Light
After 50 hours of cassette tape play, the light will come on as a reminder to clean the tape heads. If the light comes on and the tape heads were not cleaned at the recommended 30 hours of usage (see maintenance section below), they should be cleaned immediately. To reset, push the indicator for a minimum of five seconds until the light goes off.
Defective Tape Eject The tape player includes a protection mechanism to automatically eject defective tapes (warped housing, loose label, faulty tape movement) immediately upon insertion, if a tape malfunctions while in play, the tape direction will change back and forth and then e|ect the cassette. Tapes ejected before play should be considered faulty and discarded; tapes ejected during play may only be unevenly wound and could be re-usable if fully rewound, manually, outside the player.
NOTE: The tape player may repeat cycle through the loading and unloading motion several times in an effort to eject a faulty tape. During this process the tape will either eject fully or rise to the loading level and have to be pulled out manually. In either case, discard the tape; re- use may damage the tape player.
Maintenance The head in the cassette tape player can pick up dirt or tape deposits each time a cassette is played. The result is low or "muddy" sound from one or both channels, as if the treble tone control were turned all the way down. To prevent this, you should periodically clean the head with a commercially available cleaning cassette. As preventive maintenance, clean the head about every 30 hours of use. If you wait until the head becomes very dirty (noticeably poor sound), it may not be possible to remove all deposits with a simple cleaning cassette. The use of 120 minutes tape is not recommended.
CAUTION: Storing cassettes out of their cases, or touching the magnetic tape with your fingers will increase the amount of dirt that gets to the tape head. Using low-quality "off-brand" tape will increase the amount of tape deposits that get on the head. Both of these practices may eventually lead to damage of the head and playing mechanism.
Main Menuts Sunroof
Sunroof To open the sunroof, push and hold the the sunroof, push and hold the when the roof reaches the desired position. Do not hold the switch on after the sunroof has fully opened or closed, or you may damage the sunroof motor.
switch. To close switch. Release the switch
Push
Push
Do not allow any part of your body to extend through the sunroof while the vehicle is in motion. In the event of a collision or sudden application of the brakes, severe personal injury could result. To avoid the possibility of injury while closing the sunroof, never allow any part of your body to extend through the opening.
CAUTION: Operating the sunroof in severe cold or when it is covered with snow or ice may cause damage to the sunroof.
Sunshade As well as the sunroof, there is a sliding sunshade which you can adjust to let in light with the roof closed, or to block out light entirely. The sunshade opens automatically as you open the sunroof.
SLIDING GLASS
SUNSHADE
(cont'd)
Main Menuts Sunroof (cont'd)
If the Sunroof Won't Close The sunroof can be closed manually, if the control switch will not close it. 1. Remove the round plug near the
rear center of the headliner,
2. Insert the sunroof wrench (from
the tool bag) into the socket.
3. Turn the wrench counterclock- wise until the roof closes and seats into its locked position.
4. Replace the plug.
Remove plug
SOCKET
CAUTION: Do not put weight on the sunroof or force it open or closed, you may damage the mechanism.
Maintenance Periodically pour a little water down the front corner drain holes to make sure they are not plugged. If they are free, water should drop on the ground behind each front wheel.
DRAIN HOLES
Main Menuts Gasoline
For proper operation of your car's emission controls, your engine is designed to use unleaded fuel only.
CAUTION: Using leaded or even low-lead gasoline could damage some of your emission controls, and also void their coverage under the emission controls warranty.
Use gasoline from pumps labeled unleaded, with a pump octane number of 86 or higher. The pump octane number is an average of the Research (R) octane and Motor (M) octane numbers. Use of a lower octane gasoline can cause persistent, heavy "SPARK KNOCK" (a metallic rapping noise), which can lead to engine damage if severe.
CAUTION: If you notice steady spark knock while holding a steady speed on a level road, try changing brands of gasoline. If the spark knock persists, consult your Honda dealer. Failure to do so is considered misuse, and misuse is not covered under the New Car Warranty.
Occasionally you may notice light spark knock while accelerating or driving up hills. This is no cause for concern, it simply means your engine is running at its most economical.
Gasoline Containing Alcohol If you decide to use a gasoline containing alcohol ("gasohol"), be sure its octane rating is at least as high as that recommended for unleaded gasoline. There are types of "gasohol": that containing ethanol, and that containing methanol. Do not use gasohol that contains more than 10% ethanol. Do not use gasoline containing methanol (methyl or wood alcohol) that does not also contain cosolvents and corrosion inhibitors for methanol. Never use gasoline containing more than 5% methanol, even it has cosolvents and corrosion inhibitors.
two
if
(cont'd)
Main Menuts Gasoline (cont'd)
NOTE:
Fuel system damage or vehicle performance problems resulting from the use of such fuels is not covered under the new car warranties. Honda cannot endorse the use of fuels containing methanol since evidence of their suitability is as yet incomplete. Before purchasing fuel from an unfamiliar station, try to confirm whether the fuel contains alcohol; of what kind, and how much. If you notice any undesirable operating symptoms after using a gasoline that contains alcohol, or one that you think contains alcohol, switch to an unleaded gasoline, as recommended on page 55.
Operation In Foreign Countries In order to comply with U.S. Federal Emissions Regulations, you must use unleaded fuels of the recommended octane rating. These fuels may not be available in other countries. If you intend taking your car outside the U.S. or Canada, write to American Honda Consumer Affairs (stating the year and model of your car) at the address below for information regarding modifications you may need to have done.
American Honda Motor Co., Inc. Consumer Affairs 100 W. AIondra Blvd., Gardena, CA 90248
Fuel Filler Door and Cap
Gasoline is extremely flammable and is explosive under certain conditions. Perform this operation in a well-ventilated area with the engine stopped. Do not smoke or allow open flames or sparks in the area or where gasoline is stored.
The fuel filler door is opened by pulling up on the lever at the left side of the driver's seat. The door will lock automatically when closed; push it until it clicks.
CAUTION: You may hear a hiss when you open the filler cap. This sound is residual pressure escaping from the fuel tank. Open the cap slowly and remove the cap after the hissing stops. Do not overfill the tank; fill only until the gas pump clicks off automatically and never top off.
Main Menuts Pull up
RELEASE LEVER
Open
Close
Fuel vapor is extremely hazardous under certain conditions. Always stop the engine before refueling, and never refuel near sparks or open flames.
CAUTION: When reinstalling the fuel cap, be sure both tabs on the cap are engaged in the slots of the filler neck and turn the cap until it stops. If you replace the cap, use only a genuine Honda replacement part or Its equivalent. Failure to use the proper part could cause serious fuel system problems. How to Improve Your Gas Mileage:
Drive at a smooth, steady pace to avoid unnecessary decelerations and stops — accelerating back to speed uses more fuel. Plan trips to avoid rush hour traffic if possible. Make sure the parking brake is completely released. Consolidate trips whenever possible. Keep vehicle weight to a minimum by removing unnecessary items from the luggage area. Whenever possible, use fresh air from the dash vents to keep cool when driving; open windows, or use of the air conditioning both affect fuel economy. Keep the tires adjusted to the recommended pressure. Tire Pressure (measured cold)
Front: 195 kPa (28 psi) Rear: 180 kPa (26 psi)
195 kPa (28 psi) : (Si with 4WS)
Condition of Your Car You can only get maximum fuel economy if your car is in top running condition. Have all required maintenance done at the proper intervals. Check tire pressures and tire wear frequently. If tire wear is uneven, have the alignment checked by your Honda dealer. Proper alignment saves gasoline and prolongs tire life.
Main Menuts Ignition Switch
The combined ignition switch/anti-theft lock is located on the right side of the steering column and has four positions:
0-LOCK position: The key can be removed or inserted in this position. To remove the key, push it in at position I, then turn it to 0 and pull it out. When the key is removed, the steering column will lock.
NOTE: On cars equipped with automatic transmissions, the transmission must be in Park before pushing and turning the key to the O-LOCK position.
Never turn the ignition switch to the lock position or remove the key while the car is in motion; the steering wheel can lock causing a loss of directional control, and an accident could result.
I-ACCESSORY position: In this position, the accessory circuit is on, but the ignition circuit is off. If the key is difficult to turn from the 0 to the I position, turn the steering wheel slightly to relieve pressure on the lock.
II-ON position: This Is the normal running position.
III-START position: The starter will engage when the key is turned to this position.
To remind you to remove the ignition key when leaving your car, a beeper will sound if the key is still in the ignition when you open the driver's door. The beeper system is deactivated when you turn the ignition to 0 (Lock) and fully remove the key.
Main Menuts Four Wheel Steering (Si with 4WS)
The four wheel steering system (4WS) provides limited steering of the rear wheels, in addition to the normal steering of the front wheels. The system is "steering angle dependent." That is, depending on how far the steering wheel is turned, the rear wheels are steered in either the same or the opposite direction of the front wheels.
Moderate turns Sharper turns Sharper turns
Same direction
Opposite direction
Moderate turns
When the steering wheel is turned a m o d e r a te a m o u n t, up to approximately one half turn, the rear wheels are steered in the same direction as the front wheels. For example, during lane changing and on gentle curves, the front and rear wheels steer in the same direction.
When the steering wheel is turned more than approximately one half turn, the rear wheels are steered in the opposite direction of the front wheels. This reduces the turning radius of the car for easier parking, U-turns, and maneuvering in confined spaces.
Conventional steering 4WS
(cont'd)
Main Menuts Four Wheel Steering (cont'd)
CAUTION: If the car is very close to a wall or other obstacle, the rear of the body can swing enough to contact the obstacle when turning very sharply. Go slowly, and use both outside mirrors.
Conventional steering
4WS
Main Menuts Starting the Engine
Before Starting
Manual Transmission: 1 . Apply the parking brake. 2 . Push the clutch pedal all the way in (see NOTE below). 3 . Shift the transmission to neutral. NOTE: On cars equipped with manual transmissions, the engine will not crank unless the clutch pedal is fully depressed.
Automatic Transmission: 1. Make sure the shift lever is in Park (P). 2. Apply the parking brake and the foot brake.
Starting a Cold Engine(2.0 S) NOTE: When starting in cold weather, keep all unnecessary electrical circuits off (lights, defogger, etc.) for the best battery output.
1. Above 32°F(0°C)
Below 32°F(0°C)
Push the accelerator to the floor 1 time and slowly release it.
Push the accelerator to the floor 2 or 3 times and slowly release it.
Below 0°F(-18°C)
Push the accelerator to the floor 3 or 4 times and slowly release it.
DO NOT pump while cranking.
2. With your foot OFF the accelerator, crank the engine until it starts and runs. (It may require more than 5 seconds of cranking.)
NOTE:
If the engine won't start, push the accelerator pedal down 1 more time and slowly release it, then start the engine. Repeat once more if necessary, If the engine still won't start, push the accelerator down about halfway; hold it there and crank the engine until it starts. Once the engine starts, release the accelerator gradually as the engine warms up. If the engine doesn't start within 1 5 seconds of cranking, turn the key off and wait 10 seconds before trying again.
3. If the outside temperature is below freezing, or if your car has not been driven for several days, warm up the engine for a few minutes before driving.
(cont'd)
Main Menuts Starting the Engine (cont'd)
Starting a Warm Engine (2.0 S) Start it without pushing the accelerator down. If it won't start, push the accelerator pedal about halfway and hold it there while cranking the engine until it starts. It may take 20 to 30 seconds of cranking. DO NOT pump the accelerator. Once the engine starts, release the accelerator gradually as the engine speeds up.
Starting the Engine (2.0 Si,Si)
NOTE:
When starting in cold weather, keep all unnecessary electrical circuits off (lights, defogger, etc.) for the best battery output. Do not crank the engine for more than 15 seconds at a time. Wait 10 seconds before going to the next step.
1. With YOUR FOOT OFF THE ACCELERATOR start the engine by
turning the key to the III position.
2. If the engine won't start within 15 seconds or starts but fails to continue to run, push the accelerator pedal halfway, and hold it there while cranking the engine. Once the engine starts, release the accelerator gradually as the engine speeds up.
3. If it doesn't start within 15 seconds, push the accelerator pedal down to the floor and hold it there while cranking in order to clear flooding. Try step 2 again.
Cold Weather at High Altitude Starting (2.0 Si,Si)
NOTE:
When starting in cold weather, keep all unnecessary electrical circuits off (lights, defogger, etc.) for the best battery output. Do not crank the engine for more than 15 seconds at a time. Wait 10 seconds before going to the next step.
1. When starting in cold weather at high altitude (above 8,000 feet), push the accelerator pedal about halfway and hold it there while cranking the accelerator gradually as the engine speeds up.
the engine starts, release
the engine. Once
2. If it doesn't start within 15 seconds, push the accelerator pedal down to the floor and hold it there while cranking in order to clear flooding. Try step 1 again.
NOTE: If the outside temperature is below freezing, or if your car has not been driven for several days, warm up the engine for a few minutes before driving.
Main Menuts Safety Items
Before driving away, check that: The doors are closed properly. The mirrors are properly adjusted, and the windows clean. The driver and passengers are wearing properly adjusted seat belts. The head restraints are properly adjusted. The warning and indicator lights are operating properly. The brake pedal feels normal. All luggage and cargo is secured. Nothing is interfering with the driver's feet or blocking vision to the rear.
While driving remember to:
Always drive defensively; expect the unexpected. Reduce your speed during night hours and bad weather. Follow at a safe distance; don't tailgate. Get off the highway when you are tired; stop and take a rest.
When stopping for repairs:
Park the car well off the road. Turn on the hazard warning flasher. Use flares or other warning devices to warn other motorists.
After parking your car:
Apply the parking brake and shift to first gear if equipped with manual transmission, or PARK on automatic transmission equipped cars. Make sure the windows are closed and all doors are locked. If parked on a hill: Turn the front wheels away from the curb if facing uphill. Turn the front wheels toward the curb if facing downhill. Never leave children unattended in a parked car. Take your keys.
Main Menuts Engine Exhaust Gas Warning
A properly maintained car is your best protection against exhaust gas entering the passenger compartment. The exhaust system should be competent mechanic whenever:
inspected by a
thoroughly
The car is raised for an oil change. You notice a change in the sound of the exhaust. The exhaust system or the rear or underside of the car is damaged.
Avoid breathing exhaust gases. They contain carbon monoxide, which is a colorless, odorless gas that can cause loss of consciousness and eventual death. If you suspect that exhaust gas is entering the passenger compartment, have the cause determined and corrected as soon as possible. If you must drive under these conditions, drive only with all windows fully open. Do not drive with the trunk lid open. An open trunk may draw exhaust gases into the passenger compartment. If you must drive with the trunk lid open, drive only with all the windows wide open. Do not run the engine in confined areas, such as garages, any longer than necessary to move the car in or out. If you must sit in a parked car with the engine running for more than a short time, adjust the heating/ventilation system as follows:
1. Push the 2. Set the temperature lever for best comfort. 3.Turn the fan to the highest speed.
buttons on.
and
NOTE: To insure proper operation of the car's ventilation system, keep the front air inlet clear of snow, mud, leaves or other obstructions.
Main Menuts Shifting the 5 Speed
lower gear
The fully synchronized manual transmission is very easy to shift up or down. When you slow down for traffic, steep hills, or corners, shift to a lower gear before the engine starts to labor. When descending steep grades, select a to help maintain a safe speed and to prevent the brakes from over- heating. When shifting, depress the clutch pedal fully, shift gears and then release the clutch gradually. Do not speed-shift; allow time for the gears to synchronize. To prevent grinding the gears when shifting into reverse, hold the clutch pedal depressed briefly before shifting, or shift the lever into one of the forward gears before selecting reverse. A safety lockout prevents accidental shifting straight from 5th to Reverse.
Avoid rapid acceleration or sudden deceleration when either or both driving wheels are on a slippery surface. Decreased traction could cause loss of directional control.
CAUTION:
Do not drive with your foot on the clutch pedal as this will cause premature wear of clutch components. Do not shift into reverse while the car is moving.
(cont'd)
Main Menuts Shifting the 5 Speed (cont'd)
Maximum Allowable Speeds The speeds shown below are the maximum at which the car can be driven or downshifted in each gear without over-revving the engine:
(2.0 S)
(2.0 Si,Si)
Recommended Shift Speeds For best fuel economy, and effective emission control, shift at the speeds shown for your car:
Main Menuts Shifting the Automatic
The automatic transmission shift lever has a locking mechanism to prevent accidental shifting into Reverse (R), Park (P) or 2nd (2). Also, the Automatic Shift Lock prevents you from shifting out of Park unless the brake pedal is already depressed and the ignition switch is in the II position. Push the button on the shift handle to shift into 2nd, Reverse or Park; depress the brake pedal and then push the button on the shift handle to shift out of Park.
: Depress the brake pedal first and push the button, then shift.
: Push the button, then shift. : Shift as desired.
Depress button
If you cannot shift out of Park with the brake pedal depressed and the ignition switch in the II position: 1. Turn the ignition switch off and
remove the key.
2. Insert the key in the Shift Lock Release located to the right of the shift lever.
3. Press and hold the key down, then press the button on the shift handle and move the shift lever to Neutral.
4. Return the key to the
ignition switch, depress the brake pedal and restart the engine.
KEY
Insert
SHIFT LOCK RELEASE
NOTE: If you encounter any problem shifting out of Park, have your authorized Honda dealer check the system as soon as possible.
(cont'd)
Main Menuts Shifting the Automatic (cont'd)
Operating Tips For smoother operation, apply the brakes when shifting from Neutral or Park to a forward or reverse gear. When parking: bring the car to a stop with the foot brake, hold the brake on and shift into Park, set the hand brake and then turn off the engine.
NOTE: Your 4 speed automatic transmission is equipped with a torque converter lock-up clutch. Because of this, you may notice what feels like an extra shift as the clutch engages.
CAUTION:
Shift into P only after the car has come to a complete stop. Shift into or out of R only after the car has come to a complete stop. Do not "rev-up" the engine when the brake is on and the shift lever is in D, S, 2 or R. When stopped on a hill, use the brakes to hold your position, not the accelerator pedal. Do not shift from N or P into D, S, 2 or R when the engine is above idle speed. Before shifting into gear, make sure your foot is firmly on the brake pedal. Do not rest your hand on the shift lever or push the shift button while driving.
Driving Technique
D-4th Use the D range for normal in-town and highway driving. The car will start off in 1st and shift automatically to 2nd, 3rd, and 4th. The further down you push the accelerator, the later the transmission will shift and the faster the car will accelerate.
S3/S4
The " S" shift selector range changes the shift points under part throttle acceleration, allowing the transmission to stay in each lower gear for a longer period before automatically upshifting. With the shift selector in the " S" range, the "S3" indicator light in the dash panel will come on and the transmission will shift from 1st to 2nd and 3rd but not 4th. This is especially useful when climbing or descending grades. While driving in the " S" range, the car's performance is improved but fuel economy is reduced.Main Menuts While driving in the " S" range, you can select 4th gear by pushing the "S4" switch. Depending upon vehicle speed and throttle pedal position, the transmission will shift to 4th gear when the switch is pressed; the "S4" indicator light in the instrument panel will come on. Pushing the "S4" switch again will cause the transmission to downshift to 3rd gear In the "S3" mode. The "S4" indicator light in the instrument panel will go out, and the "S3" light on the instrument panel will come on. If the shift lever is moved to any other driving range, the "S4" switch will be cancelled automatically.
S4 SWITCH
NOTE:
In both the D and S modes, the transmission holds in 2nd while you are stopped in gear. When you start moving again, the transmission shifts to 1st, then 2nd and so on. If rapid acceleration is necessary, depress the accelerator to the floor; the transmission will automatically shift down according to load and engine speed. This applies to both D and S ranges.
(cont'd)
Main Menuts Shifting the Automatic (cont'd)
2-2nd Use 2nd gear for increased engine braking when driving downhill, and increased power when driving uphill; also for driving on slippery roads, and freeing the car from mud or sand, where 1 st gear could provide too much power and cause skidding or wheel-spin. The maximum recommended speed in 2nd gear is: 60 mph (97 km/h)
R-Reverse CAUTION: Shift into or out of reverse only after the car has come to a complete stop; the transmission may be damaged if you shift while the car is moving.
P-Park CAUTION: Use this position when starting the engine , or when parking. Shift into Park only when the car is COMPLETELY stopped.
N — Neutral Use when starting the engine or during prolonged idling in traffic.
Main Menuts Towing a Trailer
Your car is designed primarily to carry passengers and a normal amount of luggage. Although your car is capable of towing a trailer, there will be an effect on handling, performance, braking, general vehicle and tire durability and fuel economy.
The weight of the trailer plus its cargo must not exceed a total of 1,000 Ibs. (450 kg). The gross vehicle weight must not exceed the Gross Vehicle Weight Rating (GVWR) indicated on the Certification label (see page 127). The gross vehicle weight is the total weight of the car, driver, passengers, luggage, hitch and trailer tongue load. The total weight supported by each axle must not exceed the Gross Axle Weight Rating (GAWR). The front and rear GAWR's are shown on the Certification distribution of luggage and passengers in the car, as well as the tongue load and hitch weight should also be considered in terms of the GAWR, which is the maximum amount of weight that should be supported over the front and the rear axles. You should have your car and trailer weighed at a commercial weighing station to check both the GVWR and GAWR's to confirm that the total weight and weight distribution are within safe driving limits. The maximum trailer tongue load must not exceed 100 Ibs. (45
kg). Cargo should be distributed so that the tongue load is approximately 10% of the total weight of the trailor and its cargo. This is done by distributing approximately 60% of cargo weight toward the front of the trailer and 4 0% toward the rear.label (page 127). The
TRAILER WEIGHT
TONGUE LOAD
Maximum: 1,000 Ibs (450 kg)
Maximum: 100 Ibs (45 kg)
Never load the trailer so that the back is heavier than the front. This will seriously affect vehicle handling. Be sure the cargo is secured so that it will not move during driving.
(cont'd)
Main Menuts Towing a Trailer (cont'd)
Hitches Use only a hitch recommended by your Honda dealer. The hitch should be bolted securely to the car and installed by a qualified technician. Do not use a hitch designed for temporary installation and never use one that attaches only to the bumper.
Trailer Brakes and safety chains The Honda Automobile Division recommends that trailers equipped with brakes, should conform to any applicable federal and state regulations, When using a trailer equipped with electric brakes, a trailer brake controller that connects to the car's electrical system is recommended. Installing a brake controller that connects to the car's brake hydraulic system could result in brake fluid contamination or leaks, A safety chain must always be used between the car and the trailer. Leave sufficient slack in the chain so that it does not bind in sharp turns. The chain should cross under the trailer tongue to prevent the tongue from dropping to the ground.
Tires Make sure your car's are properly inflated. Adjust tire pressure to the recommended tire pressure indicated on the label attached to the edge of the driver's door.The trailer tires should be of the proper size, load rating and inflated to the pressure recommended by the trailer manufacturer.
Trailer Lights Trailer light must comply with federal, state and local regulations. See your local recreation vehicle dealer or rental agency for the correct type of lighting and wiring for your trailer, Check for correct operation of the turn signals and stop lights each time you hitch up. CAUTION: Connections to your car's electrical system should be made by your Honda dealer or a qualified electrician.Improper installation may damage your vehicle's electrical system and cause a malfunction of the lights.
Main Menuts Break-in Schedule Do not tow a trailer during the 600 mile (1,000 km) break-in period: see page 2.
Maintenance If you tow a trailer, your vehicle will require more frequent maintenance due to the additional load. Refer to the "Maintenance Schedule under severe driving conditions" on page 80 for specific information.
Before Towing With the car and trailer completely loaded and parked on a level surface, confirm that the tongue loading is correct. If the car has an abnormal nose-up or nose-down attitude, check for improper cargo distribution. Check also for excessive cargo weight, worn suspension or other causes and correct the problem before driving. Be sure the cargo is secured so it will not shift while driving. Check that your rearview mirrors conform to any federal, state, or local regulations. If not, install rearview mirrors designed for towing. Before towing a trailer, practice turning, stopping and reversing with a trailor in an area away from traffic until you learn the technique.
(cont'd)
Main Menuts Towing a Trailer (cont'd)
Towing Safety
Stopping distance will be increased when towing a trailer. For each 10 mph (16 km/h) of speed, allow at least two car lengths between you and the vehicle ahead. Avoid sudden braking which may cause trailer jackknifing and loss of control. Avoid jerky starts and sudden acceleration. If your car has a manual transmission, always start out in first gear and release the clutch at moderate engine rpm. Avoid rapid lane changing and sharp turns. The trailer could hit your car in a tight turn. Slow down before making a turn. Remember, the total length of your car plus trailer will require a wider turning circle. Crosswinds may adversely affect handling of your car and trailer, Use the rearview mirrors frequently to warn you of approaching large vehicles that may pass you causing your car and trailer to sway. When being passed, firmly grip the steering wheel and be prepared to reduce speed immediately but gradually. Never increase speed. Steer straight ahead. Towing a trailer in bad weather will magnify any difficulty in controlling the car caused by the weather itself. Avoid sudden maneuvers: slow down and use extra caution. Be careful when passing other vehicles. Passing requires considerable distance because of the added weight and length of your trailer.
Main Menuts CAUTION:
Before starting out, check the operation of the lights and all car/ trailer connections. After driving a short distance, stop and recheck the lights and connections. Reversing is difficult and requires practice. While backing-up, the trailer may pivot off-course. To correct for this, grip the bottom of the steering wheel and move your hand to the left to move the trailer to the left, or to the right to move the trailer to the right. Turn the steering wheel a little at a time, and keep the speed very low. Have someone guide you when backing. To help prevent overheating of the brakes, shift into a lower gear to make use of engine braking before descending steep or long grades. Do not make sudden downshifts. Pay strict attention to the coolant temperature gauge when going up hills. Because of the added load of the trailer, your car's engine may overheat on hot days. Turning off the air conditioner will reduce the load on the cooling system. On cars equipped with automatic transmission. —Do not hold the car stationary on an incline by using the accelerator pedal; this can cause the transmission fluid to overheat. Instead, use the handbrake or footbrake.
—When towing trailers, avoid high transmission fluid temperatures (caused by the transmission frequently shifting between 3rd and 4th gears) by driving in S3.
NOTE: Be sure to check state and local laws concerning maximum speed or other driving restrictions for cars towing trailers. If you are driving across several states, check each state's requirements before leaving home, because restrictions may vary.
Parking with a Trailer Whenever parking your car on an incline with a trailer attached, first place and seat chocks at each wheel of the car and trailer. This is in addition to the normal parking preparations of firmly applying the parking brake and placing the transmission in first or reverse (manual transmission) or P (automatic transmission).
CAUTION: Parking on an incline is not recommended and should be done only if it cannot be avoided. Follow all precautions mentioned above and turn the wheels to point towards a curb if facing downhill, away from a curb if facing uphill. When leaving an inclined parking place, move the car slightly to unseat the chocks. Then while keeping the foot brakes firmly applied, have an assistant remove the chocks.
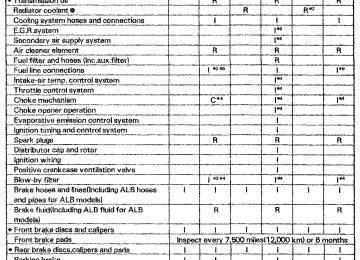
Main Menuts Maintenance Schedule and Records
Your Honda automobile must be properly maintained to ensure that it is in peak operating condition and the emission levels are within the standards set by the Federal Clean Air Act, The following instructions and maintenance procedures are based on the assumption that your car will be used exclusively for the purpose for which it was designed: 1. To carry passengers and cargo within the load limits shown on
the label on the edge of the driver's door.
2. To be driven on reasonable road surfaces within legal limits. 3. To generally be driven daily over a distance of several miles. 4. Use gasoline from pumps labeled unleaded, with a pump octane number of 68 or higher. The pump octane number is an average of the Research (R) octane and Motor (M) octane numbers.
NOTE: Failures which occur due to a lack of maintenance will not be covered under warranty.
The Required Maintenance Schedule * specifies all maintenance required to keep your car in peak operating condition. Work should be done by an authorized Honda dealer but may be done by any qualified service facility or individual who is competent in this type of work. Maintenance, replacement, or repair of emission control devices and systems may be done by any automotive repair establishment or individual using parts that are "certified" to EPA standards. After the maintenance has been done, be sure to complete the Maintenance Records on pages 79 — 81 . All required maintenance is considered normal owner operating cost and you will be charged for it by your dealer. * For vehicles sold in California, maintenance operations indicated
by * 3 on page 78 are recommended by the manufacturer. Other maintenance operations are regulations and condition the emission warranty.
required by California
Main Menuts Check the following items at each fuel stop: 1. Engine oil level. 2. Radiator coolant level.
Check the following items periodically: 1. Brakes: for braking efficiency, brake pedal travel and hydraulic
fluid level.
2. Lights: for operation of headlights, taillights, side marker lights,
stoplights, turn signals and back-up lights.
3. Tires: for correct pressures (including spare); inspect for cuts and uneven or excessive wear. Rotate every 7,500 miles (12,000 km) in the pattern shown on page 107.
4. Steering: for excessive play or vibration while driving. 5. Exhaust system: for leaks or loose mounts. 6. Wipers: for operation of windshield wipers and washer, and
7. Seat belts: for condition of fabric and buckles, and operation of
condition of wiper blades.
the restraint mechanism.
8. Battery condition.
(cont'd)
Main Menuts Maintenance Schedule and Records (cont'd)
Cheek oil and coolant level at each fuel stop, Under severe driving conditions, service these items twice as often. (See page 80 )
Main Menuts Required Maintenance Record
Have your servicing dealer record all Required Maintenance below. Keep receipts for all work done on your car.
(cont'd)
Main Menuts Maintenance Schedule and Records (cont'd)
Severe Driving Conditions CAUTION: The following items must be serviced more frequently on cars normally used under severe driving conditions. Refer to the chart below for the appropriate maintenance intervals.
Severe driving conditions include:
A: Repeated short distance driving B: Driving in dusty conditions C: Driving in severe cold weather D: Driving in areas using road salt or other corrosive materials E: Driving on rough and/or muddy roads F: Towing a trailer
R-Replace I-Inspect After inspection, clean, adjust, repair or replace if necessary.
Non-Scheduled Maintenance Record Record additional maintenance for severe driving conditions or non- scheduled maintenance on this page. (See page 78)
Main Menuts Main Menuts Fluid Locations
AUTOMATIC TRANSMISSION FLUID DIPSTICK
ANTI LOCK BRAKE FLUID RESERVOIR (Si with ALB)
POWER STEERING FLUID RESERVOIR
ENGINE OIL FILLER CAP
RADIATOR RESERVE TANK CAP
CLUTCH FLUID RESERVOIR (Manual Transmission Only)
RADIATOR CAP
ENGINE OIL DIPSTICK
WASHER FLUID RESERVOIR
BRAKE FLUID RESERVOIR
Main Menuts Engine Oil and Filter
Checking Check the engine oil a couple of minutes after shutting the engine off, with the car parked on level ground. Remove the dipstick and wipe it clean. Reinsert it all the way down, then pull it out and read the level. The level should be between the upper and lower marks.
DIPSTICK
ENGINE OIL FILLER CAP
UPPER
LOWER
Adding If the level has dropped close to the lower mark, add oil until it is even with the upper mark. 1 .Turn the oil filler cap counterclockwise to remove. Add oil, then
check the level again. Do not overfill.
2. Reinstall the cap and twist clockwise until it stops. CAUTION:
Be sure the oil filler cap is correctly replaced before starting the engine. Engine oil is a major factor affecting the performance and service life of the engine; you should use only a premium quality detergent oil labeled SG grade.
LOOK FOR THIS LABEL ON THE OIL CONTAINER
Use the proper viscosity oil for the climate in which you drive:
Ambient Temperature
Some oil labels may also include additional designations of quality such as CC or CD. However, these are acceptable only when used together with SG. NOTE: 5W-30 viscosity oil is recommended for improved fuel economy.
(cont'd)
Main Menuts Engine Oil and Filter (cont'd)
Fuel Efficient Oil For the best fuel economy from your car, it is recommended that you use a fuel efficient SG oil. This oil is usually identified by the words such as: "Energy Conserving II," "Gas Saving," and "Fuel Saving," etc.
Changing Oil and Filter Engine oil and filter should be changed together every 6 months or 7,500 miles (12,000 km), whichever occurs first. The filter is on the engine block, below the intake manifold.
CAUTION: The oil filter cannot easily be removed from above the engine. For this reason it is recommended that the oil filter change be done by a skilled mechanic.
1. Start the car to warm up the
engine, then shut it off.
2. Remove the engine oil filler cap
and drain bolt, and drain the oil.
A warmed-up engine and the oil in it are hot; be careful not to burn yourself.
3. Remove the oil filter and let the
remaining oil drain out.
4. Install a new fitter according to instructions on or with the filter.
ENGINE OIL DRAIN BOLT
OIL FILTER
Main Menuts 5. Reinstall the drain bolt with a new washer and tighten it securely. Refill the engine with the recommended oil, to the upper mark on the dipstick.
ENGINE OIL CHANGE CAPACITY (including filter): 3.8 l (4,0 US q t, 3.3 Imp qt)
6. Start the engine and make sure oil is not leaking from the drain
bolt or filter.
7. Shut off the engine and recheck the oil level.
NOTE: Please dispose of used motor oil in a manner that is compatible with the environment. We suggest you take it in a sealed container to your local service station for reclamation. Do not throw it in the trash or pour it on the ground.
CAUTION: Used motor oil may cause skin cancer if repeatedly left in contact with the skin for prolonged periods. Although this is unlikely unless you handle used oil on a daily basis, it is still advisable to thoroughly wash your hands with soap and water as soon as possible after handing used oil.
Main Menuts Transmission Oil/Fluid Check
Transmission oil/fluid must be checked with the engine off and the car on level ground.
If the engine has been running, some engine components may be hot enough to burn you. Keep hands away from the radiator fan. The fan may start automatically without warning and run for up to 15 minutes, even after the engine is turned off.
CAUTION: If the oil/fluid level is low, check for possible leaks before adding oil. Do not overfill.
Since the transmission and differential are in the same housing, you are actually checking both oil/fluid levels in one procedure. Change transmission oil/fluid according to the Maintenance Schedule on page 78
5-Speed Remove the oil filler bolt (beside the right axle). Feel inside the boh hole with your finger. If the oil is up to the bottom edge of the hole, the oil level is correct. If it is not, slowly add oil until it runs out of the hole, then reinstall the bolt and tighten it securely with a wrench.
OIL CHECK FILLER BOLT
CORRECT LEVEL
5-SPEED TRANSMISSION OIL CHANGE CAPACITY: 2.1 l (2.2 US q t, 1.8 Imp qt)
Use only SE or SF grade motor oil when adding or changing transmission oil.
Main Menuts Use the proper viscosity oil for the climate in which you drive:
Ambient Temperature
Automatic The automatic transmission fluid level is checked (with the engine off and the car on level ground) using the dipstick in the right end of the transmission housing. Remove the dipstick and wipe it off.
DIP STICK
UPPER LOWER
Insert the dipstick and remove it. The fluid level should be between the upper and lower marks. fluid and recheck. Use only DEXRON ®II If necessary, add Automatic Transmission Fluid (A.T.F.) when adding or changing fluid. After checking the fluid level, push the dipstick in securely.
AUTOMATIC TRANSMISSION FLUID CHANGE CAPACITY: 2.8 l (3.0 US q t, 2.5 Imp qt)
Main Menuts Cooling System
Your Honda engine contains a number of aluminum parts. Therefore, it requires an antifreeze/coolant specifically formulated to protect the aluminum parts from corrosion. Failure to use a suitable antifreeze/coolant may seriously shorten the life of the engine as the result of rapid corrosion damage. Some antifreeze/coolants, although labelled for use in engines containing aluminum, may not provide adequate protection for your engine. Therefore, use only a Honda RECOMMENDED antifreeze/coolant. CHECK WITH YOUR AUTHORIZED HONDA DEALER. For best corrosion protection, the mixture of coolant and water must be maintained year-round at 50/50. Concentrations less than 50% coolant may not provide sufficient protection against corrosion and freezing. Concentrations of greater than 60% coolant will impair cooling efficiency and are not recommended. Low- mineral drinking water or distilled water should be mixed with the antifreeze/coolant. Coolant loss should be replenished by a mixture containing the proper concentration of antifreeze and water. Do not mix different antifreeze/coolants. Do not use additional rust inhibitors or anti-rust products, as they may not be compatible with the radiator coolant. ENGINE DAMAGE CAUSED BY IMPROPER COOLANT USAGE IS NOT COVERED BY THE NEW CAR WARRANTY.
Checking Coolant Check the coolant level in the reserve tank when the engine is at normal operating temperature (with the engine off and the car on the level ground), using the dipstick in the reserve tank. Remove the dipstick and wipe it off. Insert the dipstick and remove it. The coolant level should be between the MAX and MIN marks.
Do not remove the radiator cap when the engine is hot; the coolant is under pressure and could severely scald you. Keep hands away from the radiator fan. The fan may start automatically without warning and run for up to 15 minutes, even after the engine is turned off.
Main Menuts If the level is between the MIN and MAX marks on the dipstick add a 50/50 solution of antifreeze and water to bring it up to MAX.
If there is no coolant visible on the dipstick, the cooling system
should be checked for leaks and repaired if necessary. Coolant must then be added to the radiator.
MAX
MIN
RESERVE TANK
CAUTION: Radiator coolant will damage paint. Quickly rinse any spilled coolant from painted surfaces.
Wait until the engine is cool, then turn the radiator cap counterclock- wise until it stops. DO NOT PRESS DOWN WHILE TURNING THE CAP. After any remaining pressure has been relieved, remove the cap by pressing down and again turning it counterclockwise. Add enough coolant to fill the radiator, and reinstall the cap. Be sure to tighten it securely. Fill the reserve tank up to the MAX mark with the engine cold.
Maintenance the 1. Check hydrometer.
freeze protection
level of
the coolant with a
2. Keep the front of the radiator free of dirt and debris. 3. Check hoses and hose clamps regularly.
(cont'd)
Main Menuts Cooling System (cont'd)
Thermostat The thermostat in the cooling system does not need to be changed for summer or winter operation. However, for extremely cold climates, an optional thermostat is available from your Honda dealer.
Replacing Coolant Replace coolant at 36 months or 45,000 miles (72,000 km), whichever comes first. Thereafter, replace every 2 years or 30,000
miles (48,000 km), whichever comes first.RADIATOR COOLANT REFILL CAPACITY: including reserve tank Manual transmission 2.0 S: 5.15 l (1.361 US gal, 1.133 Imp gal) 2.0 Si,Si: 6.15 l (1.625 US gal, 1.353 Imp gal) Automatic transmission 2.0S:5.85 l (1.546 US gal, 1.287 Imp gal) 2.0 Si,Si: 6.15 l (1.625 US gal, 1.353 Imp gal)
0.75 l (0.198 US gal, 0.165 Imp gal)
1. Set the heater temperature lever to maximum heat. 2. Remove the radiator cap and loosen the drain plug when the
radiator is cool, and drain the radiator.
RADIATOR CAP
BLEED BOLT
DRAIN PLUG
DRAIN BOLT
3. Remove the drain bolt from the front side of the cylinder block,
and drain the engine and heater.
4. Apply non-hardening sealant to the drain bolt threads, then
reinstall the bolt and tighten it securely. 5. Tighten the radiator drain plug securely.
Main Menuts 6. Mix the recommended antifreeze with an equal amount of low- mineral or distilled water and fill the reservoir to maximum, as illustrated.
Fill to here
7. Loosen the air bleed bolt in the thermostat housing, then fill the radiator to the filler neck with the coolant mixture. Tighten the bleed bolt as soon as coolant starts to run out in a steady stream without bubbles.
FILLER NECK
Fill to here
8. With the radiator cap off, start the engine and let it run until warmed up (fan goes on at least twice). Then, if necessary, add more coolant mixture to bring the level back up to the filter neck.
9. Put the radiator cap on, then run the engine again and check for
leaks.
Main Menuts Spark Plugs
Spark plugs should be replaced every 24 months or 30,000 miles (48,000 km), whichever comes first. Recommended spark plugs:
(2.0S)
For all normal driving
BCPR5EY-N11 (NGK) Q16PR-U11 (ND)
BCPR5E-11 (NGK)
For hot climates or continuous high speed driving
BCPR6EY-N11 (NGK) BCPR7EY-N11 (NGK)