- 2016 Cadillac CTS Owners Manuals
- Cadillac CTS Owners Manuals
- 2009 Cadillac CTS Owners Manuals
- Cadillac CTS Owners Manuals
- 2006 Cadillac CTS Owners Manuals
- Cadillac CTS Owners Manuals
- 2008 Cadillac CTS Owners Manuals
- Cadillac CTS Owners Manuals
- 2013 Cadillac CTS Owners Manuals
- Cadillac CTS Owners Manuals
- 2003 Cadillac CTS Owners Manuals
- Cadillac CTS Owners Manuals
- 2011 Cadillac CTS Owners Manuals
- Cadillac CTS Owners Manuals
- 2014 Cadillac CTS Owners Manuals
- Cadillac CTS Owners Manuals
- 2010 Cadillac CTS Owners Manuals
- Cadillac CTS Owners Manuals
- 2015 Cadillac CTS Owners Manuals
- Cadillac CTS Owners Manuals
- 2005 Cadillac CTS Owners Manuals
- Cadillac CTS Owners Manuals
- 2004 Cadillac CTS Owners Manuals
- Cadillac CTS Owners Manuals
- 2012 Cadillac CTS Owners Manuals
- Cadillac CTS Owners Manuals
- 2007 Cadillac CTS Owners Manuals
- Cadillac CTS Owners Manuals
- Download PDF Manual
-
away from your vehicle.
2-123
Traction Engaged
Traction Suspended
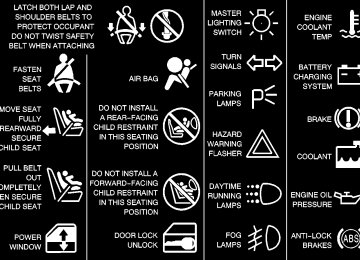
This symbol appears with the Traction Engaged message.
This symbol appears with the Traction Suspended message.
This message will appear when the traction control system is actively limiting wheel spin. Slippery road conditions may exist if this message is displayed, so adjust your driving accordingly. The message will stay on for a few seconds after the traction control system stops limiting wheel spin. See “Traction Control System” in the Index for more information.
This message will appear when the traction control system has been temporarily shut off because your vehicle’s brakes have overheated. This message does not indicate a problem with your vehicle’s traction control system. See “Traction Control System” in the Index for more information.
2-124
Trans (Transmission) Hot -- Idle Engine
Turn Signal On
This symbol appears with the Trans Hot --Idle Engine message.
This symbol appears with the Turn Signal On message.
This message indicates that the transmission fluid in your vehicle is too hot. Stop the vehicle and allow it to idle until the transmission cools down or until this message is removed. Trunk Open
If you drive your vehicle for more than approximately 1 mile (1.6 km) with a turn signal on, this message will appear as a reminder to turn off the turn signal. A multiple chime will sound when this message is displayed.
This symbol appears with the Trunk Open message.
When this message appears on the display, it means that the trunk lid of your vehicle was not closed completely. You should make sure that the trunk lid is closed completely.
2-125
Accessing the DIC Main Menu (Base Audio System) There are two different procedures for accessing the DIC main menu depending upon whether or not your vehicle has the optional Navigation system. To access the main menu of the DIC, do one of the following: D Using the base audio system, press the TUNE/SEL
knob once. Turn the knob clockwise or counterclockwise to scroll through the menu items. D Refer to the Navigation Supplement supplied with your vehicle for more information on the accessing DIC main menu and descriptions of the menu items for the Navigation system.
DIC Main Menu The DIC main menu for the base audio system consists of the following menu items:
BASS - MID - TREBLE
EQ
D DSP D AVC D H/A D AUTO STORE D PTY D TA D RDS MSG D AF D SEEK LOCAL/DISTANT D ENGLISH UNITS/METRIC UNITS D TCS D SET CLOCK D SETUP
2-126
DIC Main Menu Item Descriptions (Base Audio System) The following descriptions are for the base audio system. For information pertaining to the Navigation audio system, see “Audio System” in the Index of the Navigation Supplement supplied with your vehicle.
BASS - MID (Midrange) - TREBLE: This
menu item allows you to adjust the levels for the bass, midrange, treble, balance, and fader features of the audio system. For more information, see “Audio Systems” in the Index.
EQ (Equalizer): This menu item allows you to choose among five preset equalizations for the audio system. See “Equalizer” in the Index for more information. DSP (Digital Signal Processing): This menu item allows you to select the DSP type that you want on the audio system. You may choose Normal, Talk, Spacious, Rear Seat or Driver Seat. Press the TUNE/SEL knob to scroll through these choices. Once the desired choice is displayed, turn the knob to set your DSP choice and continue scrolling through the main menu. See “DSP” in the Index for more information.
AVC (Automatic Volume Compensation): This menu item allows you to turn the AVC feature on and off. Press the TUNE/SEL knob once to turn AVC on and off. When AVC is on, an X will be in the box next to AVC on the menu. The X disappears when AVC is off. See “AVC” in the Index for more information. H/A (Home/Away Preset Stations): This menu item allows you to switch back and forth between your home and away preset radio stations. Press the TUNE/SEL knob to switch between home and away. See “Home and Away Preset Stations” in the Index for more information. AUTOSTORE: This menu item allows you to automatically store radio stations with the strongest signals as presets. See “Audio Systems” in the Index for more information. PTY (Program-Type Mode): This menu item allows you to select radio stations based on preset program-types. To turn the PTY feature on, press the TUNE/SEL knob once. When PTY is on, an X will be in the box next to PTY on the menu. The X disappears when PTY is off. See “Audio Systems” in the Index for more information.
2-127
TA (Traffic Announcement): This menu item allows you to turn the TA feature on and off. To turn the TA feature on, press the TUNE/SEL knob once. When TA is on, an X will be in the box next to TA on the menu. The X disappears when TA is off. See “RDS Messages” in the Index for more information. RDS (Radio Data System) MSG (Message): This menu item allows you to view an RDS radio station message broadcast by a radio station. To view the message, press the TUNE/SEL knob once. The message will appear on the screen. See “RDS Messages” in the Index for more information. AF (Alternate Frequency): This menu item allows you to turn the AF feature on and off. To turn on AF, press the TUNE/SEL knob once. When AF is on, an X will be in the box next to TA on the menu. The X disappears when AF is off. See “Using RDS” in the Index for more information. SEEK LOCAL/DISTANT: This feature instructs the audio system to seek only local radio stations with the strongest signal or to seek all radio stations with a strong signal in a large area. Use LOCAL when you are in urban areas where there are several strong radio station signals and you want to limit the number of stations to
2-128
those with the strongest signals only. Use DISTANT when you are in rural areas where there are fewer radio station signals available. To switch between LOCAL and DISTANT, press the TUNE/SEL knob. Your choice will be set when you press BACK and return to the main menu. English/Metric Units
Use this menu item to adjust the measurement units.
You can choose between ENGLISH UNITS and METRIC UNITS. To switch between the two, press the TUNE/SEL knob. Once your choice is displayed, turn the knob to set your choice and continue scrolling through the main menu. The measurement units that you choose will be reflected on all the vehicle system displays, not just the DIC information. For example, the climate control panel will display degrees Celsius if you choose METRIC UNITS.
TCS (Traction Control System): You can enable or disable the traction control system using this menu item. Press the TUNE/SEL knob to switch between on and off. You can also turn the traction control system off using the traction control button located in the glove box or by programming one of the steering wheel controls (1, 2, 3 or 4) or audio system softkeys to enable/disable the TCS. See “Reconfigurable Steering Wheel Controls” and “Configurable Radio Display Keys” in the Index for more information. When you disable the traction control system, the Traction Suspended message will appear on the DIC and the traction control system warning light on the instrument panel cluster will come on. See “Driver Information (DIC) Messages” and “Traction Control System Warning Light” listed previously in this section for more information.
SET CLOCK
Use this menu item to set the time on the vehicle’s clock.
See “Setting the Clock” in the Index for more information. SETUP: When you select this menu item, the following submenu is available: D Personalization D Configure Display Keys D Configure SWC (Steering Wheel Control) Keys D Clear Tape Hours You can use the items on this submenu to customize your vehicle’s audio system and optional memory features. See “Vehicle Programming and Personalization Features,” “Reconfigurable Steering Wheel Controls” and “Care of Your Cassette Tape Player” in the Index for more information on these menu items.
2-129
Vehicle Programming and Personalization Features Your vehicle is equipped with personalization that allows you to program certain features to a preferred setting for up to two people. The number of programmable features varies depending upon which model of the vehicle is purchased. On all vehicles, features such as climate control settings, radio preset settings, exterior lighting at unlock, remote lock and unlock confirmation, and automatic door locks have already been programmed for your convenience. Some vehicles are equipped with additional features that can be programmed including the seat and outside rearview mirror position. The optional navigation system screen preferences will remain at the last set position. If your vehicle is equipped with the ability to program additional personalization features, the driver’s preferences are recalled by pressing the unlock button on the remote keyless entry transmitter, 1 or 2, or by pressing the appropriate memory button, 1 or 2, located on the driver’s door. Certain features can be programmed not to recall until the key is placed in the ignition. To change feature preferences you must use one of the following procedures.
2-130
Entering the Personalization Menu To enter the feature programming mode, use one of the following procedures: Base Audio System 1. Turn the ignition to ON, but do not start the engine. Make sure an automatic transmission is in PARK (P) or a manual transmission has the parking brake set. If your vehicle has memory settings, press the appropriate memory button, 1 or 2, located on the driver’s door armrest. The DIC display will show either Driver 1
or 2 depending on which button was selected.2.
3. Press the TUNE/SEL knob once to access the main
menu of the DIC.
4. Turn the TUNE/SEL knob until SETUP is highlighted. 5. Press the TUNE/SEL knob once to access the
SETUP menu.
6. Scroll to the feature you want to change, and press the TUNE/SEL knob to turn the feature on or off. If the feature is turned on, a check mark will appear next to the feature name. If none of the personalization items are turned on, turn on the personalization menu by pressing the TUNE/SEL knob. The list of features will then appear, and you can repeat Step 6.
Navigation System 1. Turn the ignition to ON without the engine running. Make sure an automatic transmission is in PARK (P) or a manual transmission has the parking brake set.
2. Turn on the Navigation/audio system by pressing the
PWR/VOL knob located to the lower left of the display once.
3. Access the DIC main menu by pressing the MAIN
button located to the lower left of the display.
4. Press the multi-function button next to Feat Prog to
access the Feature Programming menu.
5. Press the TUNE/SEL knob to turn on the
Personalization features. An X will appear in the box to the left when Personalization is turned on.
Personalization Features The following choices are available for programming using both the Base audio and Navigation systems unless otherwise indicated.
Personalization Name This feature allows you to type in a name that will appear on the DIC display whenever the corresponding remote keyless entry transmitter is used or one of the buttons on the driver’s door armrest (1 or 2) is pressed. If a customized name is not programmed, the system will show Driver 1 or Driver 2 to correspond with the numbers on the back of the remote keyless entry transmitters. To program a name, use one of the following procedures:
2-131
To customize the name using the Base audio system, do the following: 1. Select the PERSONALIZATION NAME menu item
by pressing the TUNE/SEL knob once. You will see a cursor on the screen.
2. Turn the TUNE/SEL knob until you reach the first letter you want to highlight it. There is a complete alphabet with both upper and lower case letters and the numbers zero through nine. Also included are spaces and other non-letter characters such as the ampersand (&).
3. Press the TUNE/SEL knob once to select the letter.
The letter will then appear on the display. If you make a mistake, press the Back key. This will exit the menu. You can then go back into the menu and edit the name. You can also press the TUNE/SEL knob repeatedly to cycle through all the characters until you reach the character you wish to change. 4. Repeat Steps 2 and 3 until the name you want is complete. You can program up to 16 characters.
5. Press the BACK button located to the lower right of
the display to exit and set your choice or let the screen time out and return to the main screen.
2-132
To customize the name using the Navigation system, do the following: 1. Press the multi-function button located to the right of
the display that is next to the EDIT prompt. This will open the EDIT menu. You will see an alphabet at the bottom of the display and a blank line with a blinking cursor. Also included here are spaces and other non-letter characters such as the ampersand (&). 2. Scroll to the first letter you want to highlight it. 3. Press the TUNE/SEL knob once to select the letter.
The letter will then appear on the line above the alphabet.
4. Repeat Steps 2 and 3 until the name you want is complete. You can program up to 26 characters. If you make a mistake, press the multi-function button located to the right of the display that is next to the Delete prompt. This will delete the last letter you typed so you can input a different letter.
5. Press the multi-function button located to the right of
the display that is next to the Back prompt to exit and set your choice.
The name you selected is now set. You can either exit the programming mode by following the instructions later in this section or program the next feature available on your vehicle.
Configure Display Keys (Base Audio System Only) This feature allows you to customize the functions of the four soft keys located to the left and right of the audio display. Most of the available functions are audio-system related. See “Audio Systems” in the Index for more information.
Remote Recall Memory/Recall Driving Positions (If Equipped) This feature recalls any previously programmed seat and mirror controls when the unlock button on the remote keyless entry transmitter is pressed. Programmable Modes Mode 1: ON Mode 2: OFF Before your vehicle was shipped from the factory, it was programmed to Mode 2. The mode to which the vehicle was programmed may have been changed since it left the factory. To determine the mode to which the vehicle is programmed or to program the vehicle to a different mode, use one of the following procedures: To change the mode using the Base audio system, do the following: 1. Enter the personalization portion of the SETUP
menu following the instructions listed previously.
2. Scroll to REMOTE RECALL MEMORY to
highlight it.
3. Press the TUNE/SEL knob to switch back and forth
between on and off. When the mode is turned on, a check mark will appear next to the feature name.
To change the mode using the Navigation system, do the following: 1. Enter the Personalization menu following the
instructions listed previously.
2. Scroll to Remote Keyless Options to highlight it. 3. Press the TUNE/SEL knob to view the modes. 4. Scroll to Recall Driving Positions and press the knob
once to select it. When the mode is turned on, an X will appear in the box to the left.
If Remote Exit Recall or Key In Recall Memory were turned on previously, selecting Remote Recall Memory/Recall Driving Positions will override that choice. The mode you selected is now set. You can either exit the programming mode by following the instructions later in this section or program the next feature available on your vehicle.
2-133
Remote Exit Recall (If Equipped) This feature allows any previously programmed exit position for the driver’s seat to be recalled when the unlock button on the remote keyless entry transmitter is pressed. Programmable Modes Mode 1: ON Mode 2: OFF Before your vehicle was shipped from the factory, it was programmed to Mode 2. The mode to which the vehicle was programmed may have been changed since it left the factory. To determine the mode to which the vehicle is programmed or to program the vehicle to a different mode, use one of the following procedures: To change the mode using the Base audio system, do the following: 1. Enter the personalization portion of the SETUP
menu following the instructions listed previously.
2. Scroll to REMOTE EXIT RECALL to highlight it.
3. Press the TUNE/SEL knob to switch back and forth
between on and off. When the mode is turned on, a check mark will appear next to the feature name.
To change the mode using the Navigation system, do the following: 1. Enter the Personalization menu following the
instructions listed previously.
2. Scroll to Remote Keyless Options to highlight it. 3. Press the TUNE/SEL knob to view the modes. 4. Scroll to Remote Exit Recall and press the knob once
to select it. When the mode is turned on, an X will appear in the box to the left.
If Remote Recall Memory/Recall Driving Positions was turned on previously, selecting Remote Exit Recall will override that choice. The mode you selected is now set. You can either exit the programming mode by following the instructions later in this section or program the next feature available on your vehicle.
2-134
Key in Recall Memory (If Equipped) This feature recalls any previously programmed seat and mirror positions when the key is inserted into the ignition. Programmable Modes Mode 1: ON Mode 2: OFF Before your vehicle was shipped from the factory, it was programmed to Mode 2. The mode to which the vehicle was programmed may have been changed since it left the factory. To determine the mode to which the vehicle is programmed or to program the vehicle to a different mode, use one of the following procedures: To change the mode using the Base audio system, do the following: 1. Enter the personalization portion of the SETUP
menu following the instructions listed previously.
2. Scroll to KEY IN RECALL MEMORY to
highlight it.
3. Press the TUNE/SEL knob to switch back and forth
between on and off. When the mode is turned on, a check mark will appear next to the feature name.
To change the mode using the Navigation system, do the following: 1. Enter the Personalization menu following the
instructions listed previously.
2. Scroll to Remote Keyless Options to highlight it. 3. Press the TUNE/SEL knob to view the modes. 4. Scroll to Key In Recall Memory and press the knob
once to select it. When the mode is turned on, an X will appear in the box to the left.
If Remote Recall Memory/Recall Driving Positions was turned on previously, selecting Key In Recall Memory will override that choice. The mode you selected is now set. You can either exit the programming mode by following the instructions later in this section or program the next feature available on your vehicle.
2-135
Auto Exit Seat (If Equipped) This feature allows any previously programmed exit position for the driver’s seat to be recalled when the key is removed from the ignition. Programmable Modes Mode 1: ON Mode 2: OFF Before your vehicle was shipped from the factory, it was programmed to Mode 2. The mode to which the vehicle was programmed may have been changed since it left the factory. To determine the mode to which the vehicle is programmed or to program the vehicle to a different mode, use one of the following procedures: To change the mode using the Base audio system, do the following: 1. Enter the personalization portion of the SETUP
menu following the instructions listed previously.
2. Scroll to AUTO EXIT SEAT using the TUNE/SEL
knob to highlight it.
3. Press the TUNE/SEL knob to switch back and forth
between on and off. When the mode is turned on, an check mark will appear in the box next to the feature name.
To change the mode using the Navigation system, do the following: 1. Enter the Personalization menu following the
instructions listed previously.
2. Scroll to Auto Exit Seat using the TUNE/SEL knob
to highlight it.
3. Press the TUNE/SEL knob to switch back and forth
between on and off. When the mode is turned on, an X will appear in the box to the left.
The mode you selected is now set. You can either exit the programming mode by following the instructions later in this section or program the next feature available on your vehicle.
2-136
Twilight Delay This feature allows you to set the amount of time you want the exterior lamps to remain on after you exit the vehicle. Programmable Modes Mode 1: 0:00 seconds Mode 2: 0:15 seconds Mode 3: 0:30 seconds Mode 4: 1:00 minute Mode 5: 1:30 minutes Mode 6: 2:00 minutes Mode 7: 2:30 minutes Mode 8: 3:00 minutes Before your vehicle was shipped from the factory, it was programmed with this feature turned off. This may have been changed since the vehicle left the factory. To determine the mode to which the vehicle is programmed or to program the vehicle to a different mode, use one of the following procedures:
To change the mode using the Base audio system, do the following: 1. Enter the personalization portion of the SETUP
menu following the instructions listed previously.
2. Scroll to TWILIGHT DELAY using the TUNE/SEL
knob to highlight it.
3. Press the TUNE/SEL knob to turn Twilight Delay on or off. If the feature is turned off, the exterior lamps will not illuminate at all when you exit the vehicle. Once the feature is turned on, the modes listed above will appear on the display, and the currently selected time delay will have a check mark next to it.
4. Turn the TUNE/SEL knob until you reach the
desired time delay.
5. Press the TUNE/SEL knob once to select
your choice. When a time is selected, a check mark will appear next to the time delay you chose. Only one mode can be selected at a time.
2-137
To change the mode using the Navigation system, do the following: 1. Enter the Personalization menu following the
instructions listed previously.
2. Scroll to Twilight Delay using the TUNE/SEL knob
to highlight it.
3. Press the TUNE/SEL knob to turn Twilight Delay on or off. If the feature is turned off, the exterior lamps will not illuminate at all when you exit the vehicle. Once the feature is turned on, the modes listed above will appear on the display, and the currently selected time delay will have an X in the box to the left. 4. Turn the TUNE/SEL knob until you reach the
desired time delay.
5. Press the TUNE/SEL knob once to select
your choice. When a time is selected, an X will appear next to the time delay you chose. Only one mode can be selected at a time.
The mode you selected is now set. You can either exit the programming mode by following the instructions later in this section or program the next feature available on your vehicle.
2-138
Lights Flash at Unlock This feature turns on the exterior lamps when the remote keyless entry transmitter is used to unlock the vehicle. The lamps will remain on for approximately 20 seconds unless a door is opened, the ignition is turned to ACCESSORY, ON or START or the remote keyless entry transmitter is used to lock the vehicle. Programmable Modes Mode 1: ON Mode 2: OFF Before your vehicle was shipped from the factory, it was programmed to Mode 1. The mode to which the vehicle was programmed may have been changed since it left the factory. To determine the mode to which the vehicle is programmed or to program the vehicle to a different mode, use one of the following procedures: To change the mode using the Base audio system, do the following: 1. Enter the personalization portion of the SETUP
menu following the instructions listed previously.
2. Scroll to LIGHTS FLASH AT UNLOCK to
highlight it.
3. Press the TUNE/SEL knob to switch back and forth
between on and off. When the mode is turned on, a check mark will appear next to the feature name.
To change the mode using the Navigation system, do the following: 1. Enter the Personalization menu following the
instructions listed previously.
2. Scroll to Remote Keyless Options to highlight it. 3. Press the TUNE/SEL knob to view the modes. 4. Scroll to Lights Flash At Unlock and press the knob
once to select it. When the mode is turned on, an X will appear in the box to the left.
The mode you selected is now set. You can either exit the programming mode by following the instructions later in this section or program the next feature available on your vehicle.
Lights Flash at Lock This feature allows the exterior lamps to flash once when the remote keyless entry transmitter is used to lock the vehicle. All doors must be closed for this feature to work, and the lamps will not flash if the parking lamps or headlamps are on. Programmable Modes Mode 1: ON Mode 2: OFF Before your vehicle was shipped from the factory, it was programmed to Mode 1. The mode to which the vehicle was programmed may have been changed since it left the factory. To determine the mode to which the vehicle is programmed or to program the vehicle to a different mode, use one of the following procedures: To change the mode using the Base audio system, do the following: 1. Enter the personalization portion of the SETUP
menu following the instructions listed previously.
2. Scroll to LIGHTS FLASH AT LOCK to highlight it.
2-139
3. Press the TUNE/SEL knob to switch back and forth
between on and off. When the mode is turned on, a check mark will appear next to the feature name.
To change the mode using the Navigation system, do the following: 1. Enter the Personalization menu following the
instructions listed previously.
2. Scroll to Remote Keyless Options to highlight it. 3. Press the TUNE/SEL knob to view the modes. 4. Scroll to Lights Flash At Lock and press the knob
once to select it. When the mode is turned on, an X will appear in the box to the left.
If Horn Sounds At Lock was previously turned on, selecting Lights Flash At Lock will override the previous choice. The mode you selected is now set. You can either exit the programming mode by following the instructions later in this section or program the next feature available on your vehicle.
Horn Sounds at Lock This feature sounds the horn once when the remote keyless entry transmitter is used to lock the vehicle. All doors must be closed for this feature to work. Programmable Modes Mode 1: ON Mode 2: OFF Before your vehicle was shipped from the factory, it was programmed to Mode 2. The mode to which the vehicle was programmed may have been changed since it left the factory. To determine the mode to which the vehicle is programmed or to program the vehicle to a different mode, use one of the following procedures: To change the mode using the Base audio system, do the following: 1. Enter the personalization portion of the SETUP
menu following the instructions listed previously.
2. Scroll to HORN SOUNDS AT LOCK to highlight it. 3. Press the TUNE/SEL knob to switch back and forth
between on and off. When the mode is turned on, a check mark will appear next to the feature name.
2-140
To change the mode using the Navigation system, do the following: 1. Enter the Personalization menu following the
instructions listed previously.
2. Scroll to Remote Keyless Options to highlight it. 3. Press the TUNE/SEL knob to view the modes. 4. Scroll to Horn Sounds At Lock and press the knob
once to select it. When the mode is turned on, an X will appear in the box to the left.
If Lights Flash At Lock was previously turned on, selecting Horn Sounds At Lock will override the previous choice. The mode you selected is now set. You can either exit the programming mode by following the instructions later in this section or program the next feature available on your vehicle.
Exterior Lights at Unlock This feature turns on the exterior lamps when the remote keyless entry transmitter is used to unlock the vehicle. The lamps will remain on for about 20 seconds unless a door is opened, the ignition is turned to ACCESSORY, ON or START or the remote keyless entry transmitter is used to lock the vehicle. Programmable Modes Mode 1: ON Mode 2: OFF Before your vehicle was shipped from the factory, it was programmed to Mode 1. The mode to which the vehicle was programmed may have been changed since it left the factory. To determine the mode to which the vehicle is programmed or to program the vehicle to a different mode, use one of the following procedures:
2-141
To change the mode using the Base audio system, do the following: 1. Enter the personalization portion of the SETUP
menu following the instructions listed previously.
2. Scroll to EXT. LIGHT AT UNLOCK to highlight it. 3. Press the TUNE/SEL knob to switch back and forth
between on and off. When the mode is turned on, a check mark will appear next to the feature name.
To change the mode using the Navigation system, do the following: 1. Enter the Personalization menu following the
instructions listed previously.
2. Scroll to Remote Keyless Options to highlight it. 3. Press the TUNE/SEL knob to view the modes. 4. Scroll to Exterior Lights At Unlock and press the
knob once to select it. When the mode is turned on, an X will appear in the box to the left.
The mode you selected is now set. You can either exit the programming mode by following the instructions later in this section or program the next feature available on your vehicle.
2-142
Doors Lock in Gear (Automatic Transmission Only) With the ignition in ON and all the doors closed, this feature allows the vehicle’s doors to automatically lock when the driver shifts the transmission out of PARK (P). Programmable Modes Mode 1: ON Mode 2: OFF Before your vehicle was shipped from the factory, it was programmed to Mode 1. The mode to which the vehicle was programmed may have been changed since it left the factory. To determine the mode to which the vehicle is programmed or to program the vehicle to a different mode, use one of the following procedures: To change the mode using the Base audio system, do the following: 1. Enter the personalization portion of the SETUP
menu following the instructions listed previously. 2. Scroll to DOORS LOCK IN GEAR to highlight it. 3. Press the TUNE/SEL knob to switch back and forth
between on and off. When the mode is turned on, a check mark will appear next to the feature name.
To change the mode using the Navigation system, do the following: 1. Enter the Personalization menu following the
instructions listed previously.
2. Scroll to Door Lock Options to highlight it. 3. Press the TUNE/SEL knob to view the modes. 4. Scroll to Doors Lock In Gear and press the knob
once to select it. When the mode is turned on, an X will appear in the box to the left.
The mode you selected is now set. You can either exit the programming mode by following the instructions later in this section or program the next feature available on your vehicle.
Automatic Door Lock (Manual Transmission Only) This feature allows the vehicle’s doors to automatically lock when the vehicle speed surpasses 5 mph (8 km/h).
Programmable Modes Mode 1: ON Mode 2: OFF Before your vehicle was shipped from the factory, it was programmed to Mode 1. The mode to which the vehicle was programmed may have been changed since it left the factory. To determine the mode to which the vehicle is programmed or to program the vehicle to a different mode, use one of the following procedures: To change the mode using the Base audio system, do the following: 1. Enter the personalization portion of the SETUP
menu following the instructions listed previously.
2. Scroll to AUTOMATIC DOOR LOCK to
highlight it.
3. Press the TUNE/SEL knob to switch back and forth
between on and off. When the mode is turned on, a check mark will appear next to the feature name.
2-143
To change the mode using the Navigation system, do the following: 1. Enter the Personalization menu following the
instructions listed previously.
2. Scroll to Door Lock Options to highlight it. 3. Press the TUNE/SEL knob to view the modes. 4. Scroll to Automatic Door Lock and press the knob
once to select it. When the mode is turned on, an X will appear in the box to the left.
The mode you selected is now set. You can either exit the programming mode by following the instructions later in this section or program the next feature available on your vehicle.
Driver Unlock in Park (Automatic Transmission Only) The feature allows the driver’s door to automatically unlock when the transmission is shifted into PARK (P).
Programmable Modes Mode 1: ON Mode 2: OFF Before your vehicle was shipped from the factory, it was programmed to Mode 2. The mode to which the vehicle was programmed may have been changed since it left the factory. To determine the mode to which the vehicle is programmed or to program the vehicle to a different mode, use one of the following procedures: To change the mode using the Base audio system, do the following: 1. Enter the personalization portion of the SETUP
menu following the instructions listed previously.
2. Scroll to DRIVER UNLOCK IN PARK to
highlight it.
3. Press the TUNE/SEL knob to switch back and forth
between on and off. When the mode is turned on, a check mark will appear next to the feature name.
2-144
To change the mode using the Navigation system, do the following: 1. Enter the Personalization menu following the
instructions listed previously.
2. Scroll to Door Lock Options to highlight it. 3. Press the TUNE/SEL knob to view the modes. 4. Scroll to Driver Unlock In Park and press the knob
once to select it. When the mode is turned on, an X will appear in the box to the left.
If Driver Unlock Key Out, Doors Unlock Key Out or Doors Unlock in Park were previously turned on, selecting Driver Unlock In Park will override the previous choice. The mode you selected is now set. You can either exit the programming mode by following the instructions later in this section or program the next feature available on your vehicle.
Driver Unlock Key Out The feature allows the driver’s door to automatically unlock when the key is removed from the ignition. Programmable Modes Mode 1: ON Mode 2: OFF Before your vehicle was shipped from the factory, it was programmed with these modes off. The mode to which the vehicle was programmed may have been changed since it left the factory. To determine the mode to which the vehicle is programmed or to program the vehicle to a different mode, use one of the following procedures: To change the mode using the Base audio system, do the following: 1. Enter the personalization portion of the SETUP
menu following the instructions listed previously.
2. Scroll to DRIVER UNLOCK KEY OUT. 3. Press the TUNE/SEL knob to switch between on
and off. When the mode is turned on, a check mark will appear next to the feature name.
2-145
To change the mode using the Navigation system, do the following: 1. Enter the Personalization menu following the
instructions listed previously.
2. Scroll to Door Lock Options to highlight it. 3. Press the TUNE/SEL knob to view the modes. 4. Scroll to Driver Unlock Key Out and press the knob
once to select it. When the mode is turned on, an X will appear in the box to the left.
If Doors Unlock Key Out or Doors Unlock in Park (automatic transmission only) were previously turned on, selecting Driver Unlock Key Out will override the previous choice. The mode you selected is now set. You can either exit the programming mode by following the instructions later in this section or program the next feature available on your vehicle.
2-146
Doors Unlock in Park (Automatic Transmission Only) The feature allows the doors to automatically unlock when the transmission is shifted into PARK (P). Programmable Modes Mode 1: ON Mode 2: OFF Before your vehicle was shipped from the factory, it was programmed to Mode 2. The mode to which the vehicle was programmed may have been changed since it left the factory. To determine the mode to which the vehicle is programmed or to program the vehicle to a different mode, use one of the following procedures: To change the mode using the Base audio system, do the following: 1. Enter the personalization portion of the SETUP
menu following the instructions listed previously.
2. Scroll to DOORS UNLOCK IN PARK to
highlight it.
3. Press the TUNE/SEL knob to switch back and forth
between on and off. When the mode is turned on, a check mark will appear next to the feature name.
To change the mode using the Navigation system, do the following: 1. Enter the Personalization menu following the
instructions listed previously.
2. Scroll to Door Lock Options to highlight it. 3. Press the TUNE/SEL knob to view the modes. 4. Scroll to Doors Lock In Park and press the knob
once to select it. When a mode is turned on, an X will appear in the box to the left.
If Doors Unlock Key Out, Driver Unlock Key Out or Driver Unlock in Park were previously turned on, selecting Doors Unlock In Park will override the previous choice. The mode you selected is now set. You can either exit the programming mode by following the instructions later in this section or program the next feature available on your vehicle.
Doors Unlock Key Out This feature allows the vehicle’s doors to automatically unlock when the key is removed from the ignition.
This feature is not available if Driver Unlock Key Out or Doors Unlock in Park (automatic transmission only) is turned on. Programmable Modes Mode 1: ON Mode 2: OFF Before your vehicle was shipped from the factory, it was programmed to Mode 2. The mode to which the vehicle was programmed may have been changed since it left the factory. To determine the mode to which the vehicle is programmed or to program the vehicle to a different mode, use one of the following procedures: To change the mode using the Base audio system, do the following: 1. Enter the personalization portion of the SETUP
menu following the instructions listed previously.
2. Scroll to DOORS UNLOCK KEY OUT. 3. Press the TUNE/SEL knob to switch between on
and off. When the mode is turned on, a check mark will appear next to the feature name.
2-147
To change the mode using the Navigation system, do the following: 1. Enter the Personalization menu following the
instructions listed previously.
2. Scroll to Door Lock Options to highlight it. 3. Press the TUNE/SEL knob to view the modes. 4. Scroll to Doors Unlock Key Out and press the knob
once to select it. When a mode is turned on, an X will appear in the box to the left.
If Driver Unlock Key Out or Doors Unlock in Park (automatic transmission only) were previously turned on, selecting Doors Unlock Key Out will override the previous choice. The mode you selected is now set. You can either exit the programming mode by following the instructions later in this section or program the next feature available on your vehicle.
2-148
Delayed Locking This feature delays the locking of the vehicle’s doors for up to five seconds after a power door lock switch or the lock button on the remote keyless entry transmitter is pressed. The five second delay occurs after the last door is closed. Programmable Modes Mode 1: ON Mode 2: OFF Before your vehicle was shipped from the factory, it was programmed to Mode 1. The mode to which the vehicle was programmed may have been changed since it left the factory. To determine the mode to which the vehicle is programmed or to program the vehicle to a different mode, use one of the following procedures: To change the mode using the Base audio system, do the following: 1. Enter the personalization portion of the SETUP
menu following the instructions listed previously.
2. Scroll to DELAYED LOCKING using the
TUNE/SEL knob to highlight it.
3. Press the TUNE/SEL knob to switch back and forth
between on and off. When the mode is turned on, a check mark will appear next to the feature name.
To change the mode using the Navigation system, do the following: 1. Enter the Personalization menu following the
instructions listed previously.
2. Scroll to Delayed Locking using the TUNE/SEL
knob to highlight it.
3. Press the TUNE/SEL knob to switch back and forth
between on and off. When the mode is turned on, an X will appear in the box to the left.
The mode you selected is now set. You can either exit the programming mode by following the instructions later in this section or program the next feature available on your vehicle.
Lock Passenger Window This feature allows you to disable either all the passenger window switches or the rear passenger window switches only. If this feature is turned on, all passenger window switches will be disabled when the window lockout button is pressed. If the feature is off, only the rear passenger window switches will be disabled. See “Power Windows” in the Index for more information.
Programmable Modes Mode 1: ON Mode 2: OFF Before your vehicle was shipped from the factory, it was programmed to Mode 2. The mode to which the vehicle was programmed may have been changed since it left the factory. To determine the mode to which the vehicle is programmed or to program the vehicle to a different mode, use one of the following procedures: To change the mode using the Base audio system, do the following: 1. Enter the personalization portion of the SETUP
menu following the instructions listed previously.
2. Scroll to LOCK PASS WINDOW using the
TUNE/SEL knob to highlight it.
3. Press the TUNE/SEL knob to switch back and forth
between on and off. When the mode is turned on, a check mark will appear next to the feature name.
2-149
To change the mode using the Navigation system, do the following: 1. Enter the Personalization menu following the
instructions listed previously.
2. Scroll to Lock Passenger Window using the
TUNE/SEL knob to highlight it.
3. Press the TUNE/SEL knob to switch back and forth
between on and off. When the mode is turned on, an X will appear in the box to the left.
The mode you selected is now set. You can either exit the programming mode by following the instructions later in this section or program the next feature available on your vehicle.
Mirror to Curb in Reverse (If Equipped) This feature will move the passenger’s outside rearview mirror to a curb view position when the shift lever is shifted into REVERSE (R), and it will return the mirror to the last known driving position when the shift lever is moved out of REVERSE (R). See “Curb View Assist Mirror” in the Index for more information.
2-150
Programmable Modes Mode 1: ON Mode 2: OFF Before your vehicle was shipped from the factory, it was programmed to Mode 2. The mode to which the vehicle was programmed may have been changed since it left the factory. To determine the mode to which the vehicle is programmed or to program the vehicle to a different mode, use one of the following procedures: To change the mode using the Base audio system, do the following: 1. Enter the personalization portion of the SETUP
menu following the instructions listed previously. 2. Scroll to MIRROR TO CURB IN REV using the
TUNE/SEL knob to highlight it.
3. Press the TUNE/SEL knob to switch back and forth
between on and off. When the mode is turned on, a check mark will appear next to the feature name.
To change the mode using the Navigation system, do the following: 1. Enter the Personalization menu following the
instructions listed previously.
2. Scroll to Mirror to Curb in Reverse using the
TUNE/SEL knob to highlight it.
3. Press the TUNE/SEL knob to switch back and forth
between on and off. When the mode is turned on, an X will appear in the box to the left.
The mode you selected is now set. You can either exit the programming mode by following the instructions later in this section or program the next feature available on your vehicle.
Enhanced Chime Volume This feature allows you to adjust the volume level of the vehicle’s warning chimes. The chime volume cannot be turned off, only adjusted.
Programmable Modes Mode 1: ON Mode 2: OFF Before your vehicle was shipped from the factory, it was programmed to Mode 1. The mode to which the vehicle was programmed may have been changed since it left the factory. To determine the mode to which the vehicle is programmed or to program the vehicle to a different mode, use one of the following procedures: To change the mode using the Base audio system, do the following: 1. Enter the personalization portion of the SETUP
menu following the instructions listed previously.
2. Scroll to ENHANCED CHIME VOLUME using the
TUNE/SEL knob to highlight it.
3. Press the TUNE/SEL knob to switch back and forth
between the normal and loud settings. You will hear a chime as an example of the volume level chosen.
2-151
To change the mode using the Navigation system, do the following: 1. Enter the Personalization menu following the
instructions listed previously.
2. Scroll to Enhanced Chime Volume using the
TUNE/SEL knob to highlight it.
3. Press the TUNE/SEL knob to switch back and forth
between the normal and loud settings. You will hear a chime as an example of the volume level chosen.
The mode you selected is now set. You can either exit the programming mode by following the instructions later in this section or program the next feature available on your vehicle.
Exiting the Personalization Menu To exit the personalization portion of the SETUP menu using the Base audio system, press the BACK key once you’ve finished making your selections. You will return to the main audio screen. To exit Feature Programming using the Navigation system, press the multi-function button next to the Back prompt once you’ve finished making your selections. You will return to the Main Menu.
2-152
Navigation (Option)
Navigation Display Controls
The display screen is located in the center on the instrument panel. Your vehicle may have a turn by turn navigation guidance system that includes a CD ROM map media covering nine regional areas throughout the contiguous United States and Canada. In addition, the system includes intersection and freeway entrances, route planning, a programmable address book, points of interest, a list of restaurants, emergency phone numbers, and a list of hotels and motels for all of the major cities on the regional CDs. The navigation system can also communicate with the Radio Data System (RDS) to receive broadcast announcements on traffic, weather information and emergency alert communications. For more information on how to use this system, see the CTS Entertainment and Navigation System Supplement.
2-153
Section 3 Comfort Controls and Audio Systems
In this section, you’ll find out how to operate the comfort control and audio systems offered with your vehicle. Be sure to read about the particular systems supplied with your vehicle.
3-2
3-2
3-6
3-6
3-6
3-7
3-9
3-9
3-10
3-10Comfort Controls Climate Control System Air Conditioning Defogging and Defrosting Rear Window Defogger Ventilation System Climate Control Steering Wheel Controls Audio Systems Setting the Clock AM-FM Radio with Cassette Tape and Compact Disc Player with Radio Data Systems (RDS) and Digital Signal Processing (DSP)
3-27
3-27
3-28
3-29
3-30
3-31
3-32
3-32
3-33Navigation/Radio System (Option) Theft-Deterrent Feature Audio Steering Wheel Controls Understanding Radio Reception Tips About Your Audio System Care of Your Cassette Tape Player Care of Your Compact Discs Care of Your Compact Disc Player Diversity Antenna System
3-
3-1
Comfort Controls This section tells you how to make your air system work for you. Manual operation of the system is described first, followed by automatic operation. See “Automatic Operation” later in this section for more information. Climate Control System
∧ (Mode): This switch selects the direction of
Manual Operation To turn the system on, press the PWR button located on the driver’s side of the climate control panel. ∨ the airflow through the vehicle. Press the up or down arrow to scroll through the available modes. The symbol for the current mode will be displayed on the climate control panel. Regardless of the mode selected, there will be some air flowing to the outboard outlets unless you close the outlet. See “Ventilation System” later in this section for more information. The following modes can be selected:
(Vent): This setting directs the airflow through
the instrument panel outlets.
(Bi-Level): This setting directs airflow into your vehicle in two ways. Cooler air is directed to the upper portion of your body through the instrument panel outlets while warmer air is directed to the floor ducts.
3-2
D
(Floor/Defrost): This setting directs airflow to the floor ducts and toward the windshield, with some air diverted toward the outboard outlets to defog the side windows.
(Floor): This setting directs airflow
through the floor ducts. Some air is diverted to the windshield and outboard outlets to minimize fogging.
∧ (Fan): This switch adjusts the fan speed. ∨ Press the up or down arrow to increase or decrease the fan speed.
(Recirculation): Press this button to limit the
amount of outside air entering your vehicle. This is helpful when you are trying to cool the air quickly or limit odors entering your vehicle. Press this button again to turn off the recirculation feature. If you notice the windows fogging, turn off the recirculation feature. Recirculation is not available in the defrost mode and will automatically turn off after 10 minutes if floor/defrost mode is selected.
(Defrost): Press this button to quickly remove fog or frost from the windshield. This setting sends most of the airflow to the windshield with a small amount diverted to the outboard outlets to minimize fogging. The air conditioning compressor may operate in this mode. A/C OFF (Air Conditioning Off): Press this button to turn off the air conditioning compressor. AC OFF will appear on the display. Press the button again to turn the compressor back on. When the compressor is on, the system will cool and dehumidify the air inside the vehicle. The compressor cannot be turned off in defrost mode.
(Driver’s Temperature Switch): This switch is used to adjust the air temperature for the driver’s side of the vehicle. To adjust the temperature, press the up or down arrow located on the PWR button. The temperature will increase or decrease with each press of an arrow. The driver’s set temperature is always displayed when the climate control system is on regardless of whether or not the system is in AUTO. See “Automatic Operation” later in this section for more information on the AUTO button.
3-3
(Passenger’s Temperature Switch): This switch is used to increase or decrease the temperature of the air for the passengers independent of the driver’s setting. To turn the system on, press the PWR button located on the passenger’s side of the climate control panel. To adjust the temperature, press the up or down arrow on the PWR button. The temperature will increase or decrease with each press of an arrow. If the passenger’s temperature switch is off, the driver’s temperature switch controls the temperature for the entire vehicle. The passenger’s side temperature is only displayed when the passenger’s side temperature switch is on.
Automatic Operation AUTO (Automatic Climate Control): This button is used to select the automatic operation of the climate control system. When the automatic operation is active, AUTO will appear next to the fan and mode settings on the display.
There are three sensors in the climate control system. One monitors the sun’s solar radiation, another monitors temperature of the air inside the vehicle, and a third monitors the temperature outside the vehicle. The climate control system will vary the fan speed, air delivery mode and use of the air conditioning compressor to maintain the set temperature based on the information received from these sensors. See “Driver’s Temperature Switch” and “Passenger’s Temperature Switch” listed previously for more information on setting a temperature. To find your comfort zone, start with the 75_F (24_C) setting and allow approximately 10 to 30 minutes for the system to regulate. Adjust the temperature if necessary. If you choose either the lowest temperature setting, 60_F (16_C), or the highest temperature setting, 90_F (32_C), the system will not cool or heat any faster, but the system will stay at that setting without regulating fan speed. To avoid blowing cold air in cold weather, the system will start at lower fan speeds until warm air is available. The length of reduction depends on the outside air temperature, engine coolant temperature or the time since the engine was last started. As the engine coolant warms up, the fan speed will gradually increase.
3-4
Interior Temperature Sensor
Electronic Solar Sensor
This sensor monitors the interior temperature of the vehicle. It is located to the right of the steering wheel on the instrument panel.
While the climate control system is in AUTO, the system uses both the interior temperature sensor and the electronic solar sensor to automatically adjust the temperature and airflow in the vehicle. See “Electronic Solar Sensor” following for more information. Be sure not to cover the sensor with anything. If you do, the automatic climate control system will not work properly.
This sensor monitors the sun’s solar radiation. It is located on top of the instrument panel near the windshield. While the climate control system is in AUTO, the system uses the information collected by the electronic solar sensor to automatically adjust the temperature and airflow to maintain your comfort. The climate control system may supply cooler air to one side of your vehicle, if that side is facing the sun. Be sure not to cover the sensor on top of the instrument panel. If you do, the automatic climate control system will not work properly.
3-5
Air Conditioning On hot days, open the windows long enough to let hot inside air escape. This reduces the time it takes for your vehicle to cool down. Then keep your windows closed for the air conditioner to work its best. While the system is in AUTO, it will use recirculation as necessary to cool the air. Defogging and Defrosting When the mode switch is set for floor/defrost or the defrost button is pressed, outside air will be selected automatically. This helps clear the windshield more quickly. Adjust the temperature and set the fan speed to the highest setting. When the windshield is clear, adjust the fan speed for maximum defrosting to a lower setting or return to AUTO mode. Recirculation is not available in the defrost mode, and the air conditioning compressor cannot be turned off in this mode. For maximum side window defogging, turn the outboard outlet thumbwheels to the side window defogger setting. See “Ventilation System” later in this section for more information on the outlet settings.
3-6
Rear Window Defogger When the rear window defogger is turned on, the rear window and both outside rearview mirrors are heated to remove fog from the surface of the glass.
The rear window defogger button is located on the climate control panel to the right of the defrost button.
Press the button to turn on the rear defogger. Press the button again to turn the system off. The system will automatically shut off after 10 minutes unless your vehicle is traveling more than 30 mph (48 km/h). If further defogging is desired once the system is off, press the button again. The system will automatically shut off after five minutes for any cycles after the initial activation.
Using the rear window defogger will not cancel automatic climate control operation.
Ventilation System
NOTICE:
Don’t use a razor blade or something else sharp on the inside of the rear window. If you do, you could cut or damage the warming grid or the integrated rear window antenna, and the repairs wouldn’t be covered by your warranty.
Do not attach a temporary vehicle license, tape or decals across the defogger grid on the rear window.
There are five instrument panel outlets, three in the center and one at each end. The outlets located at each end of the instrument panel have a feature that the center air outlets do not. These outlets will have air flowing to them in all modes, including defrost, when the climate control system is on.
3-7
(Closed): Turn the thumbwheel to this symbol to
close the outlets and minimize the amount of air entering the vehicle.
Ventilation Tips D Keep the hood at the base of the windshield and
front air inlet free of ice, snow or any other obstruction (such as leaves). The heater and defroster will work far better, reducing the chance of fogging the inside of your windows.
D When you enter a vehicle in cold weather, select the highest fan setting for a few moments before driving off. This helps clear the intake ducts of snow and moisture, and reduces the chance of fogging the inside of your windows.
D Keep the air path under the front seats clear of objects. This helps air to circulate throughout your vehicle.
You can adjust the direction of airflow by moving the knobs in the center of the outlets and by turning the thumbwheel at the bottom of the outlets. You may choose from the following positions:
(Side Window Defogger): Turn the thumbwheel to this symbol on the outboard outlets to use the side window defogger feature. The air coming through the outlets will be directed toward the side windows to prevent fogging.
(Open): Turn the thumbwheel to this symbol to open the outlets completely and allow the maximum amount of air to enter the vehicle. A small amount of air will still be directed to the side window defogger setting.
3-8
Climate Control Steering Wheel Controls There are four controls that can be programmed for use with the climate control system.
The controls are located on the left spoke of the steering wheel.
Audio Systems Your audio system has been designed to operate easily and to give years of listening pleasure. You will get the most enjoyment out of it if you acquaint yourself with it first. Find out what your audio system can do and how to operate all of its controls to be sure you’re getting the most out of the advanced engineering that went into it. Your vehicle has a feature called Retained Accessory Power (RAP). With RAP, you can play your audio system even after the ignition is turned off. See “Retained Accessory Power” in the Index.
See “Reconfigurable Steering Wheel Controls” in the Index for more information on programming these controls.
3-9
AM-FM Radio with Cassette Tape and Compact Disc Player with Radio Data Systems (RDS) and Digital Signal Processing (DSP)
Setting the Clock 1. Press the TUNE/SEL knob to enter the main menu. 2. Turn the TUNE/SEL knob until SET CLOCK
is displayed.
3. Press the TUNE/SEL knob to select SET CLOCK. 4. Turn the TUNE/SEL knob to adjust the time setting. 5. Press the TUNE/SEL knob to update the time.
VEHICLE TIME UPDATED will appear on the display. The time on the analog clock, located in the instrument panel cluster, will adjust.
The time of an FM station broadcasting Radio Data System (RDS) information will update the analog clock automatically.
Six-Disc CD Player Audio System Shown - Single CD Player Similar
3-10
Playing the Radio PWR (Power): Press this knob to turn the system on and off. VOL (Volume): Turn this knob to increase or to decrease the volume. AVC (Automatic Volume Compensation): With AVC, your audio system monitors the noise in the vehicle. AVC will adjust the volume level so that it always sounds the same to you. To turn AVC on and off, perform the following steps: 1. Press the TUNE/SEL knob to enter the main menu. 2. Turn the TUNE/SEL knob until AUTO VOLUME
COMP. appears on the display.
3. Press the TUNE/SEL knob to turn AVC on
or off. An X will appear in the box when AVC is selected on.
4. Press the BACK button to exit the display. To return
to the original display repeatedly press the BACK button or wait for the display to time out.
SOURCE: Press this button to select a source, either radio, cassette tape or compact disc. The cassette tape or compact disc must be loaded to select the source and to play. Available loaded sources are shown on the display as a disc or a cassette tape symbol. If none of the audio sources are loaded the display will not change from the radio source.
Finding a Station BAND: Press this button to select AM, FM1 or FM2. The display will show your selection. Y SEEK B: Press the up or the down arrow to seek to the next or to the previous station and stay there. SEEK will appear on the display. The sound will mute while seeking. The radio will seek only to stations that are in the selected band and only to those with a strong signal.
3-11
Y SCAN: Press the SCAN button to enter scan mode. SCAN will appear on the display. Press the up arrow to scan to the next station. The radio will go to a station, play for 5 seconds, then go on to the next station. Press this button again to stop scanning. To scan preset stations, press and hold SCAN for more than two seconds until you hear a beep and PSCAN appears on the display. The radio will go to the first preset station stored on your pushbuttons, play for 5 seconds, then go on to the next preset station. Press SCAN again to stop scanning presets. The radio will scan only to stations that are in the selected band and only to those with a strong signal.
LOCAL/DISTANCE Selection: With this feature you can set the radio to search for local stations or stations that are further away for a larger selection. To set this feature to LOCAL or DISTANCE, perform the following steps: 1. Press the TUNE/SEL knob to enter the main menu. 2. Turn the TUNE/SEL knob until SEEK LOCAL or
SEEK DISTANCE appears on the display.
3. Press the TUNE/SEL knob to select either LOCAL
or DISTANCE.
4. Press the BACK button to exit the display. To return
to the original display repeatedly press the BACK button or wait for the display to time out.
To search for stations, press the SEEK up or down arrows. If the system is set to LOCAL, SEEK will appear in the display. If the system is set to DISTANCE, D-SEEK will appear in the display. The radio will seek to stations with a strong signal only.
3-12
Setting Preset Stations The six numbered pushbuttons (F1 through F6) let you return to your favorite stations. You can set up to 18 stations (six AM, six FM1 and six FM2). You can set your preset stations manually or automatically and presets for home and away. To set your preset stations manually, perform the following steps: 1. Turn the radio on. 2. Press BAND to select AM, FM1 or FM2. 3. Tune in the desired station. 4. Press and hold one of the six numbered pushbuttons for two seconds until you hear a beep. The set preset station number will appear on the display above the pushbutton that it is set to. Whenever you press that numbered pushbutton for less than two seconds, the station you set will return.
5. Repeat the steps for each pushbutton.
To set your preset stations with an equalization setting, DSP setting, or a PTY setting, see each of these features later in this section. When a preset station is selected, once one of these additional settings is selected, the preset station will remember each setting and it will remain active, until the setting is selected off for that preset station.
AUTOSTORE PRESETS: To set your preset stations automatically, perform the following steps: 1. Turn the radio on. 2. Press BAND to select AM, FM1 or FM2. 3. Press the TUNE/SEL knob to enter the main menu. 4. Turn the TUNE/SEL knob until AUTOSTORE
PRESETS appears on the display.
5. Press the TUNE/SEL knob again to select.
AUTOSTORE will appear on the display. The radio will automatically search the band and select and store the six radio stations with the strongest signal. The stations will be stored by signal strength, not sequential order. The set preset station number will appear on the display above the pushbutton that it is set to. Whenever you press that numbered pushbutton for less than two seconds, the station that is set will return.
6. Press the BACK button to exit the display. To return
to the original display repeatedly press the BACK button or wait for the display to time out.
When battery power is removed and later applied, you will not have to reset your radio presets because they remain in the radios memory.
3-13
PRESETS HOME/AWAY: This feature gives you the ability to store two different kinds of station presets. HOME can be used for stations available where you live and AWAY can be for stations available outside of your local broadcasting area. To set preset stations for home and away perform the following steps: 1. Press the TUNE/SEL knob to enter the main menu. 2. Turn the TUNE/SEL knob until PRESETS
HOME/AWAY appears on the display.
3. Press the TUNE/SEL knob to select your choice.
HOME or AWAY will appear on the display.
4. Press the BACK button to exit the display. To return
to the original display repeatedly press the BACK button or wait for the display to time out.
Follow the manual or automatic steps previously listed for setting your preset pushbuttons for both home and away.
Setting the Tone (Bass/Treble) To adjust the bass, midrange, and treble, perform the following steps: 1. Press the TUNE/SEL knob to enter the main menu. 2. Turn the TUNE/SEL knob until
BASS -MID -TREBLE appears on the display.
3. Press the TUNE/SEL knob to enter into the
tone settings.
4. Press the TUNE/SEL knob to scroll through
the settings.
5. Turn the TUNE/SEL knob to increase or to decrease
the bass, midrange or treble. If a station is weak or noisy you may want to decrease the treble.
6. Press the TUNE/SEL knob to set your adjustment. 7. Press the BACK button to exit the display. To return
to the original display repeatedly press the BACK button or wait for the display to time out.
3-14
AUDIO EQUALIZER: This feature allows you to choose bass, midrange and treble equalization settings. To choose a equalization setting (EQ0 through EQ5), perform the following steps: 1. Press the TUNE/SEL knob to enter the main menu. 2. Turn the TUNE/SEL knob until EQUALIZER
appears on the display.
3. Press the TUNE/SEL knob to set your equalization
setting. The equalization setting will appear on the display.
4. Press the BACK button to exit the display. To return
to the original display repeatedly press the BACK button or wait for the display to time out.
The equalization settings are preset to EQ0 (Normal), EQ1 (Pop), EQ2 (Rock), EQ3 (Jazz), EQ4 (Talk), and EQ5 (Country).
Adjusting the Speakers (Balance/Fade) To adjust the balance or fade, perform the following steps: 1. Press the TUNE/SEL knob to enter the main menu. 2. Turn the TUNE/SEL knob until
BASS -MID -TREBLE appears on the display.
3. Press the TUNE/SEL knob to enter into the
tone settings.
4. Press the TUNE/SEL knob to scroll to BALANCE
or FADER.
5. Turn the TUNE/SEL knob to adjust the BALANCE
to the right or the left speakers and the FADER to the front or the rear speakers.
6. Press the TUNE/SEL knob to set your adjustment. 7. Press the BACK button to exit the display. To return
to the original display repeatedly press the BACK button or wait for the display to time out.
3-15
Using DSP This feature is used to provide a choice of five different listening experiences: DSP normal, talk, spacious, rear seat and driver seat. DSP can be used while listening to the radio, the cassette tape player or the CD player. The radio keeps separate DSP settings for each band, preset and source. To select a DSP choice, perform the following steps: 1. Press the TUNE/SEL knob to enter the main menu. 2. Turn the TUNE/SEL knob until one of the five
settings appears on the display.
3. Press the TUNE/SEL knob to select a DSP setting. 4. Press the BACK button to exit the display. To return
to the original display repeatedly press the BACK button or wait for the display to time out.
DSP NORMAL: This setting enhances the stereo effects. DSP NORMAL will not be displayed when in this mode. TALK: This setting should be used when listening to non-musical material such as news, talk shows, sports broadcasts and books on tape. TALK makes spoken words sound very clear. SPACIOUS: This setting is used to make the listening space seem larger. REAR SEAT: This setting adjusts the audio to give the rear seat passenger(s) the best possible sound qualities. Sound quality for the front seat passengers may be different when this setting is used.. DRIVER SEAT: This setting adjusts the audio to give the driver the best possible sound qualities. Sound quality for the rear seat passengers may be different when this setting is used. OFF: When DSP is OFF, the system will provide the best overall audio performance.
3-16
Using RDS Your audio system is equipped with Radio Data Systems (RDS). RDS features are available for use only on FM stations that broadcast RDS information. Using this system, the radio can: 1. receive announcements concerning local and
national emergencies,
2. seek to stations with traffic announcements, 3. display messages from radio stations and 4. search for a stronger station when a station is too
weak for listening.
If you are tuned to a station broadcasting RDS information, the station’s call letters and program service name will replace the station’s frequency on the display. The program type and program type name may be the same or different. If the radio is tuned to a station that is not broadcasting RDS information, the station’s frequency will remain on the display. With RDS the radio can search for a stronger station in the network when a station gets too weak for listening if alternate frequency is on.
RDS Messages ALERT: Alert warns of local and national emergencies. When an alert announcement comes on the current radio station or a related network station, ALERT will appear on the display. You will hear the announcement, even if the volume is muted or a cassette tape or compact disc is playing. If the cassette tape or compact disc player was being used, the tape or compact disc will stay in the player and resume play at the point where it stopped when the announcement has ended. You will not be able to turn off alert announcements. If the radio tunes to a related network station for the announcement, it will return to the original station when the announcement is finished. The radio uses TA volume for alert announcements. To increase or to decrease volume, turn the VOL knob. The volume can not be turned completely down or off.
3-17
TA (Traffic Announcement): This feature allows the radio to receive traffic announcements even with the volume muted, or when a CD or cassette tape is playing. When TA is on, the radio will search for another station with TA if the current station is not TA capable. During the search, TA will flash on the display. Once a TA station is found, TA will appear on the display and the traffic announcement will be played. If no station broadcasting traffic announcements is found, No Traffic will appear on the display. While a traffic announcement plays, the radio uses a special type of volume called TA volume. To increase or to decrease TA volume, turn the volume knob. TA volume can not be turned completely down or off. To turn off TA volume and stop TA announcements, you must turn TA off. When a traffic announcement comes on the current radio station or a related network station, you will hear it, even if the volume is muted or a cassette tape or compact disc is playing. If the radio tunes to a related network station for a traffic announcement, it will return to the original station when the announcement is finished. If the cassette tape or compact disc player was being used, the tape or compact disc will stay in the player and resume play at the point where it stopped.
3-18
To turn TA on or off, perform the following steps: 1. Press the TUNE/SEL knob to enter the main menu. 2. Turn the TUNE/SEL knob until TRAFFIC
ANNOUNCE appears on the display.
3. Press the TUNE/SEL knob to select ON or OFF.
An X will appear in the box when TA is selected on. 4. Press the BACK button to exit the display. To return
to the original display keep pressing the BACK button or wait for the display to time out.
MSG (Message): If the current RDS station has a message, MSG will appear on the display. If the whole message does not appear on the display, parts of the message will appear every three seconds until the message is completed. Once the complete message has been displayed, MSG will disappear from the display until another new MSG is received. If you would like to display the message, perform the following steps: 1. Press the TUNE/SEL knob to enter the main menu. 2. Turn the TUNE/SEL knob until RECALL RDS
MESSAGE appears on the display.
3. Press the TUNE/SEL knob. The last message
displayed will be displayed again.
Activating PTY Stations Program type (PTY) allows you to search for stations with specific types of music. The selectable PTYs are POP, EASY, TALK, CNTRY (Country), CLASS (Classical), and JAZZ. To activate program types, perform the following steps: 1. Press the TUNE/SEL knob to enter the main menu. 2. Turn the TUNE/SEL knob until PROGRAM TYPE
MODE appears on the display.
3. Press the TUNE/SEL knob to select ON or OFF. An
X will appear in the box when PTY is selected on.
4. Press the BACK button to exit the display. To return
to the original display repeatedly press the BACK button or wait for the display to time out.
Once program type is activated the PTYs will appear on the display above the pushbuttons, in place of the preset stations (if programmed). Press the pushbutton for the PTY that you would like to listen to. Not all stations support PTYs and pressing the pushbutton may not take you to all of the stations with that music type.
AF (Alternate Frequency): Alternate frequency allows the radio to switch to a stronger station with the same program type. To turn AF on or off, perform the following steps: 1. Press the TUNE/SEL knob to enter the main menu. 2. Turn the TUNE/SEL knob until ALTERNATE
FREQ. appears on the display.
3. Press the TUNE/SEL knob to select AF OFF, AF ON or AF REG. An X will appear in the box when AF is selected on.
4. Press the BACK button to exit the display. To return
to the original display repeatedly press the BACK button or wait for the display to time out.
Radio Message LOCKED: This message is displayed when the THEFTLOCKR system has been activated. You must return to the dealership for service.
3-19
Playing a Cassette Tape With the radio on, insert a cassette tape. The tape will begin playing as soon as it is inserted. When one side of your cassette tape is done playing, auto reverse plays the other side of your cassette tape. A cassette tape may be loaded with the radio off but it will not start playing until the radio is on. While the tape is playing, use the volume knob and set the tone and DSP just as you do for the radio. Other controls may have different functions when a tape is inserted. The display will show a tape symbol. TAPE PLAY will appear on the display while a tape is playing, with an arrow to indicate which side of the tape is playing. If an error appears on the display, see “Cassette Tape Messages” later in this section. When a tape is inserted the tape functions will appear on the display above the pushbuttons, in place of the preset stations (if programmed). The following explains what each pushbutton and the SEEK and SCAN buttons will perform while a tape is playing: F1 PREV (Previous): Your tape must have at least three seconds of silence between each selection for previous to work. Press this pushbutton to seek to the previous selection on the tape.
3-20
F2 NEXT: Your tape must have at least three seconds of silence between each selection for next to work. Press this pushbutton to seek to the next selection on the tape. REV % (Rewind): Press this pushbutton to rewind the tape rapidly. The radio will play while the tape rewinds. Press this pushbutton again to return to playing speed. FWD & (Fast Forward): Press this pushbutton to fast forward to another part of the tape. The radio will play while the tape advances. Press this pushbutton again to return to playing speed. F5 A-B (Side): Press this pushbutton to play the other side of the tape. Y SEEK B: Your tape must have at least three seconds of silence between each selection for the SEEK arrows to work. Press the up or the down arrow to seek to the next or to the previous selection on the tape. Y SCAN: Press this button to listen to selections for a few seconds. The tape will go to a selection, play for 10 seconds, then go on to the next selection. Press this button again to stop scanning.
(Eject): Press this button, located to the right of the
cassette tape slot to stop a tape when it is playing or to eject a tape when it is not playing. Eject may be activated with the radio off and/or the ignition off.
Cassette Tape Messages If an error occurs while trying to play a cassette tape, it could be that one of the following has occurred: D The cassette tape is tight and the cassette player
cannot turn the hubs of the tape. Hold the cassette tape with the open end down and try turning the right hub counterclockwise with a pencil. Flip the tape over and repeat. If the hubs do not turn easily, your cassette tape may be damaged and should not be used in the player. Try a new tape to be sure your player is working properly.
D The cassette tape is broken. Check to see if your tape
is broken. Try a new tape.
CLEAN TAPE: If this message appears on the display, the cassette tape player needs to be cleaned. It will still play tapes, but you should clean it as soon as possible to prevent damage to the tapes and player. See “Care of Your Cassette Tape Player” in the Index. If any error occurs repeatedly or if an error can’t be corrected, contact your dealer.
Your cassette tape player automatically reduces background noise. Dolby Noise Reduction is manufactured under a license from Dolby Laboratories Licensing Corporation. Dolby and the double-D symbol are trademarks of Dolby Laboratories Licensing Corporation. Auto CrO2 allows the cassette tape player to adjust to the type of cassette tape for clearer sound for CrO2
cassette tapes.Using the Single Compact Disc Player Insert a disc partway into the slot, label side up. The player will pull it in. If the ignition and the radio are on the disc will begin playing. The display will show a CD symbol. CD and the track number will appear on the display when a CD is playing. A compact disc may be loaded with the radio off but it will not start playing until the radio is on. The integral CD player can play the smaller 8 cm compact discs with a 12 cm adapter. Full-size compact discs and the smaller compact discs (with the 12 cm adapter) are loaded in the same manner. See you dealer for more information about the 12 cm adapter for using 8 cm discs.
3-21
If an error appears on the display, see “Compact Disc Messages” later in this section. When a CD is inserted the CD functions will appear on the display above the pushbuttons, in place of the preset stations (if programmed). The following explains what each pushbutton and the SEEK and SCAN buttons will perform when a CD is playing: F1 PREV (Previous): Press this pushbutton to seek to the previous track on the compact disc. Press and hold this pushbutton to reverse the compact disc. Release it to return to playing speed. F2 NEXT: Press this pushbutton to seek to the next track on the compact disc. Press and hold this pushbutton to fast forward to another part of the compact disc. Release it to return to playing speed. F3 RDM (Random): Press this pushbutton to listen to the tracks in random, rather than sequential, order. RANDOM will appear on the display. Press this pushbutton to turn off random play. RANDOM will disappear from the display. F4 RPT (Repeat): Press this pushbutton to listen to the track that you are currently listening to again. REPEAT will appear on the display. Press this pushbutton again to turn off repeat play. REPEAT will disappear from the display.
3-22
F6 DISP (Display): Press this pushbutton to display the time of the track. Press this pushbutton again to remove the time of the track from the display. Y SEEK B: Press the up or the down arrow to seek to the next or to the previous track on the CD. Y SCAN: Press this button to listen to each track for 10 seconds. The compact disc will go to a track, play for 10 seconds, then go on to the next track. Press this button again to stop scanning.
(Eject): Press this button, located to the right of the CD slot, to stop a CD when it is playing or to eject a CD when it is not playing. Eject may be activated with the radio off and/or the ignition off. Using the Six-Disc Compact Disc Changer The integral CD player can play the smaller 8 cm compact discs with a 12 cm adapter. Full-size compact discs and the smaller compact discs (with the 12 cm adapter) are loaded in the same manner. See you dealer for more information about the 12 cm adapter for using 8 cm discs. If an error appears on the display, see “Compact Disc Messages” later in this section. When a CD is inserted the CD functions will appear on